If you’re searching for a quick beef dinner recipe that feels vibrant, fresh and restaurant-quality, these Chimichurri Beef Flatbreads deliver bold flavour in under 30 minutes. Tender British beef stir fry strips are seared until beautifully caramelised and layered onto warm flatbreads. After that, they are finished with bright green chimichurri. Made using premium beef available from Nicol Retailer, this dish combines heritage flavour with modern convenience.
British beef is known for its traceability, high welfare standards and consistent quality. This makes it a reliable choice for flavour-driven recipes, as highlighted by the Agriculture and Horticulture Development Board (AHDB).
The History Behind Chimichurri
Chimichurri originates from Argentina and Uruguay, where it is traditionally served with grilled beef during asado cooking. As widely documented in South American cuisine by BBC Good Food, this is a classic pairing.
The sauce itself is simple yet powerful: parsley, garlic, olive oil and vinegar. Designed to cut through rich, grilled meat, chimichurri provides brightness and balance. Over time, this humble herb sauce has travelled far beyond its roots and become a global favourite in modern kitchens. This recipe honours that tradition while giving it a contemporary twist. In particular, it swaps open-fire grilling for quick-seared British beef stir fry strips and serves it in soft flatbreads for easy sharing.
These Chimichurri Beef Flatbreads with Charred Peppers are a quick and flavour-packed Mediterranean-inspired dish made with tender British beef stir fry strips, fresh herbs, and vibrant roasted peppers. Ready in under 30 minutes, this easy beef flatbread recipe is perfect for weeknight dinners, casual entertaining, or summer gatherings. The fresh chimichurri sauce adds brightness and depth, while warm flatbreads and creamy yoghurt create a satisfying balance of textures and flavours.
Course Dinner, lunch, Main Course
Cuisine British Fusion, Mediterranean
Keyword British beef stir fry strip, chimichurri beef flatbread recipe, easy flatbread meal, high protein beef recipe, Mediterranean beef recipe, Nicol Retailer recipes, quick beef dinner UK,, weeknight beef recipe
Mix with red wine vinegar, olive oil, chilli flakes, and salt. Set aside.
Cook the Peppers
Heat a pan over medium-high heat.
Add sliced peppers and cook until slightly charred and softened (5–6 minutes). Remove and set aside.
Sear the Beef
Season beef strips with smoked paprika, cumin, salt, and pepper.
Heat olive oil in a hot pan and cook beef in batches for 2–3 minutes until browned and juicy.
Assemble
Warm flatbreads.
Spread a spoonful of yoghurt over each, top with beef, charred peppers, and drizzle generously with chimichurri.
Serve with lemon wedges.
Notes
For the most tender result, cook the beef stir fry strips quickly over high heat and avoid overcrowding the pan. Overcooking can cause the beef to become tough. Let the meat rest briefly before assembling the flatbreads to retain its juices.The chimichurri sauce can be made up to 24 hours in advance and stored in the fridge. Allow it to return to room temperature before serving to enhance flavour.Vegan VariationTo make this recipe vegan:Replace the beef with marinated portobello mushrooms, grilled aubergine strips, or plant-based steak-style strips.Use dairy-free yoghurt or a tahini-based sauce instead of natural yoghurt. Ensure flatbreads are dairy-free.The chimichurri sauce is naturally vegan, so no changes are required.Gluten-Free VariationTo make this recipe gluten-free:Use certified gluten-free flatbreads or wraps. Check that all seasonings and condiments are gluten-free. Ensure no cross-contamination during preparation.Alternatively, serve the beef and chimichurri over rice, quinoa, or a fresh salad instead of flatbread.For extra flavour, add a squeeze of fresh lemon just before serving, or crumble over feta (omit for vegan version). If you prefer extra heat, increase the chilli flakes in the chimichurri
These Chimichurri Beef Flatbreads are incredibly versatile and can be styled to suit anything from a relaxed weeknight dinner to an impressive sharing platter for guests.
For a vibrant Mediterranean-style spread, serve alongside a rocket and shaved parmesan salad, drizzled with lemon and olive oil. The peppery leaves and salty cheese complement the richness of the beef beautifully. Add a bowl of marinated olives and warm flatbreads for a complete sharing table.
If you’re looking for something heartier, pair with crispy sweet potato wedges or rosemary roasted baby potatoes. The natural sweetness of the potatoes balances the tangy chimichurri and savoury beef. A side of grilled courgettes or charred aubergine enhances the Mediterranean feel.
For a lighter, summer-ready option, serve the chimichurri beef over a fresh couscous or quinoa salad with cucumber, cherry tomatoes and fresh herbs. You can also swap flatbreads for lettuce wraps for a low-carb alternative that still delivers bold flavour.
Entertaining guests? Present the components separately and allow everyone to build their own flatbread. Add toppings such as:
However you serve it, using high-quality British beef stir fry strips ensures the centrepiece of the dish remains tender, flavourful and satisfying. This turns a simple flatbread into something truly memorable.
Mediterranean-inspired dishes, rich in olive oil, herbs and fresh vegetables, are often associated with balanced eating patterns, as outlined by the NHS guide to the Mediterranean diet.
The Star Ingredient: British Beef Stir Fry Strips
At the heart of this recipe are premium British beef stir fry strips. These are a versatile, quick-cooking cut that delivers exceptional flavour and tenderness. Because the beef is sliced evenly and thinly, it cooks rapidly at high heat. Moreover, this makes it ideal for fast, flavour-forward dishes like flatbreads, stir fries, wraps and noodle bowls.
What makes British beef stand out is its quality and traceability. Carefully sourced and prepared, it offers consistent texture, rich natural flavour, and excellent cooking performance. When seared properly, stir fry strips develop a beautiful caramelised crust while remaining juicy inside — exactly what you want for a bold dish like chimichurri beef.
Unlike tougher cuts that require long cooking times, stir fry strips allow you to achieve restaurant-style results in minutes. This makes them perfect for busy households, weeknight meals, and entertaining without stress.
Using high-quality beef from Nicol Retailer ensures:
Consistent thickness for even cooking
Tender texture without overcooking
Deep, natural beef flavour
Reliable performance in high-heat recipes
When you start with quality ingredients, you don’t need complicated techniques or heavy sauces to create something special. The beef becomes the hero of the plate — enhanced, not masked, by fresh herbs and balanced seasoning.
Final Thoughts
From the traditional Argentine asado to your own kitchen table, chimichurri has travelled through history as a celebration of beef and bold flavour. By pairing it with premium British beef stir fry strips, you create a dish that feels both authentic and contemporary.
Great recipes begin with great ingredients — and with quality beef from Nicol Retailer, you’re already halfway there.
A timeless British dessert celebrating seasonal forced rhubarb
There are few desserts more comforting than a classic rhubarb crumble. When made with beautifully pink forced rhubarb, it becomes something truly special. Grown in darkness to encourage tenderness and natural sweetness, forced rhubarb has long been a staple of British kitchens. It is prized for its delicate flavour and vibrant colour. Paired with juicy strawberries and topped with a golden, buttery oat crumble, this recipe delivers the perfect balance of sharp, sweet, and crunchy in every spoonful. For anyone seeking a Rhubarb & Strawberry Crumble Recipe | Classic British Dessert – Nicol Retailer, this dish captures everything you love about a traditional pudding.
This Rhubarb and Strawberry Crumble with Vanilla Custard is an ideal dessert for family dinners, Sunday lunches, or relaxed entertaining. Simple to prepare yet deeply satisfying, it showcases how quality seasonal ingredients can elevate even the most familiar recipes. Fans of the Rhubarb & Strawberry Crumble Recipe | Classic British Dessert – Nicol Retailer will appreciate its versatility and classic taste.
Why Forced Rhubarb Makes the Difference
Forced rhubarb cooks more quickly than outdoor-grown varieties and retains its shape beautifully when baked. Its naturally sweet-tart flavour pairs perfectly with strawberries. This reduces the need for excessive sugar while delivering a bright, fresh taste. According to BBC Good Food, forced rhubarb is ideal for desserts thanks to its tenderness and colour. Therefore, it is perfect for crumbles and puddings
Using premium forced rhubarb sourced from Nicol Retailer ensures consistent quality, flavour, and performance every time you bake. Notably, the Rhubarb & Strawberry Crumble Recipe | Classic British Dessert – Nicol Retailer benefits from choosing premium ingredients.
This Rhubarb and Strawberry Crumble is a classic British dessert made with vibrant forced rhubarb, sweet strawberries, and a golden, buttery oat topping. Baked until bubbling and served warm with creamy vanilla custard, it’s a comforting, seasonal pudding that’s easy to prepare and perfect for family dinners or entertaining. Made using premium forced rhubarb available from Nicol Retailer, this recipe celebrates fresh flavour, colour, and traditional home baking.
In a large mixing bowl, combine rhubarb, strawberries, sugar, orange zest and juice, and vanilla.
Stir in cornflour if you prefer a thicker filling.
Transfer to a baking dish.
Make the Crumble Topping
In a large bowl, combine flour, oats, brown sugar, ground cinnamon, and salt.
Add cold butter cubes and rub with fingertips until the mixture resembles coarse crumbs.
Scatter evenly over the fruit filling.
Bake
Place in the preheated oven and bake for 35–40 minutes, until the fruit is bubbling and the crumble is golden brown.
Make the Vanilla Custard (Optional)
Heat milk and vanilla pod (seeds scraped) until just below boiling, then remove from heat.
Whisk egg yolks, sugar, and cornflour in a bowl.
Gradually pour hot milk into the egg mixture, whisking constantly.
Return to the pan and simmer gently until thickened.
Remove from heat and cool slightly (remove vanilla pod if used).
To Serve
Spoon warm crumble into bowls and pour over a generous serving of vanilla custard. For extra flair, add a dollop of whipped cream or a scoop of vanilla ice cream.
Notes
For the best flavour and colour, use fresh forced rhubarb, which is naturally sweeter and more tender than outdoor-grown rhubarb, allowing it to cook quickly while retaining its vibrant pink hue. This crumble is best served warm, straight from the oven, with vanilla custard, ice cream, or dairy-free alternatives.Gluten-free variation: To make this recipe gluten free, simply replace the plain flour and oats in the crumble topping with certified gluten-free flour and gluten-free oats. Ensure all other ingredients, including custard, are gluten-free.Vegan variation: For a vegan version, use plant-based butter or margarine in the crumble topping and serve with dairy-free custard, coconut yoghurt, or vegan vanilla ice cream. Swap caster sugar for a vegan-friendly sugar if required.This flexible dessert makes an ideal make-ahead pudding, reheating well and delivering comforting flavour with minimal effort.
This Rhubarb and Strawberry Crumble is best served warm, straight from the oven, when the fruit is gently bubbling and the crumble topping is perfectly crisp. For a classic British finish, pour over hot vanilla custard. This allows it to seep into the crumble and soften the topping slightly for a comforting, nostalgic pudding experience.
For a more indulgent dessert, serve with a generous scoop of vanilla ice cream, clotted cream, or lightly whipped double cream. The cold creaminess contrasts beautifully with the warm, sharp-sweet rhubarb. If you prefer a lighter option, try Greek-style yoghurt or crème fraîche. This adds a subtle tang that balances the sweetness of the fruit.
This dessert also adapts well to different occasions. Serve it as a relaxed family pudding or a comforting Sunday lunch dessert. Alternatively, dress it up for entertaining by portioning it into individual ramekins and garnishing with a sprig of mint or a dusting of icing sugar. Leftovers reheat well and can even be enjoyed cold the next day with tea or coffee. Indeed, the Rhubarb & Strawberry Crumble Recipe | Classic British Dessert – Nicol Retailer is suitable for any event. It works for casual evenings and for special celebrations.
For dietary flexibility, pair the crumble with plant-based custard or dairy-free ice cream for a vegan-friendly serving. You can also use gluten-free accompaniments to keep the dish suitable for gluten-free guests. However you serve it, using high-quality forced rhubarb sourced from Nicol Retailer ensures vibrant colour, balanced flavour, and consistently delicious results.
This Rhubarb and Strawberry Crumble is a celebration of classic British baking. It combines the sharp sweetness of forced rhubarb with juicy strawberries and a crisp, buttery crumble topping. Simple to prepare and endlessly comforting, it’s the kind of dessert that never goes out of style. Whether served with warm vanilla custard, ice cream, or a dairy-free alternative, this recipe delivers reliable flavour and seasonal charm every time. To sum up, if you want a Rhubarb & Strawberry Crumble Recipe | Classic British Dessert – Nicol Retailer, this is the one to try.
For the best results, start with premium ingredients. Using high-quality forced rhubarb ensures vibrant colour, balanced flavour, and perfect texture, making all the difference in a baked dessert. You can source fresh forced rhubarb and other quality baking ingredients from Nicol Retailer, trusted by home cooks and professionals alike. With the right ingredients and a simple method, this timeless pudding becomes a standout dessert you’ll return to again and again.
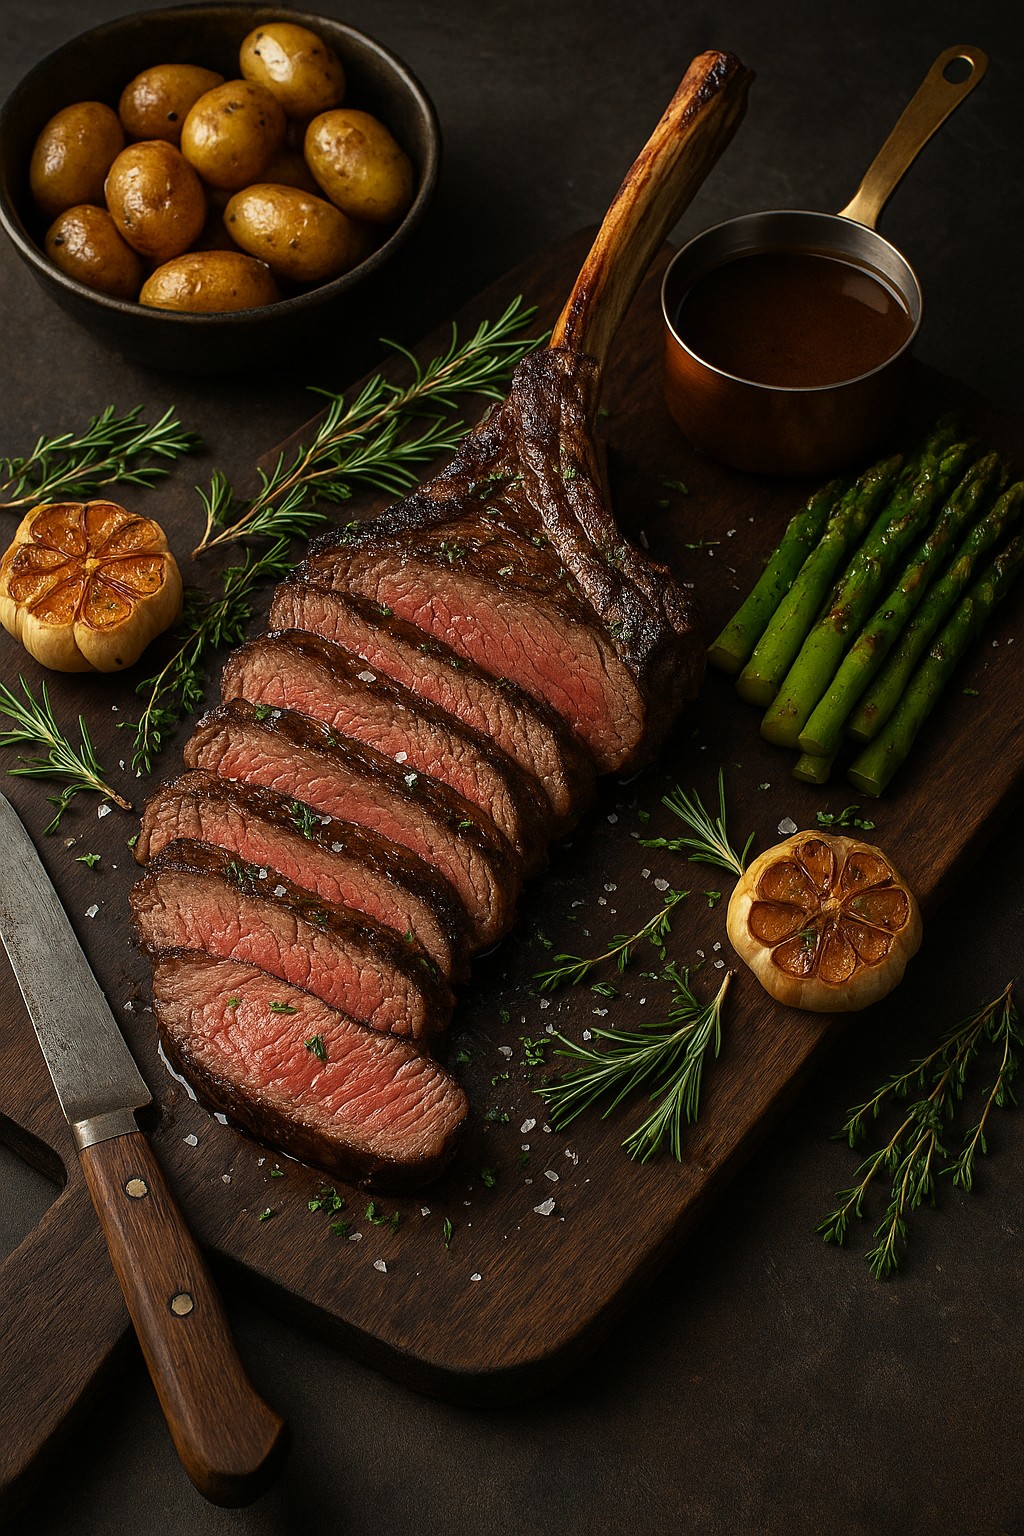
Rich, indulgent, and beautifully simple, this 14-day aged T-bone steak recipe brings steakhouse-quality dining straight to your home kitchen. Using premium aged British beef, the steak is pan-seared to develop a deep caramelised crust. Despite this, it remains juicy and tender inside. It is then finished with aromatic garlic herb butter for maximum flavour. Served with creamy truffle mashed potatoes and charred asparagus, this dish is ideal for special occasions. It also works well for dinner parties or an elevated weekend meal. You can follow the step-by-step instructions below to cook the perfect restaurant-style T-bone steak. Importantly, it is made using high-quality ingredients available from Nicol Retailer.
Pan-Seared Aged T-Bone Steak with Herb Garlic Butter, Truffle Mash & Charred Asparagus
This pan-seared 14-day aged T-bone steak recipe delivers restaurant-quality flavour at home, featuring a perfectly caramelised crust, juicy medium-rare centre, and rich garlic herb butter. Paired with creamy truffle mashed potatoes and charred asparagus, this dish highlights the exceptional quality of Birchstead aged British beef, making it ideal for special occasions, dinner parties, or an indulgent steak night. Premium steak available from Nicol Retailer.
Remove the T-bone steaks from the fridge 40–45 minutes before cooking to allow them to come to room temperature.
Pat dry thoroughly and season generously with sea salt and black pepper on both sides.
Make the Garlic Herb Butter
In a bowl, mix the softened butter with garlic, parsley, rosemary, and lemon zest.
Season lightly with salt and pepper.
Roll into a log using cling film and chill until needed.
Prepare the Truffle Mash
Peel and cut the potatoes into even chunks. Boil in well-salted water for 15–18 minutes until tender.
Drain thoroughly, then mash with butter and warm cream until smooth. Stir in truffle oil gradually, season to taste, and keep warm.
Cook the T-Bone Steaks
Heat a heavy cast-iron pan or grill pan over high heat. Add olive oil. When shimmering, add the steaks and sear for: 5–6 minutes per side for medium-rare
During the final minute, add a slice of garlic herb butter to each steak and baste well. Remove from the pan and rest on a board for 10 minutes.
Char the Asparagus
While the steaks rest, heat a pan or grill. Toss asparagus with olive oil, salt, and pepper. Cook for 3–4 minutes until lightly charred and tender. Finish with a squeeze of lemon.
To Serve
Slice each T-bone against the grain if desired, or serve whole for dramatic presentation. Plate with a generous scoop of truffle mashed potatoes, charred asparagus, and an extra disc of garlic herb butter melting over the steak.
Notes
For the best results, allow the 14-day aged T-bone steaks to come fully to room temperature before cooking and season just before searing to achieve a deep, caramelised crust. Always rest the steak after cooking to lock in juices and maintain tenderness. This recipe is naturally gluten-free, provided the butter and seasonings used are certified gluten-free. For a fully gluten-free variation, serve the steak with charred asparagus or roasted vegetables instead of mashed potatoes, or prepare the mash using gluten-free, additive-free ingredients.Well-done steak tips: If you prefer your T-bone steak well done, sear the steak as usual to develop flavour, then reduce the heat and continue cooking more gently. Finish the steak in a moderate oven (170°C / 150°C fan) for 6–10 minutes, depending on thickness, until fully cooked through. Cover loosely with foil while resting to retain
This recipe works because it is built around the natural quality of 14-day aged British T-bone steak. This allows the beef to shine without unnecessary complexity. Dry ageing intensifies flavour and tenderises the meat. Therefore, the steak requires minimal seasoning and simple cooking techniques to achieve outstanding results.
Using a high-heat pan sear creates a deep, caramelised crust through the Maillard reaction, locking in juices while delivering rich, savoury flavour. Finishing the steak with garlic herb butter adds aromatic depth and enhances the beef’s natural umami without overpowering it. Resting the steak after cooking is a crucial step. It allows the juices to redistribute evenly for a more succulent and tender bite.
The pairing of creamy truffle mashed potatoes works perfectly because the smooth, luxurious texture balances the robust character of the aged steak, while the subtle earthiness of truffle complements the beef rather than competing with it. Charred asparagus adds freshness, colour, and a slight bitterness that cuts through the richness, creating a well-rounded plate.
Star Ingredient
This recipe is designed around the exceptional quality of Birchstead 14-Day Aged Beef T-Bone Steak, available from Nicol Retailer — perfect for premium, restaurant-quality meals at home.
Pairing Suggestions
The bold flavour and tenderness of this 14-day aged T-bone steak call for pairings that both complement and elevate the natural richness of the beef. Dry ageing intensifies umami notes, making this steak particularly well suited to structured, full-bodied accompaniments.
Side Dish Pairings
On the plate, this steak pairs exceptionally well with creamy truffle mashed potatoes, which add luxury and softness to contrast the firm texture of the meat. Charred asparagus, buttered greens, roasted mushrooms, or garlic-roasted root vegetables bring freshness and earthiness, rounding out the dish beautifully. For a lighter meal, a crisp green salad with a sharp vinaigrette helps cut through the richness.
Sauces & Finishing Touches
While the quality of aged British beef means this steak needs little embellishment, classic accompaniments such as peppercorn sauce, red wine jus, or chimichurri can be served on the side for variety. In addition, a final sprinkle of flaky sea salt or a melting knob of garlic herb butter enhances flavour. This approach does not mask the natural taste of the beef.
This versatile pairing approach makes the dish perfect for steak nights, dinner parties, romantic meals, and celebratory occasions. Additionally, it allows the premium quality of the ingredients to shine. For best results, use high-quality aged beef sourced from Nicol Retailer. This ensures a truly restaurant-quality experience at home.
Finally, the recipe is highly adaptable. Whether cooked medium-rare for maximum juiciness or well done using the oven-finish method, the quality of aged British beef ensures consistent results. This balance of technique, flavour contrast, and premium ingredients makes the dish reliable, impressive, and ideal for both special occasions and elevated home cooking.
Jerusalem artichokes are one of the UK’s most underrated seasonal vegetables. Nutty, gently sweet and wonderfully comforting, they shine in warming dishes that are perfect for autumn and winter. This creamy Jerusalem artichoke and leek soup is a simple yet indulgent recipe that celebrates fresh produce at its best.
Using high-quality Jerusalem artichokes from Nicol Retailer Limited, this dish is ideal for anyone looking to cook seasonally, eat well, and enjoy comforting homemade food with minimal effort.
Jerusalem artichokes are naturally high in fibre, particularly inulin, which supports digestive health and gut function. According to the NHS, increasing fibre intake can help improve digestion and support overall wellbeing, making Jerusalem artichokes a nourishing choice for seasonal, home-cooked meals.
What Are Jerusalem Artichokes?
Jerusalem artichokes are a knobbly root vegetable prized for their nutty, slightly sweet flavour and creamy texture when cooked. Despite their name, they are neither from Jerusalem nor related to globe artichokes. Instead, they belong to the sunflower family and are native to North America, where they were cultivated by Indigenous peoples long before European settlers arrived.
The name “Jerusalem artichoke” is widely believed to be a linguistic twist on the Italian word girasole (meaning sunflower), which English speakers misheard as “Jerusalem.” The plant’s tall yellow flowers closely resemble sunflowers, which adds to the confusion.
Jerusalem artichokes have a flavour often compared to:
Chestnuts
Hazelnuts
Mild artichoke hearts
When cooked, they become beautifully creamy, making them ideal for:
Soups and purées
Roasting and gratins
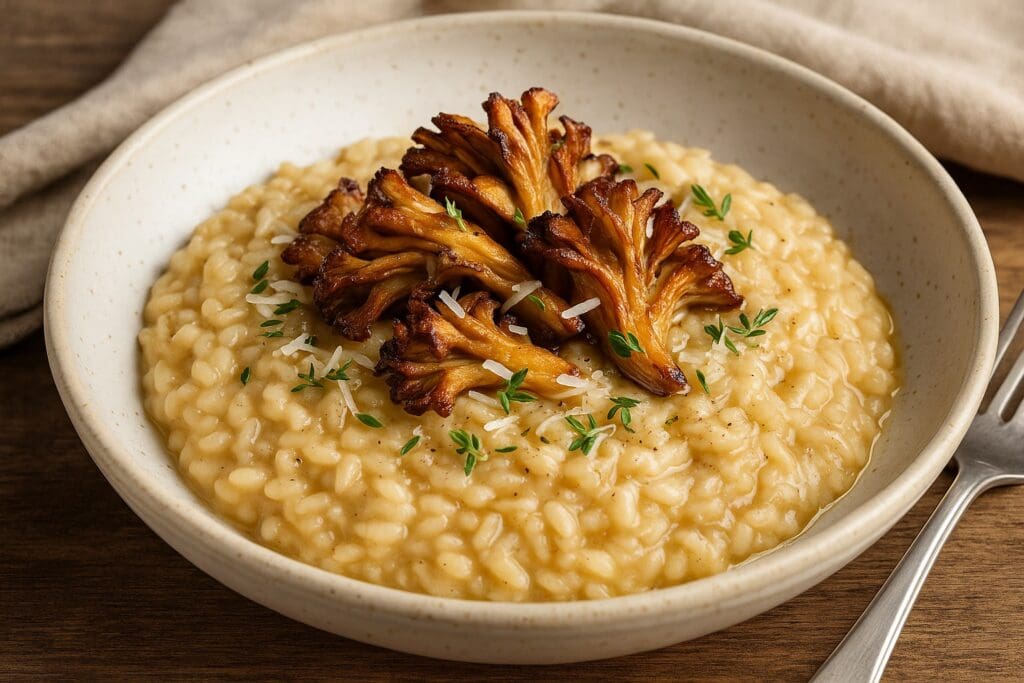
Risottos and pasta dishes
They don’t need peeling — just a good scrub — which makes them both practical and versatile in the kitchen.
A Brief History of Jerusalem Artichokes
The history of Jerusalem artichokes dates back to North America, where they were cultivated long before being introduced to Europe in the 17th century and quickly gained popularity, particularly in France and England. They were valued as a reliable crop that could grow in poor soil and harsh conditions, making them an important food source during periods of scarcity.
In the UK, Jerusalem artichokes became especially significant during wartime rationing, when they were widely grown as a hardy, nutritious vegetable that required little maintenance. Although they later fell out of favour as diets changed, they’ve made a strong comeback in recent years thanks to renewed interest in seasonal eating, heritage vegetables, and sustainable food.
Creamy Jerusalem Artichoke & Leek Soup is a comforting, seasonal dish that highlights the naturally sweet, nutty flavour of fresh Jerusalem artichokes. Gently cooked with leeks, onion, garlic and thyme, then blended until silky smooth, this warming soup is perfect for autumn and winter meals. Finished with a swirl of cream and served with crusty bread, it’s an easy, wholesome recipe that works beautifully as a starter or light main. Ideal for home cooks looking for simple, flavour-packed vegetable recipes using fresh produce.
Scrub the Jerusalem artichokes well — you don’t need to peel them unless the skin is very knobbly. Chop into roughly even pieces so they cook evenly.
In a large saucepan, heat the olive oil (or butter) over medium heat. Add the onion and leeks, and cook 5–7 minutes until softened but not browned. Add the garlic and cook another minute.
Stir in the chopped Jerusalem artichokes and potato (if using). Sprinkle with a pinch of salt and some fresh thyme leaves.
Add the vegetable stock so it just covers the vegetables. Bring to a gentle boil, then reduce to a simmer.
Simmer for 20–25 minutes, or until the Jerusalem artichokes are very tender when pierced with a fork.
Remove the thyme sprigs. Use an immersion blender (or transfer in batches to a blender) and blitz to a smooth, creamy texture.
Stir in the single cream (or oat cream) and warm through but don’t boil. Taste and adjust seasoning with salt and pepper.
Notes
This Creamy Jerusalem Artichoke & Leek Soup is a comforting, seasonal recipe that makes the most of the naturally sweet, nutty flavour of fresh Jerusalem artichokes. The soup is naturally gluten-free and can be easily adapted to suit vegan and dairy-free diets, making it a versatile option for a wide range of dietary needs.Vegan & Dairy-Free VariationTo make this soup fully vegan, replace the butter with extra-virgin olive oil and substitute the single cream with oat cream, soy cream, or coconut milk. Oat cream provides the most neutral flavour and keeps the soup smooth and creamy without overpowering the delicate taste of the artichokes. Ensure you use a plant-based vegetable stock for the best depth of flavour.Gluten-Free & Coeliac-FriendlyJerusalem artichokes are naturally gluten-free, making this soup suitable for people with coeliac disease or gluten intolerance. To keep the recipe fully gluten-free:
Use certified gluten-free stock cubes
Check labels on cream alternatives and garnishes
Serve with gluten-free bread or croutons if required
Flavour & Texture TipsJerusalem artichokes do not need peeling; simply scrub them well to preserve nutrients and save time.Adding a small potato enhances creaminess, but it can be omitted for a lighter texture.For extra depth, roast a portion of the artichokes before adding them to the soup.Fresh thyme complements the earthy flavours beautifully, while a drizzle of olive oil or truffle oil adds a luxurious finish.Storage & Meal PrepRefrigerator: Store in an airtight container for up to 3 daysFreezer: Freeze for up to 3 monthsDefrost gently and reheat slowly to maintain the creamy textureThis recipe is ideal for batch cooking, weekday lunches, or elegant starters for dinner parties.
Serve this creamy Jerusalem artichoke and leek soup hot, allowing the nutty aroma of the artichokes and gentle sweetness of the leeks to come through. Ladle into warmed bowls and finish with a light drizzle of cream or extra-virgin olive oil to enhance the soup’s silky texture. Garnish with freshly cracked black pepper, soft thyme leaves, or finely chopped chives for a fresh, herbaceous note.
For added texture and visual appeal, top with a handful of crispy roasted Jerusalem artichoke slices or golden croutons. These provide a satisfying contrast to the smooth soup and elevate it from a simple meal to a restaurant-style dish.
Bread & Sides
This soup is best enjoyed with:
Thick slices of crusty sourdough, toasted and lightly buttered
To turn the soup into a complete meal, serve alongside:
A fresh green salad with lemon vinaigrette to balance the richness
A grilled cheese or toasted sandwich for a comforting lunch
Roasted seasonal vegetables or a savoury tart for a satisfying supper
Entertaining & Occasions
This Jerusalem artichoke soup works beautifully as:
A starter for dinner parties, served in smaller bowls or cups
A cosy weeknight supper during colder months
A nourishing make-ahead lunch, as the flavours deepen over time
It can also be served chilled in warmer months for a lighter, more refined take, making it a versatile recipe to return to throughout the year.
Whether you’re serving family, guests, or simply enjoying a quiet meal at home, this soup offers comforting flavour, seasonal character and an elegant presentation — especially when made with fresh Jerusalem artichokes from Nicol Retailer Limited.
This creamy Jerusalem artichoke soup is a comforting, seasonal recipe made using fresh Jerusalem artichokes and vegetables sourced from Nicol Retailer Limited. With a naturally nutty flavour and smooth, velvety texture, this soup is ideal for autumn and winter cooking and is perfect for vegetarian and vegan-friendly meals.
Simple to prepare and rich in flavour, this recipe showcases the best of seasonal UK produce, making it a wholesome choice for home cooks looking for easy, nourishing comfort food.
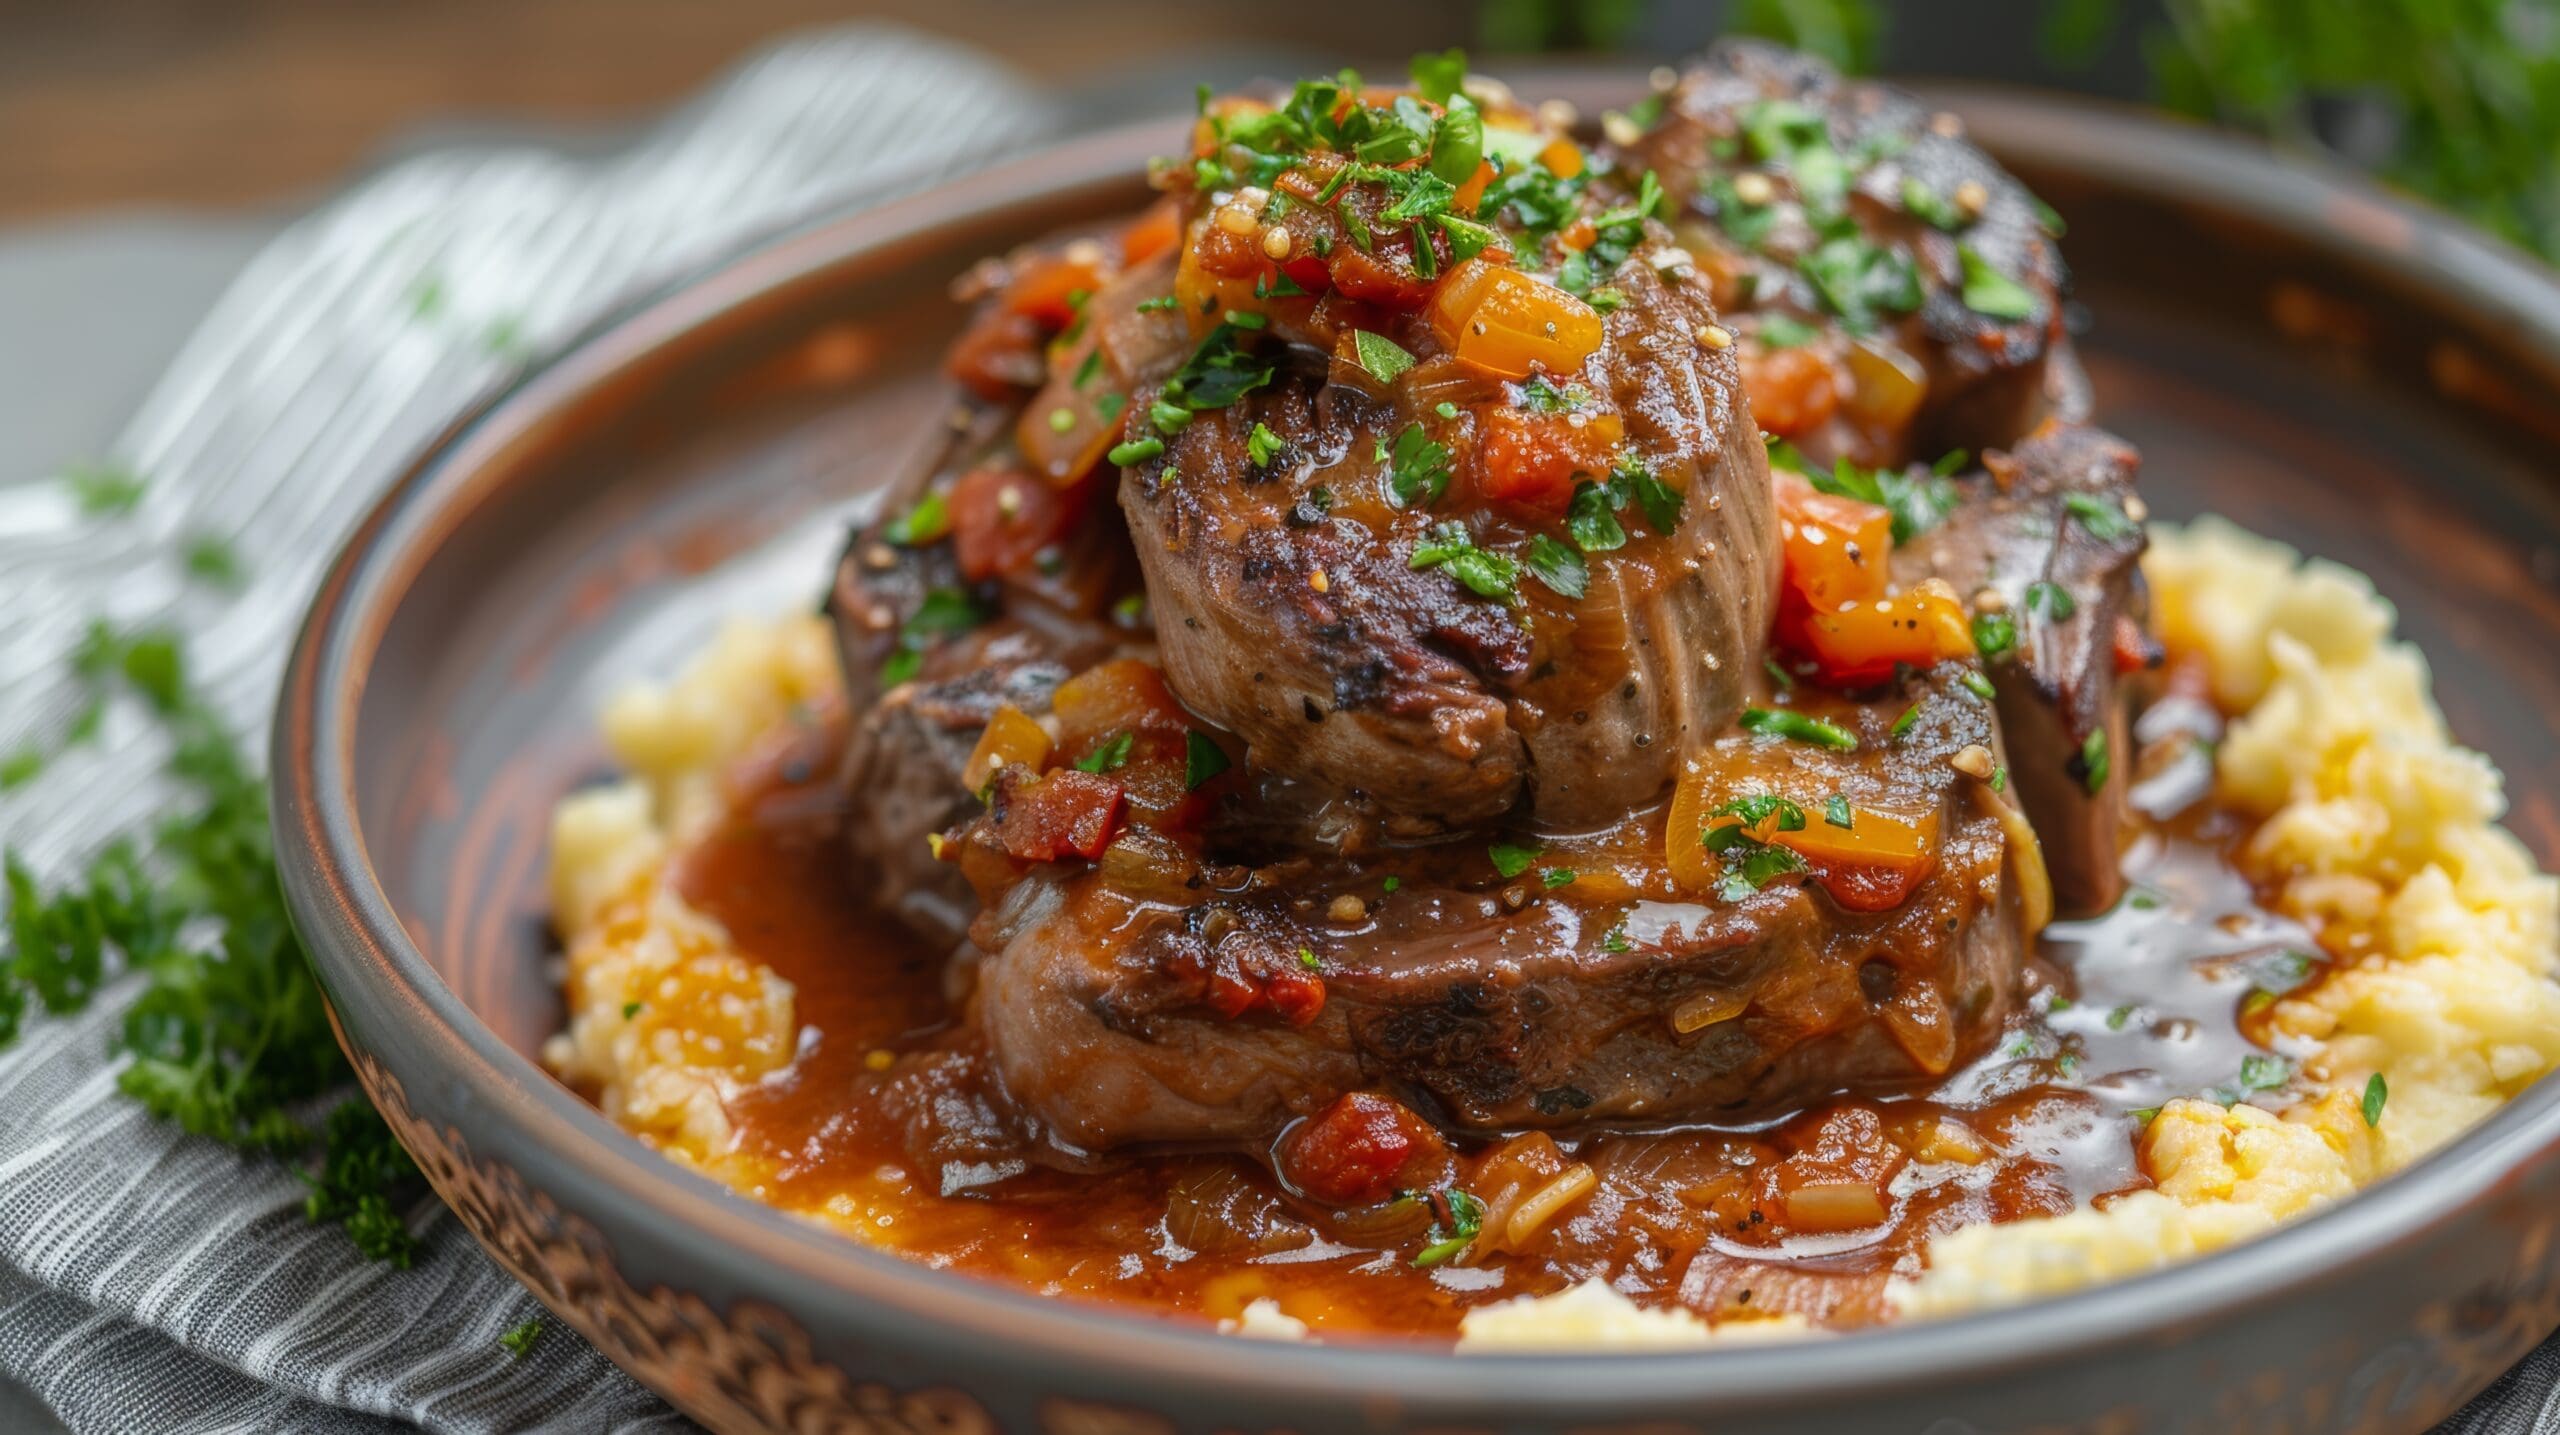
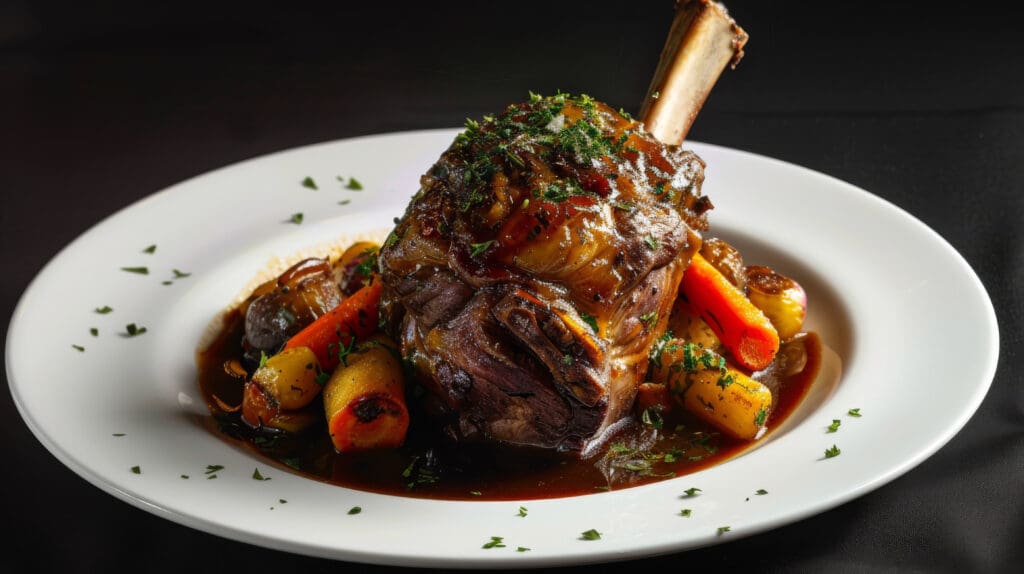
Lamb shoulder has long been one of Britain’s most loved cuts — rich, flavourful and deeply comforting. But with the right technique, it can also become something truly refined. This Pressed British Lamb Shoulder with Artichoke Purée, Lemon Thyme Jus & Crispy Lamb Crumb proves that humble cuts, when handled with care, can rival the most premium plates.
At Nicol Retailer, we believe great cooking starts with quality ingredients and thoughtful preparation. This recipe was created to showcase the versatility of British diced lamb shoulder. It transforms it into an elegant dish suitable for fine dining, special occasions or restaurant-style home cooking.
Lamb is a valuable source of protein, iron and vitamin B12. According to the NHS, red meat consumed in moderation contributes to a balanced diet and supports muscle health and energy levels. Using quality lamb shoulder allows you to enjoy both nutritional benefits and exceptional flavour.
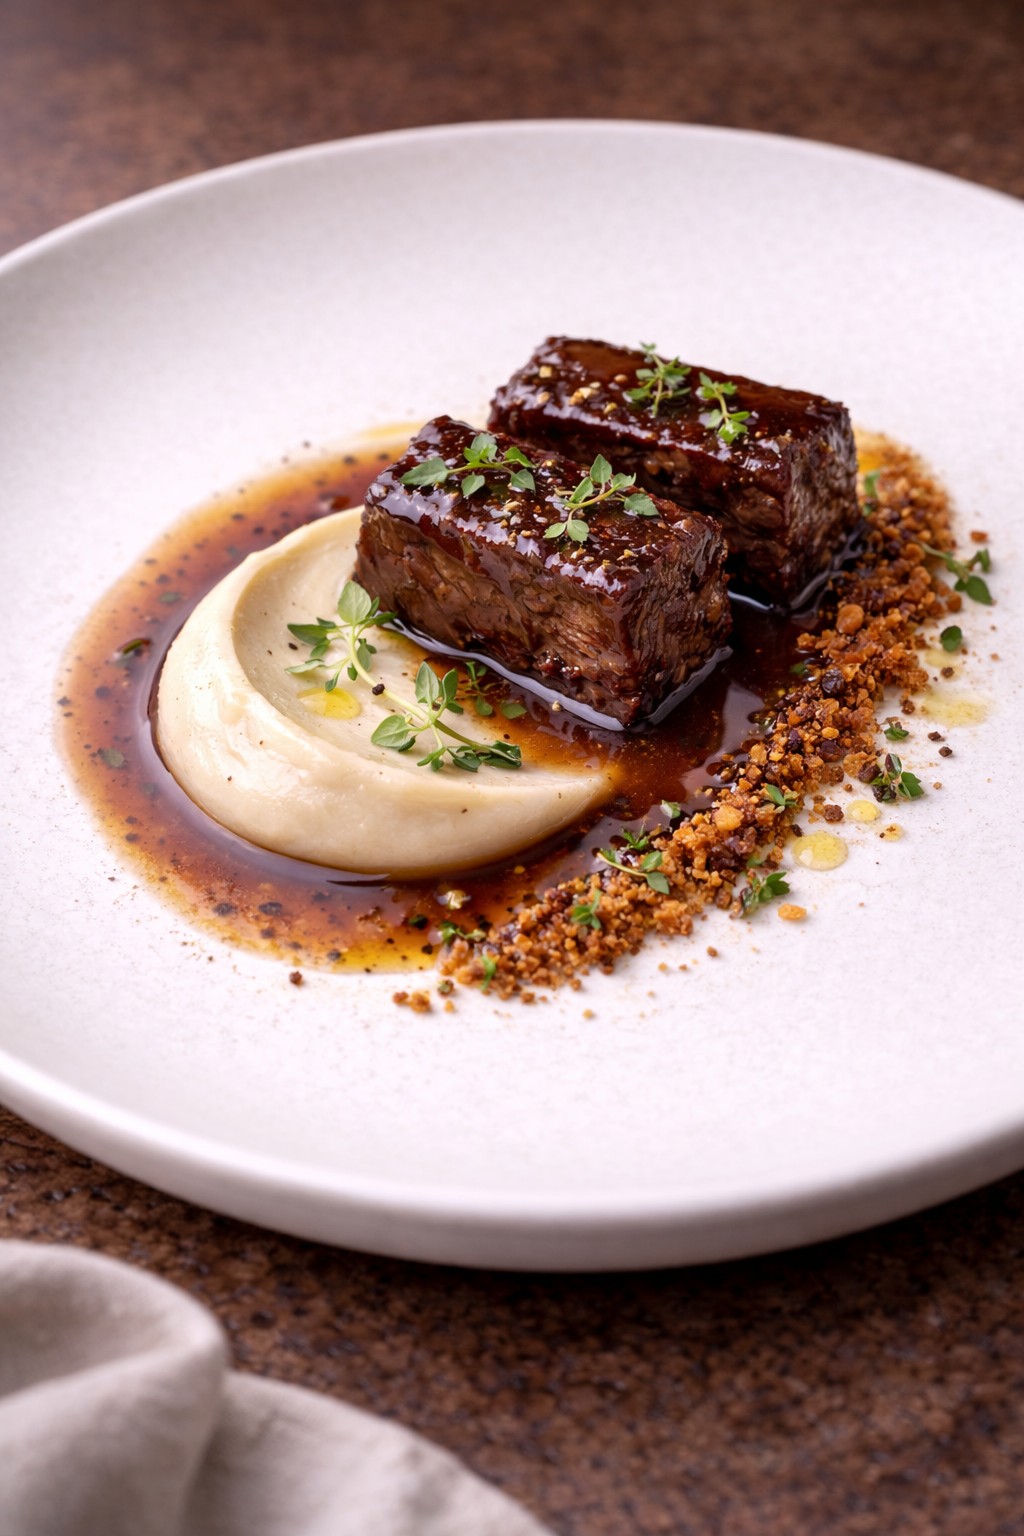
This refined recipe celebrates the depth and versatility of British diced lamb shoulder. It transforms a traditionally slow-cooked cut into an elegant, fine-dining dish. The lamb is gently braised until tender, then pressed for a clean, restaurant-style finish. Additionally, it is paired with silky artichoke purée, a light lemon-thyme jus and crisp lamb crumb for balance and texture. Designed to be both impressive and achievable, this recipe guides you step by step through the techniques needed to create a beautifully plated dish. As a result, it highlights the natural richness and quality of British lamb.
This fine-dining lamb recipe showcases British diced lamb shoulder, slow-cooked until tender, then pressed and plated for an elegant, restaurant-style finish. Served with silky artichoke purée, a light lemon-thyme jus and crisp lamb crumb, it delivers deep flavour, refined texture and modern presentation. Ideal for premium menus, special occasions and elevated home cooking.
Course Main Course
Cuisine British (with a modern twist)
Diet Gluten Free
Keyword British lamb shoulder recipe, diced lamb shoulder, fine dining lamb,, lamb main course, modern British cuisine, premium lamb recipe, pressed lamb shoulder, slow-cooked lamb
Transfer to a small casserole with bay, thyme and stock (just covering).
Cover tightly and cook at 150 °C for 2½–3 hours until tender but intact.
Remove lamb carefully, reserve all cooking liquid.
Press lamb firmly between trays lined with parchment and chill for 4 hours or overnight (recommended for best fine-dining presentation). Cut into neat rectangles before serving.
Artichoke Purée
Simmer artichokes in lightly salted water until very soft.
Drain thoroughly.
Blend with butter and cream until silky smooth.
Pass through a sieve for restaurant-level texture.
Keep warm.
Lemon Thyme Jus
Combine reserved lamb liquor with additional stock.
Reduce gently until glossy and savoury.
Finish with lemon zest and thyme leaves — subtle, not sharp.
Crispy Lamb Crumb
Finely chop lamb trimmings.
Fry slowly in olive oil until crisp and golden.
Drain and season lightly.
Fine-Dining Plating
Spoon a smooth oval of artichoke purée off-centre on a warm plate.
Place 2–3 pieces of pressed lamb on top.
Nap lightly with lemon thyme jus (never flood).
Sprinkle a restrained line of crispy lamb crumb for texture.
Finish with micro herbs, cracked pepper and a drop of olive oil.
This recipe has been thoughtfully developed to showcase the full potential of British diced lamb shoulder, a cut celebrated for its rich flavour, natural marbling and exceptional performance in slow cooking. When treated with patience and care, lamb shoulder transforms into something truly special — deeply savoury, tender, and refined.The key to this dish lies in gentle, low-temperature cooking, which allows the connective tissue in the lamb shoulder to break down gradually, resulting in a melt-in-the-mouth texture without losing structure. Pressing the lamb after cooking is a fine-dining technique that elevates the presentation, giving clean, elegant portions while intensifying flavour.Paired with a silky artichoke purée and a light lemon-thyme jus, the lamb remains the star of the plate, balanced by subtle freshness and aromatic depth. This restrained approach ensures the natural character of British lamb shines through, making the dish both luxurious and approachable.Using high-quality, responsibly sourced British lamb not only guarantees consistency and flavour, but also supports traceability and trusted farming standards. This recipe is perfect for special occasions, elevated home dining, or premium menu inspiration — proof that with the right technique, lamb shoulder can rival any prime cut.
Lamb shoulder contains connective tissue that breaks down beautifully during gentle cooking, creating a tender, flavourful result. BBC Good Food highlights slow cooking as the best method for shoulder cuts, allowing the meat to absorb seasoning while retaining moisture. This approach forms the foundation of many classic and modern lamb recipes.
Serving Suggestions
Serve this pressed lamb shoulder as a refined main course, plated with care to highlight each element. A simple side of buttered seasonal greens such as tenderstem broccoli, cavolo nero or green beans complements the richness without overpowering the dish. For added freshness, a lightly dressed bitter leaf salad with lemon and olive oil works beautifully.
This recipe pairs well with creamy mashed potato, soft polenta or a small portion of roasted new potatoes if a more substantial accompaniment is desired. Ideal for dinner parties, special occasions or restaurant-style home dining, this dish is best served warm on pre-heated plates for a polished finish.
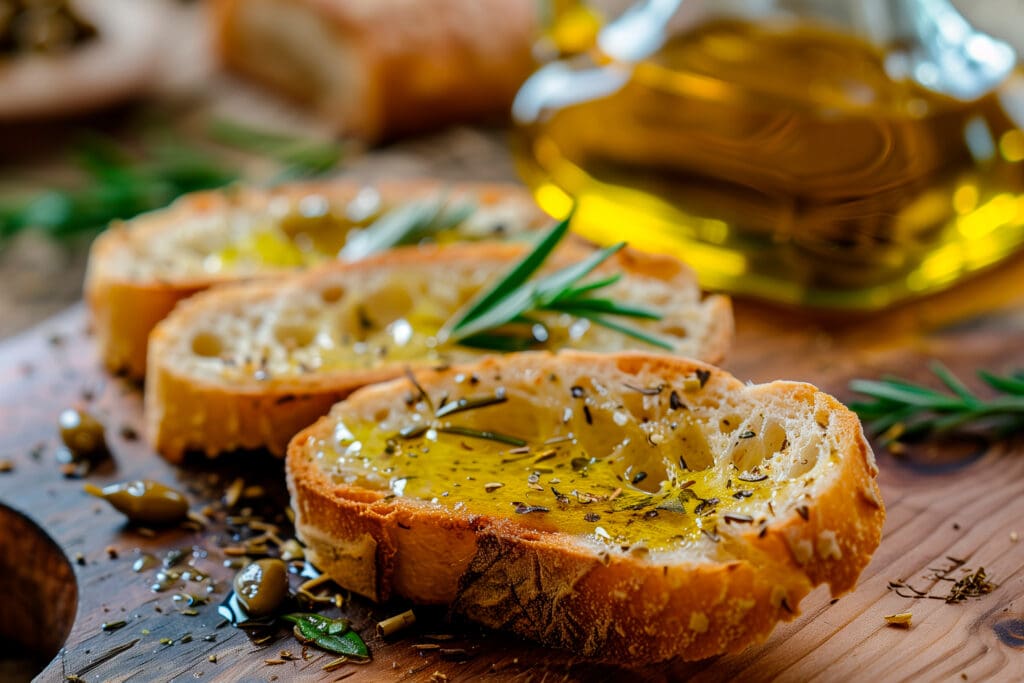
Sometimes the most memorable dishes are the simplest ones — where a handful of quality ingredients come together to create something quietly spectacular. This Warm Anchovy & Buttered Leeks with Lemon Crumbs recipe is exactly that: elegant, comforting, and packed with deep, savoury flavour. This recipe uses premium anchovy fillets in sunflower oil. These are available to buy online from Nicol Retailer and are ideal for adding rich, savoury depth to Mediterranean-style dishes.
Tender leeks are gently cooked until silky and sweet. They are then enriched with anchovy fillets that melt effortlessly into the butter and oil, creating a glossy, umami-rich sauce. Finished with crisp lemon crumbs for contrast and freshness, this dish feels both rustic and refined — perfect as a starter, a light main, or a luxurious side.
History of Anchovies
Anchovies have been used in cooking for centuries, particularly in Mediterranean cuisine. They are prized for their ability to add deep umami flavour. As documented by Encyclopaedia Britannica, this dates back to ancient Roman times. The Romans famously used anchovies to make garum — a fermented fish sauce that was considered a luxury condiment. It was traded across Europe. This early love for anchovies laid the foundation for their enduring role in cuisines from Italy and Spain to France and Greece.
Over time, anchovies became prized not just for their flavour, but for their practicality. Preserved in oil or salt, they travelled well and delivered intense savoury depth to simple dishes. Today, anchovies remain a cornerstone of Mediterranean cooking — quietly enhancing sauces, vegetables, and pastas with their unmistakable umami richness.
In modern kitchens, anchovies are valued less as a “fish” ingredient and more as a natural seasoning. When gently heated, they melt into oils and butters, creating deep flavour without overpowering a dish. This is exactly what makes them perfect for recipes like this warm leek dish.
Using quality anchovies from Nicol Retailer honours this long culinary tradition, bringing an ancient ingredient into contemporary, elegant home cooking.
How to make this Recipe
Elegant yet wonderfully simple, this Warm Anchovy & Buttered Leeks with Lemon Crumbs recipe celebrates the magic of slow cooking and quality ingredients. Follow the steps below to recreate this comforting Mediterranean-inspired recipe at home. It is perfect as a refined starter, light main, or indulgent side:
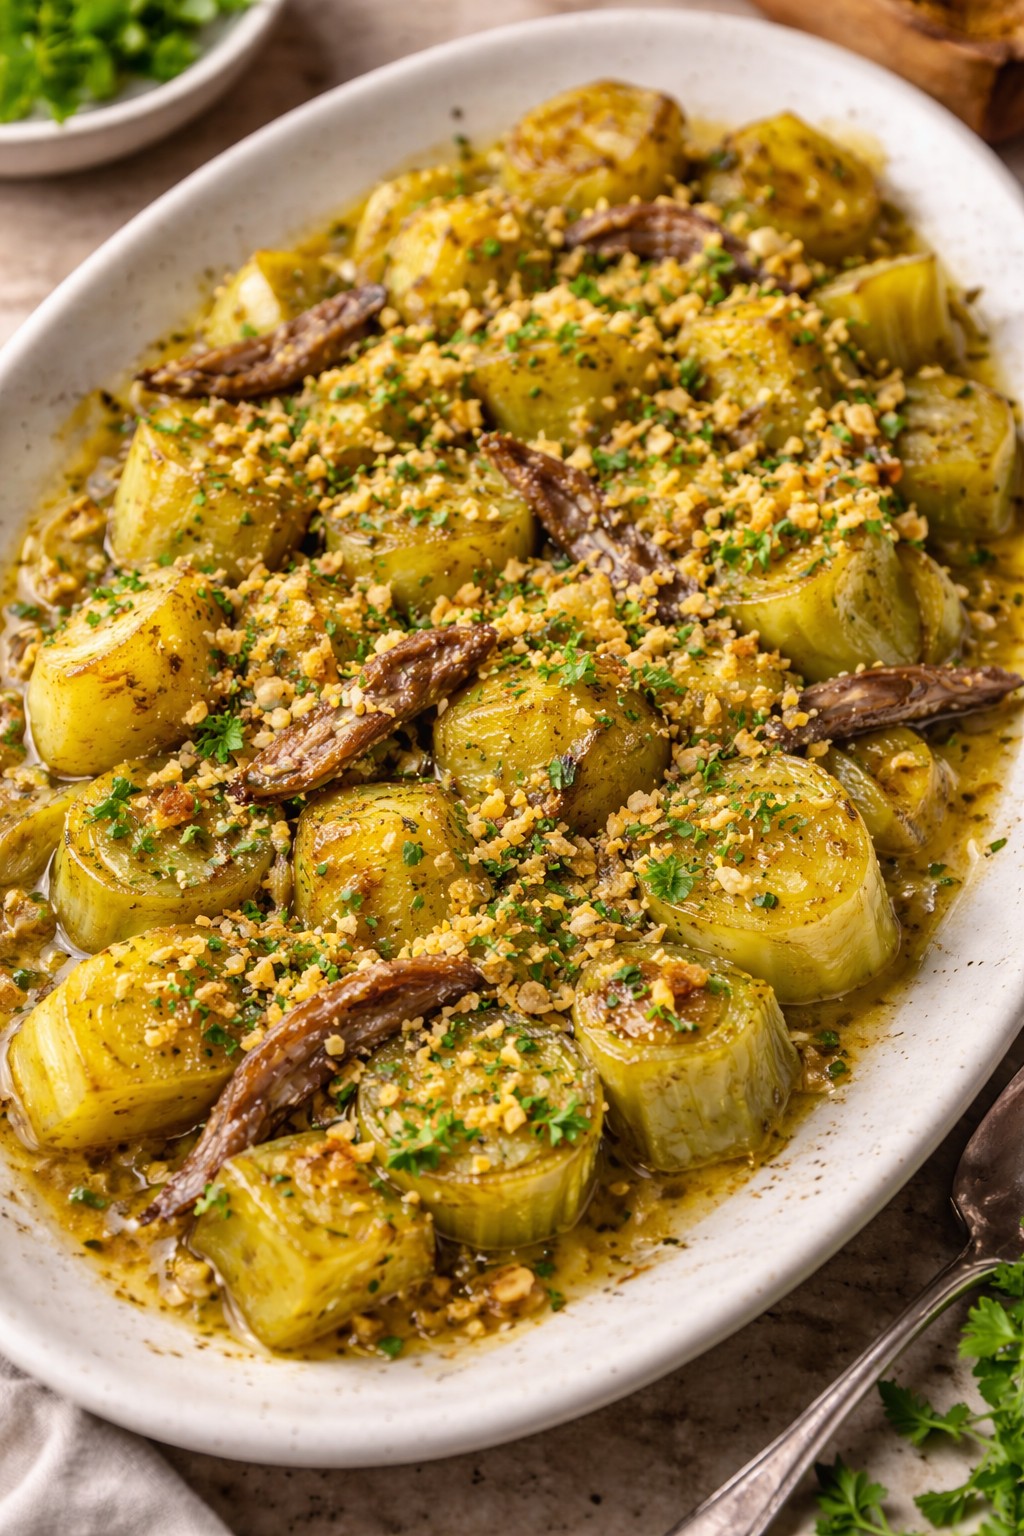
Warm Anchovy & Buttered Leeks with Lemon Crumbs is a rich yet elegant Mediterranean-inspired dish where anchovy fillets melt into buttery olive oil, coating tender leeks with deep savoury flavour. Finished with golden lemon-garlic breadcrumbs for crunch and freshness, this simple recipe delivers bold umami taste using anchovy fillets in sunflower oil from Nicol Retailer. Perfect as a refined starter, side dish, or light main, it’s quick to prepare and full of comforting flavour.
Course Light Main Course, Side Dish, Starter
Cuisine European, Italian, Mediterranean
Diet Low Calorie
Keyword anchovy fillets in sunflower oil, anchovy leeks recipe, how to cook leeks with anchovies, warm leek dish
Remove from heat, stir in lemon zest and black pepper. Set aside.
Cook the Leeks
In a wide pan, heat butter, olive oil, and anchovy oil over medium heat.
Add garlic and cook gently for 30 seconds.
Add leeks, stir to coat, then cover and cook gently for 15–20 minutes, stirring occasionally, until soft and glossy.
Add the Anchovies
Add anchovy fillets to the pan.
Stir gently until they melt into the leeks, creating a silky sauce.
Season with black pepper (no salt needed).
Finish & Serve
Spoon leeks onto a serving platter or shallow bowls.
Sprinkle generously with lemon crumbs.
Finish with chopped parsley or chives if desired. Serve warm.
Notes
This Warm Anchovy & Buttered Leeks with Lemon Crumbs recipe is designed to maximise flavour using anchovy fillets in sunflower oil, which naturally melt into the cooking fat to create deep umami richness without added salt. The gentle cooking method allows the leeks to become soft, sweet, and glossy, perfectly balancing the savoury anchovies.Gluten-free variation: To make this recipe gluten-free, simply use gluten-free breadcrumbs for the lemon crumb topping or omit the crumbs entirely for a naturally low-carb dish.Vegan variation: For a vegan alternative, replace anchovy fillets with capers, white miso, or finely chopped olives to replicate the savoury depth, and use vegan butter or olive oil instead of dairy butter. This maintains the Mediterranean flavour profile while keeping the dish 100% plant-based.Serve warm as an elegant starter, flavourful side dish, or light main. Using premium ingredients from Nicol Retailer ensures the best texture, aroma, and overall taste.
This dish isn’t just rich in flavour — it’s also packed with nutritional goodness, making it a smart choice for balanced, wholesome meals.
Anchovies
Nutritionally, anchovies are rich in protein and omega-3 fatty acids, supporting heart health, according to Healthline. They are:
High in protein, supporting muscle health
A natural source of omega-3 fatty acids, which help support heart and brain health
Rich in calcium and phosphorus, essential for strong bones
Packed with vitamin B12, supporting energy production and nervous system health
Because anchovies are used melted into the dish, you benefit from their nutrients without needing large quantities.
Leeks
Leeks are a good source of fibre and vitamins, contributing to digestion and overall wellbeing, as highlighted by BBC Good Food, offering:
Dietary fibre, aiding digestion and gut health
Vitamin K, important for bone strength
Vitamin A and antioxidants, supporting immune health
Natural sweetness without added sugars
When slowly cooked, leeks become easier to digest while retaining their nutritional value.
Together, anchovies and leeks create a dish that’s:
Naturally low in carbohydrates
Rich in healthy fats (from olive oil and anchovy oil)
High in flavour without relying on heavy sauces or processed ingredients
It’s a wonderful example of Mediterranean-style eating — simple, seasonal, and nourishing.
Serving & Pairing Suggestions
This Warm Anchovy & Buttered Leeks with Lemon Crumbs dish is wonderfully versatile. It is easy to adapt for different occasions and menus. Its rich, savoury depth pairs beautifully with both simple accompaniments and more refined plates.
Serve it warm, spooned into shallow bowls or arranged neatly on a platter. Allow the glossy anchovy-butter sauce to pool gently around the leeks. A slice of crusty sourdough, focaccia, or toasted ciabatta is essential for soaking up every last drop of the lemon-scented oil.
As a starter, it works beautifully ahead of grilled fish, roast chicken, or a light pasta course. As a side dish, it complements roasted meats, pan-seared white fish, or a vegetarian spread featuring lentils, beans, or polenta. For a simple yet elegant vegetarian main, serve the leeks over creamy mashed potatoes, soft polenta, or butter beans, finished with an extra drizzle of olive or anchovy oil.
For non-alcoholic options, sparkling water with lemon or a light elderflower spritz keeps the palate refreshed.
For an extra flourish, finish the dish at the table with freshly cracked black pepper, a squeeze of lemon juice, or a scattering of chopped herbs. These small touches elevate the dish and reinforce its Mediterranean character.
Shop the Ingredients
Create this dish using anchovy fillets in sunflower oilfrom Nicol Retailer, your trusted source for high-quality ingredients. It’s used by home cooks and professional kitchens alike.
This Warm Anchovy & Buttered Leeks with Lemon Crumbs recipe is a perfect example of how simple ingredients, when carefully chosen, can create truly memorable food. By using high-quality anchovy fillets that melt seamlessly into the dish, you achieve deep, savoury flavour without complexity. For the best results, sourcing premium ingredients is key — which is why home cooks and professional kitchens alike trust Nicol Retailer for reliable quality and exceptional produce. From pantry staples to specialist ingredients, Nicol Retailer makes it easy to cook with confidence, bringing restaurant-quality flavour into everyday meals.
A Restaurant-Style Recipe Packed with Flavour & Nutrition
If you’re looking for a vegetable dish that feels indulgent yet nourishing, this charred cavolo nero with crispy chickpeas delivers on every level. Inspired by Italian restaurant kitchens, this simple but elegant recipe transforms humble ingredients into a dish worthy of centre stage.
Cavolo nero — also known as Tuscan kale — has a deep, earthy flavour and sturdy leaves that stand up beautifully to high heat. When lightly blanched and then charred, it develops smoky edges while remaining tender, making it the perfect base for bold, Mediterranean flavours.
A Brief History of Cavolo Nero
Cavolo nero, meaning “black cabbage” in Italian, originates from Tuscany, where it has been grown and cooked for centuries. Traditionally used in rustic Italian dishes such as ribollita and hearty vegetable soups, cavolo nero has long been valued for both its robust flavour and nutritional strength. Unlike softer leafy greens, its dark, textured leaves were prized for their ability to withstand cold winters and long cooking times. Today, cavolo nero has become a favourite in modern European and British kitchens, celebrated by chefs for its versatility, depth of flavour, and suitability for high-heat cooking such as charring and grilling.
Also known as Tuscan kale, cavolo nero has been used for generations in traditional Italian cooking and is valued for its robust flavour and ability to hold its texture when cooked.
Cavolo nero is rich in vitamins and antioxidants, which support overall health as part of a balanced diet, according to NHS healthy eating guidance.
How to Make Charred Cavolo Nero with Crispy Chickpeas – A Restaurant-Style Italian Recipe
This simple yet elegant recipe brings out the very best of cavolo nero, transforming it into a restaurant-style dish that’s both comforting and refined. By lightly blanching the leaves and then charring them over high heat, the cavolo nero develops a smoky depth while remaining tender. Paired with crispy chickpeas, fresh lemon, and a drizzle of olive oil, this recipe is easy to follow, full of flavour, and perfect for home cooks or professional kitchens alike. Follow the step-by-step instructions below to recreate this vibrant, Italian-inspired dish at home.
Charred Cavolo Nero with Crispy Chickpeas, Lemon Oil & Parmesan
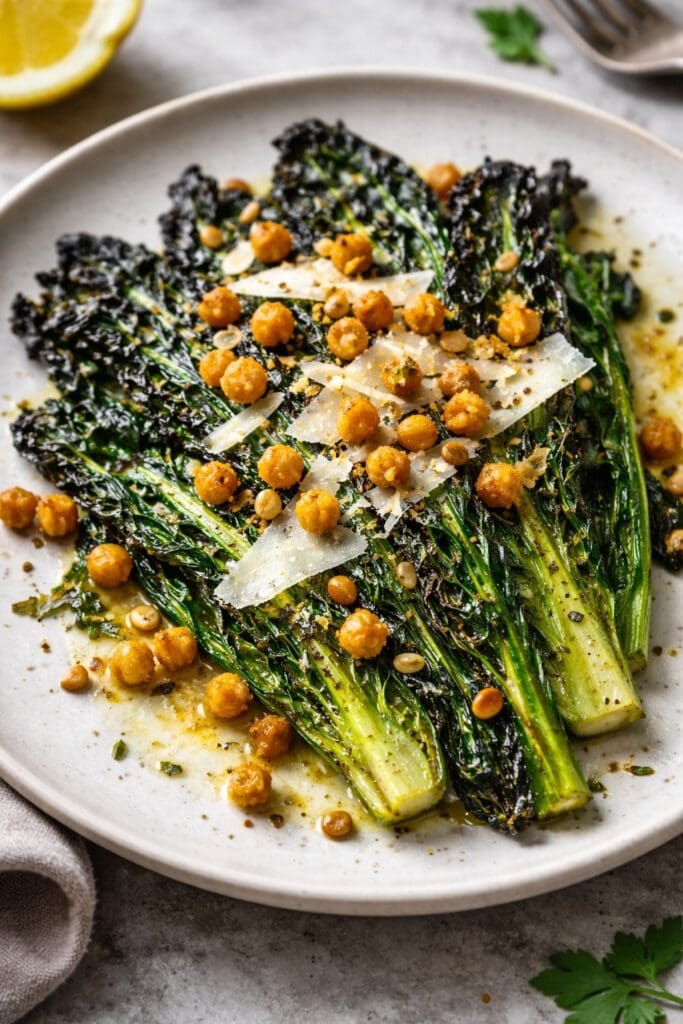
Charred Cavolo Nero with Crispy Chickpeas, Lemon & Parmesan is a modern, restaurant-style dish that highlights the deep, earthy flavour of fresh cavolo nero. The leaves are lightly blanched, then charred for a smoky finish and paired with golden, crispy chickpeas for texture. Finished with bright lemon, extra virgin olive oil and delicate Parmesan shavings, this elegant recipe is quick to prepare, nutrient-rich, and perfect as a vegetarian starter, side dish, or small plate.
Blanch the cavolo nero in well-salted boiling water for 2 minutes until just tender. Drain and refresh briefly in cold water. Squeeze dry thoroughly.
Char the greens
Heat a heavy pan or grill pan over high heat. Add 1 tablespoon olive oil and lay in the cavolo nero in a single layer. Allow it to char lightly without stirring for 1–2 minutes per side until smoky and crisp at the edges. Season lightly and remove to a warm plate.
Crisp the chickpeas
In the same pan, add 2 tablespoons olive oil. Add chickpeas, season with salt, and cook over medium-high heat until golden and crisp. Add sliced garlic and chilli flakes for the final 30 seconds, tossing gently.
Finish with lemon oil
Remove from heat and stir through lemon zest and lemon juice. Taste and adjust seasoning.
Plate
Arrange the charred cavolo nero neatly on warm plates. Spoon over the crispy chickpeas. Finish with shaved Parmesan, cracked black pepper, and a final drizzle of extra virgin olive oil or garlic oil.
Notes
This charred cavolo nero with crispy chickpeas recipe is a simple yet elegant way to enjoy fresh cavolo nero cabbage. Lightly blanching and charring the leaves brings out their natural sweetness while keeping a tender texture, making this dish ideal as a restaurant-style side dish, vegetarian starter, or small plate.For a vegan cavolo nero recipe, simply omit the Parmesan or replace it with a plant-based hard cheese, nutritional yeast, or toasted breadcrumbs for added umami and crunch. The dish is naturally gluten-free, low in sugar, and rich in fibre, making it suitable for a wide range of diets.This recipe works well for home cooks and food businesses, and pairs beautifully with grilled vegetables, roasted potatoes, pasta, or grain bowls. It’s also a great option for meal prep, plant-forward menus, and Mediterranean-inspired cooking.
This charred cavolo nero with crispy chickpeas is a beautifully flexible dish that transitions effortlessly from casual home cooking to polished restaurant presentation. Its balance of smoky greens, citrus brightness, and crisp texture makes it suitable for a wide range of serving styles and dining occasions.
Starter, Small Plate or Sharing Dish
Serve warm as an elegant starter, neatly plated and finished with shaved Parmesan, lemon zest, and a drizzle of extra virgin olive oil. Add warm sourdough, focaccia, or toasted flatbread on the side to soak up the garlicky lemon oil. For sharing, present on a large platter and finish generously at the table for a rustic yet refined effect.
Elevated Side Dish
This dish pairs exceptionally well with rich and simply cooked proteins. Serve alongside roast chicken, grilled lamb chops, pan-seared salmon, or slow-cooked pork. The slight bitterness of cavolo nero cuts through richness, while the chickpeas add texture and body, creating a well-balanced plate.
Satisfying Vegetarian or Vegan Main
Turn this dish into a filling main course by serving it over warm grains such as farro, pearl barley, quinoa, or lentils. Finish with extra olive oil and toasted nuts or seeds for added depth. For vegan menus, omit the Parmesan or replace it with a plant-based alternative without compromising flavour.
Pasta & Bowl Dishes
Toss the cavolo nero and chickpeas through freshly cooked pasta with olive oil, garlic, and a splash of pasta water for a quick yet refined Italian-style meal. Alternatively, layer it into grain bowls with roasted vegetables, hummus, or tahini dressing for a nourishing lunch or dinner option.
Brunch & Light Meals
Serve as a topping for toasted sourdough, folded into omelettes, or alongside poached eggs for a vibrant brunch dish. The bold flavours work particularly well with eggs and creamy elements.
Beverage Pairings
For non-alcoholic options, serve with sparkling water and citrus or a lightly brewed herbal tea.
Seasonal & Menu Adaptations
In cooler months, enrich the dish with roasted squash or sweet potato. In warmer seasons, lighten it with fresh herbs and additional lemon. Its versatility
Presentation
Presentation plays a key role in elevating this dish from simple greens to a restaurant-quality plate. The deep green tones of the charred cavolo nero contrast beautifully with the golden chickpeas, making it visually striking with minimal effort.
Plating Style
Use a neutral or stoneware plate to allow the natural colours to stand out. Arrange the cavolo nero loosely rather than stacked, letting the charred edges remain visible for a rustic yet refined look. Spoon the crispy chickpeas evenly over the top to add height and texture.
Finishing Touches
Finish the dish with:
Delicate shavings of Parmesan scattered lightly rather than piled
A fine grating of fresh lemon zest for colour and aroma
A light drizzle of extra virgin olive oil just before serving
A twist of freshly cracked black pepper for contrast
Optional garnishes such as toasted pine nuts, breadcrumbs, or a few chilli flakes can be added for extra texture and visual interest.
Shop the Ingredients at Nicol Retailer Limited
All the fresh ingredients used in this charred cavolo nero with crispy chickpeas recipe are available from Nicol Retailer Limited, your trusted source for high-quality fresh produce. From fresh cavolo nero cabbage to lemons, garlic, and other everyday cooking essentials, Nicol Retailer Limited supplies carefully selected ingredients that deliver on freshness, flavour, and consistency. Whether you’re cooking at home or sourcing produce for a food business, shopping with Nicol Retailer Limited means reliable quality, competitive pricing, and produce you can trust. Simply add the ingredients to your basket and recreate this restaurant-style dish with confidence.
If you love adding bold yet refined flavours to everyday meals, this Yuzu Herb Butter is about to become your new kitchen essential. For those looking for a yuzu herb butter recipe, this creamy, aromatic, and citrus-fresh compound butter transforms ordinary dishes into something truly special.
Created by Nicol Retailer Limited, this recipe celebrates the unique flavour of yuzu – a prized Japanese citrus known for its fragrant blend of lemon, lime, and grapefruit notes. Combined with fresh herbs and a hint of umami, this butter delivers restaurant-quality flavour with minimal effort.
What Is Yuzu and Why It’s Used in Cooking
Yuzu is a highly aromatic citrus fruit originating from East Asia and widely used in Japanese cuisine. While it resembles a small, knobbly lemon, its flavour is far more complex, combining notes of lemon, lime, mandarin, and grapefruit. Rather than being eaten fresh, yuzu is prized for its juice and zest, which add fragrance and brightness to both savoury and sweet dishes.
In Japan, yuzu is commonly used in ponzu sauce, dressings, marinades, soups, desserts, and compound butters. Its sharp acidity cuts through rich ingredients like butter, fish, and meat, while its floral aroma lifts flavours without overpowering them. This makes yuzu especially popular with chefs looking to add depth and refinement to simple recipes.
Because fresh yuzu is rarely available in the UK, high-quality bottled yuzu juice has become the preferred choice for home cooks and professionals alike. Using a reliable, authentic product ensures consistent flavour and avoids bitterness.
If you’d like a deeper understanding of yuzu, its origins, and how it’s traditionally used, this guide from BBC Good Food offers a helpful overview: https://www.bbcgoodfood.com/howto/guide/what-yuzu
What Makes Yuzu So Special?
Yuzu is a cornerstone of Japanese cuisine, valued for its intense aroma rather than sweetness. Unlike lemon, yuzu offers floral depth and complexity, making it perfect for savoury dishes. Using high-quality juice is key, which is why this recipe features Kishida Yuzu Juice, a premium product trusted by chefs and food professionals.
A little yuzu goes a long way, lifting rich ingredients like butter while keeping flavours balanced and fresh. Ingredient usage & culinary context
Why You’ll Love This Yuzu Herb Butter
This isn’t just butter – it’s a flavour enhancer that works across cuisines and diets:
Adds instant depth to grilled fish, prawns, or scallops
Elevates roasted vegetables and plant-based dishes
Melts beautifully over steak, chicken, or tofu
Perfect for finishing rice, noodles, or warm bread
Ideal for entertaining, meal prep, or gifting
It’s also incredibly quick to make, requiring no cooking and just a handful of ingredients.
How to Make Yuzu Herb Butter
This Yuzu Herb Butter recipe is quick to prepare and requires no cooking, making it perfect for both everyday meals and special occasions. Using premium Kishida Yuzu Juice, fresh herbs, and a touch of umami, this simple compound butter delivers bold, citrus-led flavour with minimal effort. Follow the step-by-step instructions below to create a versatile butter that melts beautifully over fish, vegetables, meat, or warm bread.
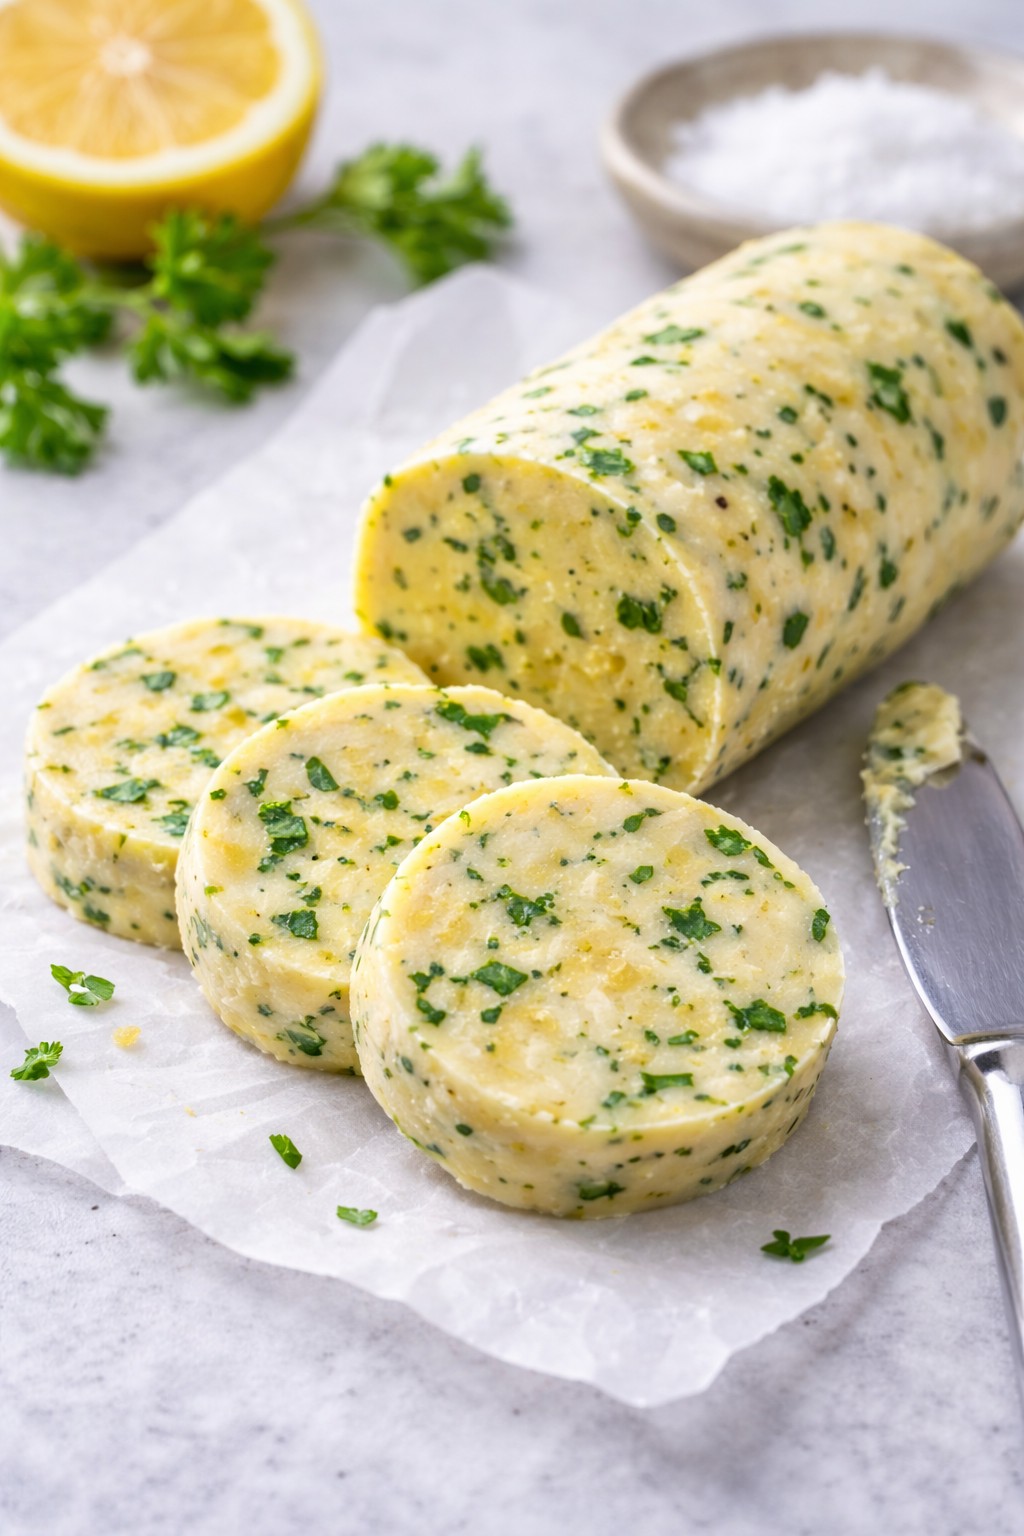
Make your dishes shine with this easy and flavourful Yuzu Herb Butter recipe. Combining Kishida Yuzu Juice, fresh herbs, and optional miso, this savoury compound butter is perfect for adding a citrusy, umami-rich boost to grilled vegetables, seafood, meats, or crusty bread. Ideal for foodies, home cooks, and fans of Japanese flavours, this butter is a versatile kitchen staple.
Course Appetiser enhancer, Condiment, Side Dish, Topping/Finishing butter
Cuisine Asian-inspired, Japanese-inspired, Modern European (with Japanese twist)
Diet Gluten Free, Low Calorie, Vegetarian
Keyword compound butter with yuzu, Japanese citrus butter, Kishida Yuzu Juice recipe, yuzu butter recipe, yuzu herb butter
In a bowl, combine the softened butter with yuzu juice, herbs, miso (if using), garlic, zest, salt, and pepper. Mix until fully combined and smooth.
Shape and chill:
Scoop the butter onto a piece of baking parchment or clingfilm, roll into a log, and twist the ends. Chill in the fridge for at least 1 hour to firm up, or freeze for longer storage.
Slice & serve:
Slice into discs and serve over grilled salmon, roasted veg, steak, warm bread, or even stirred into steamed rice or soba noodles
Notes
What is Yuzu? Yuzu is a fragrant Japanese citrus fruit known for its sharp, floral aroma — similar to a blend of lemon, lime, and grapefruit. It’s widely used in Japanese cuisine to enhance sauces, dressings, and marinades.Where to buy yuzu juice: We recommend Kishida Yuzu Juice 1.8L — a premium-quality product ideal for cooking, baking, and dressings available at Nicol Retailer Limited.Make-ahead & storage tips: Yuzu herb butter can be made in advance and stored in the fridge for up to 5 days, or frozen for 3 months. Slice from frozen as needed.How to use yuzu butter: This citrus compound butter pairs beautifully with grilled fish, roasted vegetables, steamed rice, noodles, bread, tofu, and steak. It melts easily and adds a gourmet touch to everyday dishes.Customise it: Try swapping parsley for chives or coriander, adding chilli flakes for heat, or including a touch of white miso for a deeper umami flavour.Dietary swaps: Use plant-based butter to make this recipe fully vegan and dairy-free.Why you’ll love it: This recipe is quick, elegant, and brings bold flavour with minimal effort. It’s perfect for entertaining, meal prep, or enhancing weeknight dinners.
One of the best things about this Yuzu Herb Butter is how effortlessly it enhances a wide range of dishes. The fragrant citrus notes of yuzu cut through richness, while the herbs and umami create depth, making it a versatile finishing butter you’ll reach for again and again.
Perfect with Seafood
Yuzu herb butter melts beautifully over grilled salmon, pan-seared scallops, prawns, sea bass, or cod. The citrus freshness brightens the natural sweetness of seafood without overpowering it, making it ideal for both simple weeknight meals and elegant dinner parties.
Elevate Meat Dishes
Add a slice of yuzu butter to rested steak, roast chicken, pork chops, or lamb cutlets. As it melts, it creates a glossy, flavour-packed sauce that enhances savoury depth while keeping the dish light and balanced.
Transform Vegetables
Toss freshly roasted or steamed vegetables such as asparagus, tenderstem broccoli, green beans, carrots, mushrooms, or sweetcorn with yuzu herb butter for instant flavour. It’s an easy way to make plant-based dishes more exciting and satisfying.
Ideal for Vegetarian & Vegan Cooking
This butter is exceptional with tofu, aubergine, courgette, or roasted cauliflower. Simply swap to plant-based butter to keep it vegan while maintaining the bright, Japanese-inspired flavour profile.
Finish Rice, Noodles & Grains
Stir yuzu herb butter into steamed rice, soba noodles, udon, quinoa, or couscous for a fragrant, citrus-led finish. It adds richness without heaviness, making it perfect for Asian-inspired bowls.
Simple but Luxurious with Bread
Serve yuzu herb butter with warm sourdough, crusty baguette, focaccia, or brioche. It’s also delicious melted over corn on the cob or stirred into mashed potatoes for a refined twist.
Entertaining & Meal Prep
Because it can be made ahead and frozen, yuzu herb butter is ideal for entertaining, dinner parties, and batch cooking. Slice as needed and let it melt naturally over hot food for a restaurant-quality finish at home.
Star Ingredient: Premium Yuzu Juice from Nicol Retailer Limited
The hero of this recipe is yuzu juice – a highly prized Japanese citrus ingredient known for its fragrant aroma and vibrant, complex flavour. Unlike lemon, yuzu offers a unique balance of sharpness and floral notes, making it ideal for savoury dishes like this Yuzu Herb Butter.
For best results, we recommend using Kishida Yuzu Juice, available to buy directly from Nicol Retailer Limited. This premium-quality yuzu juice is trusted by chefs and food professionals for its consistency, freshness, and authentic flavour profile.
Using a high-quality yuzu juice ensures:
Bright, clean citrus flavour without bitterness
Consistent results in cooking, baking, dressings, and sauces
A true Japanese-inspired taste that elevates simple recipes
Whether you’re making compound butter, marinades, dressings, or desserts, this yuzu juice delivers
Ingredients Available to Buy from Nicol Retailer Limited
To help you recreate this recipe with confidence, Nicol Retailer Limited stocks key specialist ingredients used in this dish:
Kishida Yuzu Juice – Ideal for savoury recipes, desserts, drinks, and dressings
Japanese pantry staples suitable for home cooks and professionals
High-quality ingredients sourced with flavour and performance in mind
Shopping with Nicol Retailer Limited means you get trusted products, reliable quality, and ingredients chosen specifically for creative cooking.
Yuzu Herb Butter FAQ – How to Use Yuzu Juice in Cooking
What is yuzu juice used for?
Yuzu juice is a highly aromatic Japanese citrus ingredient used to bring brightness and depth to both savoury and sweet dishes. It’s especially popular in sauces, marinades, dressings, desserts, and elegant finishing touches like yuzu herb butter, where it balances richness with fresh citrus notes.
Can yuzu juice replace lemon in recipes?
Yes. Yuzu can be used instead of lemon, but it offers a more refined flavour. While lemon is sharp and direct, yuzu delivers floral, mandarin-like notes with gentle bitterness, creating a more complex and elegant finish.
Is yuzu herb butter vegetarian or vegan?
This yuzu herb butter is vegetarian and naturally gluten-free. To make it vegan, simply use a high-quality plant-based butter — the citrus and herb flavours remain beautifully balanced.
How long does yuzu herb butter keep?
Stored in an airtight container, yuzu herb butter lasts up to 5 days in the fridge. It can also be frozen for up to 3 months. Freezing it in a log allows you to slice off portions as needed.
What does yuzu herb butter taste like?
It’s creamy and silky with a fragrant citrus lift. The butter provides richness, the herbs add freshness, and yuzu brings a bright, floral tang that feels lighter and more aromatic than lemon.
What dishes pair best with yuzu herb butter?
Yuzu herb butter pairs beautifully with grilled fish, prawns, roasted vegetables, tofu, steak, chicken, rice, noodles, and warm bread. Use it as a finishing butter to instantly elevate simple dishes.
Where can I buy yuzu juice in the UK?
You can buy premium Kishida Yuzu Juice from Nicol Retailer Limited. It’s ideal for cooking, baking, dressings, drinks, and Japanese-inspired recipes.
Why add yuzu to compound butter?
Yuzu’s acidity and aroma cut through butter’s richness, creating balance and elegance. It transforms simple butter into a restaurant-quality finishing ingredient with minimal effort.
A Show-Stopping Festive Dessert by Nicol Retailer Limited
If you’re searching for the ultimate Christmas dessert that looks incredible, tastes luxurious, and delivers a true festive wow-factor, then this Black Forest Christmas Pavlova is the one. With its billowy cloud of meringue, luscious whipped cream, rich dark chocolate shavings and a Christmas is the season of indulgence, celebration and bringing people together through unforgettable food. And when it comes to festive desserts, nothing steals the spotlight quite like this Black Forest Christmas Pavlova topped with Darta Pitted Morello Cherries. With its glossy ruby-red cherries, crisp meringue shell and rich chocolate shavings, this dessert not only tastes extraordinary — it looks like a centrepiece straight from a luxury Christmas magazine.
This recipe has quickly become a top-searched festive dessert thanks to its dazzling presentation, naturally gluten-free base, and the irresistible flavour pairing of chocolate and cherries. Morello cherries, in particular, bring a distinct sweet-tart intensity that cuts beautifully through the sweetness of the pavlova, creating balance, richness and a nostalgic Christmas warmth in every bite.
Crafted and photographed by Nicol Retailer Limited, this recipe is designed to showcase the exceptional quality of Darta Pitted Morello Cherries, a premium ingredient beloved by home bakers and professional chefs alike. Whether you’re hosting Christmas dinner, planning a festive gathering, or creating a show-stopping dessert for the big day, this pavlova offers all the glamour of a traditional Black Forest cake — but with a lighter, cloud-like twist.
The History of Cherries at Christmas
The tradition of using cherries during the Christmas season has deeper historical roots than many realise. Their presence in festive recipes goes back centuries, woven into European winter traditions, religious symbolism and early culinary practices.
Symbol of Prosperity and Celebration
In medieval Europe, cherries were seen as a luxurious ingredient. Fresh cherries were rare in winter, so preserved or dried cherries became a treasured festive treat, symbolising abundance, prosperity and generosity. Using cherries in a Christmas dish was considered a sign of wealth and hospitality — a tradition that continues today with premium Morello cherries.
German and Central European Influence
The Black Forest region of Germany, famous for its cherries and cherry spirits like kirsch, heavily influenced European Christmas baking. From Black Forest gâteau to cherry-filled pastries and winter compotes, cherries became a beloved component of German Weihnachtszeit (Christmas time). Families often preserved sour cherries during summer to enjoy in festive dishes at year-end — a custom still reflected in modern cherry desserts.
The Rise of Victorian Christmas Baking
Victorian Britain cemented many of the Christmas traditions we follow today, including lavish desserts. Cherries were often used in:
decorative puddings
winter tarts
festive trifles
ornamental cakes
Victorians adored rich, colourful additions to their Christmas tables, and cherries — especially preserved Morello cherries — offered the perfect jewel-toned flourish.
Cherries as a Winter Ingredient
Sour cherries, like Morello cherries, preserve exceptionally well. Whether jarred, canned or dried, their intense flavour makes them ideal for winter baking. Long before frozen fruit was available, families relied on preserved cherries to add brightness to dark winter days — and so cherries naturally became tied to seasonal celebrations.
Modern Christmas Revival
Today, cherries are experiencing a renaissance in festive cooking. Their bold colour, refreshing acidity and ability to balance sweet desserts make them a favourite in:
pavlovas
cheesecakes
cocktail garnishes
charcuterie boards
chocolate desserts
The combination of cherries and chocolate — the essence of Black Forest flavours — continues to be one of the world’s most beloved Christmas pairings.
How to Make Christmas Pavlova with Morello Cherries and Chocolate
Get ready to create a truly unforgettable festive showstopper with this Black Forest Christmas Pavlova featuring Darta Pitted Morello Cherries. This beautifully balanced dessert combines a crisp meringue shell, pillowy soft centre, silky whipped cream and luxurious dark chocolate — all crowned with vibrant, glossy Morello cherries supplied by Nicol Retailer Limited. Perfect for Christmas Day, winter gatherings or any celebration where you want a dessert that looks spectacular and tastes even better, this recipe is surprisingly simple to make and delivers outstanding results every time.
Follow the step-by-step instructions below to recreate this stunning pavlova at home and treat your guests to a festive masterpiece they’ll remember long after the last slice is gone:
Winter Black Forest Pavlova with Darta Morello Cherries
This Winter Black Forest Pavlova is a show-stopping Christmas dessert featuring a crisp meringue base layered with soft whipped cream, rich dark chocolate shavings, and a generous topping of Darta Pitted Morello Cherries. With its festive flavour, stunning presentation, and perfect balance of sweetness and tart cherry richness, this pavlova makes an irresistible centrepiece for any Christmas dinner or holiday celebration. Simple to prepare yet visually impressive, it’s the ultimate seasonal dessert for cherry lovers and Black Forest fans alike.
Keyword Black Forest dessert, Christmas dessert ideas, Christmas pavlova recipe, Easy pavlova recipe, Festive pavlova recipe, Gluten-free Christmas dessert, Morello cherry pavlova, Pavlova with cherries, Winter Black Forest Pavlova
Prep Time 25 minutesmins
Cook Time 1 hourhr30 minutesmins
This Winter Black Forest Pavlova is a show-stopping Christmas dessert featuring a crisp meringue base layered with soft whipped cream, rich dark chocolate shavings, and a generous topping of Darta Pitted Morello Cherries. With its festive flavour, stunning presentation, and perfect balance of sweetness and tart cherry richness, this pavlova makes an irresistible centrepiece for any Christmas dinner or holiday celebration. Simple to prepare yet visually impressive, it’s the ultimate seasonal dessert for cherry lovers and Black Forest fans alike. 1 hourhr
Line a baking tray with baking paper; draw a 20cm circle to guide the pavlova shape.
Whisk the egg whites to soft peaks.
Add the caster sugar 1 tablespoon at a time, whisking until glossy and stiff.
Gently fold in the vinegar and cornflour.
Spoon the mixture onto the tray and shape it into a nest with raised sides.
Bake for 1 hour 30 minutes until crisp.
Turn off the oven, leave the door slightly ajar, and let the pavlova cool inside for 1 hour.
Prepare the Cherries & Cream
Whip the double cream with vanilla to soft peaks.
Gently warm the Morello cherries in a saucepan with the cherry syrup (add a splash of liqueur if desired)
Let them cool before topping.
Assemble the Dessert
Place the cooled pavlova on a serving plate.
Spread the whipped cream over the top.
Spoon the cherries over the cream, allowing some syrup to drizzle down the sides.
Finish with dark chocolate shavings and optional orange zest.
Serve immediately for the best texture — crisp shell, marshmallow centre, and juicy cherries.
Notes
This Winter Black Forest Pavlova is a luxurious, festive dessert that brings together all the flavours of a traditional Black Forest gateau—dark chocolate, whipped cream and tangy cherries—reimagined in a light, airy pavlova. The crisp meringue shell with its soft, marshmallow-like centre creates the perfect base for rich cream and vibrant Darta Pitted Morello Cherries, whose deep ruby colour and naturally tart flavour cut beautifully through the sweetness, giving every bite a balanced and indulgent finish.Perfect for Christmas Day, Boxing Day gatherings or festive dinner parties, this pavlova not only tastes incredible but also makes an impressive centrepiece. The dessert can be prepared in stages, making it ideal for busy holiday hosts: bake the meringue ahead of time, whip the cream just before serving and finish with cherries and chocolate shavings to create a restaurant-worthy presentation in minutes.Because it’s naturally gluten-free and adaptable for dairy-free diets, this recipe is suitable for a wide range of guests—making it a reliable choice when entertaining a crowd. The use of premium Darta Morello Cherries elevates the flavour, providing a rich, fruity depth that regular tinned cherries simply can’t achieve. Their vibrant colour also enhances the festive look, making the pavlova as beautiful as it is delicious.Whether you’re looking for a Christmas dessert that’s easy yet elegant, a showstopping centrepiece, or a creative way to showcase high-quality Morello cherries, this Winter Black Forest Pavlova ticks every box. Light, bright, and indulgent, it’s a dessert your guests will remember long after the holidays.
Turn your Black Forest Christmas Pavlova with Darta Morello Cherries into the unforgettable centrepiece of your festive celebration with these indulgent, crowd-pleasing serving suggestions. This pavlova is already strikingly beautiful, but with a few thoughtful touches, it becomes a truly magical dessert moment — the kind guests talk about long after Christmas is over.
For an elegant showstopper effect, present the pavlova on a tall cake stand and allow the cherry syrup to cascade gently down the sides. The deep ruby glow of the Darta Morello Cherries, contrasted with the snowy whipped cream and crisp meringue, creates a dramatic Christmas aesthetic worthy of magazine covers. Just before serving, scatter a handful of dark chocolate shavings and a whisper of orange zest over the top — the aroma alone will have everyone leaning closer.
To elevate each slice, pair it with a scoop of vanilla bean ice cream, clotted cream, or a chilled spoonful of mascarpone. These creamy additions enhance the tartness of the cherries and melt beautifully into the pavlova’s marshmallow centre. For those who enjoy a festive tipple, offer a small glass of kirsch, cherry liqueur, Amaretto, or spiced mulled wine. The warmth and spice complement the rich chocolate notes and fruit beautifully, creating a full sensory experience.
Hosting a larger crowd? Transform this recipe into individual mini pavlovas, allowing each guest to enjoy their own personal dessert masterpiece. They look adorable on a dessert table and allow for customised toppings — think extra chocolate for chocoholics, more cherries for fruit lovers, or even toasted almonds for crunch.
For a truly memorable Christmas moment, serve the pavlova surrounded by glowing fairy lights, festive greenery or seasonal berries. The colours pop under soft lighting, making it perfect for Christmas photos and social sharing — a brilliant touch for your brand’s online presence or for customers who love posting their holiday creations.
Whether enjoyed on Christmas Eve, served proudly after Christmas dinner, or shared on Boxing Day with leftover prosecco, this pavlova brings comfort, elegance and a hint of nostalgic Black Forest charm. With its blend of sweetness, tart fruit, and festive flavours, it promises to be a dessert that guests remember — and request — year after year.
Shop the Star Ingredients at Nicol Retailer Limited
Bring this unforgettable Black Forest Christmas Pavlova to life using the finest, chef-approved ingredients — all conveniently available from Nicol Retailer Limited. We’re proud to supply premium-quality ingredients trusted by home bakers, professional chefs, cafés and catering businesses across the UK.
Darta Pitted Morello Cherries – The Star of the Recipe
No ingredient defines this dessert quite like our Darta Pitted Morello Cherries. Known for their vibrant ruby colour, bold flavour and perfect sweet–tart balance, these cherries instantly elevate any festive recipe. Their rich syrup and natural fruitiness pair beautifully with chocolate, meringue and whipped cream, making them the ultimate centrepiece for Christmas desserts. Our cherries are:
Plump and juicy
Pitted for convenience
Packed in generous 1kg bags
Perfect for pavlovas, Black Forest cakes, cocktails, cheesecakes & festive bakes
These cherries aren’t just an addition — they’re a statement ingredient that makes your dessert look spectacular and taste unforgettable.
Recreate This Festive Showstopper With Nicol Retailer Limited
From the hero ingredient — Darta Pitted Morello Cherries — to the chocolate, sugar, cream and flavourings, everything you need for this Black Forest Christmas Pavlova is available to buy now at Nicol Retailer Limited.
Make this Christmas unforgettable with ingredients that inspire creativity and deliver exceptional results.
For more premium-quality baking ingredients and festive essentials, visit Nicol Retailer Limited’s online store to explore the full range of products, including the exceptional Darta Pitted Morello Cherries: https://nicolretailer.com/
Made with Birchstead 95% British Beef Burger Pucks & Schär Gluten-Free Mini Brioche Sliders
There’s something deeply satisfying about a slider that tastes like pub-fare but feels handcrafted in your own kitchen. Using top-quality ingredients makes all the difference — that’s why we love the combination of the rich, British beef from Birchstead and the soft gluten-free brioche buns from Schär. The result is a burger slider that’s juicy and flavourful. It is suitable for people avoiding gluten — yet still indulgent, comforting and irresistibly tasty.
This gourmet gluten-free beef sliders recipe is crafted using premium-quality ingredients available exclusively at Nicol Retailer. The Birchstead 95% beef burger pucks offer exceptional flavour and tenderness. Meanwhile, the Schär gluten-free mini brioche buns provide a soft, bakery-style texture perfect for coeliac-friendly cooking. Together, they create a delicious, restaurant-style slider that’s easy to make at home. For more free-from products and premium British meats, explore Nicol Retailer’s full range at https://nicolretailer.com/product-category/butchered-meat/ .
When you pair the 95% beef burger pucks from Birchstead with Schär’s mini brioche sliders, you get a match for pub-style meals, casual dinner parties or cosy at-home feasts. This recipe elevates humble sliders into a rustic dish that looks amazing and tastes even better. Plus, everyone can enjoy it.
Premium Quality Fresh Beef at Nicol Retailer
Discover truly premium-quality, fresh British beef at Nicol Retailer, home to some of the finest cuts and expertly crafted burger pucks available online. Our range includes the exceptional Birchstead British Top Rump Short Rib Cap 95% Beef Burger Pucks, renowned for their rich flavour, tender texture and consistent cooking results. Perfect for home cooks, restaurants and catering businesses, Nicol Retailer provides high-grade, responsibly sourced beef. These products deliver unbeatable taste in every bite. Whether you’re preparing gourmet sliders, family meals or menu-ready dishes, our fresh beef products offer outstanding quality and value — delivered with the reliability and service Nicol Retailer is known for.
How to Make These Delicious Gourmet Sliders
Follow this simple step-by-step guide to recreate the rustic, flavour-packed sliders shown in the recipe:
Create irresistible restaurant-style gourmet beef sliders using Birchstead British 95% beef burger pucks and Schär gluten-free mini brioche sliders. These premium, gluten-free beef sliders feature juicy patties, caramelised onions, and soft brioche buns, perfect for fine dining menus, gastro pubs, catering, and home cooks seeking a luxury bite. Ready in just 30 minutes, this recipe delivers rich flavour, stunning presentation and greater accessibility for gluten-free diners.
Course Gourmet Bar Snack, Main Course, Sharing Platter, Starter
Cuisine Contemporary British, European Fusion, Gourmet Home Cooking, Modern British
Toppings: baby gem lettuce or rocket; slices of gherkin or pickles; tomato slices; mayonnaise, burger sauce, mustard or gluten-free burger sauces of your choice.
Heat the olive oil (and butter if using) in a medium sauté pan over medium-low heat.
Add the thinly sliced onions and a pinch of salt. Stir gently.
Add the thinly sliced onions and a pinch of salt. Stir gently.
Add the brown sugar and balsamic vinegar (if using), stir to combine, and cook a further 5 minutes until onions are soft, sweet and jam-like
Remove from heat and set aside.
Cook the burger pucks
Heat a griddle pan or heavy frying pan over medium-high heat. Lightly oil the surface.
Season each beef puck with a little salt and pepper just before cooking.
Place the pucks on the hot pan. For 57 g patties, cook ~2–3 minutes each side for medium-rare/medium; extend by 1–2 minutes per side for well done (adjust to your preference).
If using cheese, add a slice to each puck about 30 seconds before finishing so it melts nicely.
Once cooked, remove from heat and let rest on a plate.
Prepare the buns
Split the gluten-free mini brioche buns and, if you like, lightly butter/toast them on the hot griddle or a clean pan until just crisp & golden — this adds a nice texture contrast.
Serve & enjoy!
Serve warm, ideally with a side of sweet potato fries, a crisp salad, or even a quick slaw
For a pub-style bite: serve 2 sliders per person with a pint or a soft drink; for a snack platter, include assorted sauces and extra toppings so people build their own.
Notes
For a truly restaurant-quality finish, allow the Birchstead beef patties to reach room temperature before cooking — this ensures even browning and maximum juiciness. Gluten-free buns can soften quickly, so lightly toasting the Schär mini brioche sliders adds structure, enhances flavour, and prevents soaking. Take your time caramelising the onions; slow cooking is what develops their deep, sweet flavour and elevates the entire dish. These sliders are best assembled just before serving so the beef stays hot, the cheese remains melted, and the buns retain their soft texture. Perfect for coeliac-friendly entertaining, party platters, pub-style menus or premium takeaway boxes.
These gourmet gluten-free beef sliders are wonderfully versatile, making them ideal for everything from casual family dinners to laid-back weekend entertaining. To elevate your dish and create a well-rounded meal, here are some delicious serving suggestions that pair beautifully with the juicy Birchstead beef and soft Schär brioche buns.
Classic Pub-Style Sides
For a traditional British pub feel, serve your sliders alongside:
Marinated olives, sun-dried tomatoes, and antipasti
This transforms your dish into a balanced sharing board perfect for game nights, gatherings, or casual celebrations.
Family-Friendly Add-Ons
For a full, comforting dinner, try adding:
Garlic roasted potatoes
Steamed seasonal vegetables
Corn on the cob with herb butter
These sides help round out the meal and make it suitable for all ages.
Premium Star Ingredients — Available at Nicol Retailer
What makes this recipe truly exceptional is the quality of the ingredients — both of which you can conveniently purchase from Nicol Retailer.
The foundation of the dish is the Birchstead British Top Rump Short Rib Cap 95% Beef Burger Pucks. These are made from premium British beef known for its tenderness, rich flavour and superb cooking consistency. These burger pucks offer professional-grade quality, ensuring every slider is juicy, satisfying and packed with natural beef richness.
To complement this, the recipe uses Schär Gluten-Free Mini Brioche Sliders — soft, golden, and buttery in texture. These buns elevate the dish, offering a light sweetness that pairs perfectly with the savoury beef. They also ensure the recipe remains suitable for gluten-free diners. Their bakery-style softness makes them ideal for gourmet sliders, giving you a restaurant-standard result at home.
Nicol Retailer proudly stocks both items, allowing you to source premium beef and high-quality gluten-free brioche buns from one trusted supplier. Whether you’re cooking for family, entertaining guests, or designing a menu for a business, Nicol Retailer ensures you have access to top-tier ingredients that deliver exceptional taste every time.
A Silky, No-Bake Dessert Made with Centaur Pistachio Paste
If you’re looking for a dessert that blends luxury, artistry and effortless elegance, this Pistachio & White Chocolate Mousse Cake deserves a place at the top of your baking list. Made with the incredibly smooth and intensely flavourful Centaur Pistachio Paste (1kg) from Nicol Retailer Limited, this no-bake masterpiece delivers a depth of nutty richness that transforms each bite into a decadent experience.
The velvety pistachio mousse melts on the palate, the buttery biscuit base adds a satisfying crunch, and the white chocolate topping brings a silky sweetness that completes the perfect harmony of flavours. Whether you’re hosting a celebration, preparing a gourmet after-dinner treat, or simply treating yourself to something extraordinary, this dessert promises show-stopping presentation, unforgettable flavour and pure pistachio indulgence.
Crafted to impress but remarkably simple to prepare, this mousse cake showcases the true beauty of premium ingredients — and when those ingredients come from Nicol Retailer Limited, you know you’re working with the best. This is the kind of dessert that turns a special occasion into a memory.
Brief History of Pistachio Paste
Pistachio paste has a long, rich history that stretches back thousands of years. Pistachios themselves are one of the world’s oldest cultivated nuts, enjoyed as early as 7000 BC in Persia (modern-day Iran). Known as “the green gold,” pistachios quickly became prized across the Middle East, Mediterranean and later Europe for their vibrant colour, natural sweetness and luxurious flavour.
Although pistachios were historically eaten whole, roasted or ground into sweets, pistachio paste as we know it today gained popularity in the 19th and early 20th centuries when European pastry chefs began incorporating finely milled pistachios into creams, custards, pralines and patisserie fillings. Italy — especially Sicily — is now renowned for its pistachio paste, using naturally green nuts from Bronte to create deeply flavoured spreads and dessert bases. France also embraced pistachio paste in classic pâtisserie such as Paris-Brest, macarons and ice cream.
Today, pistachio paste is a key ingredient in gourmet desserts worldwide, loved for its smooth texture, distinctive flavour and versatility. Whether used in cakes, mousses, gelato or buttercreams, high-quality paste like Centaur Pistachio Paste delivers a pure, authentic pistachio profile that elevates even the simplest recipes into patisserie-level creations.
How to Make This Delicious Pistachio & White Chocolate Mousse Cake
Creating this luxurious, no-bake dessert is far easier than it looks — and every step helps build the silky texture, rich pistachio flavour and beautiful presentation that make this mousse cake unforgettable. Follow the simple instructions below to prepare each layer to perfection and bring this elegant dessert to life in your own kitchen.
Indulge in this luxurious Pistachio & White Chocolate Mousse Cake, made with rich, nutty Centaur Pistachio Paste from Nicol Retailer Limited. This no-bake dessert combines a buttery biscuit base, creamy pistachio mousse, and a silky white chocolate topping for an irresistible gourmet treat. Perfect for celebrations, dinner parties, or anytime you want a show-stopping pistachio dessert with authentic flavour and a smooth, melt-in-the-mouth texture.
Press mixture firmly into the base of a 20 cm (8-inch) springform cake tin or tart ring.
Chill in fridge while you prepare the filling.
Make the Pistachio Mousse
In a mixing bowl, whisk together the mascarpone (or yogurt), powdered sugar, vanilla extract and Centaur Pistachio Paste until smooth.
In a separate bowl, whip the double cream to soft peaks.
Gently fold the whipped cream into the pistachio-paste mixture until fully combined and light.
Pour Mousse Over Base
Remove the biscuit base from fridge and pour the pistachio mousse over it.
Smooth the top with a spatula.
Chill in fridge for at least 2 hours (preferably overnight) so the mousse sets firmly.
Prepare the White Chocolate Glaze
Gently melt the white chocolate with 50 ml cream in a heatproof bowl over simmering water (double boiler). Stir until smooth and glossy.
Let cool slightly, then pour over the chilled pistachio mousse layer.
Return to fridge and chill for at least 30 minutes to set.
Decorate & Serve
Carefully remove the cake from the tin.
Sprinkle crushed pistachios over the top.
Add white chocolate shavings or curls.
Garnish with a few whole pistachios and fresh mint leaves for colour.
Slice and serve chilled — the contrast between cold creamy mousse and crunchy pistachios is irresistible.
Notes
For the richest flavour, use high-quality Centaur Pistachio Paste from Nicol Retailer Limited — it provides a deep, authentic pistachio taste that elevates the mousse beyond ordinary desserts.Chill the mousse cake for at least 2 hours (or overnight) for the smoothest texture and cleanest slices.Use full-fat mascarpone or Greek yogurt for the creamiest consistency; swapping to yogurt gives a lighter, tangier finish.If the mousse feels too thick, loosen it with a small splash of cream; if too thin, chill for 20 minutes before assembling.For a professional finish, top the cake with crushed pistachios, white chocolate curls, or a drizzle of melted chocolate.This recipe is naturally no-bake, making it perfect for warm weather or quick hosting without using the oven.For gluten-free diners, simply replace the base with gluten-free digestive biscuits.Keep refrigerated until ready to serve — this dessert tastes best chilled and firm.
Why You’ll Love This Pistachio & White Chocolate Mousse Cake
This stunning no-bake dessert stands out for so many irresistible reasons:
Rich, authentic pistachio flavour thanks to premium Centaur Pistachio Paste from Nicol Retailer Limited, giving every bite a deep, natural nuttiness that cheaper alternatives can’t match.
Perfectly balanced sweetness from silky white chocolate, which enhances rather than overwhelms the pistachio mousse.
No baking required, making this cake easy, reliable and ideal for beginners or quick preparation.
Luxurious, melt-in-the-mouth texture created by the smooth pistachio mousse, buttery biscuit base and glossy white chocolate layer.
Visually stunning presentation, with its elegant green hue and patisserie-style finish, guaranteed to impress guests.
Ideal for celebrations, including birthdays, festive gatherings, dinner parties or gifting — this is a dessert that always steals the spotlight.
Versatile and customisable, allowing you to adjust sweetness, decorate creatively and serve with berries, chocolate or fresh herbs.
Made with high-quality ingredients sourced from Nicol Retailer Limited, ensuring premium taste and dependable results every time.
Light yet indulgent, offering a luxurious dessert without feeling overly heavy or dense.
Serving Suggestions
his luxurious Pistachio & White Chocolate Mousse Cake deserves to be served in a way that enhances its elegant layers and rich, nutty flavour. For the best experience, slice the cake while fully chilled to preserve its smooth mousse texture and clean, defined lines. Serve each portion on a chilled dessert plate to maintain its light, creamy consistency.
To complement the deep, buttery flavour of the Centaur Pistachio Paste, pair each slice with fresh seasonal berries—such as raspberries, strawberries or blueberries—for a pop of natural acidity and colour contrast. A drizzle of warm white chocolate or a touch of honey also adds a luxurious finishing note.
For a restaurant-style touch, garnish plates with crushed pistachios, mint leaves, or delicate white chocolate curls. The fresh mint brings brightness, while the added pistachios enhance the cake’s natural nuttiness and provide a satisfying crunch.
Beverage pairings can elevate your dessert even further. This pistachio mousse cake pairs beautifully with espresso, matcha latte, sweet dessert wine, or a light herbal tea. If you prefer something indulgent, try serving with a scoop of vanilla bean ice cream or pistachio gelato for the ultimate pistachio lover’s plate.
Whether you’re entertaining guests, celebrating a special occasion, or enjoying a refined treat at home, these serving suggestions turn every slice into a gourmet dessert experience — making your Pistachio & White Chocolate Mousse Cake truly unforgettable.
Shop Premium Ingredients for This Recipe at Nicol Retailer Limited
Creating a dessert as luxurious as this Pistachio & White Chocolate Mousse Cake begins with using the right ingredients — and you can find everything you need in one place at Nicol Retailer Limited. Whether you’re a home baker, a chef, or simply someone who loves crafting high-quality desserts, Nicol Retailer offers a carefully curated selection of premium products that take your baking to the next level.
Centaur Pistachio Paste – The Star Ingredient
The secret behind this cake’s rich flavour and silky, nutty mousse is the Centaur Pistachio Paste (1kg). Unlike cheaper pastes or artificially flavoured spreads, this premium paste delivers:
Deep, authentic pistachio flavour
Smooth, velvety consistency
Natural colour without additives
Excellent blending for mousses, creams and toppings
This is the key ingredient that transforms a simple no-bake cake into a patisserie-style masterpiece — and it’s exclusively available at Nicol Retailer Limited.
Other High-Quality Essentials You Can Buy at Nicol Retailer
To help you create this stunning dessert effortlessly, Nicol Retailer provides top-quality versions of all the core ingredients you need, including:
Butter & dairy products for a rich mousse and smooth base
Digestive biscuits or alternatives for the perfect crumb base
Double cream, mascarpone, or Greek yogurt for creamy, stable mousse texture
Crushed pistachios for decorative finishing touches
Everything is chosen for its freshness, quality and reliability, giving you confidence that your dessert will turn out beautifully every time.
Why Buy from Nicol Retailer Limited?
Trusted supplier of premium baking ingredients
Excellent value for bulk and speciality items
Perfect for home bakers, cafés, patisseries and catering
Fast delivery and reliable customer service
Carefully selected quality products not always available in supermarkets
When you shop at Nicol Retailer Limited, you’re not just buying ingredients — you’re investing in exceptional flavour, professional results and unforgettable desserts.
There are meals that warm you… and then there are meals that embrace you. This Luxury Saffron & Lemon Butter Risotto is exactly that — rich, velvety, aromatic and impossibly elegant.
Made using the premium Gallo Pronto Saffron Risotto Base (1kg) from Nicol Retailer Limited, this recipe brings the golden magic of saffron risotto to your kitchen without hours of stirring. Each spoonful is silky, deeply infused with saffron, brightened with lemon zest and enriched with butter and parmesan for that unmistakable restaurant finish.
Whether you’re cooking for a date night, hosting a dinner party, or simply craving the comfort of Italian cooking, this risotto delivers flavour, luxury and ease all in one beautifully golden bowl.
f you’re curious about what makes traditional risotto so unique, Eataly explains the origins and Italian culinary tradition behind this iconic dish: https://www.eataly.com/us_en/magazine/culture/what-is-risotto
Why You’ll Love This Luxury Saffron Risotto
This isn’t just any risotto — it’s an experience.
Golden and aromatic thanks to real saffron
Ultra-creamy texture with no fuss
Ready in under 25 minutes
Restaurant-quality finish with lemon butter & parmesan
Versatile — pair with seafood, chicken, or enjoy on its own
Consistently perfect thanks to Gallo Pronto’s expertly balanced base. It’s everything you love about risotto, made beautifully simple.
How to Make This Delicious Saffron Risotto (Easy Step-by-Step Guide)
Making this luxurious risotto is wonderfully simple, with each step building more flavour and creaminess. For those interested in mastering authentic technique, BBC Good Food offers a helpful guide on how to make perfect risotto:https://www.bbcgoodfood.com/howto/guide/how-make-perfect-risotto
By using the Gallo Pronto Saffron Risotto Base, you eliminate guesswork and achieve perfect texture every time:
Luxury Saffron & Lemon Butter Risotto Using Gallo Pronto Saffron Risotto Base
Create a rich, silky, restaurant-quality saffron risotto in minutes using Gallo Pronto Saffron Risotto Base. This luxurious Italian dish combines creamy saffron rice with lemon butter, parmesan and white wine for an irresistibly aromatic flavour. Perfect for elegant weeknight dinners, entertaining, or pairing with seafood. Easy, delicious and beautifully golden — a premium risotto made effortlessly at home.
Add diced onion and cook gently for 3–4 minutes until soft.
Add garlic and cook for 30 seconds until fragrant.
Toast the Risotto Base
Add Gallo Pronto Saffron Risotto Base to the pan.
Stir for 1 minute to warm and coat in the aromatics.
Deglaze with Wine
Pour in the white wine.
Let it bubble away for 1–2 minutes until reduced.
Add Stock & Simmer
Gradually add the hot stock, stirring occasionally.
Simmer for 12–15 minutes until creamy and al dente.
Finish with Lemon Butter & Parmesan
Turn off the heat.
Stir in cold butter cubes, lemon zest and grated parmesan.
Let the risotto rest for 1 minute to become extra silky.
Serve
Plate immediately while hot, topped with fresh herbs, parmesan shavings and extra lemon zest.
Notes
Use hot stock for best results — adding cold liquid can tighten the starch and prevent the risotto from becoming silky and creamy.Don’t over-stir — gentle, occasional stirring helps the rice release just enough starch without becoming gluey.Add butter at the end — stirring in cold butter creates a glossy, restaurant-style finish.White wine adds depth, but you can replace it with extra stock if you prefer alcohol-free.Adjust creaminess — add a splash of stock at the end if the risotto thickens too quickly.Parmesan enhances the saffron flavour — always grate fresh for the best texture and taste.Serve immediately — risotto waits for no one! It continues to thicken as it cools, so dish it up while beautifully loose and velvety.Pair with seafood like prawns or scallops to enhance the delicate saffron aroma.Use Gallo Pronto Saffron Risotto Base from Nicol Retailer Limited for consistently perfect texture and colour every time.
Serving Suggestions – Make It a Restaurant-Worthy Meal
Transform your Luxury Saffron & Lemon Butter Risotto into a complete fine-dining experience with these carefully curated pairings. Each suggestion enhances the saffron’s aroma, the lemon’s brightness and the velvety creaminess of the risotto, turning a simple dish into an unforgettable meal.
Seared King Prawns or Scallops
Nothing elevates saffron risotto quite like perfectly seared seafood. King prawns add sweetness and juiciness, while scallops offer a buttery, melt-in-the-mouth texture. Cook quickly in butter, garlic and lemon zest until golden. Arrange on top for a stunning restaurant-style presentation.
Lemon & Herb Roast Chicken
For something heartier, pair your risotto with tender, lemon-roasted chicken thighs or a whole roasted chicken. The citrus and herbs lift the dish beautifully, while the chicken juices provide an intense savouriness that complements the creamy saffron rice.
Crispy-Skinned Sea Bass or Salmon
Pan-fried sea bass with perfectly crisp skin is an elegant, delicate pairing. Alternatively, roasted salmon with a touch of honey and lemon matches wonderfully with the saffron’s warmth, adding richness while keeping the plate fresh and balanced.
Grilled Asparagus, Tenderstem Broccoli or Green Beans
Fresh, vibrant greens cut through the richness of the risotto. Lightly charred asparagus or tenderstem broccoli adds a smoky depth, while lemon-dressed green beans bring crunch and brightness. This combination creates a beautifully complete Mediterranean-style plate.
Crisp Green Salad with Lemon Dressing
For a lighter option, serve with a refreshing mixed-leaf salad dressed with lemon juice, olive oil, black pepper and a pinch of sea salt. The tanginess helps balance the risotto and leaves the palate clean and refreshed.
Extra Lemon Zest & Parmesan Shavings
A simple but powerful finishing touch. Fresh lemon zest enhances the saffron aroma, while parmesan shavings melt gently into the warm risotto, highlighting its luxurious creaminess.
Serve with Warm Crusty Bread or Garlic Ciabatta
Ideal for soaking up every last bit of velvety saffron sauce. Garlic ciabatta adds irresistible aroma and texture, making the meal feel decadent and satisfying.
Add Garlic Butter Prawns for a Show-Stopping Finish
Top your risotto with sizzling garlic butter prawns for an eye-catching, flavour-intense finish — the kind you would expect from a Michelin-style Italian restaurant.
Perfect for Dinner Parties & Special Occasions
This risotto shines as the centrepiece of a classy dinner party menu:
Perfectly balanced, beautifully golden and unforgettable.
Shop the Star Ingredient – Only at Nicol Retailer Limited
Create this exquisite risotto at home using the finest quality base: Gallo Pronto Saffron Risotto Base (1kg) Available here: https://nicolretailer.com/product/gallo-pronto-saffron-risotto-base-1kg/
Premium ingredients make premium dishes — and this one shines.
Conclusion
This Luxury Saffron & Lemon Butter Risotto is proof that extraordinary food doesn’t have to be complicated. With the Gallo Pronto Saffron Risotto Base from Nicol Retailer Limited, you get stunning colour, rich flavour and perfect texture every single time — all in under 25 minutes.
Whether you’re cooking to impress or treating yourself, this dish brings warmth, elegance and pure Italian comfort to your table. One spoonful… and you’ll understand why this recipe is a keeper.
Bring the Magic of Italian Christmas to Your Kitchen
Panettone is one of the most beloved Christmas bakes in the world. Tall, golden, soft as clouds and filled with fruity sweetness, this Italian Christmas bread has been enjoyed for over 500 years. Its delicate texture, gentle citrus aroma and beautiful domed shape make it a centrepiece dessert for festive gatherings, breakfasts and gifting.
This recipe teaches you how to make a luxury homemade Panettone that is light, airy, buttery and far superior to supermarket versions. With step-by-step instructions and simple ingredients, you can enjoy authentic Italian Christmas baking at home.
Whether served on Christmas morning, paired with coffee, shared with guests, or wrapped as a beautiful homemade gift, this Panettone recipe will fill your home with festive aromas and warm holiday cheer.
A Short History of Panettone – The Pride of Milan
Panettone originates from Milan, Italy, where it was first created during the Renaissance. What began as a simple enriched bread has evolved into the iconic tall, dome-shaped Christmas cake known today. Traditionally, Panettone is made with a long fermentation process that creates its signature airy crumb and rich depth of flavour.
Legend has it that Panettone was invented by a Milanese baker named Toni, which is why many Italians still call it “Pane di Toni” — Toni’s Bread. Today, Panettone is shared across Europe during the festive season, symbolising celebration, generosity and the spirit of Christmas.
According to BBC Good Food, Panettone has been a festive staple in Milan for centuries.
How to Make This Panettone
Making this luxury homemade Panettone is easier than you think. You’ll prepare a rich, buttery dough, knead it until smooth, let it rise slowly, then fold in rum-soaked fruit for extra flavour. After shaping and proving in a tall Panettone case, it’s baked until golden and cooled upside-down to keep its iconic tall, fluffy structure. Follow the simple steps and you’ll have a beautifully soft, fragrant Italian Christmas bread straight from your oven.
Create a soft, buttery and beautifully golden homemade Panettone with this authentic Italian Christmas recipe. Made with enriched sweet dough, citrus zest, rum-soaked raisins and mixed peel, this festive bread is light, airy and irresistibly fragrant. Perfect for gifting, Christmas morning breakfast or serving with coffee, this easy step-by-step Panettone guide delivers bakery-quality results at home.
Course brunch, Dessert, Snack
Cuisine Italian, Traditional Christmas
Diet Vegetarian
Keyword bakery style panettone, Christmas panettone,, holiday baking ideas, homemade panettone, Italian Christmas bread, Italian panettone, panettone recipe, panettone with raisins, sweet bread recipe, traditional panettone
Use room-temperature ingredients for best dough development; cold eggs or milk will slow the rise of this enriched bread.Be patient with rising time—Panettone needs a long, slow prove to achieve its signature tall, airy, cloud-soft texture.High-quality dried fruit makes a big difference. Soak raisins and peel in rum or orange juice to keep them plump and fragrant.The dough will be sticky—this is normal for enriched breads. Avoid adding extra flour; rely on a dough hook to knead properly.Use a Panettone case or tall tin to support the dough as it rises upward instead of spreading outward.Hang the Panettone upside-down after baking to prevent collapse and keep the crumb light and tall—this step is essential for authentic results.Flavour variations: Add chocolate chips, pistachios, amarena cherries, or swap citrus peel for candied fruit.Storage: Wrap tightly in cellophane or foil to keep it soft for 5–7 days.Serving tip: Panettone tastes best slightly warm or lightly toasted and served with butter, mascarpone or a festive cream.
Serve Warm with Butter, Mascarpone or Clotted Cream
Panettone is at its most indulgent when enjoyed slightly warm. Spread each slice with soft salted butter for a rich, comforting finish, or elevate it further with a dollop of silky mascarpone or classic clotted cream. The creamy texture melts into the warm, airy crumb, creating a beautifully luxurious Christmas treat.
Enjoy with Espresso or Hot Chocolate on Christmas Morning
A slice of freshly baked Panettone makes the perfect Christmas morning breakfast. Pair it with a strong Italian espresso for an authentic Milanese experience, or serve with a mug of creamy hot chocolate for a cosy, family-friendly moment. The gentle sweetness of the bread pairs wonderfully with warm festive drinks.
Toast Slices Lightly and Drizzle with Honey
For a quick and irresistible twist, toast thick slices of Panettone until lightly caramelised. Once golden, drizzle with honey or maple syrup for a glossy, fragrant finish. This simple serving idea enhances the citrus notes and adds a gentle crispness while keeping the centre soft and fluffy.
Use Leftovers for Panettone French Toast
Turn leftover Panettone into the ultimate luxury breakfast with Panettone French Toast. Dip slices into a mixture of eggs, cream, sugar and cinnamon, then pan-fry until golden. Serve with berries, syrup or whipped cream. It’s one of the most delicious ways to repurpose leftover festive bread and guaranteed to impress guests.
Wrap in Cellophane and Gift to Friends and Family
Homemade Panettone makes a stunning edible Christmas gift. Wrap the entire loaf in festive cellophane, tie with ribbon and add a gift tag for a thoughtful, artisan-style present. Panettone keeps beautifully when wrapped well, making it ideal for gifting to neighbours, colleagues or loved ones.
Shop Premium Baking Ingredients at Nicol Retailer Limited
Make your Panettone even better with high-quality ingredients available at: Nicol Retailer Limited – Premium Ingredients for Home & Professional Bakers.
The Ultimate Festive Treat That Defines British Christmas
Few foods capture the magic of Christmas quite like the humble mince pie. But when made properly — buttery, golden, generously filled and beautifully spiced — they become something truly unforgettable. This recipe combines soft, melt-in-the-mouth shortcrust pastry with the rich, warming flavour of Chef’s Selections Mincemeat (3kg) from Nicol Retailer Limited. It creates bakery-quality mince pies perfect for gifting, serving, or enjoying fresh from the oven.
Whether you’re celebrating National Mince Pie Day on December 13th or preparing for festive gatherings, this recipe brings together tradition, luxury, and irresistible Christmas flavour in every bite.
The History of Mince Pies — A British Christmas Icon
Mince pies have been part of British festive traditions for over 600 years. Originally made with minced meat, dried fruits and warming spices brought back from the Middle East during the Crusades, they evolved throughout the centuries into the sweet, fruit-rich pies we know today.
By Victorian times, mince pies had become a symbol of generosity and celebration — served warm at festive gatherings and gifted as a gesture of love and good fortune. Today, over 200 million mince pies are eaten in the UK every year. This makes them one of the nation’s most cherished seasonal bakes.
National Mince Pie Day — A Celebration of Festive Baking
National Mince Pie Day, celebrated in the UK every year on 12 December, is a joyful tribute to one of Britain’s most beloved festive treats. It marks the start of the Christmas baking season. Homes fill with the warm aroma of citrus, cinnamon and spiced fruit. It’s the perfect moment to bake a fresh batch of mince pies, share them with loved ones and enjoy the tradition that has been part of British Christmas for centuries. Using Chef’s Selections Mincemeat (3kg) from Nicol Retailer Limited makes this celebration even more delicious. It gives every pie a rich, authentic festive flavour.
How to Make These Delicious Christmas Mince Pies
Making these traditional Christmas mince pies is wonderfully simple and incredibly rewarding. With just a few basic ingredients and the rich, flavour-packed Chef’s Selections Mincemeat (3kg) from Nicol Retailer Limited, you can create bakery-quality mince pies right at home. The process begins with preparing a buttery shortcrust pastry and filling each case generously with spiced mincemeat. Then, bake them to golden perfection. Whether you’re an experienced baker or making mince pies for the first time, this step-by-step guide will help you achieve beautifully festive, perfectly flavoured pies every single time.
Luxury Christmas Mince Pies Using Chef’s Selections Mincemeat
Celebrate the festive season with these beautifully golden, buttery Christmas mince pies made using Chef’s Selections Mincemeat (3kg) from Nicol Retailer Limited. Filled with rich vine fruits, warming spices, citrus zest and optional brandy, these homemade mince pies deliver authentic holiday flavour with a bakery-quality finish. With a crisp shortcrust pastry and perfectly spiced filling, they’re ideal for National Mince Pie Day, Christmas gatherings, gifting, or cosy winter treats. Easy to prepare and irresistibly delicious, this recipe captures the true taste of Christmas in every bite.
Rub flour, salt and cold butter together until breadcrumb-like.
Stir in the caster sugar.
Add the egg and bring together into a dough.
If dry, add 1 tablespoon cold water.
Wrap in clingfilm and refrigerate for 30 minutes.
Prepare the Filling
In a bowl, mix the Chef’s Selections Mincemeat with brandy and/or orange zest for extra festive depth (optional but incredible).
Assemble the Mince Pies
Preheat oven to 200°C (180°C Fan).
Grease a muffin or tart tray.
Roll out pastry to 3mm thickness.
Cut rounds to fit your tray for the bases.
Spoon 1–2 tsp mincemeat into each pastry case.
Top with pastry lids, stars, or festive shapes.
Seal edges gently and brush tops with beaten egg.
Sprinkle with demerara sugar.
Bake
Bake for 18–22 minutes until golden brown and bubbling slightly.
Serve
Cool for 10 minutes, dust with icing sugar, and serve warm with clotted cream, brandy butter or custard.
Notes
For the best flavour, use high-quality Chef’s Selections Mincemeat (3kg) from Nicol Retailer Limited — its rich fruit content and warming spices create a deeper, more authentic Christmas taste than supermarket jars.Chill the pastry for at least 30 minutes before rolling. This helps prevent shrinking and gives the mince pies a delicate, buttery crumb.Do not overfill the mince pies; the filling expands as it bakes. A heaped teaspoon per case is usually perfect.Pastry thickness matters — roll your pastry to about 3mm for the ideal balance of crispness and tenderness.Add orange zest or a splash of brandy to the filling for an extra festive boost.Use festive pastry cut-outs (stars, trees, or hearts) instead of full lids for a lighter, bakery-style pie.Brush with beaten egg for a shiny golden finish, and top with demerara sugar for sparkle and crunch.Storage: Mince pies keep for 3–4 days in an airtight container or can be frozen for up to 2 months.Serving suggestion: Warm slightly and serve with clotted cream, brandy butter, or vanilla custard for a traditional Christmas treat.
These luxuriously spiced Christmas mince pies shine even brighter when paired with the right festive accompaniments. Here are delicious serving ideas that elevate the flavour, texture and presentation — perfect for holiday gatherings, Christmas Eve treats, or National Mince Pie Day celebrations.
Classic Brandy Sauce
Nothing says traditional British Christmas dessert like warm brandy sauce poured generously over a hot mince pie. Smooth, silky and gently boozy, it balances the sweetness of the mincemeat and adds a festive warmth to every bite.
Brandy Butter
Creamy, rich and sweet, brandy butter melts beautifully over warm mince pies. Made with butter, icing sugar and a splash of brandy, it creates an indulgent finish worthy of a Christmas dessert table.
Vanilla Custard
A thick, velvety custard brings comforting warmth and creaminess. Try adding a pinch of nutmeg or cinnamon for a festive twist.
Luxury Vanilla Ice Cream
The contrast of cold, silky ice cream against a hot, freshly baked mince pie is irresistible — ideal for those who prefer a lighter, refreshing finish.
Spiced Whipped Cream
Lightly whipped cream flavoured with cinnamon, nutmeg and a hint of orange zest pairs beautifully with the fruity mincemeat.
Festive Presentation Ideas
Dust pies with icing sugar “snow”
Arrange on a wooden board with holly, cinnamon sticks and dried orange slices
Pack into gift boxes for neighbours or friends
Serve warm on a tiered stand for a Christmas afternoon tea
Shop the Star Ingredient
All you need for these delicious festive mince pies — including the premium Chef’s Selections Mincemeat (3kg) — is available at: Nicol Retailer Limited – https://nicolretailer.com/product/chefs-selections-mincemeat-3kg/
When you want to create a meal that people will talk about long after the plates are cleared, nothing compares to the Birchstead 14-Day Aged Bone-In Carvery Beef Forerib. This majestic, five-bone cut is the crown jewel of traditional British roasting — rich in flavour, intensely tender, and visually stunning with its tall, frenched bones and beautiful marbling.
Aged for 14 days to deepen the natural savoury notes of the beef, this cut delivers a melt-in-the-mouth tenderness and a luxurious buttery finish that rivals any high-end steakhouse or Michelin-starred dining room. When roasted properly, it produces thick, juicy slices with a perfect rosy interior, caramelised crust, and an aroma that fills the entire home with anticipation.
Whether you’re hosting a holiday feast, an elegant Sunday roast, or a special celebration, this recipe brings prestige, theatre and unforgettable flavour to the table. And the best part? Every ingredient used in this recipe — including the show-stopping aged forerib — can be purchased directly from Nicol Retailer Limited, your trusted supplier for premium British meats.
Why This 14-Day Aged Forerib Is the Star of Every Table
When it comes to creating a roast that truly commands the spotlight, the Birchstead 14-Day Aged Bone-In Carvery Beef Forerib stands in a class of its own. This cut is celebrated by chefs, home cooks and meat connoisseurs across the UK for its depth of flavour, luxurious tenderness and dramatic visual appeal. Here’s why this spectacular 5-bone joint is guaranteed to elevate any dining occasion:
Exceptional Ageing for Unmatched Depth of Flavour
Ageing beef for 14 days intensifies its natural savouriness, enriches its umami notes and enhances tenderness without compromising juiciness. This slow ageing creates a buttery texture and full-bodied flavour profile that you simply cannot achieve with standard supermarket beef. The result is a roast that tastes richer, smells more aromatic and slices like premium steak.
Stunning Five-Bone Structure for Dramatic Presentation
Nothing makes an entrance quite like a tall, five-bone forerib roast. Frenched bones rise proudly above the perfectly roasted beef, creating a visually striking centrepiece worthy of a Michelin-star restaurant. Whether you bring it to the table whole or carve between the bones for a theatrical reveal, this cut guarantees admiration — and appetite.
Naturally Marbled for Superior Juiciness and Tenderness
The forerib is one of the most flavourful and tender cuts of beef, thanks to its beautiful natural marbling. As the beef roasts, the marbling melts slowly, self-basting the joint from the inside out. This means consistently moist slices, an incredible melt-in-the-mouth texture and that irresistible beefy richness with every bite.
Perfect Balance of Tradition and Gourmet Cooking
This is a cut steeped in British roasting tradition yet sophisticated enough for gourmet dining. The 14-day ageing process elevates a classic forerib into a celebration-worthy dish. Whether it’s a holiday feast, Sunday roast, Christmas centrepiece or luxury family dinner, this beef transforms familiar flavours into something extraordinary.’
How to Make This Delicious Recipe
Creating this 14-Day Aged Bone-In Carvery Beef Forerib Roast is far easier than its grand appearance suggests — and the results are nothing short of spectacular. With its rich marbling, deep 14-day aged flavour and dramatic five-bone structure, this premium joint from Nicol Retailer Limited delivers restaurant-quality results using simple, reliable techniques.
By following the step-by-step guide below, you’ll learn how to season, sear, roast, rest and carve your forerib to perfection, achieving beautifully even cooking, a caramelised crust, and melt-in-the-mouth tenderness every time. Whether you’re preparing this for a Sunday roast, festive celebration or luxury dinner party, this recipe ensures your beef becomes the unforgettable star of the table:
Indulge in the rich, buttery flavour of this 14-Day Aged Bone-In Carvery Beef Forerib, slow-roasted to perfection for a tender, melt-in-the-mouth finish. This impressive 5-bone joint is expertly aged to deepen flavour and enhance juiciness, making it the perfect centrepiece for Sunday roasts, holiday feasts and special celebrations. Cooked with herbs, garlic and a high-heat crust, then served with a glossy homemade gravy, this luxurious roast delivers restaurant-quality results at home. All ingredients, including the premium Birchstead forerib, can be purchased directly from Nicol Retailer Limited for exceptional freshness and value.
Course Dinner, Holiday Centrepiece, Main Course, Special Occasion Dish, Sunday Roast Alternative
Cuisine Modern European, Steakhouse-Style, Traditional Roast Dinner
Remove the forerib from the fridge 1–2 hours before cooking.
Pat dry thoroughly.
Rub with olive oil, salt, pepper, garlic granules, rosemary and thyme.
Preheat the Oven
Set to 220°C (200°C fan / Gas 7). This high heat will help build the gorgeous crust.
Create the Flavour Base
Place onions, carrots, celery, and garlic in a roasting tray.
Position the forerib bone-side down on top.
Roast Hot, Then Low
Roast for 25 minutes at high heat to develop a crust.
Reduce to 160°C (140°C fan / Gas 3).
Continue cooking for approximately:1 hour 45 minutes → medium-rare2 hours → medium(A 5–6 kg joint may vary slightly depending on your oven.)Internal Temperatures:55°C – medium rare60°C – medium
Rest for Perfect Juiciness
Remove from oven, loosely cover with foil and rest for 45–60 minutes. This step ensures tender, juicy slices.
Make the Gravy
Place roasting tray on the hob.
Stir in flour, add red wine to deglaze, then pour in stock.
Reduce until glossy.
Carve & Serve
Slice between the bones for dramatic presentation.
Serve with gravy and your favourite sides.
Notes
For the juiciest and most flavourful results, always allow your 14-Day Aged Bone-In Carvery Beef Forerib to come to room temperature before roasting — this ensures even cooking throughout the thick joint. Start with a high-heat blast to create a rich, caramelised crust, then reduce the temperature for slow, gentle roasting that preserves tenderness and enhances the natural aged flavour.Resting the beef for at least 45 minutes after cooking is essential, as it allows the juices to redistribute for melt-in-the-mouth slices. Using premium Birchstead aged forerib from Nicol Retailer Limited guarantees exceptional quality, deep beefy richness, and a restaurant-worthy roast every time.
A magnificent joint like the Birchstead 14-Day Aged Bone-In Carvery Beef Forerib deserves sides that enhance its rich flavour, balance its natural fattiness, and create a beautiful restaurant-quality presentation. These carefully selected serving suggestions transform your roast into a luxury dining experience, ensuring every plate looks as spectacular as the beef itself.
Crispy Roast Potatoes — The Essential Classic
No British roast is complete without perfectly crisp, fluffy roast potatoes. For best results:
Parboil until edges soften
Shake in the pan to roughen
Roast in beef dripping from Nicol Retailer for unbeatable flavour
The golden crunch pairs beautifully with the buttery tenderness of the aged forerib.
Honey-Glazed Carrots & Parsnips — A Touch of Sweetness
These roasted roots bring a natural sweetness that balances the richness of the beef. Dress with:
Honey
Fresh thyme
Cracked black pepper
A drizzle of olive oil
This side adds colour, shine, and irresistible caramelisation to your plating.
Buttery Greens for Balance & Freshness
To cut through the luxurious fattiness of aged beef, serve vibrant green sides such as:
Tenderstem broccoli
Green beans with garlic butter
Charred asparagus
Savoy cabbage tossed in butter
These add a clean, fresh finish and elevate the plate with vivid colour.
Garlic Butter Mushrooms — Rich and Earthy
Pan-fried mushrooms cooked in butter, garlic and thyme echo the earthy, savoury notes of the aged beef. They also add moisture and depth, making them a Michelin-style addition.
Whole Roasted Garlic Bulbs — Luxury Garnish
Slow-roasted garlic bulbs become soft, sweet and spreadable. Serve whole on the platter or squeeze over beef slices for rich, aromatic flavour.
Fresh Salad for Lightness
A crisp salad brings brightness to balance the richness. Try:
Rocket, parmesan & balsamic glaze
Watercress with lemon dressing
Baby gem Caesar salad
Refreshing, colourful and perfect for lighter palates.
Rich and Glossy Red Wine Gravy
A beautifully reduced gravy is essential for Michelin-level presentation. Use:
Beef drippings from the roasting tray
Red wine
Beef stock from Nicol Retailer
A touch of Worcestershire sauce
Silky, rich and deeply flavoured, it ties the whole meal together.
Michelin-Style Plating Inspiration
For a fine-dining finish, plate like a professional chef:
Fan out the sliced beef for dramatic colour contrast
Add roasted heritage carrots for height
Spoon red wine jus artfully around the plate
Garnish with fresh thyme or rosemary
Present the full five-bone roast at the table for a theatrical reveal
Shop Every Ingredient from Nicol Retailer Limited
Ready to Create This Luxury Roast at Home?
Bring restaurant-quality dining straight to your kitchen with the Birchstead 14-Day Aged Bone-In Carvery Beef Forerib. Order premium British beef, chef-grade ingredients and gourmet essentials directly from Nicol Retailer Limited — your trusted supplier for exceptional flavour and unbeatable value.
A Showstopper Meal That Everyone Will Remember – Introducing our 14-Day Aged Tomahawk Steak Recipe, an unforgettable culinary experience that will leave your guests talking for weeks.
If you’re searching for a recipe that turns a meal into a moment, look no further than the Birchstead 14-Day Aged Beef Tomahawk Steak. This dramatic bone-in rib steak is the crown jewel of luxury dining — deeply marbled, beautifully matured, and visually striking. With its long rib bone and impressive size, the tomahawk steak is a centrepiece that instantly elevates any dinner table.
Aged for 14 days to intensify flavour and tenderness, this premium cut cooks beautifully with minimal effort. With the right heat, the right technique, and the right ingredients — all of which you can buy directly from Nicol Retailer Limited — you can achieve a steakhouse-quality result at home, without the expensive restaurant bill.
Whether you’re cooking for a birthday celebration, a weekend feast, or a special occasion with family and friends, this recipe guarantees a rich, buttery, melt-in-the-mouth experience that will leave everyone wanting more.
Why You’ll Love This 14-Day Aged Tomahawk Steak
If you’ve ever wanted to recreate a luxury steakhouse experience at home, this Birchstead 14-Day Aged Tomahawk Steak gives you everything you need: premium flavour, dramatic presentation, and a melt-in-the-mouth tenderness only found in properly aged beef. This is more than just a steak — it’s a centrepiece that transforms an ordinary meal into an unforgettable moment. Here’s why this recipe stands out among all steak dishes and why it’s quickly becoming a favourite for home chefs and food lovers across the UK:
Aged for Deep, Rich, Unmatched Flavour
This steak is aged for 14 days, intensifying its natural beefiness and creating a depth of flavour that cheaper, non-aged cuts simply can’t match. The ageing process enhances tenderness and produces that signature buttery, savoury richness people associate with high-end restaurants
Incredible Marbling for Juicy, Tender Results
The Birchstead tomahawk steak is beautifully marbled, meaning each bite is incredibly juicy and tender. As the fat melts during cooking, it bastes the meat from within, giving you a luxurious texture and flavour every single time.
Dramatic Bone-In Steakhouse Presentation
The long rib bone gives this steak its iconic “tomahawk” look — making it the perfect showstopper for celebrations, date nights, dinner parties and special occasions. When carved and presented on a platter, it looks like something straight out of a Michelin-star kitchen.
Surprisingly Easy to Cook at Home
Though impressive in size, this tomahawk steak is simple and forgiving to cook. With a hot sear, oven finish and a short rest, your steak will be perfectly pink, tender and juicy. Whether you’re experienced or new to steak cookery, you’ll achieve restaurant-quality results.
Better Value Than Eating Out
Enjoying a tomahawk steak in a fine-dining restaurant can cost a small fortune — but by buying premium ingredients directly from Nicol Retailer Limited, you enjoy the same quality at a far better price. You get a gourmet experience without the luxury price tag.
Premium Quality From Trusted British Suppliers
The Birchstead tomahawk steak is sourced with care and quality in mind — and when purchased from Nicol Retailer Limited, you have the peace of mind of knowing you’re buying high-grade, expertly handled British produce.
Perfect for Any Special Occasion
Birthdays, Father’s Day, Valentine’s Day, Christmas, anniversaries, Sunday feasts — this steak elevates all of them. It’s a dish made for special moments, celebrations and gatherings where great food brings people together.
Fully Customisable with Flavours & Sides
Serve it with garlic butter, chimichurri, red wine jus, charred vegetables, triple-cooked chips — the possibilities are endless. This steak’s versatility makes it fit any style, whether rustic, gourmet or modern fine dining.
How to Make the Ultimate Tomahawk Steak (Step-by-Step Guide)
Cooking a 14-Day Aged Tomahawk Steak might look impressive and intimidating, but with the right method and a few chef-approved techniques, it’s surprisingly simple to achieve a restaurant-quality result at home. This bone-in rib steak is thick, flavour-packed, and perfect for high-heat searing followed by gentle roasting in the oven. Whether you want a perfectly pink medium-rare centre or a more well-done finish, this guide walks you through every step clearly. Using premium British beef from Nicol Retailer Limited, you’ll learn how to sear, baste, roast, rest, and carve your tomahawk like a professional chef — ensuring juicy, tender, flavourful results every time.
14-Day Aged Beef Tomahawk Steak – The Ultimate Luxury Feast
Elevate your next meal with this Birchstead 14-Day Aged Beef Tomahawk Steak — a premium cut known for exceptional flavour, tenderness, and dramatic presentation. With rich marbling, full beef flavour, and a bone-in design worthy of a high-end steakhouse, this tomahawk transforms any dinner into a luxury dining experience. Follow our step-by-step guide to create a mouth-watering masterpiece at home using ingredients available directly from Nicol Retailer Limited.
Course Celebration Dish, Dinner, Gourmet Weekend Meal, Main Course, Special Occasion Dish
Cuisine English, Gourmet Home Cooking, Modern European, Steakhouse
Remove the tomahawk from the fridge 45–60 minutes before cooking. Pat dry and season heavily with salt & pepper.
Sear for a Crust
Heat olive oil in a cast-iron pan.
Sear the steak for 3–4 minutes per side, including the bone edge.
Add butter, garlic, and herbs, then baste the steak for 1 minute.
Oven Roast
Transfer the pan to a 200°C (180°C fan) oven. Cook for:18–22 minutes → medium rare22–25 minutes → medium
Rest the Steak
Rest under foil for 10–15 minutes so juices redistribute.
Carve & Serve
Slice thickly against the grain and arrange on a warm platter for dramatic presentation.
Red Wine Jus (Serves 4)
Sauté the shallot and garlic in the same pan.
Add red wine and reduce by half.
Add beef stock + thyme and simmer to glossy thickness
Strain and serve with the sliced steak.
Notes
For best results, allow your Birchstead 14-Day Aged Beef Tomahawk Steak to reach room temperature before cooking — this ensures even heat distribution and maximum tenderness. Always sear the tomahawk over high heat to create a rich, caramelised crust, then finish in the oven for perfect doneness.Resting the steak for 10–15 minutes is essential, as it keeps the meat juicy and enhances flavour. For deeper richness, baste generously with butter, garlic, and herbs, and serve with a simple red wine jus to elevate this premium cut into a restaurant-quality experience. All ingredients can be purchased directly from Nicol Retailer Limited, making it easy to recreate a luxury steakhouse feast at home.
A 14-Day Aged Tomahawk Steak deserves sides that complement its rich flavour, buttery tenderness, and steakhouse-style presentation. The right accompaniments elevate your beef to a luxury dining experience — turning a simple meal into a gourmet feast. These serving suggestions are designed to balance flavour, add colour, and create a visually stunning plate that will make your guests feel like they’re dining in a premium British steakhouse.
Creamy Mashed Potatoes or Truffle Mash
A perfectly smooth mashed potato is a classic steak pairing — but for a true restaurant-level upgrade, mix in truffle butter, white truffle oil, or roasted garlic. The creamy texture pairs beautifully with the tender beef, while truffle adds irresistible depth and luxury.
Triple-Cooked Chips or Crispy Roast Potatoes
If you’re looking for crunch, triple-cooked chips or golden roasted potatoes are the ultimate choice. Their crisp exterior contrasts beautifully with the juicy steak, making every bite more satisfying.
Charred Greens for Freshness & Balance
Add colour and freshness with vegetables that stand up to the richness of the beef. Try:
Charred asparagus
Tenderstem broccoli
Sautéed green beans
Grilled courgettes
Lightly season with sea salt, olive oil, and lemon zest for a bright, clean finish that balances the dish.
Garlic Butter Mushrooms or Creamy Spinach
For extra richness, serve your tomahawk with buttery mushrooms or silky creamed spinach. Garlic mushrooms enhance the beef’s umami flavours. Creamed spinach brings comforting creaminess while keeping the meal balanced.
Roasted Garlic Bulbs for Sweetness & Aroma
Slow-roasted garlic bulbs add a fragrant, caramelised sweetness that pairs perfectly with aged beef. Simply squeeze the softened cloves alongside each slice of steak — divine!
A Crisp Side Salad
To lighten the meal, serve a fresh salad with vibrant textures:
It helps cut through richness and refresh the palate.
Red Wine Jus — A Must-Have Finishing Touch
A glossy, reduced red wine jus poured over the carved tomahawk intensifies flavour, adds moisture, and gives the dish a professional finish. This sauce ties every component together and elevates your plate from delicious to extraordinary.
Special Occasion Serving Style
For birthdays, Father’s Day, Christmas, or celebrations:
Serve the tomahawk on a wooden carving board
Present the bone whole, then slice thickly for dramatic effect
Add roasted rosemary sprigs for aroma
Pour the jus tableside for a luxury dining moment
Shop All Ingredients from Nicol Retailer Limited
Create this show-stopping 14-Day Aged Tomahawk Steak with confidence by sourcing all your ingredients directly from Nicol Retailer Limited. From the premium Birchstead 14-Day Aged Beef Tomahawk Steak to fresh herbs, aromatics, and gourmet essentials, Nicol Retailer provides everything you need to bring restaurant-quality cooking into your home. With trusted British sourcing, exceptional product quality, and competitive pricing, Nicol Retailer makes it easy to shop for luxury ingredients in one place — without the inflated costs of high-end supermarkets or steakhouses. Visit NicolRetailer.com to explore the full range and elevate every meal with chef-grade results.
When it comes to creating a memorable meal that leaves everyone in awe, few dishes can match the elegance and indulgence of a Beef Wellington. This Supreme Beef Wellington with Red Wine Jus is the ultimate showstopper for any festive occasion, holiday dinner, or special celebration.
Wrapped in Jus-Rol Puff Pastry, this dish features a tender, succulent premium beef fillet paired with earthy mushroom duxelles and savoury prosciutto. The perfect golden, flaky crust completes it. Finished with a luxurious red wine jus, this dish isn’t just about taste—it’s an experience that will wow your guests. It makes any meal unforgettable.
With this step-by-step guide, you’ll learn how to elevate your cooking with Jus-Rol Puff Pastry Block (1.5kg). This is a versatile, premium-quality pastry that delivers the perfect flaky texture every time. Whether you’re cooking for a festive family gathering or a Michelin-style dinner at home, this Beef Wellington is the epitome of fine dining made easy.
Why You’ll Love This Supreme Beef Wellington
This Supreme Beef Wellington is more than just a dish; it’s a culinary experience that combines rich, tender beef fillet, earthy mushrooms, and buttery Jus-Rol Puff Pastry. It is all enveloped in golden perfection. Whether you’re preparing for a Christmas feast, a special celebration, or a luxurious dinner party, this dish is guaranteed to impress. The beauty of this recipe lies not only in its flavour but also in how simple, premium ingredients come together. This creates a show-stopping centrepiece. Here’s why this Beef Wellington is an absolute must-try.
How to Make Supreme Beef Wellington with Red Wine Jus
Creating the perfect Supreme Beef Wellington requires precision. However, with the right ingredients and techniques, it becomes a showstopper that will leave everyone at the table impressed. This recipe combines the tenderness of premium beef fillet, the rich, savoury flavour of mushroom duxelles, and the crispiness of Jus-Rol Puff Pastry. Together, they create a luxurious dish worthy of any special occasion.
Follow this step-by-step guide to achieve the perfect Wellington, with a glossy red wine jus that adds the perfect finishing touch. Whether you’re making this for Christmas, a birthday, or just a celebration at home, you’ll feel like a Michelin-star chef in no time.
Experience pure gourmet indulgence with this Supreme Beef Wellington with Red Wine Jus — a Michelin-style showstopper featuring premium beef fillet wrapped in wild mushroom duxelles, savoury prosciutto, and buttery, flaky Jus-Rol Puff Pastry. Slow-seared for rich flavour and baked to golden perfection, this luxurious centrepiece is paired with a glossy homemade red wine jus and beautifully presented with seasonal vegetables for the ultimate festive, celebratory or special-occasion meal. Perfect for Christmas dinners, romantic evenings, or dinner-party entertaining, this Beef Wellington delivers restaurant-quality elegance straight from your home kitchen.
Course Christmas Centrepiece, Christmas Dinner, Festive Main, Gourmet Weekend Meal, Main Course, Special Occasion Dish
Cuisine Balkan / Southeast European Cuisine, Contemporary British, English, Festive Cuisine, Fine Dining, Modern European
Season the fillet generously. Heat olive oil in a heavy pan until smoking hot.
Sear on all sides (2–3 minutes), including the ends, until beautifully browned.
Sear on all sides (2–3 minutes), including the ends, until beautifully browned.
Make the Duxelles
In the same pan, add butter, mushrooms, shallot, garlic and thyme. Cook until all liquid evaporates and the mixture becomes a thick paste. Season lightly and let cool completely.
Wrap the Beef
Lay out cling film. Arrange prosciutto slices into a tight rectangle.
Spread the mushroom duxelles evenly over the prosciutto.
Place the chilled beef in the centre and roll tightly using the cling film.
Chill for 20 minutes to firm.
Encase in Puff Pastry
Roll out Jus-Rol Puff Pastry into a large rectangle.
Place the wrapped fillet onto the pastry.
Fold pastry over the beef, trim excess, and seal edges well.
Score the pastry lightly for decoration and brush generously with egg wash.
Chill again for 10–15 minutes.
Bake
Preheat oven to 200°C (180°C fan).
Bake the Wellington for 35–40 minutes for medium rare.
Remove from oven and rest for 10 minutes before slicing.
Red Wine Jus
Sauté shallot and garlic in butter until softened.
Pour in red wine and reduce by half.
Add beef stock, thyme, and Worcestershire sauce.
Simmer until glossy and lightly thickened.
Strain and season to perfection.
Notes
Pro Tips for the Perfect Beef WellingtonChill for clean layers Always chill the beef after searing and after wrapping in prosciutto and pastry. This helps the Wellington hold its shape and creates those clean, restaurant-style slices. Keep the duxelles dry Cook the mushroom mixture until all moisture evaporates. A dry duxelles prevents soggy pastry and gives the Wellington its signature rich, earthy flavour. Use high-quality puff pastry For the most luxurious, flaky crust, use Jus-Rol Puff Pastry Block. Roll it evenly and score lightly for a beautiful golden finish. Don’t skip the resting time Let the Wellington rest 10 minutes after baking. This keeps the meat juicy and prevents the pastry from collapsing when sliced. Brush with egg wash twice Two thin layers of egg wash create a glossy, deeply golden crust worthy of a Michelin-style presentation. Use a thermometer for precision For perfect doneness:
52–54°C – rare
55–57°C – medium-rare (ideal)
58–60°C – medium
Reduce the red wine jus well Take your time reducing the jus until it coats the back of a spoon. A glossy, concentrated jus elevates the whole dish. Serve with colour and contrast Pair with roasted carrots, charred greens, or buttered potatoes to create a beautiful, festive, Instagram-worthy plate.
The Supreme Beef Wellington is the ultimate centerpiece, and it deserves sides that complement its rich, decadent flavour. Whether you’re serving it for a holiday feast, a romantic dinner, or a gourmet celebration, these sides will elevate your dish to new heights. Here are some of the best ways to serve and enjoy your Beef Wellington:
Creamy Mashed Potatoes or Truffle Mash
A rich, buttery mashed potato is the perfect partner to Beef Wellington. The smooth texture complements the crispy pastry and tender beef beautifully. For an extra luxurious touch, swap the regular butter for truffle butter or drizzle with truffle oil to bring an earthy richness to the plate.
Buttered Seasonal Greens
A simple side of buttered green beans, tenderstem broccoli, or steamed asparagus adds a fresh contrast to the richness of the Wellington. The light, crisp flavours of these vegetables balance the heavy, savoury notes of the beef and puff pastry.
Roasted Root Vegetables
Roast a medley of carrots, parsnips, and for a naturally sweet and hearty side. Seasoned with herbs like rosemary and a drizzle of olive oil, these vegetables add both colour and depth to the dish, providing a perfect counterpoint to the richness of the Wellington.
Red Wine Jus
The red wine jus isn’t just a sauce — it’s the finishing touch that ties everything together. Rich, velvety, and slightly tangy, the jus adds depth to every bite of beef. For a more indulgent experience, drizzle the jus over the mashed potatoes and vegetables as well.
Garlic Mushrooms or Creamed Spinach
For an even more luxurious feel, garlic mushrooms or creamed spinach make excellent accompaniments. The earthiness of the mushrooms and the creamy texture of the spinach elevate the dish while adding extra layers of flavour.
Crusty Bread or Yorkshire Puddings
If you want a truly British experience, serve your Beef Wellington with freshly baked Yorkshire puddings. They are light, airy, and perfect for soaking up the red wine jus. Alternatively, serve with crusty bread for an authentic, rustic touch.
Wine Pairing Recommendations
To complement the richness of the Wellington, choose a full-bodied red wine, such as Cabernet Sauvignon, Syrah, or Bordeaux. The wine’s tannins and acidity will cut through the richness of the pastry and meat, balancing the dish perfectly. Alternatively, a glass of Chablis or Chardonnay also pairs beautifully, offering a crisp contrast to the rich flavours of the beef.
Holiday Serving Ideas
For Christmas or New Year’s Eve, serve your Beef Wellington with elegant sides like roasted Brussels sprouts, cranberry sauce, and brandy-infused gravy for a festive twist. The sweetness of the cranberries and the richness of the gravy elevate the flavours, making it the ideal holiday dish that will impress all your guests.
Pro Tip for Leftovers
Leftovers from your Beef Wellington can be used to create gourmet sandwiches. Serve them on fresh artisan bread with a dollop of horseradish cream or mustard. The flaky pastry and tender beef stay delicious the next day. This offers a whole new way to enjoy this amazing dish!
By pairing your Supreme Beef Wellington with these elegant sides and wine pairings, you’ll create an unforgettable meal that is guaranteed to impress. Whether you’re hosting a gourmet dinner party, a holiday celebration, or a casual Sunday roast, these complementary dishes ensure your Wellington is the star of the show.
Where to Buy – Premium Ingredients from Nicol Retailer Limited
Every ingredient used in this Supreme Beef Wellington with Red Wine Jus can be purchased directly from Nicol Retailer Limited. They are your trusted supplier for chef-quality ingredients, premium British produce, and professional-grade essentials. From the rich, golden Jus-Rol Puff Pastry Block (1.5kg) to high-quality beef fillet cuts, fresh herbs, and gourmet pantry staples, Nicol Retailer offers everything you need. You can recreate this luxury dish at home.
As one of the UK’s leading online retailers for home cooks, chefs, and food enthusiasts, Nicol Retailer Limited is committed to exceptional quality, competitive pricing, and fast delivery—helping you shop with confidence and cook with excellence. By sourcing your ingredients from Nicol Retailer, you’re choosing superior freshness and flavour while supporting a trusted British brand that prioritises reliability and value.
A luxurious, no-bake dessert bursting with flavour — created by Nicol Retailer Limited.
If you’re searching for a dessert that delivers instant indulgence with minimal effort, you’ve just found your new favourite. This Warm Morello Cherry Compote with Vanilla Mascarpone Cream is the perfect balance of tangy, rich and velvety-smooth. It’s a restaurant-quality treat made effortlessly at home.
Made using Darta Pitted Morello Cherries from Nicol Retailer Limited, this recipe celebrates the bold, natural flavour of real cherries. Each spoonful is a beautiful contrast of flavours: warm, glossy cherry compote melting into cool, creamy mascarpone with hints of vanilla. It’s elegant, comforting and guaranteed to impress.
Whether you’re hosting a dinner party, treating yourself to something special, or looking for a showstopping dessert that’s ready in minutes — this recipe delivers every time. No baking. No fuss. Just pure flavour.
How to Make This Delicious Dessert
Creating this luxurious Morello Cherry & Mascarpone dessert couldn’t be easier — and you don’t need any baking skills to achieve a restaurant-quality result. Using rich, tangy Darta Pitted Morello Cherries from Nicol Retailer Limited, this recipe comes together in just minutes. It blends warm cherry compote with silky vanilla mascarpone for the perfect balance of sweetness, creaminess, and vibrant flavour. Whether you’re preparing a quick treat, entertaining guests, or looking for a showstopping dessert with minimal effort, this step-by-step method will guide you to a stunning result every time:
Warm Morello Cherry Compote Over Vanilla Mascarpone Cream
This irresistible no-bake dessert combines the bold, tangy flavour of Darta Pitted Morello Cherries with the silky richness of vanilla mascarpone cream for a luxurious treat ready in minutes. Warm cherries simmer into a glossy compote that melts beautifully over cool, whipped mascarpone, creating the perfect balance of sweet, tart and creamy. Elegant enough for entertaining yet simple enough for everyday indulgence, this quick 17-minute recipe is ideal for dinner parties, romantic desserts or effortless weeknight treats. Made with high-quality Morello cherries from Nicol Retailer, it delivers authentic flavour, stunning presentation and guaranteed satisfaction in every spoonful.
Course Dessert, Dinner Party Dessert, No-Baked Desset
Cuisine British (with a modern twist), European, Italian
Add cherries, a splash of cherry juice, sugar, vanilla and lemon juice to a small saucepan.
Simmer gently for 5–7 minutes until warm, glossy and slightly thickened.
Set aside (keep warm)
Prepare the Vanilla Mascarpone Cream
In a bowl, whisk mascarpone, double cream, icing sugar and vanilla until soft and creamy.
Chill for 10 minutes for the perfect texture.
Assemble the Dessert
Spoon a generous layer of mascarpone cream into bowls or glasses.
Top with warm Morello cherry compote.
Finish with crushed biscuits, mint, or chocolate shavings.
Notes
For the best flavour, always use high-quality Morello cherries like the Darta Pitted Morello Cherries from Nicol Retailer. Their natural tartness balances perfectly with the rich mascarpone cream.This recipe is no-bake and ready in under 15 minutes, making it ideal for quick desserts, entertaining, or when you need something impressive with minimal effort.To lighten the dessert, you can use reduced-fat mascarpone or single cream, or replace part of the cream with Greek yogurt for extra freshness.Make the mascarpone cream ahead and keep it chilled; warm the cherry compote just before serving for the perfect temperature contrast.Add crunch by topping with crushed biscuits, granola, toasted nuts, or dark chocolate curls for added texture and flavour.This recipe is naturally vegetarian and can be made gluten-free by using gluten-free biscuits or omitting them entirely.Serve in glass dessert cups or bowls to show off the layers — it enhances presentation and looks stunning for dinner parties.Leftover cherry compote can be used on pancakes, porridge, yoghurt bowls, waffles, cheesecakes or ice cream, making it a versatile addition to your kitchen.
This Warm Morello Cherry Compote with Vanilla Mascarpone Cream is incredibly versatile. It is perfect for everything from elegant dinner parties to cosy family nights in. The rich, tangy flavour of the Morello cherries pairs beautifully with the cool, silky mascarpone, allowing you to create a dessert experience that feels indulgent, comforting, and effortlessly sophisticated.
Serve this dessert in glass tumblers, mini ramekins, cocktail glasses or dessert bowls to showcase the vibrant cherry colours and creamy layers. For added texture and flavour, sprinkle the top with crushed shortbread, biscotti crumbs, toasted almonds, granola clusters, or dark chocolate curls. These small touches elevate the presentation and create a restaurant-quality finish.
This morello cherry dessert also pairs wonderfully with:
Fresh mint leaves for a refreshing aroma and burst of colour
A drizzle of dark chocolate for a richer, more decadent twist
Toasted hazelnuts or pistachios for crunch and earthiness
A scoop of vanilla or cherry ice cream for extra indulgence
A dollop of whipped cream for added lightness
Crisp almond tuiles or wafers to add elegance
This dessert shines as a:
Showstopping dinner party finale
Easy make-ahead dessert
Romantic date-night treat
Festive Christmas or Valentine’s Day pudding
Summer evening sweet course
No matter the occasion, this recipe turns simple ingredients into something extraordinary — and every spoonful delivers a perfect balance of tart cherries and luscious vanilla cream.
A Taste of Southern Italy, Crafted for Pure Indulgence
Few dishes capture the heart of Italian cuisine as effortlessly as Burrata di Puglia. Silky on the outside, rich and creamy on the inside, this luxurious cheese transforms even the simplest ingredients into something extraordinary. Our recipe — roasted cherry tomatoes, fresh basil oil and balsamic glaze — celebrates everything people love about this iconic Italian treasure.
Burrata comes from Puglia, a sun-soaked region in Southern Italy famous for its olives, tomatoes and artisanal cheeses. Created in the early 1900s by local cheesemakers, burrata was originally a clever way to use up leftover mozzarella curds known as stracciatella. These creamy ribbons were wrapped in a delicate mozzarella shell, creating the signature “burst of cream” we adore today.
Traditionally stored in fresh asphodel leaves to maintain its moisture, burrata was once a rare, regional delicacy. Over the years, its unique texture and indulgent flavour made it a global sensation. Today, it is loved by chefs, home cooks, and food lovers everywhere.
Why Burrata Is So Popular
Burrata has become nothing short of a global food obsession — and for good reason. It combines everything people love about Italian cuisine: simplicity, indulgence, freshness and pure comfort. But its popularity goes much deeper than just flavour.
The Ultimate Creamy Indulgence
At the heart of burrata is stracciatella — soft ribbons of fresh curd mixed with cream. When you slice open the mozzarella shell and the creamy centre spills out, it creates a sensory moment that diners never forget. It feels luxurious, yet completely natural. This makes it stand out from every other cheese.
A Chef’s Secret for Instant Elegance
Restaurants around the world adore burrata because it adds a “wow factor” with almost no effort. Place it on a plate with seasonal vegetables, drizzle a little oil, and that’s it — you’ve created a dish that looks (and tastes) like fine dining. Home cooks quickly fell in love for the same reason. Burrata transforms simple meals into something extraordinary.
Taste of Authentic Italian Craftsmanship
Food lovers appreciate burrata because it represents true artisanal tradition. Handmade in Puglia using time-honoured cheesemaking techniques, burrata feels like a small piece of Italy on your plate. That cultural authenticity — combined with its luxurious texture — gives it huge global appeal.
Light, Fresh and Comforting
Unlike many cheeses, burrata is indulgent yet refreshing. The mixture of cream and curd creates a lightness that feels clean rather than heavy. It satisfies cravings without overpowering, making it ideal for modern, health-conscious eaters who still want to enjoy rich, flavourful food.
Discover the Magic of Burrata di Puglia – A Creamy Taste of Italy at Its Finest
If you’re searching for a recipe that combines effortless elegance with unforgettable flavour, this Burrata di Puglia with Roasted Tomatoes & Basil Oil is the perfect place to begin. Loved for its silky exterior and irresistibly creamy centre, burrata has become one of the world’s most celebrated cheeses — and for good reason. In this dish, the warmth of blistered cherry tomatoes meets the cool luxury of fresh burrata. This creates a restaurant-quality experience you can enjoy at home in minutes. Whether you’re planning a dinner party, elevating a family meal, or simply treating yourself, this recipe delivers pure indulgence with every bite. Made using authentic Burrata di Puglia from Nicol Retailer Limited, it’s the perfect way to bring the flavours of Southern Italy straight to your table.
A beautifully simple yet luxurious Italian dish, this Burrata di Puglia with roasted tomatoes and basil oil delivers creamy indulgence, vibrant flavour and restaurant-quality elegance in every bite — the perfect way to elevate any meal effortlessly.
Course Antipasti, lunch, Sharing Plate, Side Dish, Starter
Cuisine Italian
Diet Vegetarian
Keyword Authentic Italian cheese recipe, Best burrata to buy UK, Burrata di Puglia recipe, Burrata with roasted tomatoes, Creamy burrata dish, Easy Italian appetiser, Fresh burrata recipe UK, Italian burrata starter, Mediterranean recipe ideas, Nicol Retailer burrata, Vegetarian Italian recipes
Drizzle with olive oil, crushed garlic, salt and pepper.
Roast for 12–15 minutes, until soft, blistered and aromatic.
Make the Basil Oil
Finely chop a generous handful of basil.
Mix with 2 tbsp olive oil and a small pinch of salt.
Set aside for flavours to infuse.
Plate the Burrata
Use a large serving platter or divide across four plates.
Place one burrata ball on each half of the platter.
Arrange the warm roasted tomatoes evenly around the burrata.
Drizzle & Garnish
Pour the basil oil over the burrata.
Add a swirl of balsamic glaze.
Tear fresh basil leaves over the top.
Serve Immediately
Enjoy with toasted sourdough or ciabatta for dipping.
Notes
For the best flavour and texture, use authentic Burrata di Puglia, as its rich, creamy centre pairs perfectly with warm roasted tomatoes and fresh basil. Serve immediately after plating to enjoy the full silkiness of the burrata. This recipe works beautifully as a starter, light lunch or sharing dish, and can be made gluten-free by serving with GF bread. Fresh, high-quality ingredients make all the difference — especially real Italian burrata, available to buy at Nicol Retailer.
To enjoy this dish at its absolute best, serve your Burrata di Puglia with Roasted Tomatoes & Basil Oil the moment it’s plated — timing is everything. The gentle warmth of the roasted tomatoes softens the burrata just enough. This creates that ultra-creamy centre everyone falls in love with.
Place the burrata proudly in the centre of the plate and let the tomatoes pool around it, allowing the basil oil and balsamic glaze to mingle into a glossy, flavour-packed sauce. Serve with thick slices of toasted sourdough, ciabatta or focaccia, perfect for scooping up every silky, indulgent mouthful.
For a more complete Mediterranean experience, pair the dish with:
This recipe also shines as a show-stopping starter for dinner parties, an elegant shared antipasti dish, or a fresh summer lunch when you want something light yet luxurious. Add a sprinkle of flaky sea salt, a crack of black pepper and a final swirl of extra virgin olive oil just before serving. This adds a gourmet finish.
Whether enjoyed as a centrepiece or part of a larger spread, this burrata dish brings the pure flavours of Italy straight to your table — simple, fresh and undeniably beautiful.
Shop the Fresh Ingredients for This Recipe at Nicol Retailer
Creating this luxurious Italian dish is easy when you start with the finest ingredients — and every key element you need is available to buy at Nicol Retailer. From authentic Burrata di Puglia to vibrant Mediterranean vegetables and premium pantry essentials, we make it simple to cook restaurant-quality meals at home.
A Comforting, Gourmet Vegetarian Dish Created by Nicol Retailer Limited: Crispy Maitake Mushroom Risotto. Crispy Maitake Mushroom Risotto | Nicol Retailer Limited offers a delightful culinary experience perfect for a comforting meal.
There’s something undeniably special about a bowl of risotto — the way it soothes, satisfies, and feels like a warm embrace after a long day. And when you elevate that comfort classic with the nutty, earthy tones of maitake mushrooms, you step into gourmet territory. This delights both the palate and the soul. This is precisely what Crispy Maitake Mushroom Risotto | Nicol Retailer Limited has achieved.
This Crispy Maitake Mushroom Risotto with Parmesan & Thyme Butter captures everything we love about home cooking and fine dining in one dish. It is rich, creamy, aromatic, and deeply satisfying. Each spoonful is layered with texture: velvety arborio rice infused with thyme and butter. It’s topped with crispy, golden maitake mushrooms that bring a burst of umami with every bite.
Made with premium Maitake Mushrooms (500g) from Nicol Retailer Limited, this recipe celebrates the beauty of simple, high-quality ingredients. These are turned into something truly exceptional. This is why the Crispy Maitake Mushroom Risotto | Nicol Retailer Limited is unique.
Why You’ll Love This Recipe
This isn’t just another risotto — it’s a sensory experience. The maitake mushrooms (also known as hen-of-the-woods) have a beautifully meaty texture. They crisp up perfectly in butter. Meanwhile, the risotto base remains creamy and comforting. Here’s why Crispy Maitake Mushroom Risotto | Nicol Retailer Limited is irresistible:
Restaurant-quality flavour with ingredients you can easily find at home.
Rich, earthy aroma from the maitake mushrooms and thyme butter.
Naturally vegetarian and gluten-free, with simple swaps for vegan diets.
Ready in under 45 minutes, yet elegant enough for dinner parties.
Each bite tells a story of warmth, flavour, and craft. This is exactly what Nicol Retailer Limited stands for: premium ingredients that make everyday meals feel extraordinary.
Recipe
There’s something irresistibly comforting about the slow rhythm of making risotto. The gentle stirring, the rich aroma of garlic and butter, and that moment when the rice turns perfectly creamy. This Crispy Maitake Mushroom Risotto with Parmesan & Thyme Butter transforms a humble classic into an elegant, restaurant-quality dish. It is bursting with earthy, nutty flavour.
Using premium Maitake Mushrooms (500g) from Nicol Retailer Limited, this recipe celebrates the magic of simple ingredients done right. The maitake — also known as hen of the woods — brings deep umami and a delicate crispiness. This beautifully complements the creamy risotto base. Whether you’re planning a cosy dinner for two or an indulgent weekend meal, this dish promises warmth, comfort, and a touch of gourmet flair in every bite. Here is the recipe for Crispy Maitake Mushroom Risotto | Nicol Retailer Limited:
Crispy Maitake Mushroom Risotto with Parmesan & Thyme Butter
Indulge in the rich, earthy comfort of this Crispy Maitake Mushroom Risotto with Parmesan & Thyme Butter — a luxurious vegetarian dish bursting with flavour and texture. Tender arborio rice is slowly cooked in a creamy, aromatic broth, finished with golden, pan-seared Maitake Mushrooms from Nicol Retailer Limited, and topped with melted butter, fresh thyme, and aged parmesan.Perfect for dinner parties or cosy nights in, this risotto delivers restaurant-quality taste in under 45 minutes. The maitake mushrooms add a deep umami richness that pairs beautifully with the creamy risotto base, making every spoonful pure comfort food. Shop premium maitake mushrooms and gourmet ingredients at Nicol Retailer Limited, your trusted UK supplier of fine food essentials.
Course brunch, Comfort Food, Dinner, Main Course
Cuisine European, Italian, Mediterranean, Modern Vegetarian
Diet Gluten Free, Low Fat, Vegetarian
Keyword creamy mushroom risotto, hen of the woods risotto, maitake mushroom risotto, maitake mushrooms recipe, Nicol Retailer Limited
Tear the mushrooms into large pieces. Heat 1 tbsp olive oil and a little butter in a large pan. Sauté the maitake over medium-high heat until golden and crisp (5–7 mins). Remove and set aside for topping.
Start the Risotto
In the same pan, add another tbsp of olive oil. Sauté onion and garlic until soft and fragrant. Add rice and toast for 1–2 mins until slightly translucent.
Deglaze & Simmer
Pour in the white wine, stirring until absorbed. Add warm vegetable stock, one ladle at a time, stirring gently between each addition. Continue for about 20 minutes, or until the risotto is creamy and the rice is tender but al dente
Add Flavour & Finish
Stir in butter, parmesan, thyme, and half the crispy maitake. Adjust seasoning with salt and pepper.
Serve Beautifully
Spoon the risotto into bowls and top with the remaining crispy mushrooms. Drizzle lightly with truffle oil and finish with extra parmesan and fresh thyme.
Notes
This Crispy Maitake Mushroom Risotto is pure comfort in a bowl — creamy, earthy, and elegant. Each spoonful blends buttery arborio rice with golden, crispy Maitake Mushrooms (500g) from Nicol Retailer Limited, delivering the perfect balance of texture and umami richness.To get the best results, always use hot vegetable stock and stir slowly as the risotto cooks — this releases the rice’s natural starches for that classic creamy finish. Tear the maitake mushrooms instead of slicing them to preserve their meaty, layered texture and create crispy edges when seared.For a lighter version, you can swap the butter for olive oil and use vegan parmesan or nutritional yeast — it’s just as indulgent but completely plant-based. Chef’s Tips:Deglaze with white wine for restaurant-level depth.Finish with fresh thyme or a drizzle of truffle oil to elevate the aroma.Serve immediately — risotto is at its creamiest right off the stove.This dish is a perfect showcase of Mediterranean-inspired vegetarian cooking, made easy with Nicol Retailer Limited’s premium maitake mushrooms. Whether served as a main course or part of a fine-dining dinner menu, it’s guaranteed to impress.
Every spoonful of this Crispy Maitake Mushroom Risotto with Parmesan & Thyme Butter feels like a warm embrace — rich, aromatic, and deeply satisfying. To make the experience even more unforgettable, pair it with flavours and textures that enhance its creamy, earthy character.
For a lighter meal, serve your risotto alongside:
Rocket salad with lemon vinaigrette — its peppery freshness cuts through the richness.
Garlic-roasted asparagus or tenderstem broccoli for colour and crunch.
If you’re hosting, a basket of warm artisan bread drizzled with olive oil makes the perfect finishing touch — ideal for soaking up every last drop of creamy sauce.
Seasonal Twists
One of the joys of risotto is how easily it adapts to the seasons:
In spring, add green peas or asparagus tips for brightness.
In autumn, fold in roasted butternut squash or sage for an earthy depth.
In winter, stir through a touch of truffle oil or porcini powder for luxurious warmth.
Each variation keeps the dish exciting while highlighting the quality of the Maitake Mushrooms — their flavour is the heart of the recipe.
A Dining Experience to Remember
Serve this dish in warm bowls with a drizzle of melted butter, a sprinkle of fresh thyme, and a few extra crisp maitake pieces on top. Light a candle, pour your favourite wine, and let the gentle aroma of thyme and garlic fill the room.
This risotto isn’t just food — it’s a moment of calm, crafted with love and quality ingredients from Nicol Retailer Limited, where gourmet inspiration meets everyday simplicity.
Conclusion
Some dishes comfort you — others completely captivate you. This Crispy Maitake Mushroom Risotto with Parmesan & Thyme Butter is one of those rare recipes that does both. From the first creamy bite to the last crisp piece of golden maitake mushroom, it’s a symphony of texture and flavour — rustic, indulgent, and effortlessly elegant.
What makes this risotto truly special is the quality of the ingredients. Using premium Maitake Mushrooms (500g) from Nicol Retailer Limited, every forkful carries deep umami richness and natural sweetness. This turns an everyday meal into a fine-dining experience. This is the essence of Crispy Maitake Mushroom Risotto | Nicol Retailer Limited.
Whether you’re preparing it for loved ones, serving it as a show-stopping vegetarian main, or simply treating yourself to something extraordinary, this dish proves that comfort food can also be artful and inspiring.
Created with care. Crafted with flavour. Delivered by Nicol Retailer Limited — bringing the world’s finest ingredients to your kitchen.
🛒 Shop This Recipe – Crispy Maitake Mushroom Risotto
Recreate this creamy, crispy Maitake Mushroom Risotto with Parmesan & Thyme Butter using premium ingredients from Nicol Retailer Limited. Each product is carefully selected to bring gourmet flavour and quality to your kitchen.
🍄 Maitake Mushrooms (500g) – The star ingredient, offering deep umami flavour and a crisp, golden texture.
All premium ingredients are available to buy from Nicol Retailer Limited — your trusted UK supplier of gourmet, vegetarian, and Mediterranean cooking essentials.
A rustic, Mediterranean seafood masterpiece — Smoky Spanish Octopus with Chorizo, by Nicol Retailer Limited
There are meals that warm the soul — and then there’s this Smoky Spanish Octopus with Chorizo, Chickpeas & Paprika Oil. It’s rich, rustic, and alive with the warmth of Mediterranean sunshine — a dish that captures the passion of Spanish coastal cooking in every bite.
Tender Dockside Cooked Octopus Tentacles, smoky chorizo, and creamy chickpeas come together in a vibrant stew that glows with paprika oil and bursts of cherry tomato sweetness. The result? A comforting yet elegant seafood dish that feels equally at home in a family kitchen or a fine dining setting.
Made with premium seafood from Nicol Retailer Limited, this recipe is about celebrating freshness, quality, and the beauty of simple ingredients done right. Each mouthful delivers a perfect harmony — the smoky spice of chorizo, the tender bite of octopus, and the subtle earthiness of chickpeas wrapped in a warm, velvety sauce.
If you love Mediterranean cuisine, this is a show-stopping dish you’ll make again and again — comforting, colourful, and undeniably delicious.
This Smoky Spanish Octopus with Chorizo, Chickpeas & Paprika Oil is more than just a seafood recipe — it’s a celebration of Mediterranean flavour, quality ingredients, and authentic Spanish cooking. Inspired by traditional Spanish coastal cuisine, the dish combines the smoky depth of paprika and chorizo with the tender, meaty texture of Dockside Cooked Octopus Tentacles from Nicol Retailer Limited, your trusted UK supplier of premium seafood and gourmet ingredients.
Cooking with octopus may sound daunting, but with pre-cooked tentacles, it’s simpler than you think. For those new to working with seafood, BBC Good Food’s expert guide on how to cook octopus offers helpful techniques to achieve restaurant-quality results at home.
Beyond its incredible taste, octopus is also a powerhouse of nutrition. It’s naturally rich in protein and omega-3 fatty acids, both of which support heart and brain health. According to Healthline, it’s one of the healthiest lean proteins you can include in your diet — making this dish both indulgent and nourishing.
Whether served as part of a tapas night or a show-stopping main course, this recipe embodies everything we love about Mediterranean cooking: simple ingredients, bold flavours, and meals made to share.
Why You’ll Love This Recipe
If you adore food that tells a story — smoky, soulful, and bursting with flavour — then this Smoky Spanish Octopus with Chorizo, Chickpeas & Paprika Oil is going to win your heart. It brings the warmth of a Spanish coastal kitchen right to your table, blending rustic simplicity with restaurant-quality elegance. Here’s why this dish deserves a permanent place in your recipe collection:
Incredible Texture — Tender Meets Crispy
Thanks to Dockside Cooked Octopus Tentacles from Nicol Retailer Limited, you skip the tricky boiling stage and get perfectly cooked octopus every time — soft, meaty, and tender inside, with gorgeous golden edges when seared. It’s proof that quality seafood makes all the difference.
Deep, Smoky Spanish Flavour
Every bite sings with the essence of Spain — smoked paprika, spicy chorizo, and rich olive oil combining to create a silky, aromatic sauce that coats the chickpeas and octopus. It’s a dish that feels both bold and comforting, with layers of heat, smoke, and sweetness in perfect harmony.
Beautifully Balanced Ingredients
The earthiness of chickpeas, the freshness of cherry tomatoes, and the tang of sherry vinegar balance the richness of the chorizo and paprika oil. Each spoonful offers contrast — savoury, sweet, smoky, and bright — for a restaurant-worthy depth of flavour that’s easy to achieve at home.
Quick, Simple, and Fuss-Free
This impressive dish takes under 30 minutes from pan to plate, thanks to pre-cooked octopus. With minimal prep and everyday pantry staples, it’s perfect for both busy weeknights and relaxed weekend feasts. You’ll look like a pro without spending hours in the kitchen.
Wholesome and Nourishing
Beyond its irresistible taste, this recipe is high in protein, low in carbs, and naturally rich in omega-3 fatty acids — supporting heart health and energy. It’s a dish that feels indulgent yet wholesome, celebrating the best of the Mediterranean diet.
A Taste of Spain, Crafted in the UK
With every forkful, you’ll taste the spirit of the Spanish coast — reimagined through the quality and craftsmanship of Nicol Retailer Limited, your trusted UK supplier of premium seafood and gourmet ingredients. This isn’t just a meal; it’s an experience — an invitation to savour the sunshine, spice, and sophistication of Spain from your own kitchen.
Simple to make, spectacular to eat — this Spanish octopus recipe proves that great cooking begins with the finest ingredients.
Receipe
Get ready to bring a taste of the Mediterranean coast straight to your kitchen with this Smoky Spanish Octopus with Chorizo, Chickpeas & Paprika Oil — a dish that feels like pure sunshine in a pan.
Picture tender octopus tentacles, perfectly cooked and lightly caramelised, tossed with slices of smoky Spanish chorizo, creamy chickpeas, and sweet cherry tomatoes, all glistening in a deep red paprika oil. The aroma alone will transport you to a seaside taverna in Spain — warm, inviting, and impossible to resist.
Using premium Dockside Cooked Octopus Tentacles from Nicol Retailer Limited, this recipe delivers the kind of restaurant-quality flavour you can create effortlessly at home. It’s bold yet balanced, rich yet refreshing — the perfect harmony of smoky, savoury, and tangy Mediterranean magic.
Now, let’s dive into this irresistible seafood masterpiece — simple to prepare, stunning to serve, and guaranteed to impress:
Smoky Spanish Octopus with Chorizo, Chickpeas & Paprika Oil
Experience the bold, rustic flavours of Spain with this Smoky Spanish Octopus with Chorizo, Chickpeas & Paprika Oil — a dish that captures the essence of Mediterranean cooking in every bite. Tender, pre-cooked Dockside Octopus Tentacles are tossed with smoky Spanish chorizo, creamy chickpeas, and vibrant cherry tomatoes, then finished with a drizzle of rich paprika oil and fresh parsley.It’s hearty, colourful, and irresistibly aromatic — the perfect centrepiece for a tapas night, dinner party, or midweek indulgence. Using premium-quality octopus from Nicol Retailer Limited, this recipe combines convenience and fine-dining flavour, ready in under 30 minutes.Rich in protein and omega-3, it’s as nourishing as it is delicious — a true showcase of Mediterranean warmth, bold spices, and coastal freshness.
Warm olive oil in a small pan over low heat. Add smoked paprika and a pinch of salt. Stir, then remove from heat. Set aside to infuse while you cook the octopus.
Cook the Base
Heat 1 tbsp olive oil in a large skillet or cast-iron pan. Add chorizo slices and fry for 3–4 minutes until they release their smoky red oil. Add onion and garlic, sautéing until soft and fragrant.
Add the Flavour
Sprinkle in smoked paprika and chilli flakes. Stir in cherry tomatoes and chickpeas. Cook for 2 minutes, then pour in stock and vinegar. Simmer for 5 minutes to reduce slightly.
Add the Octopus
Stir in the Dockside Cooked Octopus Tentacles and toss gently to coat in the sauce. Cook for 3–4 minutes until the octopus is heated through and the sauce thickens slightly.
Finish & Serve
Spoon the mixture into shallow bowls, drizzle with paprika oil, and sprinkle with fresh parsley. Serve immediately with crusty bread or roasted new potatoes.
Notes
Premium Ingredients Matter: The key to this recipe’s rich, smoky depth lies in using high-quality seafood. The Dockside Cooked Octopus Tentacles from Nicol Retailer Limited are pre-cooked to perfection — tender, meaty, and ready to absorb every drop of smoky paprika and chorizo oil.Texture Tip: Always pat the octopus dry before adding it to the pan — this ensures crisp edges and a beautiful golden sear without losing tenderness.Balancing Flavours: Add the sherry vinegar right at the end for a bright, tangy lift that balances the smoky oil and hearty chickpeas.Make It Your Own: For a pescatarian version, replace chorizo with roasted red peppers or smoked paprika chickpeas. Add grilled prawns for an indulgent seafood twist.Serving Idea: Serve with rustic bread, roasted potatoes, or a simple rocket salad.
When it comes to this Smoky Spanish Octopus with Chorizo, Chickpeas & Paprika Oil, every bite feels like a journey through Spain’s sun-drenched coastlines — rustic, vibrant, and bursting with flavour. Whether you’re setting the table for a family supper, a romantic evening, or a Spanish-style tapas night with friends, this dish steals the spotlight effortlessly.
A Tapas Feast to Remember
Transform your table into a lively Spanish tapas experience by serving this octopus dish alongside a few Mediterranean favourites. Pair it with patatas bravas, grilled padron peppers, or manchego cheese and olives for that authentic Spanish flair. The smoky chorizo and paprika oil tie beautifully with other small plates, creating a warm, communal dining experience full of colour and laughter.
Tip: Serve it straight from the cast-iron pan to the table — the sizzling aroma and rustic presentation will captivate your guests before the first bite.
Side Dishes That Complete the Experience
To turn this into a show-stopping main course, serve with:
Crusty artisan bread to soak up that rich paprika oil.
Chargrilled vegetables like courgettes, peppers, and aubergine for smoky depth.
Or a simple rocket and lemon salad to balance the richness with bright, fresh acidity.
These sides don’t just fill the plate — they amplify the flavours and texture, creating the perfect Mediterranean harmony.
How to Serve It Beautifully
Presentation matters — and this dish deserves to look as good as it tastes. Serve your octopus in shallow ceramic bowls or a rustic skillet, drizzle with paprika oil, and finish with a handful of fresh parsley or microgreens. Add a lemon wedge on the side for that final touch of brightness.
The glistening red oil, golden chickpeas, and charred octopus create a naturally stunning contrast — ideal for food photography or social media sharing.
Seasonal Twist Ideas
Summer: Serve it warm with fresh salad greens.
Winter: Pair with roasted root vegetables and crusty bread for a hearty, comforting meal.
Spring: Add peas or asparagus for a pop of freshness.
The recipe’s versatility means you can enjoy it all year round — a dish that brings Mediterranean warmth to even the chilliest UK evening.
The Perfect Meal to Share
At its heart, this recipe celebrates togetherness and flavour — just like all great Spanish cooking. The combination of smoky chorizo, tender Dockside Cooked Octopus Tentacles, and creamy chickpeas makes it ideal for sharing at the centre of the table.
Serve it family-style with a few bottles of wine, laughter, and good conversation. After all, the best meals are the ones enjoyed together — and this one has the power to turn any dinner into a celebration.
Conclusion
Every once in a while, a dish comes along that reminds us why we love to cook — and this Smoky Spanish Octopus with Chorizo, Chickpeas & Paprika Oil is exactly that kind of recipe. It’s rustic yet refined, simple yet luxurious — the perfect blend of Spanish passion and Mediterranean warmth brought to life with premium Dockside Cooked Octopus Tentacles from Nicol Retailer Limited. Each bite is a celebration of flavour — smoky, spicy, and subtly sweet — with the tender octopus soaking up every drop of paprika oil and chorizo richness. It’s the kind of meal that doesn’t just fill you up, but fills the room with laughter, warmth, and a sense of connection.
Whether you serve it for a special dinner, a festive gathering, or a tapas night with friends, this dish has one goal: to make every table feel like a seaside evening in Spain. 🇪🇸
So go ahead — gather your ingredients, pour a glass of wine, and let this recipe transport you. Because great food isn’t just about what’s on the plate — it’s about the moments shared around it.
🛒 Shop This Recipe
Recreate this delicious Smoky Spanish Octopus with Chorizo, Chickpeas & Paprika Oil at home using premium ingredients from
Nicol Retailer Limited.
Soft, Steamy, and Full of Flavour — Discover the irresistible delight of Hoisin Mushroom Bao Buns, a Vegan Street Food Sensation by Nicol Retailer Limited
The Street-Food Classic That’s Stealing the Show
If there’s one dish guaranteed to make your taste buds dance, it’s this: Hoisin Mushroom & Pickled Veg Bao Buns — soft, fluffy clouds of perfection filled with sticky, savoury-sweet mushrooms. They also include crunchy pickled vegetables and fresh herbs.
These aren’t just any buns — they’re made with premium Bao Hirata Buns from Nicol Retailer Limited. This is the secret ingredient behind their irresistible texture.
Pillowy on the outside and perfectly chewy inside, they create the ultimate bite — one that’s sweet, tangy, and satisfyingly umami all at once.
Why Everyone Loves This Recipe
Whether you’re vegan, flexitarian, or just a foodie with good taste, this recipe ticks every box. It’s quick, healthy, and packed with bold Asian street-food flavours that feel indulgent but don’t weigh you down. Here’s what makes it a winner:
100% plant-based and dairy-free
Made with authentic Hirata buns for that signature fluffiness
15-minute prep — perfect for midweek meals or party platters
Customisable with tofu, jackfruit, or crispy tempeh
These bao buns aren’t just food — they’re an experience. Every bite feels like something straight out of a modern Asian restaurant, but easier and faster to make at home.
The Star Ingredient: Bao Hirata Buns
The hero of this dish is undoubtedly the Bao Hirata Bun (1 × 30 × 50 g) — soft, versatile, and restaurant-quality. At Nicol Retailer Limited, these buns are sourced for chefs and food lovers who appreciate true authenticity. Whether you’re filling them with mushrooms, or teriyaki tofu, they transform simple ingredients into unforgettable meals.
There’s something truly irresistible about soft, fluffy bao buns filled with sticky, flavour-packed goodness. These Hoisin Mushroom & Pickled Veg Bao Buns are no exception. Each bite delivers the perfect balance of sweet and savoury. They feature glossy mushrooms, crisp pickled vegetables, and aromatic herbs wrapped in a warm, pillowy Bao Hirata Bun.
This recipe brings together everything you love about Asian street food — vibrant, fresh, and full of texture — but made simple for your home kitchen. Whether you’re planning a weekend lunch, a dinner party appetiser, or a vegan twist on comfort food, these bao buns are sure to impress.
Now, let’s make this mouth-watering restaurant-style dish come to life — step by step:
Indulge in these soft, pillowy Bao Hirata Buns filled with sticky hoisin-glazed mushrooms, crisp pickled vegetables, and fresh herbs. A vegan-friendly, Asian street food classic — bursting with sweet, savoury, and tangy flavours. Made with premium Bao Hirata Buns from Nicol Retailer Limited for a restaurant-quality experience at home.
Course Appetizer, Main Course, Starter, Street Food
Fresh coriander leaves and toasted sesame seeds for garnish
Instructions
Quick-pickle the veg
In a bowl, combine carrot, cucumber, salt, sugar and 2 tbsp rice vinegar. Toss well and set aside for 15 minutes to soften and absorb flavour.
Cook the mushrooms
Heat vegetable oil in a large pan over medium-high heat. Add the sliced mushrooms and cook until they release their moisture and begin to brown (about 5–6 minutes).
Add garlic, ginger, hoisin sauce, soy sauce, maple syrup and 1 tsp rice vinegar. Stir until the mushrooms are glossy and coated in a sticky, savoury-sweet glaze.
Steam the buns
Steam the Bao Hirata Buns for 2–3 minutes until soft and fluffy (per pack instructions).
Assemble the bao
Open each bun gently and fill with a spoonful of hoisin mushrooms, then top with pickled carrot and cucumber. Garnish with coriander and sesame seeds for a burst of freshness and crunch.
Serve immediately
Serve warm with extra hoisin sauce or chilli oil on the side for dipping.
Notes
These Hoisin Mushroom & Pickled Veg Bao Buns are a celebration of texture and flavour — a perfect balance of sweet, savoury, and tangy wrapped in the softest Bao Hirata Buns from Nicol Retailer Limited.Chef’s Tip: Use a mix of mushrooms such as shiitake, oyster, and chestnut for a deeper, meatier flavour. Don’t rush the cooking process — allow the mushrooms to caramelise slightly before adding the sauce for that glossy, sticky finish.Flavour Boost: Add a dash of rice wine or mirin while cooking for extra depth, or drizzle a little sesame oil just before serving for a nutty aroma.Make Ahead: The pickled vegetables can be prepared up to 2 days in advance — they taste even better once the flavours develop. Simply store in an airtight container in the fridge.Customise It: These bao buns are endlessly versatile. Try swapping the mushrooms for tofu, tempeh, or even shredded jackfruit for a unique twist.Serving Suggestion: Serve immediately after assembling while the buns are still warm and pillowy. Pair with a small bowl of dipping hoisin sauce or sriracha mayo for a restaurant-style touch.With every bite, you’ll enjoy the fusion of authentic Asian street-food flavours and plant-based goodness — all made effortless with Bao Hirata Buns from Nicol Retailer Limited.
These Hoisin Mushroom & Pickled Veg Bao Buns aren’t just a meal — they’re an experience. Each soft, pillowy bun is packed with flavour, freshness, and texture, making it the perfect centrepiece for any occasion. Whether you’re hosting friends, craving something light yet satisfying, or looking to recreate an authentic Asian street-food night at home, these bao buns will steal the spotlight.
Street-Food Feast at Home
Turn your kitchen into a bustling street market! Serve these bao buns alongside crispy vegetable spring rolls, edamame with sea salt, and steamed dumplings for the ultimate Asian street-food platter. Add a dipping trio — hoisin, sriracha mayo, and soy-ginger dressing — for flavour variety that keeps everyone coming back for more.
Light Lunch or Weekend Brunch
Pair your bao buns with a side of sesame cucumber salad or Asian-style slaw. For a weekend treat, serve them with bubble tea or homemade iced matcha lattes — refreshing, Instagram-worthy, and a total crowd-pleaser.
Date Night or Dinner Party
Planning a dinner that feels restaurant-worthy but effortless? Plate up your bao buns on a bamboo steamer or slate board, drizzle a little extra hoisin sauce on top, and sprinkle toasted sesame seeds.
Comfort Food Combo
For something heartier, serve your bao buns with sticky jasmine rice or miso soup on the side. The warm, savoury broth complements the sweet hoisin glaze beautifully, while the rice helps soak up all that irresistible sauce.
Dipping Sauces that Make It Unforgettable
Amp up the experience with easy homemade dips — creamy sriracha mayo, tangy soy-lime sauce, or a punchy peanut dressing. These sauces not only boost flavour but also make your bao buns perfect for sharing platters or party appetisers.
Pro Tip:
For a show-stopping presentation, serve the bao buns warm in bamboo baskets lined with parchment paper. Garnish with fresh coriander, red chilli slices, and a light drizzle of sesame oil. It’s a small detail that makes a big impact — both on taste and presentation.
No matter how you serve them, these Hoisin Mushroom Bao Buns promise to be the star of any table. They are simple to make, irresistibly delicious, and bursting with vibrant street-food flair
Create your own bao feast at home with authentic Bao Hirata Buns, available from Nicol Retailer Limited — delivering quality and taste across the UK.
Shop the Ingredients
Recreate this delicious street-food experience at home with authentic Bao Hirata Buns (2 × 30 × 50 g) — available exclusively from Nicol Retailer Limited. Browse the full shop here for restaurant-quality products, sauces, and gourmet essentials delivered across the UK.
Final Thoughts
From the first bite, these Hoisin Mushroom Bao Buns prove that flavour and simplicity can coexist beautifully. They’re quick, healthy, and utterly addictive — the kind of dish that keeps people talking (and sharing). Make them once, and you’ll be hooked. Made possible with Bao Hirata Buns from Nicol Retailer Limited — where quality meets creativity.
🛒 Shop This Recipe
Bring this delicious Hoisin Mushroom & Pickled Veg Bao Bun recipe to life
with authentic ingredients from
Nicol Retailer Limited —
your trusted UK source for restaurant-quality food and gourmet essentials.
A smoky, comforting British classic reimagined — by Nicol Retailer Limited, this creamy Kipper Kedgeree recipe offers a unique twist to a favourite dish.
There’s something timeless about a bowl of kedgeree — the kind of dish that feels like home yet carries the richness of tradition. Originally inspired by Anglo-Indian flavours, this British breakfast favourite has evolved into a comforting classic. It is warm, fragrant, and full of heart.
Our Creamy Kipper Kedgeree with Poached Egg & Fresh Herbs brings this heritage dish into the modern kitchen. It combines the smoky depth of John West Kippers in Sunflower Oil with fragrant basmati rice, gentle spices, and a rich, creamy texture. It is all topped with a soft, golden poached egg that melts beautifully into the dish.
Every bite delivers comfort and luxury. You get fragrant basmati rice, smoky kipper fillets, creamy sauce, and a perfectly poached egg that melts into the rice like velvet. It’s wholesome, rich in omega-3, and irresistibly satisfying. This is the kind of dish that feels both hearty and elegant.
Whether you’re preparing a lazy weekend brunch, a quick midweek dinner, or a British-inspired supper for guests, this recipe is a beautiful reminder that simplicity, when done right, can be extraordinary.
Why John West Kippers Make This Dish Shine
When it comes to flavour, quality matters — and John West Kippers in Sunflower Oil bring authenticity and depth to this dish like nothing else.
Each fillet is lightly smoked to perfection, preserving the natural sweetness of the fish while infusing it with subtle, savoury richness. Packed in sunflower oil, these kippers are tender, flaky, and full of heart-healthy omega-3 fats. This makes them as nutritious as they are delicious.
They’re also ready to use straight from the tin — no fuss, no prep, just pure, ocean-fresh goodness. It’s this balance of convenience and craftsmanship that makes them perfect for modern home cooks and professional chefs alike.
At Nicol Retailer Limited, we’re proud to bring this British favourite straight to your kitchen. This means you can create restaurant-quality dishes effortlessly.
There’s something deeply comforting about this Creamy Kipper Kedgeree with Poached Egg & Fresh Herbs. It is a dish that wraps you in warmth with every spoonful. Each bite brings together the smoky richness of John West Kippers in Sunflower Oil, the gentle spice of golden turmeric, and the freshness of chopped herbs and lemon zest. Topped with a perfectly poached egg, it’s a celebration of British home cooking at its best. It is hearty, wholesome, and made to be shared.
Simple enough for a weekday supper yet elegant enough for brunch with friends, this recipe transforms humble ingredients into something truly memorable. It is the kind of meal that makes everyone pause for just one more bite.
Let’s bring this comforting British classic to life — rich, creamy, and irresistibly smoky :
Creamy Kipper Kedgeree with Poached Egg & Fresh Herbs
This Creamy Kipper Kedgeree with Poached Egg & Fresh Herbs is a modern twist on a British classic — rich, comforting, and full of smoky flavour. Made with John West Kippers in Sunflower Oil, fragrant basmati rice, warm spices, and fresh herbs, it’s finished with a perfectly poached egg for an irresistible touch of indulgence. High in protein and omega-3, this easy one-pan meal is ideal for brunch, lunch, or a light dinner — beautifully balanced, wholesome, and bursting with flavour.Deliciously simple and proudly British — crafted with quality ingredients from Nicol Retailer Limited.
Course brunch, Dinner, lunch, Main Course
Cuisine British (with a modern twist), Modern European
Diet Low Fat
Keyword British brunch ideas, creamy kedgeree, easy kipper recipes, high protein fish recipe, John West kippers recipe, kipper kedgeree, Nicol Retailer Limited, omega 3 meal, smoked fish rice dish
Rinse the basmati rice until the water runs clear. In a saucepan, cook with a pinch of salt according to packet instructions. Drain and set aside.
Sauté Aromatics
In a large skillet or pan, melt the butter over medium heat. Add onion and garlic, cooking for 3–4 minutes until soft and fragrant. Stir in curry powder and turmeric, cooking for 1 minute to release the spices’ aroma
Combine Kippers & Creamy Base
Pour in the milk and cream, then gently stir in the flaked John West Kippers. Let the mixture warm through for 2–3 minutes — the kippers will infuse the sauce with their smoky richness.
Add the Rice & Herbs
Stir in the cooked rice, parsley, chives, and lemon zest. Season with salt, pepper, and a squeeze of lemon juice. Mix until everything is well combined and heated through.
Serve with Poached Eggs
Spoon the kedgeree into bowls and top each serving with a perfectly poached egg. Sprinkle with extra herbs and a touch of black pepper. Serve with lemon wedges on the side.
Notes
This Creamy Kipper Kedgeree is a comforting twist on the traditional British dish — perfectly balancing smoky, spiced, and creamy flavours. Using John West Kippers in Sunflower Oil gives this recipe its signature depth and omega-rich goodness while saving time in preparation.Pro Tip: Flake the kippers gently to keep their texture intact, and don’t skip the fresh herbs — parsley, chives, and lemon zest bring freshness that lifts the entire dish.For a lighter version, substitute single cream with milk or Greek yoghurt. Want extra flavour? Add a pinch of smoked paprika or a dash of curry powder to enhance the aromatic base. Poach the eggs just before serving for that beautiful golden yolk that enriches every bite.Serve it warm with a squeeze of lemon and enjoy the true comfort of modern British cooking — simple, wholesome, and made better with Nicol Retailer Limited ingredients.
Few dishes feel as comforting and soulful as a warm bowl of Creamy Kipper Kedgeree. With its delicate balance of smoky John West kippers, golden rice, and creamy sauce, it’s a meal that suits every moment — from lazy weekend brunches to elegant evening dinners. The beauty of kedgeree lies in its versatility; it’s as satisfying served simply as it is dressed up for a special occasion. Here are some delicious and creative ways to serve, enjoy, and elevate this dish :
Perfect for a Relaxed Brunch
Start your weekend on a luxurious note by serving this kedgeree for brunch. Its creamy, gently spiced flavour pairs beautifully with the soft, golden yolk of the poached egg. Present it in rustic bowls and finish with extra chopped herbs and lemon zest for a café-style touch.
Pair with: A pot of English Breakfast tea, a frothy cappuccino, or a chilled glass of freshly squeezed orange juice.
Serve with: Buttered sourdough toast or warm flatbread to soak up every last drop of creamy sauce.
Light Lunch or Supper Option
If you’re after something hearty yet not too heavy, this kedgeree makes the perfect lunch or early dinner. Its balance of carbs, protein, and omega-3 fats keeps you satisfied without the sluggishness of a rich meal.
Pair with: A crisp green salad dressed with lemon vinaigrette, or roasted asparagus with olive oil and cracked pepper.
Optional Garnish: A drizzle of lemon juice or a few capers add a refreshing tang that brightens the smoky kippers beautifully.
Elegant Dinner Party Starter
Surprise your guests with this unexpected showstopper. Serve smaller portions of kedgeree in individual ramekins or shallow bowls, each topped with a delicately poached egg. The combination of creamy rice and smoky fish feels indulgent, yet refined — a conversation starter for sure.
With a Side of Comfort
To turn this dish into the ultimate comfort meal, serve it alongside simple, warming sides that complement its creamy texture. Pair with:
Caramelised leeks or sautéed spinach for a green boost.
These sides add freshness and colour, making the plate even more inviting.
For a Fresh, Modern Twist
Kedgeree is wonderfully adaptable — perfect for experimenting with seasonal ingredients. Add fresh spinach or kale for extra greens, stir through Greek yoghurt for a lighter finish, or top with a sprinkle of toasted almonds for crunch. Pair with: A citrus salad made with orange segments, fennel, and rocket — a refreshing contrast to the smoky, creamy kedgeree.
Picnic or Meal Prep Idea
Believe it or not, kedgeree tastes even better the next day as the flavours deepen. Store in airtight containers, and enjoy it cold or gently reheated for lunch. It’s a brilliant make-ahead dish for busy days, picnics, or even office lunches. Pair with: Sparkling elderflower water, a light cucumber cooler, or an iced green tea with lemon.
Every spoonful of this Creamy Kipper Kedgeree celebrates the best of British comfort cooking — smoky, fragrant, and irresistibly creamy. It’s the perfect balance of tradition and modern simplicity, made effortless with John West Kippers in Sunflower Oil.
This dish doesn’t just nourish — it warms, satisfies, and reminds you why classic recipes never go out of style. Whether it’s a weekend brunch or a weeknight dinner, this kedgeree brings restaurant-quality flavour straight to your kitchen.
Made with care and quality ingredients from Nicol Retailer Limited, it’s proof that good food starts with the right ingredients — and ends with happy hearts.
Cook. Savour. Celebrate. Your kitchen, your story — powered by Nicol Retailer Limited.
🛒 Shop This Recipe
Bring this Creamy Kipper Kedgeree with Poached Egg & Fresh Herbs to life with high-quality, chef-approved ingredients from
Nicol Retailer Limited.
Every product is carefully selected to deliver fresh flavour, premium quality, and authentic British taste — straight to your kitchen.
Experience a bite-sized taste of elegance with our Quail Egg & Smoked Salmon Blinis with Lemon-Dill Crème Fraîche — by Nicol Retailer Limited.
There are appetisers — and then there are showstoppers.
These Quail Egg & Smoked Salmon Blinis with Lemon-Dill Crème Fraîche are the kind of canapés that make people pause mid-conversation. Elegant, bite-sized, and bursting with delicate flavour, they bring together three things that define luxury entertaining: simplicity, sophistication, and quality ingredients.
Each blini is a masterpiece of balance — soft, buttery pancake base; silky smoked salmon; zesty, herby crème fraîche; and the pièce de résistance — a perfectly cooked Caillor Quail Egg. It adds richness and visual appeal.
It’s the perfect recipe for special occasions, dinner parties, weddings, or festive spreads. In these events, presentation matters as much as taste. And thanks to Caillor Cooked & Peeled Quail Eggs (1×48) from Nicol Retailer Limited, these luxurious canapés are as effortless to prepare as they are beautiful to serve.
The Secret to Perfect Quail Egg Canapés
If you’ve ever tried working with quail eggs, you’ll know they can be tricky. Their delicate shells and petite size make them easy to overcook or difficult to peel. This is why professional chefs and caterers trust Caillor Cooked & Peeled Quail Eggs.
These eggs are precooked to perfection and carefully peeled, preserving their shape, texture, and soft, creamy yolk. They’re ready to use straight from the pack. This makes them perfect for restaurants, catering services, or home cooks who value efficiency without compromising quality. Pairing them with smoked salmon and a fresh lemon-dill dressing gives this dish a beautifully balanced profile:
The smoky, salty salmon enhances the quail egg’s richness.
The zesty lemon and fragrant dill cut through the creaminess for freshness.
And the soft blini base ties everything together into one harmonious bite.
Recipe
Elegant, delicious, and effortless — these Quail Egg & Smoked Salmon Blinis with Lemon-Dill Crème Fraîche are the perfect bite-sized appetisers for any occasion. Made using premium Caillor Cooked & Peeled Quail Eggs (1×48) from Nicol Retailer Limited, each blini combines silky smoked salmon, zesty crème fraîche, and the rich creaminess of quail eggs. This creates a luxurious, flavour-packed experience.
Serve them as canapés, brunch bites, or elegant party starters — they’re guaranteed to impress every guest. Her e is the recipe:
Quail Egg & Smoked Salmon Blinis with Lemon-Dill Crème Fraîche
Delight your guests with these elegant Quail Egg & Smoked Salmon Blinis, featuring perfectly sized Caillor Cooked & Peeled Quail Eggs from Nicol Retailer Limited. Each bite combines creamy lemon-dill crème fraîche, silky smoked salmon, and tender quail eggs for a luxurious appetiser that’s perfect for parties, brunches, or festive gatherings. Easy to assemble and full of gourmet flair, this canapé brings sophistication to any occasion
Course Appetizer, brunch, Canape, party food, Starter
In a small bowl, mix the crème fraîche, lemon juice, dill, lemon zest, and a pinch of black pepper. Chill until ready to serve.
Assemble the Blinis
Lay the blinis on a platter. Add a small dollop of the crème fraîche mixture to each one, followed by a delicate ribbon of smoked salmon.
Add the Quail Eggs
Top each blini with a Caillor Cooked & Peeled Quail Egg — each perfectly bite-sized at 3 cm long and 2.7 cm wide, ideal for elegant canapés. Slice a few in half for visual appeal.
Garnish and Serve
Sprinkle with chopped dill and a touch of lemon zest. Add horseradish cream or a tiny spoon of caviar for a gourmet finish. Serve immediately.
Notes
This Quail Egg & Smoked Salmon Blini recipe is a perfect balance of luxury and simplicity — elegant enough for a dinner party, yet quick and easy for casual gatherings. Each canapé showcases premium Caillor Cooked & Peeled Quail Eggs from Nicol Retailer Limited, paired with smooth lemon-dill crème fraîche and rich smoked salmon for a truly gourmet bite.For the best results, assemble just before serving to maintain the blinis’ light texture and prevent sogginess. If you’re hosting, you can prep the crème fraîche mixture and smoked salmon ribbons up to 6 hours ahead, then chill until needed. Chef’s Tip: For extra indulgence, top each canapé with a small spoonful of caviar, a touch of horseradish cream, or a few pearls of salmon roe. Add microgreens or edible flowers for a professional finish that photographs beautifully.This recipe is ideal for holiday entertaining, brunch buffets, wedding receptions, and corporate events, adding a refined touch to any occasion.
These Quail Egg & Smoked Salmon Blinis are a celebration of flavour, texture, and visual beauty — soft, buttery blinis topped with zesty lemon-dill crème fraîche, silky smoked salmon, and the rich creaminess of quail eggs. Their delicate balance makes them perfect for a wide range of occasions, from intimate brunches to lavish celebrations.
Here’s how to make the most of these bite-sized showstoppers:
Elegant Canapés for Entertaining
Perfect for dinner parties, cocktail evenings, or wedding receptions — these blinis bring a touch of fine dining to any gathering. Arrange them on a slate board or marble platter, and garnish with micro herbs, lemon zest, or edible flowers for a stunning presentation.
Luxurious Weekend Brunch
Elevate your brunch spread by serving these blinis alongside avocado toast, smoked trout pâté, and freshly squeezed orange juice. Their creamy, smoky richness complements lighter dishes perfectly. Add a pot of Earl Grey tea or a mimosa for the ultimate relaxed weekend indulgence.
Picnic Perfection or Garden Party Favourite
These canapés travel beautifully and can be served cold, making them ideal for picnics, outdoor events, or afternoon teas. Pack them in a chilled box, then garnish just before serving for that freshly prepared look.
Pair them with sparkling elderflower tonic or lemon-infused sparkling water for a refreshing outdoor treat.
Charcuterie & Grazing Board Delight
Add these blinis to your charcuterie or grazing board for an elevated twist. Surround them with cheeses, olives, roasted nuts, marinated artichokes, and cured meats for a vibrant mix of textures and flavours. They work particularly well with mild cheeses like Brie or creamy goat’s cheese.
Festive Feasts & Holiday Starters
Looking for a luxurious appetiser for Christmas, Easter, or New Year’s Eve? These blinis shine on any festive table. The quail eggs add elegance, while the smoked salmon brings indulgence — making them a natural pairing for celebratory meals. Serve as a starter before roast lamb, beef Wellington, or vegetarian tarts for a beautifully balanced menu.
Fine Dining & Formal Events
If you’re hosting a formal event or catering for clients, presentation is everything. Stack the blinis slightly overlapping on white porcelain platters or slate trays, garnish with dill fronds, caviar pearls, or edible gold leaf. For a creative twist, top each quail egg with a tiny spoon of trout roe or lemon caviar for extra texture.
Light Lunch or Afternoon Tea
For a lighter option, serve your blinis alongside seasonal salads, grilled asparagus, or cold seafood platters. Their delicate flavour pairs wonderfully with crisp greens, pickled vegetables, or creamy potato salads. They also make a sophisticated addition to afternoon tea platters — perfectly portioned and visually stunning.
Conclusion
Every bite of these Quail Egg & Smoked Salmon Blinis with Lemon-Dill Crème Fraîche captures the essence of elegant dining — delicate, luxurious, and unforgettable. The rich creaminess of the Caillor Quail Eggs, the silky texture of smoked salmon, and the bright freshness of lemon and dill come together in perfect harmony. They create a dish that feels indulgent yet effortless.
Whether served at a celebration, brunch, or intimate dinner, these blinis prove that beautiful food doesn’t have to be complicated — it just starts with the right ingredients.
Crafted using Caillor Cooked & Peeled Quail Eggs (1×48) from Nicol Retailer Limited, this recipe combines restaurant-quality flavour with the convenience modern cooks love. Because at Nicol Retailer Limited, we believe every meal — no matter how small — deserves premium ingredients, care, and a touch of artistry.
Serve. Savour. Celebrate. Bring gourmet simplicity to your table today — shop the full range of luxury ingredients at Nicol Retailer Limited .
A classic British favourite, the Smoked Gammon Hock & Parsley Terrine, reinvented by Nicol Retailer Limited
There’s something special about classic British dishes — those that carry both flavour and tradition in every bite. The Smoked Gammon Hock & Parsley Terrine is one such masterpiece. It’s rustic yet refined, simple yet show-stopping.
This terrine combines tender, slow-cooked smoked gammon with fresh parsley and aromatic herbs. It is set in a light, savoury jelly that perfectly balances richness and freshness. The result? A dish that feels indulgent but is surprisingly easy to make at home.
Made with premium smoked gammon hock from Nicol Retailer Limited, every slice tells a story of quality, craftsmanship, and flavour.
Traditionally served at family gatherings and festive tables, this recipe brings that same charm to modern dining. Whether you’re planning a picnic, a dinner party, or simply want to impress your guests, the terrine delivers elegance and comfort in one slice. When you use Smoked Gammon Hock (1 kg) from Nicol Retailer Limited, you’re starting with premium-quality meat. It is expertly smoked for depth of flavour and perfectly cured. It’s ideal for slow cooking or terrine preparation.
Why Smoked Gammon Hock Works Perfectly
The gammon hock, also known as the pork knuckle, is one of the most flavourful cuts of the pig. When smoked, it develops a rich, deep taste that gives this terrine its signature character. The slow simmering process breaks down connective tissue and infuses the meat with natural savouriness. It keeps it juicy and tender.
Using a smoked hock means you don’t need to add extra salt or heavy seasonings. The meat itself brings complexity, enhanced by fresh herbs like parsley and chives. Combined with a gentle jelly set using stock from the same hock, it creates a terrine that’s full-bodied, balanced, and authentic.
It’s economical, too — one hock goes a long way, yielding a terrine that can serve 6–8 people. This makes it a perfect make-ahead dish for entertaining.
Recipe
Get ready to impress your guests with this Smoked Gammon Hock & Parsley Terrine — a true British classic that’s rich in flavour and beautifully simple to prepare. Made with Smoked Gammon Hock (1 kg) from Nicol Retailer Limited, this elegant make-ahead dish combines tender, smoky gammon with fresh herbs and a light, savoury jelly. Perfect for entertaining, picnics, or festive gatherings, it delivers rustic charm and restaurant-quality flavour in every slice. Here is the recipe:
Indulge in this classic Smoked Gammon Hock & Parsley Terrine, a rustic British favourite bursting with flavour. Made using premium Smoked Gammon Hock (1 kg) from Nicol Retailer Limited, this dish combines tender, slow-cooked ham with fresh herbs, mustard, and a light, savoury jelly. Perfect for picnics, festive platters, or elegant starters, it’s rich, wholesome, and beautifully balanced. Serve with toasted sourdough, cornichons, and wholegrain mustard for a truly irresistible bite.Available from Nicol Retailer Limited — your trusted UK supplier for premium British meats and gourmet ingredients.
Course Appetizer, Cold Platter, lunch, Starter
Cuisine English, European, french
Diet Gluten Free
Keyword British starter, ham hock terrine,, Nicol Retailer Limited, parsley terrine, smoked gammon hock
Place the smoked gammon hock, carrot, onion, celery, bay leaves and peppercorns in a large pan. Cover with cold water and bring to a gentle boil. Simmer for 2–2½ hours until the meat is falling off the bone.
Shred the Meat
Remove the hock and allow it to cool slightly. Discard the skin and bones, then shred the meat into chunky pieces. Strain and reserve 100 ml of the cooking stock.
Prepare the Gelatine
Soak the gelatine in cold water for 5 minutes (or follow pack instructions). Warm the reserved stock, remove from the heat, and stir in the drained gelatine until dissolved. Add the mustard, lemon juice, parsley and chives.
Assemble the Terrine
Line a loaf tin with clingfilm, leaving enough overhang to cover the top. Layer the shredded gammon into the tin and pour over the herby gelatine mixture. Press down gently to remove air pockets, fold over the clingfilm and chill overnight until set.
Slice & Serve
Turn out the terrine and slice thickly. Serve cold with toasted sourdough, cornichons, and a spoonful of mustard or chutney.
Notes
This Smoked Gammon Hock & Parsley Terrine is a timeless British classic that brings rustic charm and gourmet flair to any table. Using Smoked Gammon Hock (1 kg) from Nicol Retailer Limited, you’ll achieve tender, smoky meat with a beautifully balanced herby flavour.For best results, cook the gammon slowly until it easily pulls from the bone — this ensures rich flavour and perfect texture. The overnight chill is essential for setting the terrine, allowing the flavours to deepen and the gelatine to firm up properly.You can prepare this dish up to three days in advance, making it perfect for entertaining, picnics, or festive buffets. Serve straight from the fridge with pickles, mustard, or crusty bread for a traditional presentation.Pro Tip: Use the leftover cooking stock as a flavour base for soups, sauces, or risotto — nothing goes to waste!
The beauty of this Smoked Gammon Hock & Parsley Terrine lies in its versatility. It’s rustic yet refined — equally at home on a picnic blanket, a festive buffet, or a fine dining starter menu. Every slice offers the perfect blend of smoky, herby, and savoury flavours — and when paired thoughtfully, it becomes truly unforgettable.
Here’s how to serve and elevate your terrine for any occasion :
As a Classic British Starter
Serve a generous slice of terrine on a chilled plate with toasted sourdough or crusty baguette, a spoonful of wholegrain mustard, and a few crisp cornichons on the side. The buttery bread contrasts perfectly with the smoky, savoury meat and sharp pickle. Ideal for dinner parties or festive gatherings where presentation matters.
Picnic Perfection
Pack this terrine for a countryside picnic or light alfresco lunch. Slice it thickly and pair with buttered new potatoes, pickled onions, and apple chutney for a flavour-packed cold platter. It travels beautifully and tastes even better the next day once the flavours have deepened — making it a must-have for summer outings.
Light Lunch or Brunch Idea
Turn your terrine into a light yet satisfying meal by serving it with a fresh green salad, hard-boiled eggs, and a lemon vinaigrette. Add a few slices of ripe pear or apple for sweetness — the perfect contrast to the salty, smoky meat. Balanced, refreshing, and ideal for a weekend brunch or lunch buffet.
Charcuterie-Style Sharing Board
Create an elegant charcuterie board featuring your Smoked Gammon Hock Terrine, slices of artisan cheese, crackers, and seasonal fruits like figs or grapes. Add bowls of mustard, pickled radishes, and caramelised onion chutney for that irresistible sweet-savoury contrast.
Warm & Hearty Meal Option
For a more substantial dish, serve your terrine slightly warmed alongside creamy mashed potatoes or roasted root vegetables. Drizzle lightly with warm mustard cream sauce for an indulgent twist on the traditional cold terrine. This version is perfect for winter dining — rich, comforting, and deeply satisfying.
Modern Gastro Pub Twist
Reimagine your terrine as part of a British-inspired tasting menu. Serve it on slate with pea shoots, a soft-boiled quail egg, and a drizzle of apple reduction for a restaurant-quality presentation that wows every time.
Shop the Star Ingredient
For the best flavour and texture, make this recipe using Smoked Gammon Hock (1 kg) from Nicol Retailer Limited — expertly smoked for depth of flavour and ideal for slow cooking, shredding, and terrines. Delivering quality and freshness across the UK, Nicol Retailer Limited is your trusted source for premium British meats and gourmet ingredients.
The Smoked Gammon Hock & Parsley Terrine is a true celebration of British culinary heritage. It is timeless, elegant, and full of honest flavour. Each slice tells a story of tradition and craft: tender smoked gammon, fresh herbs, and delicate jelly coming together in perfect harmony. It’s the kind of dish that feels special yet comforting. It’s ideal for family gatherings, dinner parties, or casual weekend lunches.
Made using premium Smoked Gammon Hock (1 kg) from Nicol Retailer Limited, this recipe delivers quality you can taste in every bite. Whether you’re a home cook or a professional chef, it’s proof that simple ingredients, when prepared with care, can create something truly extraordinary.
So why not bring a touch of British tradition to your table? Visit Nicol Retailer Limited to explore our full range of artisan meats, gourmet ingredients, and chef-approved produce — delivered fresh across the UK.
Because every great meal starts with quality. And at Nicol Retailer Limited, quality is our signature.
Prefer Not to Make It from Scratch?
If you love the idea of a rich, flavour-packed terrine but don’t have the time to make one from scratch, we’ve got you covered. Explore our delicious range of ready-made pâtés and terrines, all prepared with the same attention to quality and traditional craftsmanship that makes this recipe so special.
From smooth, savoury pâtés to beautifully seasoned rustic terrines, there’s something for every table and occasion. Simply serve with crusty bread, chutney, or a fresh salad for an effortless gourmet experience.
🛒 Shop our full selection here: 👉 https://nicolretailer.com/product-category/pates-terrines/
Brought to you by Nicol Retailer Limited — your trusted UK source for premium ingredients and artisanal ready-made delicacies.
A golden, flavour-packed vegan recipe for Crispy Garlic-Chilli Satonoyuki Tofu by Nicol Retailer Limited
If you think tofu is bland, prepare to have your mind changed forever. This Crispy Garlic-Chilli Satonoyuki Tofu with Sticky Soy Glaze is bold, aromatic, and packed with that irresistible sweet–spicy kick we all crave.
Using the delicate yet firm texture of Satonoyuki Firm Silken Tofu — available to buy from Nicol Retailer Limited — this recipe delivers the perfect balance of crisp edges, soft interiors, and a glossy, sticky glaze that clings beautifully to every bite.
It’s quick enough for a weekday dinner, delicious enough for a dinner party, and completely plant-based. Whether you’re vegan, vegetarian, or just love a flavour explosion, this dish will become a new favourite in your kitchen.
About Satonoyuki Firm Silken Tofu
Satonoyuki is Japan’s leading tofu brand, loved for its delicate flavour, silky texture, and reliability in both Asian and Western cooking.
Unlike traditional tofu, Satonoyuki Firm Silken Tofu keeps its shape beautifully — meaning you can fry, grill, or bake it without crumbling. It absorbs sauces and marinades effortlessly, making it the perfect canvas for this sticky soy glaze.
Available in convenient 300 g packs, it’s ideal for both home cooks and restaurants. You can order Satonoyuki Firm Silken Tofu (12 × 300 g) directly from Nicol Retailer Limited — your trusted supplier of authentic British and international ingredients, delivered across the UK.
Recipe
Get ready to fall in love with tofu all over again! This Crispy Garlic-Chilli Satonoyuki Tofu with Sticky Soy Glaze is a flavour-packed masterpiece that transforms everyday ingredients into something truly extraordinary. Made using premium Satonoyuki Firm Silken Tofu — available from Nicol Retailer Limited — this recipe delivers the ultimate balance of crunchy, golden texture on the outside and silky softness within.
Infused with the bold flavours of garlic, ginger, soy, and chilli, this vegan-friendly dish is as comforting as it is impressive. Whether you’re cooking for family, entertaining friends, or simply craving something special, this recipe guarantees to satisfy every bite.
Scroll down for the full recipe, step-by-step instructions, and serving tips to make this irresistible tofu dish at home.
Crispy Garlic-Chilli Satonoyuki Tofu with Sticky Soy Glaze
Crispy Garlic-Chilli Satonoyuki Tofu with Sticky Soy Glaze — a flavour-packed vegan dish made with Satonoyuki Firm Silken Tofu, pan-fried until golden and coated in a sweet-spicy soy glaze. Each bite delivers a perfect balance of crisp texture, silky interior, and bold umami flavour. Finished with sesame seeds, spring onions, and a squeeze of lime, this tofu bowl is delicious served over jasmine rice or noodles. Ideal for a quick weeknight dinner or an impressive plant-based meal.Made using premium Satonoyuki Firm Silken Tofu (available from Nicol Retailer Limited) — firm enough to hold its shape yet smooth enough to melt in your mouth.
Carefully drain and press your Satonoyuki tofu to remove excess moisture (about 10 min). Cut into 1-inch cubes, then toss lightly in cornflour, salt, and pepper for a delicate crisp coating.
Fry Until Golden
In a non-stick pan, heat oil over medium heat. Fry tofu cubes on all sides until crisp and golden — around 6–8 minutes. Remove and drain on kitchen paper.
Make the Glaze
In the same pan, reduce heat to low and add garlic and ginger. Sauté until fragrant (30 sec). Stir in soy sauce, rice vinegar, maple syrup, sriracha, and sesame oil. Simmer gently until thickened and glossy — about 2–3 minutes.
Glaze & Toss
Return the crispy tofu to the pan and toss to coat evenly in the sticky glaze. The tofu will soak up the flavour beautifully while staying crisp outside and tender inside.
Serve & Garnish
Spoon over jasmine rice or noodles, sprinkle with sesame seeds and spring onions, and finish with a squeeze of lime juice.
Notes
Satonoyuki Firm Silken Tofu is the perfect base for this recipe — firm enough to hold its shape while delivering that soft, melt-in-the-mouth interior. Its versatility makes it ideal for frying, baking, or glazing.For extra crispiness, press the tofu for 10 minutes before cooking and toss it in cornflour. This creates that irresistible golden crust.The sticky soy glaze balances savoury umami with a touch of heat and sweetness — perfect over jasmine rice or noodles. Double the sauce for meal-prep bowls or stir-fry dishes.Swap soy sauce for tamari to make this dish 100% gluten-free.This tofu pairs beautifully with roasted vegetables, edamame, or steamed bok choy for a colourful, nutrient-rich plate.Great for vegan, vegetarian, and dairy-free diets, this recipe is high in plant protein and packed with bold flavour.Serve hot with lime wedges and sesame seeds for a restaurant-style finish.Created using Satonoyuki Firm Silken Tofu (available from Nicol Retailer Limited) — your go-to UK supplier for premium Asian and vegan ingredients.
This Crispy Garlic-Chilli Satonoyuki Tofu is one of those rare dishes that’s as versatile as it is delicious. Whether you want to keep it light or turn it into a hearty main course, this tofu works beautifully with a variety of sides, textures, and flavours. Here are some irresistible ways to serve and pair it:
Classic Rice Bowl
Serve your crispy tofu over a generous bed of steamed jasmine or sticky rice to soak up every drop of the sticky soy glaze. Add a side of stir-fried vegetables — like broccoli, bok choy, or sugar snap peas — for balance and colour. This simple bowl highlights the savoury umami glaze while keeping the meal wholesome and satisfying.
Noodle Heaven
For a slurp-worthy twist, toss your glazed tofu into rice noodles, udon, or soba. Drizzle over a little extra sauce and top with chopped peanuts, coriander, and lime juice for a Southeast Asian-inspired vibe. Perfect for those who love a heartier, restaurant-style vegan noodle bowl.
Buddha Bowl Bliss
Turn this dish into a vibrant, nutrient-packed Buddha bowl by layering crispy tofu with quinoa, roasted sweet potatoes, fresh avocado, cucumber ribbons, and pickled red cabbage. Finish with a sprinkle of sesame seeds and a spoonful of leftover glaze as dressing. Ideal for meal prep or a balanced, colourful plant-based lunch.
Wrap It Up
Take your tofu on the go by wrapping it in a warm tortilla or rice paper roll. Add shredded carrots, lettuce, and a drizzle of spicy mayo or vegan hoisin for a delicious fusion snack. A fun, family-friendly twist that’s easy to pack for lunch or picnics.
Japanese-Inspired Dinner Set
Create an elegant dinner experience by pairing your tofu with miso soup, steamed edamame, and pickled ginger. Add a side of sushi rice and finish with a cup of green tea for a balanced, authentic Japanese meal. A simple yet sophisticated way to showcase Satonoyuki’s authentic Japanese origins.
Fresh & Light Option
If you’re after something refreshing, serve your crispy tofu on top of a crunchy Asian slaw made from shredded cabbage, carrots, and spring onions. Toss the slaw in a light sesame dressing and enjoy the perfect mix of hot, cold, crunchy, and soft textures. A refreshing option for summer days or lighter lunches.
Family-Style Feast
Double the recipe and serve it as a centrepiece alongside other dishes like fried rice, vegetable tempura, or vegan dumplings. The glossy, sticky tofu makes a stunning main dish that looks (and tastes) like something straight from your favourite restaurant.
Why It Works Year-Round
This tofu dish isn’t just for one season — it’s a recipe that fits any occasion. In winter, serve it warm with rice or noodles for cosy comfort. In summer, enjoy it chilled in a salad or as a protein-packed picnic wrap. For entertaining, it’s impressive, vibrant, and easy to prepare in advance.
Tip:
All the ingredients, including the Satonoyuki Firm Silken Tofu (12×300g), are available to buy from Nicol Retailer Limited — your trusted source for premium British and Asian ingredients with nationwide UK delivery.
This Crispy Garlic-Chilli Satonoyuki Tofu is proof that plant-based food can be indulgent, flavourful, and satisfying. It’s a recipe that celebrates texture and taste — golden on the outside, soft within, and glazed to perfection.
Proudly created by Nicol Retailer Limited, this dish brings authentic Japanese tofu to your UK kitchen. Every bite is bold, aromatic, and deeply comforting — the kind of meal that keeps everyone coming back for seconds.
Few dishes capture the warmth of British home cooking like this Blackgate Cumberland Sausage & Apple Cider Skillet. It is a rich, one-pan comfort meal that brings together golden sausages, caramelised onions, and tender apples in a glossy cider gravy.
Made with Blackgate Signature Premium Cumberland Pork Sausages (1.2 kg) , this recipe delivers authentic flavour and quality every time. Whether you’re serving a cosy family dinner, a Sunday lunch, or a pub-style feast, this Blackgate Cumberland Sausage & Apple Cider Skillet fills the kitchen with irresistible aromas and classic comfort.
Juicy, hand-linked sausages are gently simmered in a glossy apple cider gravy. They are combined with sweet caramelised onions and crisp apple slices, creating the perfect harmony of savoury and sweet. It’s the kind of dish you’ll want to serve on a chilly evening with creamy mash and a glass of cold cider.
Why You’ll Love This Recipe
Authentic Flavour: Made with high-quality Blackgate Cumberland sausages, perfectly spiced and bursting with traditional seasoning.
Sweet & Savoury Harmony: Apples and cider bring brightness that balances the richness of the pork.
One-Pan Wonder: Less mess, more flavour — everything cooks together for ultimate convenience.
Quick & Satisfying: From pan to plate in under an hour.
🇬🇧 A True British Classic: Comfort food that tastes like the Blackgate Cumberland Sausage & Apple Cider Skillet you make at home.
A Classic Made Modern- Recipe
While the combination of sausages, apples, and cider is deeply rooted in traditional British pub fare, this skillet version modernises the classic. It’s simple enough for a midweek dinner, yet elegant enough for weekend entertaining. And the best part? It all comes together in one pan, making cooking (and washing up!) a breeze. Consider adding the Blackgate Cumberland Sausage with Apple Cider for that modern twist.
This recipe captures that cosy, rustic feel of an English countryside kitchen. It features hearty meals, simple ingredients, and bold flavours to take centre stage. Here are the recipe and instructions on how to make it:
Blackgate Cumberland Sausage & Apple Cider Skillet
A rich, caramelised one-pan dish that brings together juicy Cumberland sausages, sweet apples, earthy onions, and a luscious cider gravy. It’s hearty, perfectly balanced, and ideal for a family dinner, pub-style menu, or festive gathering.
Course Comfort Food, Dinner, Family Meal, Main Course, Pub-Style Dish
Cuisine English, Modern European, Traditional Pub Food
Diet Low Calorie
Keyword apple cider skillet, Blackgate Signature sausages, British comfort food, Cumberland sausage recipe, one-pan sausage dinner
Heat the olive oil in a large cast-iron pan or deep skillet over medium heat. Add the Blackgate Cumberland sausages and brown on all sides for 10 minutes. Remove and set aside.
Caramelise the onions & apples
In the same pan, add the onions and cook for 5 minutes until soft. Add the apple slices and brown sugar, then cook for another 5–7 minutes until caramelised and golden.
Create the cider gravy
Sprinkle the flour over the onion and apple mixture, stirring well to coat. Gradually pour in the cider, followed by the stock, stirring constantly to create a smooth sauce. Add mustard, Worcestershire sauce, thyme, salt, and pepper. Simmer for 5 minutes until thickened slightly.
Combine and simmer
Return the browned sausages to the pan, nestling them into the cider gravy. Reduce the heat to low, cover, and simmer for 25–30 minutes until the sausages are cooked through and the sauce is rich and glossy.
Scatter with fresh parsley and serve directly from the skillet for a rustic, homely presentation.
Notes
Versatile & comforting: This Cumberland Sausage & Apple Cider Skillet is a true taste of British comfort food — sweet, savoury, and hearty enough for any season. Ideal for family dinners, Sunday lunches, or pub-style menus.Make ahead: The flavours deepen overnight, so this dish tastes even better the next day. Simply cool, cover, and refrigerate for up to 2 days. Reheat gently on the hob until piping hot.Freezer-friendly: Once cooled, portion into airtight containers and freeze for up to 3 months. Defrost overnight in the fridge before reheating.Ingredient swaps:Use pear cider or white wine for a milder flavour.Swap apples for pears or shallots for a more subtle sweetness.For a lighter version, use low-fat sausages or reduce the oil by half.Serving ideas: Pair with buttery mashed potatoes, roasted vegetables, or Yorkshire puddings for a full British feast.For a glossy finish: Stir in a knob of cold butter just before serving — it makes the sauce rich and silky.Best sausages to use: The Blackgate Signature Premium Cumberland Pork Sausages (1.2 kg) have a perfect balance of spice and coarsely ground pork, ensuring a satisfying bite every time.
Crusty bread — perfect for soaking up the cider gravy.
Steamed green vegetables — like broccoli, green beans, or peas for freshness.
If you’re entertaining, serve the Blackgate Cumberland Sausage & Apple Cider Skillet family-style straight from the skillet for a rustic, pub-inspired presentation.
This Blackgate Cumberland Sausage & Apple Cider Skillet is proof that simple ingredients can make the most satisfying meals. It’s a timeless recipe that celebrates the best of British cooking — hearty, flavourful, and irresistibly comforting. Whether you’re feeding a family, hosting friends, or simply craving something warming, this dish never fails to impress. Serve it with your favourite sides and raise a glass of cider to true comfort food done right.
Few dishes say comfort quite like a slow-braised British Beef Shin Ragù — rich, silky, and bursting with deep, savoury flavour. Using the exceptional Alec Jarrett British Red Tractor Beef Shin Middle Cut, this recipe transforms a humble cut into a restaurant-quality masterpiece.
As the beef gently cooks in red wine, tomatoes, and aromatic herbs, it breaks down into tender shreds. This creates a sauce so luscious you’ll want to savour every bite. Served over buttery Parmesan mash, it’s the perfect balance of rustic warmth and indulgent dining.
This is comfort food, elevated — and proof that with Nicol Retailer Limited’s premium British beef, you can bring chef-level flavour straight to your home kitchen.
Why Alec Jarrett British Red Tractor Beef Shin is the Star Ingredient
The Alec Jarrett British Red Tractor Beef Shin Middle Cut from Nicol Retailer Limited is the hero of this dish. It’s a premium British cut known for its exceptional quality, traceability, and melt-in-the-mouth tenderness. Every reason to choose it makes this recipe shine:
🇬🇧 Certified British Quality: As a Red Tractor Assured product, this beef guarantees traceability, animal welfare, and sustainable farming practices — so you know exactly where your meat comes from.
Rich and Full-Bodied Flavour: Beef shin is cut from the hardworking leg, rich in connective tissue and flavour. When slow-cooked, the collagen melts down, giving the sauce its silky texture and mouthfeel.
Generous and Versatile: The 5 kg pack is ideal for batch cooking, dinner parties, or freezing portions for future meals — delivering incredible value and consistent quality.
Perfect for Braising: The slow cooking process transforms this affordable cut into restaurant-quality tenderness, full of deep, comforting flavour.
You can source this premium ingredient exclusively at Nicol Retailer Limited — the home of professional-grade British meats.
Recipe
This easy-to-follow recipe guides you through every step. From browning the beef and building layers of flavour to preparing the creamy mash that completes the dish. Whether you’re cooking for a Sunday family meal, a special dinner, or simply craving a hearty bowl of comfort, this British Beef Shin Ragù is a timeless classic that delivers every time. Here is the recipe and ingredients:
Braised British Beef Shin Ragù with Creamy Parmesan Mash
Indulge in pure comfort with this Braised British Beef Shin Ragù with Creamy Parmesan Mash, a dish that brings slow-cooked luxury to your dinner table. Using Alec Jarrett British Red Tractor Beef Shin Middle Cut from Nicol Retailer Limited, this recipe delivers melt-in-the-mouth beef simmered in a rich red wine and tomato sauce, served over velvety Parmesan mash.Each bite combines deep, savoury flavours and silky textures — perfect for Sunday roasts, date nights, or elegant family meals. With Red Tractor-certified British beef, this dish guarantees both quality and flavour in every forkful.
Season beef pieces and brown in olive oil over medium heat until golden on all sides. Remove and set aside.
Build the base:
In the same pot, cook onions, carrots, and celery for 5 minutes. Add garlic and tomato purée; cook for 1 minute
Deglaze:
Pour in red wine, scraping up any caramelised bits. Reduce slightly.
Simmer:
Add chopped tomatoes, stock, herbs, and ISFI Cayenne Pepper. Return beef to the pot.
Braise:
Cover and cook gently for 3 hours in the oven at 160 °C (140 °C fan) until beef is tender and falling apart.
Finish:
Shred the beef into the sauce with a fork. Simmer uncovered for 10 minutes to thicken.
Make the mash:
Boil potatoes until soft. Drain, mash with butter, milk, Parmesan, and salt until smooth.
Serve:
Spoon creamy mash onto plates and top generously with beef shin ragù. Garnish with extra Parmesan and herbs.
Notes
Chef’s NotesBest Cut for Braising: The Alec Jarrett British Red Tractor Beef Shin from Nicol Retailer Limited is naturally rich in collagen, giving your ragù a luxurious, velvety sauce when slow-cooked.Cook it Low and Slow: For tender, melt-in-the-mouth beef, cook gently at 160 °C for about 3 hours — patience pays off with this dish.Plan Ahead: Make your ragù a day in advance; the flavours deepen overnight for an even richer taste the next day.Freezer Friendly: Cool completely, portion into containers, and freeze for up to 3 months — ideal for batch cooking or quick weekday meals.Flavour Upgrade: Add a splash of cream or a pinch of ISFI Professional Cayenne Pepper for an indulgent twist.Creative Serving Idea: Spoon leftover ragù over buttery pasta, polenta, or even inside a Yorkshire pudding for a British-Italian fusion treat.Perfect Pairing: A glass of Chianti, Barolo, or Malbec enhances the deep beef flavour and tomato richness beautifully.
This Braised Beef Shin Ragù isn’t just a main course — it’s a centrepiece meal that deserves to be enjoyed slowly. Here are a few pairing and plating ideas to make it even more memorable:
On the Side
Garlic Bread or Ciabatta: Perfect for soaking up every drop of that rich red-wine sauce.
Crispy Roast Vegetables: Try roasted parsnips, carrots, or tenderstem broccoli for a pop of colour and crunch.
Green Salad: A fresh rocket and Parmesan salad cuts through the richness perfectly.
Creamed Spinach: Adds a luxurious, buttery texture alongside the mash.
Occasions to Serve
Sunday Roast Alternative: Serve this instead of traditional roast beef for a modern twist.
Dinner Parties: Impress guests with a dish that looks like it took hours (because it did — and it’s worth it!).
Winter Feasts: Perfect for cold evenings by the fire, paired with a glass of red and good company.
Leftover Magic: Spoon the leftover ragù over pappardelle, layer into lasagne, or use as a jacket potato topping.
Chef’s Tip: Add a splash of balsamic vinegar or a knob of butter right before serving for extra shine and richness.
Conclusion
There’s something truly special about taking simple, honest ingredients and transforming them into a dish that feels both comforting and luxurious. This Braised British Beef Shin Ragù with Creamy Parmesan Mash is proof that with patience, care, and quality ingredients, home cooking can rival any restaurant experience.
The slow-cooked Alec Jarrett British Red Tractor Beef Shin Middle Cut delivers incredible flavour and tenderness. Meanwhile, the buttery Parmesan mash provides the perfect base for soaking up that rich, glossy sauce. It’s a true celebration of British beef — hearty, satisfying, and packed with depth.
Whether you’re cooking for loved ones, preparing a Sunday feast, or just craving a bowl of comfort after a long day, this recipe promises to deliver warmth, flavour, and satisfaction in every bite.
Created by Nicol Retailer Limited — proudly bringing premium British Red Tractor meats and professional-grade ingredients to your kitchen.
Discover more gourmet recipes and chef-quality products at nicolretailer.com .
Looking for the ultimate crowd-pleasing appetiser or weekend dinner idea? These Spicy Honey-Glazed Chicken Wings, made with ISFI Professional Cayenne Pepper, are sticky, crispy, and bursting with flavour — perfectly balanced between sweet, smoky, and spicy.
The secret ingredient? ISFI Professional Cayenne Pepper – Pure Ground Chilli from Nicol Retailer Limited. This high-quality, chef-grade spice delivers clean, consistent heat with a pure chilli flavour that transforms simple chicken wings into something truly irresistible.
Whether you’re hosting a barbecue, a game-night feast, or just fancy a midweek treat, these wings will have everyone licking their fingers.
Why Choose ISFI Professional Cayenne Pepper?
When it comes to heat, not all chilli powders are equal. ISFI Professional Cayenne Pepper stands out for its purity, strength, and versatility.
Pure ground chilli – no fillers, just fiery, flavourful heat.
Professional-grade quality – trusted by chefs for consistent results.
Large 460 g tub – perfect for home cooks, caterers, or spice lovers.
Perfect balance of flavour and heat – ideal for marinades, rubs, and sauces.
Get ready to turn up the heat with these irresistibly Spicy Honey-Glazed Chicken Wings, crafted with the bold kick of ISFI Professional Cayenne Pepper from Nicol Retailer Limited. This recipe strikes the perfect balance between fiery spice and sweet stickiness, giving you wings that are crispy on the outside, juicy inside, and coated in a glossy honey-chilli glaze. Using high-quality, pure ground chilli ensures consistent flavour in every bite — ideal for impressing guests or enjoying a restaurant-style dish at home. Follow the simple, step-by-step instructions below to create the ultimate game-night snack, BBQ favourite, or comfort-food dinner that’s guaranteed to disappear fast!
Here is the recipe:
Spicy Honey-Glazed Chicken Wings with ISFI Cayenne Pepper
These Spicy Honey-Glazed Chicken Wings made with ISFI Professional Cayenne Pepper from Nicol Retailer are sticky, crispy, and packed with flavour. A perfect balance of heat and sweetness, this easy one-pan recipe is ideal for parties, barbecues, or weeknight dinners.
Course Appetizer, Main Course, Party Snack, Starter
Cuisine American, Barbecue, British (with a modern twist)
Preheat your oven to 200 °C / 400 °F / Gas 6. Line a large baking tray with foil and lightly oil it.
Season the wings:
In a large bowl, toss chicken wings with olive oil, cayenne pepper, paprika, garlic powder, salt, and pepper.
Bake:
Spread the wings in a single layer and bake for 35–40 minutes, turning halfway through until golden and crisp.
Make the glaze:
In a small saucepan, warm honey, soy sauce, ketchup, vinegar, and a pinch of cayenne pepper. Stir until slightly thickened.
Coat & finish:
Remove the wings from the oven and brush with the warm glaze. Return to the oven for 5 more minutes until sticky and sizzling.
Serve immediately with extra glaze for dipping and garnish with fresh coriander or sesame seeds.
Notes
Chef’s NotesAdjust the Heat: The ISFI Professional Cayenne Pepper from Nicol Retailer adds bold, fiery flavour. Start with ½ teaspoon for mild wings, or go up to a full teaspoon for an extra kick.Cooking Methods: These wings are perfect for baking, grilling, or air frying. For barbecues, finish them over charcoal for a smoky, flame-grilled taste.Gluten-Free Friendly: Use a gluten-free soy sauce to make the recipe completely gluten-free without sacrificing flavour.Meal Prep Tip: Cook in bulk and refrigerate for up to two days—ideal for quick lunches, party platters, or next-day snacking.Perfect for Sharing: These sticky, spicy wings are a guaranteed crowd-pleaser for parties, family dinners, or game nights.Flavour Boost: Add a squeeze of lime juice or a drizzle of extra honey before serving for a glossy, restaurant-style finish.
These Spicy Honey-Glazed Chicken Wings are incredibly versatile and can be enjoyed as everything from a fiery party appetiser to a satisfying main course. The sweet heat from ISFI Professional Cayenne Pepper, available at Nicol Retailer Limited, pairs beautifully with a range of sides, dips, and drinks.
Side Dishes That Pair Perfectly
Sweet Potato Fries: Their caramelised edges and natural sweetness balance the cayenne heat beautifully.
Buttered Corn on the Cob: A classic BBQ pairing that adds a buttery crunch to every bite.
Zesty Coleslaw: A cooling side that cuts through the spice — try one with lime juice or Greek yoghurt dressing.
Garlic Roasted Potatoes: Crispy, golden and seasoned with a pinch of cayenne for extra depth.
Fresh Garden Salad: Keep it light with cucumber, cherry tomatoes, and a drizzle of olive oil and lemon.
Mac & Cheese: For indulgence lovers, the creamy cheese perfectly offsets the chilli warmth.
Dips & Sauces
Garlic Mayo or Aioli: A cooling, creamy dip that soothes the spice while adding richness.
Spicy Yoghurt Dip: Mix yoghurt with lime juice, mint, and a dash of ISFI Cayenne Pepper for a refreshing twist.
Honey Mustard Sauce: The sweetness of honey complements the glaze perfectly.
Classic Blue Cheese Dip: For those who love contrast — tangy, rich, and irresistible with heat.
Occasions to Serve These Wings
Game Nights: The ultimate sharing snack that keeps guests coming back for more.
Summer BBQs: Grill the wings outdoors and brush with honey glaze for smoky perfection.
Family Dinners: Serve with rice or salad for a quick, satisfying meal.
Party Platters: Pair with vegetable skewers, chips, and dips for a complete spread.
There’s nothing quite like the combination of sticky honey, crispy chicken, and the fiery warmth of ISFI Professional Cayenne Pepper to make a meal unforgettable. These Spicy Honey-Glazed Chicken Wings are proof that with the right ingredients, simple home cooking can taste like restaurant-quality perfection. Whether you’re planning a family dinner, a game-night feast, or a summer barbecue, this recipe brings the perfect balance of heat, sweetness, and flavour to the table.
Ready to add some spice to your kitchen? Shop the hero ingredient — ISFI Professional Cayenne Pepper Pure Ground Chilli, 460g — exclusively at Nicol Retailer Limited. Premium quality, professional-grade spice, and endless culinary inspiration — only from Nicol Retailer.
Few desserts capture the joy of summer — or any season — quite like the Vanilla-Berry Ice Cream Float “Twist”. This irresistible recipe combines creamy vanilla soft-serve, fizzy homemade berry soda, and fresh British berries. It creates a dessert drink that’s as beautiful as it is delicious.
Crafted using the premium Arla Slower Melt Soft Ice Mix 2 L, it delivers that signature soft-serve texture and a slow-melt finish. This holds perfectly in warm weather. And because its flavour is timeless, you can enjoy this creamy, fizzy indulgence all year round. It fits from sunny garden parties to cosy winter dinners.
A Dessert for All Seasons
This isn’t just a summer dessert — it’s an all-year-round indulgence. In spring and summer, the fizzy berry soda keeps things light and refreshing. In autumn and winter, serve it with warm berry compote. Or you can drizzle it with hot chocolate sauce for a comforting twist.
The combination of creamy vanilla soft-serve, sparkling soda, and fresh fruit makes this dessert timeless, versatile, and always crowd-pleasing. Thanks to Arla’s Slower Melt Soft Ice Mix, it also stays picture-perfect longer — ideal for entertaining, catering, or home enjoyment.
Recipe
This dessert is easy to prepare, fun to serve, and endlessly adaptable — the perfect addition to your Nicol Retailer Limited recipe collection:
Beat the heat with this Vanilla-Berry Ice Cream Float “Twist” — a creamy, fizzy, and fruity dessert made using Arla Slower Melt Soft Ice Mix 2 L. This irresistible treat layers smooth vanilla soft-serve with homemade sparkling berry soda and fresh summer berries for a colourful, café-style finish that’s perfect for BBQs, garden parties, or weekend indulgence.The Arla Slower Melt Soft Ice Mix gives you a luxuriously creamy texture that holds its shape longer — ideal for floats and sundaes served in warm weather. Paired with a fizzy blend of strawberries, raspberries, and blueberries, this recipe delivers a refreshing burst of flavour in every sip and spoonful.”.
Fresh raspberries, strawberries, and blueberries (about 1 cup total)
4 mint sprigs for garnish
4 tall dessert glasses
Paper straws
Instructions
Make the Sparkling Berry Soda
Add strawberries, raspberries, blueberries, sugar, and lemon juice to a small saucepan.
Simmer on low-medium heat for 5–7 minutes until the berries release their juices and soften.
Strain through a fine mesh sieve, pressing gently to extract as much syrup as possible.
Allow the syrup to cool completely, then mix with chilled sparkling water just before serving.
Optional: Adjust sweetness with a little more syrup or sugar to taste.
Prepare the Ice Cream
Pour 600 ml of Arla Slower Melt Soft Ice Mix into your soft-serve machine and churn until thick and creamy.
No machine? Freeze the mix in a shallow container for 1–1½ hours, stirring every 30 minutes until it reaches soft-serve texture.
Assemble the Floats
Add a few fresh berries to the bottom of each glass.
Pour in about 100 ml of the homemade sparkling berry soda.
Add one large swirl (or scoop) of soft ice cream.
Top with more berries and a mint sprig.
Add a straw and serve immediately — watch the fizz bubble up beautifully!
Notes
Recipe Notes – Vanilla-Berry Ice Cream Float TwistUse quality ice cream mix: The Arla Slower Melt Soft Ice Mix 2 L creates a rich, creamy texture that holds its shape longer — perfect for floats, sundaes, or summer dessert drinks.Homemade berry soda: Fresh berries, lemon juice, and sparkling water make a naturally flavoured soda that’s lighter and more refreshing than store-bought versions.Best served fresh: Assemble just before serving to keep the fizz lively and the soft-serve texture silky.Chill everything: Keep the glasses, soda, and serving spoons cold to prevent premature melting.Customise flavours: Swap berries for mango, peach, or cherry for different seasonal twists.Make it vegan: Use a dairy-free soft-serve alternative and ensure your sugar and soda are vegan-friendly.Make ahead: The berry syrup can be prepared up to 2 days in advance and stored in the fridge.Presentation tip: Garnish with fresh mint, edible flowers, or a drizzle of berry coulis for a professional café-style finish.
he Vanilla-Berry Ice Cream Float “Twist” is wonderfully versatile — a dessert drink that’s as fitting at a summer BBQ as it is after a festive roast dinner. With its mix of creamy vanilla soft-serve and fruity fizz, it complements a wide variety of flavours, making it an easy centrepiece for any menu or celebration. Below are some delicious ways to serve and pair this dessert for maximum impact.
Sweet Treat Pairings
Classic Shortbread Biscuits – Crisp, buttery, and lightly sweet, shortbread is the perfect companion for a creamy dessert. Its crumbly texture contrasts beautifully with the smoothness of the ice cream float.
Mini Meringues or Pavlova Pieces – Add crunch and sweetness with crushed meringue. It is especially lovely when topped with extra berry syrup for a touch of decadence.
Lemon Drizzle Cake – The light citrus notes of a classic British lemon drizzle pair wonderfully with the soft vanilla base. They enhance the tangy berries.
Sponge Fingers or Madeleines – Elegant and airy, these delicate cakes soak up the fizzy berry soda. They do this just enough to enhance each bite.
Vanilla or Almond Wafers – Add a nostalgic touch with wafer rolls or almond biscuits — ideal for dipping into the creamy layers.
Flavour Add-Ons & Seasonal Twists
Summer: Add crushed pistachios, toasted coconut, or a drizzle of mango syrup for a tropical flair. Serve with grilled peaches or nectarines for an alfresco dessert.
Autumn: Drizzle caramel or maple syrup over the ice cream for a toffee-apple twist. -Pair with cinnamon shortbread or spiced apple crumble bites.
Winter: Replace the chilled soda with warm berry compote or mulled fruit syrup. Add grated dark chocolate or a splash of Irish cream liqueur for a comforting, grown-up version.
Spring: Use fresh rhubarb syrup or add edible flowers such as violets or pansies for a floral touch.
How to Serve for Impact
For Home Entertaining: Use tall clear glasses or mason jars to show off the colourful layers. Add a reusable straw and serve on small dessert plates with biscuits on the side.
For Parties or Catering: Prepare the berry syrup and soda in advance, and churn the ice cream just before serving. Offer toppings such as chocolate flakes, chopped nuts, or fruit purees so guests can customise their floats.
Expert Tip from Nicol Retailer Limited:
Because Arla Slower Melt Soft Ice Mix holds its texture longer than standard soft ice, you can serve this dessert confidently at buffets, outdoor events, or high-volume service — no more melting mess before your guests dig in!
There’s something magical about Christmas dinner — the smell of rosemary and thyme filling the kitchen, the sparkle of fairy lights, and the comfort of a hearty roast at the centre of the table. If you’re planning a vegan or vegetarian Christmas dinner, this Festive Nut Roast Loaf with Cranberries & Chestnuts deserves pride of place.
Rich, hearty, and beautifully glazed with cranberry sauce, this nut roast is a far cry from the dry, dull versions of the past. It’s moist, full of texture, and bursting with savoury-sweet flavour from chestnuts, mushrooms, and herbs.
The Secret to a Perfect Nut Roast
A truly great nut roast is all about balance — nutty crunch, tender vegetables, and a touch of festive sweetness. In this recipe, roasted nuts and chestnuts bring depth, mushrooms and lentils add savoury body, and cranberries provide that Christmassy sparkle.
Why It’s a Christmas Classic
This festive nut roast brings together everything we love about Christmas cooking: comfort, colour, and community. It’s a dish that feels homemade, wholesome, and special — without being complicated. Every slice tells a story: toasted nuts for crunch, lentils for body, chestnuts for warmth, and cranberries for a sparkle of joy. It’s proof that vegan food can be indulgent, comforting, and utterly beautiful on the Christmas table.
Recipe
Now, let’s dive into what you’ll need to create this perfect Christmas nut roast:
Festive Nut Roast Loaf with Cranberries & Chestnuts
This Festive Nut Roast Loaf is the ultimate Christmas showstopper for vegetarians and vegans alike. Bursting with roasted nuts, earthy lentils, sweet cranberries, and savoury herbs, it’s moist on the inside with a crisp, golden crust. Topped with a glossy cranberry glaze and served alongside roasted veggies and vegan gravy, it’s a plant-based main that everyone will love. Ideal for Christmas dinner, New Year’s feasts, or cosy winter gatherings.
180°C (fan 160°C) / 350°F. Line a large 2lb loaf tin with baking paper.
Cook the vegetables:
Heat olive oil in a large frying pan. Sauté the onion, garlic, carrot, celery, and red pepper for 5–6 minutes until soft.
Add mushrooms:
Stir in mushrooms and cook for another 5 minutes, until most of the moisture evaporates.
Combine ingredients:
In a large bowl, mix the cooked vegetables with the chestnuts, chopped nuts, breadcrumbs, lentils, soy sauce, tomato purée, herbs, smoked paprika, nutritional yeast, cranberries, salt, and pepper.
Bind the mixture:
Add the flaxseed mixture (or eggs). Stir well until everything holds together. Add extra breadcrumbs if too wet or a splash of water if too dry.
Assemble the loaf
Spoon half the mixture into the tin, press down firmly, spread with half the cranberry sauce, then add the rest of the mixture on top. Smooth the surface and finish with the remaining cranberry sauce.
Bake:
Cook for 50–60 minutes, until firm, golden, and slightly crisp on the edges.
Rest before serving:
Allow the loaf to rest for 10 minutes before slicing — this helps it hold together beautifully.
Notes
his Festive Nut Roast Loaf with Cranberries & Chestnuts is a hearty, flavour-packed vegan or vegetarian main that’s perfect for Christmas dinner, Sunday roasts, or any special occasion. It combines the richness of mixed nuts and chestnuts with sweet-tart cranberries and savoury herbs, creating a beautifully balanced dish that’s both satisfying and festive.Make it ahead of time — simply prepare and bake the loaf the day before, then reheat gently before serving. It slices best when cooled slightly and can be frozen for up to 3 months.For a gluten-free version, use gluten-free breadcrumbs and tamari instead of soy sauce. For a lower-sodium option, choose reduced-salt soy sauce or omit added salt.This nut roast pairs wonderfully with vegan gravy, roast potatoes, Brussels sprouts, and a dollop of cranberry sauce for the perfect plant-based Christmas feast.
A glorious nut roast loaf like this deserves to be served in style — surrounded by all the trimmings, glistening gravy, and the sparkle of Christmas cheer. Here are some delicious ways to serve your Festive Nut Roast with Cranberries & Chestnuts for a truly memorable meal:
1. The Classic Roast Dinner Plate
Pair your nut roast with all the traditional trimmings for the ultimate comforting Christmas feast:
Crispy roast potatoes tossed in olive oil and rosemary for that irresistible crunch.
Maple-glazed carrots and parsnips that bring natural sweetness to the plate.
Brussels sprouts with chestnuts sautéed in vegan butter for a double-chestnut hit.
Rich vegan gravy, poured generously over each slice for a luscious, savoury finish.
This combination strikes the perfect balance of flavours — crisp, creamy, sweet, and savoury — everything a Christmas dinner should be.
2. For a Lighter Festive Lunch
If you’d rather serve this nut roast as part of a lighter meal, try pairing it with:
A winter salad made from kale, roasted beetroot, orange segments, and toasted pecans.
A spoonful of cranberry relish for tang and colour.
Some warm crusty bread or roasted root vegetables drizzled with olive oil and thyme.
It’s simple, elegant, and full of seasonal flavour — perfect for Boxing Day lunch or a relaxed New Year’s Eve supper.
3. The Leftover Magic
One of the best things about this nut roast? The leftovers. Slice it thick and layer it into sandwiches with:
Vegan mayo, rocket, and extra cranberry sauce for a fresh, festive kick.
Or crumble it into a wrap with stuffing and roasted veg for a delicious on-the-go treat.
You can even reheat slices in a pan until golden and serve with a fried egg (if not vegan) or tofu scramble for a hearty post-Christmas brunch.
5. Presentation Tips for the Wow Factor
Turn your nut roast into the star of the show with a few finishing touches:
Brush the top with extra cranberry sauce before serving for that glossy, ruby-red shine.
Garnish with fresh thyme or rosemary sprigs for an elegant, aromatic finish.
Serve it on a rustic wooden board or white platter surrounded by roasted vegetables and twinkling lights for a picture-perfect festive look.
Make It Ahead – Stress-Free Christmas Cooking
Christmas Day is magical — but let’s be honest, it can also be hectic. Between roasting potatoes, basting veggies, and keeping the prosecco chilled, the last thing you want to worry about is timing your main course perfectly. That’s why this Festive Nut Roast with Cranberries & Chestnuts is a dream come true for busy cooks — it’s make-ahead friendly, freezer-safe, and easy to reheat without losing flavour or texture
Make the Mixture in Advance
If you want to save time on the big day, you can prepare the nut roast mixture up to 24 hours ahead. Here’s how:
Follow the recipe up to the point of baking.
Pack the uncooked mixture into your lined loaf tin.
Cover tightly with cling film or foil and store it in the fridge overnight.
When you’re ready to cook, simply remove it from the fridge, let it sit at room temperature for 20–30 minutes, then bake as normal. This method not only saves time but also allows the flavours to develop and deepen overnight, making the roast even tastier.
How to Freeze Your Nut Roast
This recipe freezes beautifully, so you can make it weeks in advance and still enjoy that just-baked freshness. To freeze before baking:
Assemble the loaf, wrap it tightly in cling film and foil, and freeze for up to 2 months.
Defrost completely in the fridge overnight before baking.
To freeze after baking:
Allow the loaf to cool completely.
Wrap well in foil or place in an airtight container.
Label with the date and freeze for up to 3 months.
To reheat, defrost overnight in the fridge, then cover loosely with foil and bake at 170°C (fan 150°C) for about 20–25 minutes, until piping hot in the centre.
Reheating and Refreshing the Glaze
To restore that gorgeous glossy top, brush the nut roast with fresh cranberry sauce or a drizzle of maple syrup just before reheating. This not only refreshes the appearance but also locks in moisture and gives it that irresistible festive shine. If you’re reheating individual slices, a few minutes in the oven or a quick pan-sear in olive oil works wonders — it gives a lightly crisped edge while keeping the middle soft and juicy.
Serving on the Day
Once reheated, plate it up on a warm serving dish and garnish with:
Fresh rosemary sprigs
Whole cranberries
A scattering of toasted nuts or pomegranate seeds for sparkle
No one will ever guess it was made ahead — it looks and tastes like it just came out of the oven.
Why This Recipe Is Perfect for Planning Ahead
One of the joys of this make-ahead vegan nut roast is its flexibility:
Holds its shape perfectly even after freezing or reheating
Tastes even better the next day, as the flavours have time to mingle
Saves time and stress on Christmas morning
Leaves your oven free for all those glorious trimmings.
A Little Christmas Wisdom
Christmas cooking isn’t about perfection — it’s about joy, warmth, and good food shared with loved ones. With this make-ahead Festive Nut Roast Loaf with Cranberries & Chestnuts, you’ll have one less thing to worry about and one more reason to celebrate. Light the candles, pour a glass of something bubbly, and let the delicious aroma of your homemade nut roast fill the house. You’ve earned it.
Created by Nicol Retailer Limited
This Festive Nut Roast Loaf with Cranberries & Chestnuts recipe was lovingly created by Nicol Retailer Limited — your trusted source for quality vegan, gluten-free, and festive ingredients. Every element of this dish, from the mixed nuts and chestnuts to the herbs, lentils, and cranberry sauce, is available to buy directly from Nicol Retailer.
Explore our full range of seasonal products, plant-based essentials, and baking favourites in-store or online at Nicol Retailer Limited and bring your Christmas cooking to life with quality you can taste.
Shop the Ingredients for This Recipe
Make your Christmas cooking simple, stress-free, and full of festive flavour with Nicol Retailer Limited. We stock everything you need to recreate this Festive Nut Roast Loaf with Cranberries & Chestnuts — all in one place!
Ingredients Available at Nicol Retailer
Mixed Nuts – premium quality almonds, cashews, walnuts & hazelnuts for the perfect crunch.
Lentils – wholesome plant-based protein that adds heartiness and texture.
Cooked Chestnuts – sweet, buttery, and ready to chop straight into your nut roast.
Cranberry Sauce – tangy and glossy, ideal for glazing your loaf or serving on the side.
Herbs & Spices – rosemary, thyme, smoked paprika, and festive seasonings for authentic Christmas flavour.
Breadcrumbs (Gluten-Free Option Available) – to hold your roast together beautifully.
Olive Oil, Tomato Purée & Soy Sauce – pantry staples for that savoury, umami richness.
All ingredients are available to buy at Nicol Retailer Limited, in online. We pride ourselves on offering high-quality vegan, vegetarian, and allergy-friendly ingredients, carefully sourced to make your festive meals truly special.
Bring your Christmas menu to life with the best festive ingredients from Nicol Retailer Limited. Visit: https://nicolretailer.com/shop/
There’s something irresistibly simple yet special about Padron peppers. Mild, smoky, and sometimes with a cheeky surprise of heat, these little green gems are a true Spanish favourite. Our Charred Padron Peppers with Garlic, Lemon and Feta Crumble bring all the sunshine of Spain straight to your kitchen — and it all starts with the freshest Padron peppers from Nicol Retailer. This dish, Charred Padron Peppers with Feta and Lemon – a taste of Spain from Nicol Retailer, captures the essence of Spanish flavours perfectly.
Ingredient Spotlight: Padron Peppers
At the heart of this dish are the Padron peppers — small, glossy green peppers that have become a Spanish tapas icon. Originally from the Galicia region of Spain, these bite-sized peppers are famous for their mild, earthy flavour and signature smoky aroma when blistered in olive oil.
But here’s what makes them truly special — about one in ten Padron peppers has a surprise spicy kick! This natural game of chance adds a playful twist to every serving, keeping your guests guessing. It entertains your taste buds too.
When cooked properly, Padron peppers develop a soft, silky texture. They offer a charred, slightly nutty flavour that pairs beautifully with sea salt, garlic, lemon and creamy feta. They’re delicious served simply as a bar snack, or elevated — as in this recipe — into a show-stopping side dish.
At Nicol Retailer, our Fresh Padron Peppers (500g) are carefully sourced for premium quality, ensuring freshness, vibrant colour, and authentic taste every time. Whether you’re cooking for two or preparing a tapas feast, these peppers bring the true taste of Spain right to your kitchen.
Why You’ll Love This Recipe
If you’re looking for a dish that’s effortlessly impressive, this Charred Padron Peppers with Garlic, Lemon and Feta Crumble recipe ticks every box. It captures the essence of Spanish tapas dining — relaxed, full of flavour, and perfect for sharing with friends and family.
Quick and fuss-free
Ready in just 15 minutes, this recipe is ideal for busy evenings, weekend gatherings, or spontaneous tapas nights. No complicated prep, no fancy equipment — just a hot pan and quality ingredients.
Big flavour, simple ingredients
Each bite delivers the smoky depth of blistered Padron peppers, the tangy freshness of lemon, and the creamy saltiness of feta. A drizzle of olive oil ties it all together for a true Mediterranean feel.
Healthy and wholesome
Naturally gluten-free, vegetarian, and rich in antioxidants and healthy fats, these peppers are as nourishing as they are delicious. They’re light yet satisfying — perfect as a snack, side, or part of a balanced mezze platter.
Versatile and crowd-pleasing:
Serve them as a starter, side dish, or part of a sharing tapas board. They pair beautifully with seafood, grilled meats, or simply a glass of crisp white wine.
A taste of Spain at home:
Whether you’re hosting a summer BBQ, a family dinner, or a date-night feast, this recipe brings that authentic Spanish sunshine to your table. It’s proof that simple, fresh ingredients can deliver restaurant-quality flavour in minutes.
What You’ll Need & How to Make It
To make this delicious Charred Padron Peppers with Feta and Lemon, you only need a few fresh, high-quality ingredients:
Charred Padron Peppers with Garlic, Lemon & Feta Crumble
Experience the bold flavours of Spain with this easy Charred Padron Peppers with Garlic, Lemon and Feta Crumble recipe. Using fresh Padron peppers from Nicol Retailer, this vibrant Mediterranean dish is lightly blistered in olive oil, tossed with zesty lemon and garlic, and finished with creamy crumbled feta.Perfect for tapas nights, BBQ sides or appetiser platters, this quick and healthy recipe serves four and is both gluten-free and vegetarian. Each bite offers a smoky, tangy and slightly spicy kick – an irresistible mix that brings sunshine to your table.
Warm a large griddle over medium-high heat until hot.
Cook the Padron peppers
Add the olive oil, then the peppers in a single layer. Sauté for 6–8 minutes, turning occasionally, until the skins are blistered and slightly charred.
Add garlic
Stir in the grated garlic for the last 30 seconds of cooking, just until fragrant
Season and finish
Remove from heat. Sprinkle over lemon zest, a squeeze of lemon juice, and season with sea salt and black pepper.
Garnish
Crumble over the feta cheese and, if desired, drizzle lightly with honey or sprinkle with chilli flakes for a sweet-heat finish.
Notes
Padron peppers are a Spanish favourite known for their mild, smoky flavour — but every now and then, one packs a spicy surprise! That’s part of their charm. When blistered in olive oil and finished with lemon zest, garlic and crumbled feta, they create a perfectly balanced bite of heat, salt and tang.For best results, use fresh Padron peppers from Nicol Retailer and cook them over high heat until charred and slightly wrinkled. Serve immediately while warm for that authentic tapas bar experience. This quick and easy dish is ideal for sharing platters, BBQs, or healthy vegetarian starters.
One of the best things about Charred Padron Peppers with Garlic, Lemon and Feta Crumble is their versatility. Their smoky, salty, and tangy flavour means they complement a wide range of dishes — whether you’re building a full Spanish tapas spread or adding a Mediterranean twist to your usual meal. Here are some delicious ways to enjoy them:
Classic Tapas Board
Serve your Padron peppers alongside other Spanish favourites for a vibrant sharing platter:
Patatas bravas or roasted potatoes for a hearty touch
Manchego cheese and olives for extra Mediterranean flair
Freshly baked crusty bread with olive oil and sea salt for dipping
Light Summer Lunch
Combine the peppers with crisp salads, couscous, or quinoa bowls for a bright, wholesome lunch. The feta crumble and lemon zest bring freshness and texture, pairing beautifully with cherry tomatoes and avocado.
Dinner Party Side
Add a touch of elegance to grilled or roasted mains:
Grilled chicken or halloumi skewers
Pan-seared salmon or sea bass
Oven-roasted lamb chops with rosemary
The lemon and garlic notes cut through richness perfectly, balancing the dish and brightening the plate.
Conclusion
Simple, fresh and bursting with Mediterranean flavour, this Charred Padron Peppers with Garlic, Lemon and Feta Crumble recipe is proof that great food doesn’t have to be complicated. With just a few quality ingredients, you can create a dish that’s light, healthy, and full of character — a perfect balance of smoky, salty, tangy and creamy.
Whether you serve it as part of a Spanish tapas feast, a BBQ side, or a quick weeknight appetiser, these blistered peppers always impress. Their unpredictable little kick adds fun and authenticity to every bite. It reminds you of sunny terraces and relaxed evenings in Spain.
At Nicol Retailer, we’re proud to offer Fresh Padron Peppers (500g) — sourced for their quality and flavour so you can bring the taste of Spain straight to your kitchen.
Explore our range of fresh produce, gourmet ingredients, and global flavours today at nicolretailer.com and make every meal a little more exciting.
If you’re searching for a dessert that combines sophistication, simplicity, and incredible flavour, this Gooseberry & Vanilla Panna Cotta with Almond Crumble is the one to make. It’s that rare kind of recipe — elegant enough for a dinner party. Yet, it is easy enough for a midweek treat.
Each spoonful offers a harmony of textures: the smooth, creamy vanilla panna cotta, the bright tang of Royal Crown Gooseberries in Light Syrup, and the buttery crunch of almond crumble. Together, they create a dessert that’s light yet indulgent. It is comforting but undeniably luxurious.
And the best part? You don’t need to be a pastry chef to make it. Thanks to Macphie Panna Cotta Base Mix , available to buy from Nicol Retailer, creating the perfect panna cotta has never been simpler. This professional-quality mix delivers a silky, restaurant-standard texture every time. It saves you the stress of measuring gelatine or worrying about the set. Just add milk and cream, and you’re minutes away from a flawless dessert.
The secret to what makes this recipe truly shine lies in the gooseberries. Sourced and packed with care, Royal Crown Gooseberries in Light Syrup (3kg) are naturally sweet with a gentle tartness. This pairs beautifully with the creamy vanilla base. Their syrup adds a delicate gloss and subtle sweetness that elevates the entire dish. Because they’re preserved at peak ripeness, you can enjoy this fresh, fruity flavour all year round.
Whether you’re planning a romantic dinner, hosting guests, or simply indulging in a weekend treat, this panna cotta delivers that “wow” moment every time. It looks stunning, tastes divine, and takes surprisingly little effort. A true modern British dessert with a fine-dining twist.
Here is the recipe and instructions of how to make the delicious recipe:
Gooseberry & Vanilla Panna Cotta with Almond Crumble
This elegant dessert blends silky vanilla panna cotta with a vibrant gooseberry compote and buttery almond crumble. By using a panna cotta mix, you’ll create a restaurant-quality dessert effortlessly — beautifully enhanced with a handful of Royal Crown Gooseberries in Light Syrup, available from Nicol Retailer
Course Dessert
Cuisine English, European
Diet Vegetarian
Keyword Butternut squash at Nicol Retailer, buy gooseberries online, easy panna cotta dessert, gooseberry compote recipe, gooseberry dessert recipe, gooseberry panna cotta, panna cotta with fruit compote, Royal Crown Gooseberries
Prepare the panna cotta mix according to packet instructions with milk and cream.
Add vanilla bean paste for extra aroma.
Gently fold in a handful of drained Royal Crown Gooseberries for pops of flavour and texture
Pour into glass cups or moulds. Chill for at least 3 hours or until set.
Make the Gooseberry Compote
Add gooseberries, syrup, lemon zest, and juice to a saucepan.
Simmer gently for 5–7 minutes until thick and glossy.
Cool completely before spooning over the panna cotta.
Prepare the Almond Crumble
Preheat oven to 180 °C (160 °C fan).
Combine flour, butter, ground almonds, sugar, and salt until crumbly.
Bake for 10–12 minutes until golden. Cool and crumble.
Assemble & Serve
Top each panna cotta with gooseberry compote.
Sprinkle with almond crumble and garnish with fresh mint or whole gooseberries.
Serve chilled for a refreshing, elegant finish.
Notes
For the best flavour, use Royal Crown Gooseberries in Light Syrup from Nicol Retailer Their gentle sweetness and delicate tartness make the perfect topping for creamy panna cotta.If you’d like extra texture, fold a few whole gooseberries into the panna cotta before chilling — it adds a lovely burst of flavour in every spoonful.To make it gluten-free, simply substitute the plain flour in the crumble with a gluten-free blend.For a lighter version, swap half the double cream with Greek yoghurt or coconut cream — it’ll still be smooth and delicious.This dessert can be made a day ahead, making it ideal for dinner parties or special occasions. Chill, garnish just before serving, and enjoy a touch of restaurant elegance at home.Chef’s Tip The secret to a truly unforgettable panna cotta is balance — creamy, silky texture with just the right touch of tart fruit. Using Royal Crown Gooseberries in Light Syrup from Nicol Retailer gives you that perfect contrast every time. Their gentle tang lifts the sweetness of the panna cotta and adds a burst of freshness to each bite.For an elegant finish, serve in clear glasses so the golden layers of gooseberry, cream, and crumble shine through. It’s the kind of dessert that looks impressive, tastes divine, and leaves your guests asking for seconds — with none of the stress.
What makes this dessert truly special is its perfect balance of flavour, texture, and simplicity. It’s the kind of recipe that feels indulgent but doesn’t overwhelm. It is rich enough to satisfy a sweet craving, yet light enough to leave you wanting just one more spoonful.
The Macphie Panna Cotta Base Mix, available from Nicol Retailer, guarantees flawless results every time. Forget the stress of measuring gelatine or wondering if your cream will set. This professional-quality mix creates a silky, smooth panna cotta with barely any effort. It gives you that restaurant-perfect wobble and melt-in-the-mouth texture in just a few easy steps.
Then there’s the Royal Crown Gooseberries in Light Syrup (3kg) — a true gem for home bakers and dessert lovers alike. Their natural tartness cuts through the creamy richness of the panna cotta. Meanwhile, the light syrup adds a subtle sweetness and a glossy finish. Because they’re carefully preserved, you can enjoy that burst of fruity freshness no matter the season. It’s like capturing the taste of summer in every spoonful.
The addition of a buttery almond crumble brings a satisfying crunch and a touch of nuttiness. This creates a beautiful contrast against the soft panna cotta and syrupy gooseberries. Together, these elements form a dessert that feels layered, thoughtful, and completely irresistible.
But beyond flavour, this recipe works because it’s achievable. You don’t need special tools or complex techniques — just quality ingredients and a little patience while it chills. Whether you’re making it for guests or simply treating yourself, it’s a foolproof recipe that delivers big on taste, texture, and presentation.
A little elegance, a little nostalgia, and a whole lot of flavour — this Gooseberry & Vanilla Panna Cotta is proof that the simplest desserts are often the most memorable.
Serving & Pairing Suggestions
This Gooseberry & Vanilla Panna Cotta with Almond Crumble is more than just a dessert — it’s an experience. Every element brings its own texture and flavour. When served beautifully, it feels like something you’d order at an upscale restaurant. The best part? You can create it effortlessly at home.
Serve your panna cotta chilled, ideally in clear dessert glasses or stemmed coupes so the layers of creamy vanilla, glossy gooseberry compote, and golden crumble are on full display. The visual contrast — pale cream against the soft pink hue of the gooseberries — instantly elevates the presentation and makes it perfect for entertaining.
For a little extra flair, garnish with whole Royal Crown Gooseberries in Light Syrup and a few fresh mint leaves. This not only adds a pop of colour but also enhances the fruity aroma. You can even drizzle a teaspoon of the syrup from the tin over the top for that glossy, photo-worthy finish.
When it comes to pairings, this panna cotta loves a light, refreshing drink. Try serving it with a chilled glass of Prosecco, sparkling rosé, or even elderflower cordial for a delicate, floral complement to the gooseberries’ tartness. The creamy panna cotta and crisp bubbles work together beautifully. This combination cleanses the palate after each bite.
For something heartier, it follows a rich main course perfectly — think roasted lamb, venison, or a classic British beef dish. The bright, fruity notes of the gooseberries bring balance to a savoury meal. It ends dinner on a light yet luxurious note.
If you want to transform this dessert into a fine-dining showpiece, add a few edible flowers or a gentle dusting of crushed pistachios before serving. The combination of colours and textures makes this panna cotta look as impressive as it tastes.
No matter the occasion — whether it’s a romantic dinner, a garden party, or a quiet indulgence at home — this recipe delivers understated elegance and comfort in every bite.
Final Thoughts
This Gooseberry & Vanilla Panna Cotta with Almond Crumble is proof that fine dining doesn’t have to be complicated. With a handful of premium ingredients and a touch of creativity, you can transform a simple dessert into something truly extraordinary. The silky-smooth panna cotta, made effortlessly using the Macphie Panna Cotta Base Mix , pairs perfectly with the sweet-tart vibrance of Royal Crown Gooseberries in Light Syrup (3kg) — both available at Nicol Retailer.
Whether you’re hosting guests, celebrating something special, or just treating yourself, this dessert captures everything wonderful about modern British cooking: elegant presentation, incredible flavour, and quality ingredients that speak for themselves.
So go ahead — pour, chill, and serve up a taste of luxury. With Nicol Retailer’s Macphie Panna Cotta Base Mix and Royal Crown Gooseberries, creating restaurant-worthy desserts at home has never been easier (or more delicious).
When only something extraordinary will do, Pan-Seared Highland Game Venison Steaks with Blackberry & Red Wine Sauce are the star of the show. Tender, lean, and full of rich, natural flavour, these British-sourced steaks elevate any dinner into an elegant experience.
In this recipe, we pair pan-seared venison with a luxurious blackberry and red wine reduction, buttery greens, and creamy dauphinoise potatoes. The result is indulgence on a plate — sophisticated yet comforting, perfect for special occasions or a romantic dinner at home.
When you want to impress your guests or treat yourself to something special, Highland Game Venison Steaks are the ultimate centrepiece. Tender, lean, and bursting with rich, earthy flavour, venison brings luxury to your table with minimal effort. In this recipe, the steaks are pan-seared to perfection and paired with a luscious blackberry and red wine sauce, buttery greens, and creamy dauphinoise potatoes — a harmony of flavours that’s elegant, indulgent, and irresistibly British.
Why This Recipe Works:
Premium quality: Using Highland Game Venison Steaks from Nicol Retailer ensures tenderness and flavour every time.
Balanced flavours: The sweet-tart blackberry and red wine sauce complements venison’s natural richness beautifully.
Luxurious yet achievable: Elegant presentation with minimal fuss.
Here is the delicious recipe:
Pan-Seared Venison Steaks with Blackberry & Red Wine Sauce, Buttered Greens & Dauphinoise Potatoes
Savour the elegance of restaurant-quality dining at home with this Highland Game Venison Steaks recipe. Tender, lean venison is pan-seared and paired with a rich blackberry and red wine reduction, creamy dauphinoise potatoes, and buttered green beans.Made with premium British Highland Game venison, available from Nicol Retailer, this dish balances luxury and simplicity — perfect for date nights, dinner parties, or weekend indulgence.
Course Main Course
Cuisine English, European, Fine Dining
Diet Gluten Free, Low Fat
Keyword British game meat, buy venison online UK, fine dining main course, gourmet meat dishes, Highland Game venison, roast dinner ideas, venison recipes
Preheat oven to 160 °C (fan) / 180 °C (conventional)
Rub a gratin dish with the cut garlic, then discard garlic.
Thinly slice the potatoes (≈ 3 mm).
In a saucepan, combine milk + cream + bay + pinch of nutmeg, bring just to a simmer.
Layer potatoes in the dish, seasoning each layer with salt & pepper.
Pour over the hot cream mixture so it just covers the potatoes.
Sprinkle the grated cheese on top.
Bake for about 1¼ to 1½ hours or until the potatoes are tender and the top is golden.
Cook the venison steaks
Take steaks out of fridge ~20 minutes before cooking, pat dry, season both sides with salt & pepper.
Heat a heavy frying pan over medium-high heat; add olive oil.
When oil is hot (shimmering), add the steaks. Sear for ~2–3 minutes per side for medium-rare (depending on thickness).
In the last minute, add butter & fresh thyme/rosemary to the pan; baste steaks with the melted butter.
Remove steaks to a resting plate, loosely cover with foil.
Make the blackberry & red wine sauce
In the same pan used for the steaks (with those flavourful browned bits), lower heat a little. Add shallot & garlic, sauté until softened.
Deglaze with red wine, scraping the fond from the pan. Let wine reduce ~5 minutes.
Add stock, blackberries, redcurrant jelly (if using), and balsamic. Simmer until the sauce reduces and thickens—blackberries will burst.
Strain if you prefer a smooth sauce (pressing the berries), or leave it slightly chunky.
Swirl in cold butter at the end (off the heat) for sheen and richness.
Taste & adjust salt, pepper & acidity.
Cook the greens
Blanche the greens (beans or broccoli) in salted boiling water ~2–3 minutes until just tender.
Drain and toss with butter, salt & pepper.
Plate & serve
Slice the venison steaks (if desired) and arrange on warm plates.
Spoon the blackberry & red wine sauce over the steaks (or serve on the side).
Add a portion of dauphinoise potatoes and the buttered greens.
Optionally garnish with fresh thyme sprigs or extra blackberries.
Notes
Quality matters: For the best flavour and tenderness, use Highland Game Venison Steaks from Nicol Retailer. British farmed, Red Tractor–assured venison offers a lean, rich taste that elevates any special meal.Don’t overcook: Venison is naturally lean and can dry out quickly. Cook the steaks medium-rare to medium, then rest them for 5–10 minutes to lock in juices and enhance tenderness.Make ahead: The blackberry and red wine sauce can be prepared a day in advance and gently reheated before serving — ideal for dinner parties or festive gatherings.Pairing ideas: Serve with creamy dauphinoise potatoes, buttered greens, or roasted root vegetables for a balanced, restaurant-quality meal. Diet-friendly: This dish is gluten-free, high in protein, and low in fat, making it a healthy yet indulgent choice for those following low-carb or balanced diets.Freezing tip: You can freeze cooked venison and sauce separately for up to 2 months. Defrost overnight in the fridge and reheat gently before serving.
Venison is a naturally lean, protein-rich meat that’s packed with flavour and goodness. The Highland Game Venison Steaks available from Nicol Retailer are responsibly sourced from wild deer across the Scottish Highlands, where they roam freely and graze naturally.
Each steak is expertly trimmed and portioned, ready for quick pan-searing or grilling — a perfect choice for both professional chefs and home cooks who love restaurant-quality results. When you buy from Nicol Retailer, you’re choosing: ✅ Premium British venison, ethically sourced ✅ Red Tractor quality assurance ✅ Convenient 6x4x125g pack – ideal for family meals or entertaining ✅ Freshness and quality you can taste in every bite
Order your Highland Game Venison Steaks here and bring gourmet dining home tonight.
Serving & Pairing Suggestions
A dish as elegant as pan-seared Highland Game Venison Steaks deserves accompaniments that highlight its rich, natural flavour. Whether you’re planning a romantic dinner, hosting friends, or treating yourself to a weekend feast, these serving ideas and wine pairings will turn your meal into a fine-dining experience right at home.
For a non-alcoholic option, a chilled blackberry and rosemary spritzer makes a refreshing alternative that mirrors the flavours of the sauce.
Side Dishes that Shine
Your Highland Game Venison Steaks are already a statement piece, but the right sides make them unforgettable:
Dauphinoise Potatoes: Buttery, creamy, and golden, these are the ultimate indulgent companion to tender venison.
Buttered Greens: Tenderstem broccoli, green beans, or kale sautéed in butter and garlic provide a crisp, fresh contrast.
Honey-Glazed Carrots or Parsnips: Their gentle sweetness plays off the tartness of the blackberry sauce.
Roasted Root Vegetables: Earthy flavours like beetroot or celeriac enhance venison’s natural richness.
Celeriac Purée: Smooth, silky, and lightly nutty – perfect for scooping up every last drop of sauce.
Dessert Pairing
After a rich, savoury main, end your meal on a high note with something light yet decadent:
Dark Chocolate Tart or Mousse: The bitterness of chocolate balances the fruitiness of the sauce.
Poached Pears in Red Wine: A sophisticated, flavour-matched dessert that mirrors the venison’s sauce.
Serve your venison on warm plates to keep the meat tender and juicy. For a restaurant-style finish, spoon the glossy blackberry and red wine sauce over the top, then garnish with a few fresh blackberries or a sprig of rosemary. Light candles this dish deserves a little ceremony.
Final Thoughts
This Highland Game Venison Steaks with Blackberry & Red Wine Sauce recipe is proof that fine dining doesn’t have to stay in the restaurant. With just a few quality ingredients, you can create a dish that’s elegant, comforting, and deeply satisfying. The rich, gamey flavour of Highland Game Venison Steaks, balanced with the sweetness of blackberries and the depth of red wine, delivers a true taste of luxury. Whether it’s a romantic dinner, a festive celebration, or a weekend treat, this recipe will always impress.
For the very best results, choose premium Highland Game Venison Steaks (6x4x125g) available exclusively at Nicol Retailer. Sustainably sourced, British, and beautifully tender, they’re the perfect centrepiece for any special meal. Order yours today and bring restaurant-quality flavour to your own kitchen — because great food starts with exceptional ingredients.
Looking for the ultimate crowd-pleasing recipe? These Mini Brioche Sliders with Garlic Butter & Caramelised Onions are everything you want in comfort food. They feature soft, glossy St Pierre Mini Brioche Buns, juicy beef patties, melty cheese, sweet caramelised onions, and a drizzle of garlicky butter. Perfect for parties, BBQs, or casual family dinners, these sliders are small in size but big on flavour!
Why You’ll Love This Recipe
Soft & Buttery Buns – Made with St Pierre Mini Brioche Buns, these sliders stand out from the crowd. Their rich, buttery flavour and light, fluffy texture make every bite taste gourmet.
Juicy, Flavour-Packed Patties – Each mini burger is made with seasoned beef patties that stay juicy and tender, perfectly balanced with the sweetness of slow-cooked caramelised onions.
Garlic Butter Indulgence – Brushing the brioche with melted garlic butter before toasting creates a glossy golden crust. This also creates an irresistible aroma that fills the kitchen.
Perfect for Any Occasion – Whether you’re hosting a party or planning a BBQ, these sliders are guaranteed to please kids and adults alike. They are also perfect for a quick family dinner.
Versatile & Adaptable – Keep it classic with beef and cheddar. Alternatively, customise with chicken, turkey, veggie patties, or even plant-based cheese for different diets.
Restaurant-Quality at Home – With just a few simple ingredients, you can recreate sliders that taste like they’ve come straight from a gourmet food truck. You don’t have to leave your kitchen.
Crowd-Pleasing Favourite – Bite-sized, indulgent, and fun to eat, these sliders will disappear fast from any serving platter. They’re the type of recipe that guests ask for again and again.
Here is the recipe:
Mini Brioche Sliders with Garlic Butter & Caramelised Onions
Soft, buttery St Pierre Mini Brioche Buns meet juicy beef sliders, sweet caramelised onions, and a drizzle of garlic butter. Perfect for parties, appetisers, or a fun family dinner!
Course Appetizer, brunch, Buffet, lunch, Main Course, party food
Cuisine American, European
Diet Diabetic
Keyword Beef sliders with brioche buns, Brioche bun slider recipe, Caramelised onion sliders, Garlic butter sliders, Mini brioche sliders recipe, Party food sliders, St Pierre mini brioche buns recipe
In a pan, heat olive oil and cook the sliced onions on low heat for 15–20 mins until soft, golden, and sweet.
Make the sliders
Season the beef mince with salt & pepper, shape into 10 mini patties, and pan-fry or grill for 3–4 mins per side until cooked through.
Garlic butter
Melt butter with minced garlic, gently simmer for 1 min.
Assemble
Split each brioche bun, brush with garlic butter, and lightly toast. Spread mayo and mustard, add patties, cheese, caramelised onions, and top with the golden brioche lid.
Finish & serve
Garnish with fresh parsley and serve warm.
Notes
Buns: St Pierre Mini Brioche Buns are naturally rich and buttery – lightly toasting them with garlic butter makes them extra indulgent.Meat Swap: You can replace beef with chicken, turkey, or even plant-based mince for a lighter or vegetarian-friendly version.Cheese Options: Cheddar, gouda, or Swiss cheese melt beautifully – pick your favourite!Caramelised Onions: Low and slow cooking is key – resist the urge to rush for the best sweet, golden finish.Make Ahead: Patties and caramelised onions can be prepped the day before; just reheat and assemble when ready to serve.Serving Size: Great for party platters, appetisers, or fun family dinners – they disappear fast!Pairings: Delicious with sweet potato fries, rocket salad, or a side of coleslaw.Chef’s TipsPerfectly Juicy Patties: Gently shape the mince into patties without overworking – this keeps them tender. Press a small dent in the centre of each patty before cooking to prevent them puffing up.Extra Flavour Boost: Mix a dash of Worcestershire sauce or smoked paprika into your mince for a richer depth of flavour.Crisp Finish: After caramelising, deglaze the onion pan with a splash of balsamic vinegar or red wine for tangy-sweet onions.Golden Brioche: Brush the cut sides of the buns with garlic butter before toasting for a glossy, golden crunch.Keep it Warm: If making a batch, keep sliders warm in a low oven (around 100°C) before serving so the cheese stays melty.Plating Tip: Serve on a wooden board with cocktail sticks to hold them together – practical and Instagram-worthy!
One of the best things about these Mini Brioche Sliders is their versatility. Whether you’re serving them as appetisers, party food, or the star of a casual dinner, they fit beautifully into any menu. Here are some irresistible serving ideas:
Party Platters & Buffets – Arrange the sliders neatly on a rustic wooden board or tiered serving tray. Brush the brioche buns with a little extra garlic butter for shine. Add cocktail sticks for easy grabbing. Perfect for birthdays, family gatherings, or even wedding receptions.
Family Dinners Made Fun – Instead of a traditional burger night, serve these bite-sized sliders with crispy fries, sweet potato wedges, or onion rings for a playful, family-friendly dinner. Kids will love their size, while adults enjoy their gourmet twist.
Game Day Food – Sliders are game-day royalty! Serve them alongside bowls of nachos, wings, and dips like BBQ sauce, garlic aioli, or spicy sriracha mayo. Their compact size makes them easy to enjoy in front of the TV with friends.
Picnic Perfection – Pack the cooked patties and caramelised onions separately. Then assemble on-site with your St Pierre Mini Brioche Buns for a show-stopping picnic treat. Pair with coleslaw, pickles, and crisp salad for a fresh outdoor feast.
BBQ Favourite – Take these sliders to the grill! Toast the brioche over the barbecue for a smoky finish. Then serve with grilled corn, potato salad, and fresh summer greens.
Sweet & Savoury Combo Platter – Showcase the versatility of St Pierre Mini Brioche Buns by serving both savoury beef sliders and sweet dessert sliders filled with Nutella, strawberries, and whipped cream. It’s the ultimate crowd-pleaser platter.
Sliders are all about indulgence. When made with St Pierre Mini Brioche Buns, they’re elevated into something truly unforgettable. Whether you’re cooking for a party, a family dinner, or just treating yourself, these Mini Brioche Sliders with Garlic Butter & Caramelised Onions deliver the perfect balance of flavour, texture, and style.
Bring home the star ingredient and try it for yourself – get your pack of St Pierre Mini Brioche Buns today at Nicol Retailer.
Gluten-Free & Vegan Alternatives
Nobody should miss out on these delicious sliders, and with a couple of smart swaps, you can enjoy them gluten-free or fully plant-based without compromising on taste.
Gluten-Free Option – with Schar Gluten Free Mini Brioche Sliders 10×3
If you’re catering for coeliac diets or anyone avoiding gluten, Schar’s brioche sliders are the perfect alternative. Soft, golden, and slightly sweet, they mimic the flavour and texture of traditional brioche while being 100% gluten-free. Pair them with juicy patties, caramelised onions, and garlic butter for sliders everyone can enjoy.
Tip: Lightly toast gluten-free brioche to hold the fillings better and avoid sogginess.
Vegan Option – with La Boulangerie Vegan Brioche Style Burger Bun
For a plant-based version, swap to La Boulangerie’s Vegan Brioche Style Buns. Rich, soft, and golden, they deliver the same indulgence as classic brioche but are made without eggs or dairy.
Patties: Use your favourite plant-based burger or make lentil/bean patties.
Cheese: Melt vegan cheddar or smoky vegan cheese for the perfect bite.
Butter: Replace garlic butter with a dairy-free spread for that same garlicky kick.
Result: A fully plant-based slider that’s every bit as indulgent as the original – glossy buns, savoury filling, caramelised onion sweetness, and garlicky richness in every bite.
With St Pierre, Schar, and La Boulangerie, Nicol Retailer offers a brioche option for everyone — traditional, gluten-free, and vegan — so no guest is left out at your table.
When it comes to fresh, vibrant cooking, few ingredients are as underrated and versatile as Mooli (also known as Daikon Radish). One delightful way to enjoy this ingredient is by making a Fresh Mooli & Carrot Salad with Lemon Dressing. This crisp, white root vegetable is a staple in Asian and Middle Eastern kitchens. It is loved for its delicate peppery flavour, refreshing crunch, and impressive nutritional benefits.
At Nicol Retailer, our Fresh Mooli (2kg pack) is carefully sourced for maximum freshness, flavour, and quality. Whether you’re a home cook or catering for family gatherings, this humble root transforms everyday meals into something truly special. For instance, a mooli carrot salad with lemon dressing.
Why Choose Fresh Mooli?
Light & Refreshing: Adds natural crunch to salads, slaws, and side dishes. It perfectly blends in a salad with fresh carrot and lemon dressing.
Nutrient-Rich: High in vitamin C, fibre, and antioxidants.
Versatile: Delicious raw, pickled, stir-fried, or added to soups and curries.
Diet-Friendly: Vegan, gluten-free, low in calories – perfect for healthy eating.
When paired with colourful vegetables like carrots, spring onions, and fresh coriander, mooli shines as the star ingredient. It makes this crisp, tangy, and utterly addictive salad.
Here s the step by steps of how to make this delicious recipe, a fresh mooli and carrot salad dressed with lemon.
Refreshing Mooli & Carrot Salad with Lemon Dressing
Fresh Mooli & Carrot Salad with Lemon DressingCrisp, light, and packed with flavour, this Fresh Mooli (Daikon Radish) and Carrot Salad is the perfect healthy side dish. Made with julienned mooli, crunchy carrots, spring onions, fresh coriander, and a zesty sesame-lemon dressing, it’s a refreshing no-cook recipe ready in just 10 minutes. Ideal for summer barbecues, Asian-inspired meals, or a light lunch, this vibrant salad balances sweet, tangy, and nutty flavours beautifully. Garnished with toasted sesame seeds, it pairs wonderfully with grilled fish, sushi, or spicy noodles.
Peel and julienne (or grate) the Fresh Mooli and carrots.
Place in a mixing bowl with sliced spring onions, chilli and coriander.
Make the Dressing
In a small bowl, whisk together lemon juice, vinegar, sesame oil, honey (or agave), salt and pepper.
Combine
Pour the dressing over the salad and toss well to coat.
Finish & Serve:
Sprinkle with toasted sesame seeds for extra crunch.
Serve chilled as a light side dish or refreshing starter.
Notes
For the best texture, serve this salad immediately after tossing with the dressing. If preparing ahead, keep the vegetables and dressing separate, then combine just before serving to maintain crunch and freshness.TipsAdd crunch: Toss in roasted peanuts, cashews, or crispy fried shallots for extra texture.Spice it up: A dash of chilli flakes or a drizzle of sriracha can give it a fiery kick.Make it creamy: Add a spoonful of Greek yoghurt or tahini to the dressing for a richer flavour.Swap veggies: Replace carrots with cucumber, beetroot, or thinly sliced red cabbage for colour and variety.Protein boost: Top with grilled tofu, edamame, or shredded chicken for a light main course.Citrus twist: Swap lemon with lime or yuzu juice for a sharper, tangy profile.
This salad isn’t just a side – it’s a versatile dish that elevates any meal. Especially when featuring fresh ingredients like mooli and carrot, combined with a lemony zest.
With Grilled Fish or Chicken: The citrusy dressing cuts through smoky flavours, making it a refreshing side to seafood or lean meats.
Alongside Sushi or Asian Dishes: Its crisp crunch balances soy, ginger, and wasabi notes perfectly.
At Summer BBQs: A cooling, light option to serve alongside rich burgers, skewers, and grilled veggies.
Paired with Spicy Curries: The fresh mooli offers a cooling contrast to bold Indian or Thai curries.
As a Light Lunch: Add extra protein (tofu, prawns, or chickpeas) and enjoy as a satisfying meal on its own.
Drinks Pairing: Complements citrusy mocktails, or sparkling water with lime.
Bring Freshness to Your Table
Ready to try this recipe? Stock up on Fresh Mooli (2kg) direct from Nicol Retailer. With its crisp texture and delicate flavour, it’s the secret ingredient your kitchen has been missing. Order now and create this refreshing salad at home – healthy, vibrant, and full of flavour with the freshness of mooli and carrots under a lemony finish.
When the evenings call for something rich, comforting, and deeply satisfying, nothing quite compares to braised beef cheeks. These underrated cuts of beef transform into fork-tender, melt-in-the-mouth perfection when cooked low and slow. For an exquisite meal, try red wine braised beef cheeks with creamy polenta & crispy sage. Paired with creamy Parmesan polenta and crispy sage leaves, this dish is the ultimate autumn-winter warmer – elegant enough for a dinner party, yet hearty enough for a cosy Sunday supper.
Best of all, you don’t need to search far – you can buy premium, Red Tractor assured Alec Jarrett British Beef Cheeks (2 kg pack) directly from Nicol Retailer.
Why Beef Cheeks Deserve the Spotlight
Beef cheeks are one of the most underrated cuts. They come from the hardworking cheek muscle of the cow, and while they require time to cook, the payoff is huge: an almost buttery, melt-in-the-mouth texture that rivals prime steak. Choosing Alec Jarrett British Red Tractor Beef Cheeks guarantees not only tenderness and flavour, but also:
✅ High welfare British farming – the Red Tractor seal ensures traceability and quality.
✅ Generous pack size (2 kg) – perfect for batch cooking, dinner parties, or meal prep.
✅ Excellent value – a more affordable way to enjoy restaurant-quality dining at home.
📦 Order now from Nicol Retailer and get this exceptional cut delivered straight to your door.
This dish highlights the beef cheeks at their absolute best: slow-braised in red wine and herbs until tender, finished with a glossy sauce, and served over creamy Parmesan polenta. Here is the recipe:
Red Wine & Herb Braised Beef Cheeks with Polenta & Crispy Sage
Indulge in this melt-in-the-mouth Red Wine & Herb Braised Beef Cheeks recipe – the ultimate comfort food for a special dinner. Slow-cooked to perfection, tender British beef cheeks are seared and simmered in a rich red wine sauce with garlic, carrots, and aromatic herbs, then served on a bed of creamy Parmesan polenta. Finished with crispy sage and fresh parsley, this hearty dish is perfect for Sunday roasts, dinner parties, or cosy family meals. Pair it with a bold red wine for a restaurant-quality experience at home.
Course Dinner, Main Course, Special Occasion Dish, Supper
Cuisine English, European, Italian
Diet Low Fat
Keyword beef cheeks with polenta, braised beef cheeks recipe, British beef cheeks recipe, red wine beef cheeks, restaurant style beef cheeks, slow cooked beef cheeks
Take the beef cheeks out of the fridge ~30 min ahead, pat dry, season generously with salt & pepper.
Lightly dust with flour, shake off excess.
Heat a large heavy-based casserole or Dutch oven over medium-high heat. Add olive oil (and pancetta if using).
Sear the cheeks in batches, 2–3 minutes per side, until deeply browned. Remove and set aside.
Build the braising base
In the same pot, reduce heat to medium, add onions, celery, carrots, garlic. Sauté until softened and starts to take colour (≈8 minutes).
Stir in tomato purée, cook out for a minute.
Deglaze with red wine, scraping up the fond (brown bits) from the base. Let wine reduce a bit (5–8 minutes).
Add beef stock, bay leaves, thyme, rosemary, orange zest, and sugar/honey (if using). Stir to combine.
Braise low & slow
Return beef cheeks into the liquid (they should be mostly submerged; top off with extra stock or water if needed)
Bring to a gentle simmer, then cover, reduce heat to very low (or transfer to oven at ~150 °C / 300–325 °F).
Braise for 4 hours (or longer), turning once or twice, until the cheeks are falling-apart tender
Finish sauce
Carefully remove the beef cheeks, set aside and keep warm
Strain the braising liquid (optional) back into the pot, discard herbs & vegetables (or blitz & re-strain for a smoother sauce).
Reduce over medium heat to thicken to a nice sauce/glaze consistency. Adjust seasoning with salt, pepper, maybe a splash of balsamic or red wine vinegar for brightness.
Return cheeks to the sauce to coat and warm through.
Make the polenta
While the sauce is reducing, bring the water (or water + milk) to a simmer in a saucepan.
Gradually whisk in polenta, reduce heat and cook, stirring frequently, for ~20–25 minutes until thick and creamy.
Stir in butter, Parmesan, season to taste
Crisp the sage & plate
In a small frying pan, heat a little olive oil until shimmering, then fry sage leaves until crisp (a few seconds each side). Drain on paper towels, sprinkle salt.
Plate: spoon a bed of creamy polenta, lay a beef cheek (or pieces) on top, drizzle with sauce, garnish with crispy sage (and parsley or pancetta bits).
Notes
Make Ahead: Beef cheeks taste even better the next day as the flavours deepen. Cool, refrigerate overnight, then gently reheat in the sauce.Freezer Friendly: Once cooled, store beef cheeks with sauce in airtight containers for up to 3 months. Defrost overnight in the fridge and reheat slowly.Flour Swap: To keep the recipe gluten-free, dust beef cheeks with cornflour or rice flour instead of wheat flour.Polenta Texture: For creamier polenta, replace half the water with milk or cream. For a dairy-free option, use olive oil instead of butter and nutritional yeast instead of Parmesan.Wine Choice: A bold, full-bodied red wine (Cabernet Sauvignon, Merlot, Shiraz) works best. Avoid light wines, as they won’t stand up to the richness of the beef.Serving Ideas: Instead of polenta, try mashed potato, celeriac mash, or buttered pappardelle pasta.Add a Twist: A stick of cinnamon, star anise, or dried chilli in the braising liquid gives the dish a unique depth.
This recipe isn’t just about cooking beef – it’s about transforming a humble, underrated cut into something extraordinary. Here’s why it works so well:
Beef Cheeks at Their Best
Beef cheeks are naturally full of connective tissue and collagen. While that makes them tough if cooked quickly, it’s exactly what makes them perfect for slow braising. Over hours of gentle heat, the collagen melts away, creating meat that’s fork-tender and luxuriously soft – almost like butter. Using Alec Jarrett British Red Tractor Beef Cheeks ensures the quality of the meat matches the technique, giving you consistently delicious results.
Deep, Layered Flavour
Every element in this recipe builds flavour:
Searing the beef cheeks locks in rich, meaty notes.
The red wine and beef stock form a bold base, reduced slowly until concentrated.
Fresh herbs like thyme and rosemary infuse the braise with fragrance.
Orange zest adds a subtle lift, balancing the richness with a hint of brightness. The result? A sauce that’s glossy, intense, and restaurant-worthy.
The Perfect Partner: Creamy Polenta
Instead of classic mashed potato, this recipe uses Parmesan polenta – smooth, creamy, and comforting with a subtle nutty flavour. It soaks up the sauce beautifully without overpowering the beef, creating a balanced dish where every mouthful is pure comfort.
A Textural Finish
The garnish of crispy sage leaves isn’t just for looks. Their crunch provides contrast to the tender beef and silky polenta, while their earthy aroma ties the whole dish together. It’s the kind of thoughtful touch that elevates a slow-cooked meal from rustic to refined.
Designed for Success at Home
While this dish looks and tastes like something you’d order at a fine dining restaurant, it’s actually very achievable at home. Once the beef cheeks are in the oven, the recipe is largely hands-off – making it ideal for dinner parties or family gatherings. The large 2 kg pack from Nicol Retailer is perfect for feeding a crowd or batch-cooking for the freezer.
Serving Suggestions & Pairings
One of the greatest pleasures of cooking braised beef cheeks is how beautifully they adapt to different settings. Whether you’re planning a cosy Sunday meal with family or hosting friends for a sophisticated dinner party, this dish always rises to the occasion. Slow-cooked, succulent beef pairs effortlessly with rich reds, vibrant sides, and indulgent accompaniments that make every bite feel special.
Side Dish Ideas – Colour, Balance & Comfort
While creamy Parmesan polenta makes the perfect base, don’t stop there. Build a plate that’s as beautiful as it is delicious:
Roasted root vegetables – caramelised carrots, parsnips, and beetroot bring a natural sweetness that complements the richness of the beef.
Steamed seasonal greens – a bright, vibrant counterpoint that refreshes the palate after each decadent bite.
Crisp winter salad – bitter leaves, crunchy walnuts, and a citrus dressing add a refreshing zing, lightening the dish while adding a gourmet twist.
These sides don’t compete with the beef cheeks – they frame them, allowing the Alec Jarrett British Red Tractor Beef Cheeks to remain the star of the show.
Entertaining & Occasions – A Dish That Impresses Every Time
This isn’t just food; it’s an experience. Imagine setting down a platter of glossy, melt-in-the-mouth beef cheeks, the rich aroma of red wine and herbs filling the room. Guests lean closer, eyes widening, as you spoon the cheeks over creamy golden polenta and top them with crispy sage. It’s a dish that invites conversation, warmth, and indulgence.
For Sunday roasts, it offers a modern, luxurious alternative to traditional joints.
For dinner parties, it delivers a wow factor with very little last-minute fuss – the oven does all the work while you entertain.
For batch cooking, the generous 2 kg pack from Nicol Retailer makes it easy to portion, freeze, and reheat – so you can relive the comfort of this dish on a weeknight without the wait.
Why These Pairings Work
The magic lies in harmony. The melt-in-the-mouth beef cheeks bring richness and depth, the glossy red wine sauce offers warmth and intensity, and the sides provide balance, freshness, and texture. Each glass of wine, each forkful of polenta, each bite of crisp sage creates a rhythm – indulgence followed by freshness, comfort balanced by elegance.
This isn’t just a recipe – it’s an invitation to slow down, to savour, and to turn a meal into a memory. And it all begins with the finest Alec Jarrett British Red Tractor Beef Cheeks, available to buy now at Nicol Retailer.
Buy the Star Ingredient Today
Ready to give it a go? Order your Alec Jarrett British Red Tractor Beef Cheeks (2 kg) now from Nicol Retailer and bring this recipe to life in your own kitchen. 👉 Click here to buy now and experience the ultimate comfort food with premium British beef.
Final Thoughts
Some meals feed your body. This one feeds your soul. Slow-braised in red wine and herbs, Alec Jarrett British Red Tractor Beef Cheeks become melt-in-the-mouth, rich, and unforgettable. Perfect for Sunday roasts, dinner parties, or cosy nights in – it’s comfort food with a touch of elegance. 👉 Order your 2 kg pack today from Nicol Retailer and bring restaurant-quality dining to your home.
Looking for a healthy Japanese soup recipe that’s quick, light, and bursting with umami? This Japanese Chicken & Vegetable Clear Soup with Ninben Shiro Dashi is made using the authentic Ninben Shiro Dashi 500 g – a concentrated Japanese soup base that transforms simple ingredients into a restaurant-quality dish in under 30 minutes.
Whether you need a light starter, a comforting soup course, or a nourishing weeknight dinner, this recipe with Ninben Shiro Dashi is a winner. It includes delicious elements like chicken, vegetables, and the famous Ninben Shiro Dashi for a clear soup packed with flavour.
What is Ninben Shiro Dashi?
Shiro dashi is a light-coloured Japanese soup base made from dashi stock (kombu and bonito), soy sauce, and mirin. Unlike darker broths, it doesn’t overpower or darken your dishes – making it ideal for clear soups, simmered vegetables, and noodle recipes like Japanese Chicken & Vegetable Clear Soup with Ninben Shiro Dashi.
Ninben, a heritage Japanese brand with over 300 years of expertise, is famous for producing shiro dashi with a clean, balanced umami flavour. Just a splash of Ninben Shiro Dashi 500 g saves hours of stock-making.
The History of Japanese Clear Soup – and Why Ninben Shiro Dashi Matters
Clear soups, known as osuimono, have been part of Japanese dining for over a thousand years. Originating in the Heian period (794–1185), they were created to highlight the natural taste of seasonal ingredients rather than overwhelm them. Traditionally served in kaiseki (multi-course banquets) and formal tea ceremonies, osuimono embodies the Japanese principle of simplicity and elegance.
At the heart of every clear soup is dashi – the light yet flavour-rich stock made from kombu (kelp) and katsuobushi (bonito flakes). This combination forms the backbone of Japanese cuisine, celebrated for its clean umami depth. Chefs would carefully prepare dashi daily, then use it to create soups with proteins like chicken and vegetables, often turning them into a Japanese Chicken & Vegetable Clear Soup with Ninben Shiro Dashi.
Ninben’s Place in This Tradition
Founded in 1699 in Tokyo, Ninben is one of Japan’s oldest and most respected producers of dashi. For over 300 years, the brand has perfected the art of balancing umami, sweetness, and clarity in its soup bases.
Today, Ninben Shiro Dashi 500g brings this centuries-old culinary heritage into your home. By using shiro dashi, you’re not just saving time — you’re carrying forward a tradition that has shaped Japanese cuisine for generations. With just a splash of Ninben Shiro Dashi, you can recreate the same refined Japanese Chicken & Vegetable Clear Soup with Ninben Shiro Dashi once served to emperors and tea masters — now made accessible for modern kitchens worldwide.
Bring Centuries of Flavour Into Your Kitchen
For over 300 years, Japanese chefs and home cooks have relied on dashi to create soups that are light, elegant, and deeply satisfying. With Ninben Shiro Dashi 500g, you can enjoy that same tradition without the hours of preparation. This versatile soup base lets you:
Make authentic Japanese clear soups in minutes
Create noodle broths full of umami depth
Simmer vegetables, tofu, or fish with ease
Add a touch of Japanese flavour to everyday dishes
Ready to taste the difference? Shop Ninben Shiro Dashi at Nicol Retailer and bring a piece of Japanese food heritage to your table today.
Japanese Chicken & Vegetable Clear Soup with Ninben Shiro Dashi
If you’re looking for a light yet deeply flavourful soup that’s both comforting and elegant, then this Japanese Chicken & Vegetable Clear Soup (Sumashi-jiru) is for you. Using Ninben Shiro Dashi 500 g, you can create an authentic, restaurant-quality dish in minutes — no need to make stock from scratch. This recipe is perfect for busy weeknights, a warming starter, or when you want a wholesome dish that showcases the delicate balance of Japanese flavours.
Course Starter
Cuisine Japanese
Diet Low Fat
Keyword Authentic Japanese soup base, Buy Shiro Dashi UK, Chicken and vegetable soup Japanese, Japanese broth with vegetables, Ninben Shiro Dashi, Shiro dashi recipe
Prep Time 10 minutesmins
Cook Time 15 minutesmins
Servings 4People
Calories 120
Ingredients
300gchicken breast (skinless, boneless), thinly sliced
In a medium saucepan, bring 1 litre of water to a gentle simmer. Stir in the Ninben Shiro Dashi and taste — it should be delicate and balanced. Adjust with a little extra water if needed.
Cook the vegetables
Add the carrot, daikon, and shiitake mushrooms. Simmer gently for 5–7 minutes until just tender.
Add the chicken
Slide in the chicken slices and simmer for 3–4 minutes, or until fully cooked. Keep the heat gentle to maintain a clear broth.
Finish with greens
Stir through the spinach or mizuna until just wilted.
Serve
Ladle into bowls, top with spring onions, and garnish with yuzu peel or lemon zest for freshness. Enjoy steaming hot.
Notes
This Japanese Chicken & Vegetable Clear Soup is a light, healthy delight that really lets Ninben Shiro Dashi 500 g shine as the star ingredient. You can conveniently purchase this dashi on Nicol Retailer. Because shiro dashi is a concentrated soup base—combining dashi stock (kombu & bonito), mirin, and soy sauce—it instantly adds deep umami without muddying the clarity of the broth. Just one well-balanced bottle can transform simple ingredients into a restaurant-style Japanese soup in minutes.💡 Pro tip: Always check the dilution guideline on your shiro dashi bottle. Some brands are saltier or stronger than others. Start with a moderate amount (e.g. 50 ml per litre) then adjust by tasting—add a little extra water if it’s too intense, or a splash more concentrate if it feels weak.
This Japanese Chicken & Vegetable Clear Soup with Ninben Shiro Dashi is light, versatile, and pairs beautifully with a variety of Japanese and fusion dishes. Here are some ways to enjoy it:
With Rice -Serve alongside steamed Japanese short-grain rice for a traditional meal. Pair with onigiri (rice balls) filled with salmon, tuna, or pickled plum for a light lunch.
With Noodles – Add udon noodles for a heartier, comforting bowl. Try somen noodles in summer for a refreshing, chilled version. Use soba noodles for a buckwheat twist that’s rich in fibre.
Vegetarian & Vegan Options – Replace chicken with silken or firm tofu for a protein-rich, meat-free soup. Increase the amount of mushrooms (shiitake, enoki, or shimeji) for a deeper umami flavour. Add wakame seaweed for extra nutrients and a traditional Japanese touch.
Seafood Twist – Swap the chicken for king prawns, scallops, or white fish fillets. Simmer gently until the seafood is just cooked for a delicate, light broth.
As Part of a Japanese Meal, pair with gyoza (Japanese dumplings) as a starter and follow with a rice or noodle dish like the Japanese Chicken & Vegetable Clear Soup with Ninben Shiro Dashi. Serve alongside a teriyaki chicken donburi for a balanced dinner. Include as part of a multi-course Japanese-inspired meal with miso soup, sashimi, and tempura.
Nothing says British comfort food quite like a golden, flaky sausage roll. Homemade Sausage Rolls with C.J. Butchers Sausage Meat & Jus-Rol Puff Pastry are particularly delightful. Whether it’s served warm from the oven, packed in a lunchbox, or sliced up for a party platter, the humble sausage roll is one of the UK’s most-loved snacks. And the best part? They’re surprisingly easy to make at home with just two hero ingredients: C.J. Butchers Fresh Sausage Meat and Jus-Rol Puff Pastry Block.
In this recipe blog, we’ll show you how to make perfectly crisp, juicy sausage rolls that rival your favourite bakery’s version – plus tips on serving, storing, and pairing them for maximum flavour. When you use the key ingredients of Homemade Sausage Rolls with C.J. Butchers Sausage Meat & Jus-Rol Puff Pastry, success is guaranteed.
Why These Sausage Rolls Work Every Time
The secret to bakery-style sausage rolls lies in the ingredients: using the right mix is key to achieving the best Homemade Sausage Rolls with C.J. Butchers Sausage Meat & Jus-Rol Puff Pastry.
C.J. Butchers Fresh Sausage Meat (Lincolnshire or Cumberland, 2.5kg) Made with a minimum 65% pork, this traditional-style sausage meat is flecked with herbs and seasoning for a well-balanced flavour. Choose Lincolnshire for a sage-led profile, or Cumberland for peppery, spiced notes.
Jus-Rol Puff Pastry Block (1.5kg) Buttery, easy to roll, and always reliable, Jus-Rol gives you those signature flaky layers that puff up beautifully in the oven. This quality makes it perfect for crafting Homemade Sausage Rolls with C.J. Butchers Sausage Meat & Jus-Rol Puff Pastry.
Together, they’re a match made in foodie heaven.
Why This Recipe is a British Classic
Sausage rolls date back to the 19th century and remain one of the UK’s most iconic snacks. From school tuck shops to Christmas buffets, they’ve become a go-to comfort food. By using C.J. Butchers Sausage Meat and Jus-Rol Puff Pastry, you’re recreating this timeless favourite in the comfort of your own kitchen – with results that often outshine bakery versions.
Why You’ll Love This Recipe
These sausage rolls are:
Crispy and golden with perfectly flaky layers
Juicy and herby thanks to quality sausage meat
Quick and easy to make in under an hour
Crowd-pleasing – ideal for families, parties, and picnics
Once you try them, you’ll never go back to shop-bought sausage rolls again!
Buy the Star Ingredients
Ready to make your own bakery-style sausage rolls at home? You only need two star ingredients – both available from Nicol Retailer:
Make bakery-style sausage rolls at home with C.J. Butchers Fresh Sausage Meat (Lincolnshire or Cumberland) and Jus-Rol Puff Pastry Block. This easy, traditional British recipe creates golden, flaky pastry filled with juicy, herby pork sausage meat. Perfect for family dinners, picnics, lunchboxes, parties or buffets, these homemade sausage rolls are quick to prepare (20 minutes) and bake in just 30 minutes. Serve hot or cold with chutney, mustard or onion gravy for a crowd-pleasing snack or light meal.
Course Appetizer, brunch, Buffet, Dinner, Family Dinner, Main Course, party food, Starter
Cuisine Comfort Food, English, European
Keyword Cumberland sausage rolls, homemade sausage rolls, Jus-Rol sausage roll recipe, Lincolnshire sausage meat rolls, picnic sausage rolls, puff pastry sausage rolls, roll recipe, family sausage rolls, sausage roll buffet food, sausage roll recipe UK
Preheat oven to 200 °C (180 °C fan / Gas Mark 6). Line a tray with baking paper.
Prepare filling
In a bowl, mix the sausage meat with onion, garlic, herbs and black pepper.
Roll out pastry
Dust a surface with flour and roll the Jus-Rol Puff Pastry into a rectangle approx. 30×40 cm.
Assemble rolls
Shape sausage meat into a long log and place along one long edge of the pastry. Brush edges with egg wash, fold pastry over, and seal tightly.
Cut & glaze
Slice into rolls, place seam-side down, score tops with a knife and brush with egg wash.
Bake
Cook for 25–30 minutes until pastry is puffed, golden and the sausage meat is fully cooked.
Serve & enjoy
Delicious hot or cold with mustard, chutney or onion gravy.
Notes
These homemade sausage rolls are made with C.J. Butchers Fresh Sausage Meat and Jus-Rol Puff Pastry, giving you the perfect balance of juicy filling and crisp golden pastry.Each roll is protein-rich and hearty, making them ideal for family meals, buffets, picnics, or party snacks.Serve with chutney, mustard, or onion gravy for a classic British flavour pairing.For meal prep, these sausage rolls are freezer-friendly – simply bake, cool, and store for quick lunches or individual snacks.Pair with mashed potatoes, roasted vegetables, or a fresh green salad for a complete meal.Ideal for those searching for traditional British sausage roll recipes that are quick, easy, and crowd-pleasing.
Homemade sausage rolls are wonderfully versatile, making them perfect for a wide range of occasions. Here are some delicious ways to enjoy them:
Family Meals
Serve warm sausage rolls as part of a hearty dinner with creamy mashed potatoes, Yorkshire puddings, roasted carrots, and rich onion gravy. They also pair beautifully with buttered peas or seasonal greens, making them a comforting family favourite.
Individual Lunches & Snacks
Bake a batch ahead of time and store in the freezer for quick, on-the-go lunches. Pair with a crisp side salad, coleslaw, or even a simple bowl of tomato soup for a lighter, balanced meal.
Party Platters & Buffets
Slice into bite-size mini rolls and serve as finger food at parties, picnics, or festive gatherings. Offer a selection of dips such as English mustard, spicy chutney, barbecue sauce, or sweet chilli dip to keep guests coming back for more.
Picnic Perfection
Sausage rolls taste just as good cold, making them a top choice for picnics, lunchboxes, and road trips. Pack with cheese cubes, pickles, and crusty bread for a classic British-style picnic spread.
Creative Pairings
For a twist, pair your sausage rolls with apple sauce, cranberry relish, or even a cheese dip to balance the savoury richness of the pork. For a festive feel, try them with mulled wine or a warming spiced cider.
Recipe Notes
These sausage rolls are freezer-friendly – bake in bulk and store for quick snacks.
Adjust seasoning by adding chilli flakes, extra herbs, or a pinch of nutmeg.
Swap Jus-Rol Puff Pastry for gluten-free pastry if catering to dietary needs.
Use either Lincolnshire or Cumberland sausage meat depending on your flavour preference.
Frequently Asked Questions
Can I freeze homemade sausage rolls?
Yes! Bake them first, let cool, then freeze in an airtight container. Reheat in the oven until hot and crisp.
Can I make sausage rolls in advance?
Definitely. You can assemble them, store in the fridge (uncooked) for up to 24 hours, and bake when needed.
Which is better – Lincolnshire or Cumberland sausage meat?
Both are delicious! Lincolnshire is more herby, while Cumberland has a peppery, spiced profile. It depends on your taste preference.
Can I make mini sausage rolls for parties?
Yes – just slice the pastry into smaller sections before baking. Perfect for finger food.
What dips go best with sausage rolls?
Classic choices include mustard, chutney, tomato ketchup, barbecue sauce, or onion gravy.
Looking for something hearty, rustic, and packed with flavour? This Wild Boar & Apple Sausage Bake is the ultimate comfort food. Using the premium C.J. Butchers Wild Boar & Apple Sausages (2.5 kg pack) from Nicol Retailer , this recipe brings together the rich, gamey taste of wild boar and the natural sweetness of apple, roasted with seasonal root vegetables until golden and caramelised. It’s the perfect Rustic Wild Boar & Apple Sausage Bake with Roasted Root Vegetables.
Whether you’re planning a family dinner, entertaining guests, or simply craving something rustic and filling, this dish ticks every box. Best of all, it’s easy, gluten-free, and absolutely delicious, making it an excellent choice for a Rustic Wild Boar & Apple Sausage Bake with Roasted Root Vegetables.
Why Choose Wild Boar & Apple Sausages from Nicol Retailer?
Not all sausages are created equal! The C.J. Butchers Wild Boar & Apple Sausages are handcrafted with premium cuts, natural hog casings, and no artificial fillers. Include them in your Rustic Wild Boar & Apple Sausage Bake with Roasted Root Vegetables for the best results.
✅ Bold, gamey wild boar flavour ✅ Balanced with a hint of apple sweetness ✅ Generous 2.5 kg pack—ideal for families, entertaining, or batch cooking ✅ Available fresh from Nicol Retailer with the option to subscribe and save
This rustic Wild Boar & Apple Sausage Bake recipe showcases C.J. Butchers gourmet sausages from Nicol Retailer, roasted with root vegetables and apples for a hearty, flavour-packed meal.
Course Comfort Food, Dinner, Family Meal, lunch, Main Course
Cuisine English
Diet Low Calorie
Keyword C.J. Butchers Sausages, Gourmet Sausage Recipes UK, Hearty Family Dinner Ideas, Nicol Retailer Sausages, Sausage Bake with Vegetables, Wild Boar & Apple Sausages, Wild Boar Sausage Recipe
Preheat oven to 200 °C / 400 °F. Line a roasting tray with parchment.
Chop Veggies & Apples
Cut the potatoes, carrots, parsnips, onion, and apples.
Season Everything
Toss with olive oil, garlic, rosemary, salt, and pepper. Spread onto tray.
Add the Sausages
Nestle the wild boar & apple sausages among the veg.
Roast to Perfection
Roast for 40–45 minutes, turning halfway, until sausages are golden and vegetables caramel
Sweet Glaze Finish
Drizzle honey in the last 10 minutes for a sticky glaze.
Serve & Enjoy
Garnish with fresh parsley. Serve with mustard, crusty bread, or salad.
Notes
Recipe Notes
night before and simply add C.J. Butchers Wild Boar & Apple Sausages from Nicol Retailer when ready to roast.Batch Cooking & Freezer Friendly: This recipe is perfect for meal prep—cook the sausages in bulk, freeze portions, and reheat for quick weeknight dinners.Flexible Ingredients: Swap potatoes for sweet potatoes or butternut squash to create a seasonal variation of this wild boar sausage bake.Flavour Boost: Add a splash of cider or white wine to the roasting tray for a deeper flavour that complements the apple in the sausages.Dietary Notes: Naturally gluten-free and dairy-free, high in protein, and rich in fibre from root vegetables—making it a balanced and hearty main course recipe.Entertaining Tip: The 2.5 kg pack of sausages from Nicol Retailer is ideal for feeding a crowd, making this recipe great for parties, barbecues, or Sunday dinners.
Suggested Pairings for Wild Boar & Apple Sausage Bake
Pairing food and drink with C.J. Butchers Wild Boar & Apple Sausages takes this rustic bake from a weekday dinner to a truly memorable meal. Here’s how to serve it like a pro alongside your Rustic Wild Boar & Apple Sausage Bake with Roasted Root Vegetables:
Side Dishes
Creamy Mashed Potatoes: The buttery smoothness balances the bold, gamey flavour of the wild boar. Add a hint of horseradish for extra punch.
Braised Red Cabbage: A classic British pairing—its tangy sweetness complements the apple notes in the sausages.
Buttered Green Beans with Garlic: A lighter side that adds freshness and crunch.
Honey-Roasted Parsnips or Carrots: If you’re cooking for a crowd, double up on root veg for an earthy, caramelised flavour.
Breads & Grains
Crusty Farmhouse Loaf: Perfect for soaking up the honey-cider glaze and sausage juices.
Garlic & Herb Focaccia: Adds a Mediterranean twist to this British classic.
Rustic Pearl Barley Salad: A hearty grain that works beautifully with roasted apples and root veg.
Cheese Pairings (for entertaining)
Turn this dish into a feast by serving it alongside a cheese board:
Mature Cheddar: Strong enough to stand up to wild boar.
Summer: Slice the sausages onto a charcuterie board with fresh apple slaw and crusty bread.
Where to Buy
Get the star ingredient—C.J. Butchers Wild Boar & Apple Sausages (2.5 kg, £49.99) —exclusively at Nicol Retailer. Perfect for rustic dinners, hearty family meals, or entertaining guests. Subscribe and save up to 3% on regular deliveries.
If you’re looking for a healthy, dairy-free alternative to milk, you’ll love this homemade oat milk recipe. Smooth, creamy, and naturally vegan, oat milk is one of the most popular plant-based milk alternatives. Not only is it delicious, but it’s also budget-friendly and made with siIf you’ve ever browsed the plant-based aisle at your local supermarket, you’ll know that oat milk is everywhere. Loved by baristas, health enthusiasts, and families alike, it has become one of the UK’s fastest-growing dairy alternatives. But did you know that you can easily make it yourself at home in under 10 minutes?
This homemade oat milk recipe is smooth, creamy and naturally vegan. It’s made with just a handful of ingredients, costs pennies compared to shop-bought cartons, and can be customised to your taste. Whether you’re switching for health reasons, sustainability, or just fancy trying something new, homemade oat milk is a delicious place to start.
Why Is Oat Milk So Popular?
Oat milk isn’t just a trend—it’s part of a global shift towards plant-based diets. Compared to almond or soy milk, oat milk has a naturally creamy texture and a neutral flavour that makes it versatile. It froths beautifully for lattes, pours smoothly over cereal, and blends seamlessly into smoothies. But it’s not just about taste:
Oats are cheap, widely available, and bought in bulk, they last for ages
You can keep it plain or get creative with flavours.
It’s dairy-free, nut-free, soy-free, and can be made gluten-free.
For many households, oat milk ticks every box: sustainability, health, affordability, and taste.
Learn how to make creamy homemade oat milk in under 10 minutes. Vegan, dairy-free, nut-free & gluten-free recipe with flavours, tips & FAQs.:
Make your own oat milk at home in just 10 minutes with simple ingredients you already have in the cupboard. This easy vegan milk alternative is naturally dairy-free, nut-free, and perfect for coffee, tea, cereal, smoothies, or baking. Our step-by-step recipe shows you how to create creamy oat milk that’s smooth, refreshing, and free from additives or preservatives. With flavour variations like chocolate, vanilla or cinnamon, it’s a versatile plant-based drink the whole family will enjoy. Store it in the fridge for up to 5 days and shake before use for the best resultsLearn how to make healthy homemade oat milk today – cheaper, fresher and tastier than shop-bought!
One of the best things about homemade oat milk is how versatile it is. Once you’ve mastered the basic recipe, you can transform it into different flavours that rival (or even beat!) shop-bought versions. Here are some delicious ways to upgrade your oat milk:
Classic Vanilla Oat Milk – Add 1 tsp pure vanilla extract or scrape half a vanilla pod into the blender. Perfect for adding a subtle sweetness to porridge, coffee, or baking.
Rich Chocolate Oat Milk – Blend in 2 tsp cocoa powder + 1 tbsp maple syrup or agave. Tastes just like chocolate milkshake – but dairy-free and guilt-free!
Golden Cinnamon Oat Milk – Stir in ¼ tsp ground cinnamon (or nutmeg) for a warming, spiced drink. Ideal for cosy autumn nights or served warm with biscuits. Pair with baked crumpets or pancakes for a real treat.
Barista-Style Creamy Oat Milk – Use 750 ml water instead of 1 litre for a thicker, creamier texture. Froths beautifully in lattes, cappuccinos, and hot chocolates. A must-try for coffee lovers who want that café-quality finish at home.
Berry Oat Milk Smoothie Twist – Add a handful of fresh strawberries, raspberries, or blueberries before blending. Sweet and fruity, and packed – perfect for summer mornings.
Coconut Oat Milk Fusion – Blend in 1 tbsp desiccated coconut or a splash of coconut extract. A tropical twist that works well in smoothies or served over granola.
Honey & Mint Oat Milk (non-vegan option) – Sweeten with a drizzle of honey and blend with fresh mint leaves. Refreshing, light, and perfect chilled over ice.
The beauty of oat milk is that you can experiment endlessly. From indulgent chocolatey versions to light, fruity twists, it adapts to every craving. Why not batch-make a few flavours, bottle them up, and have your very own vegan milk bar at home?
Serving Ideas
Homemade oat milk isn’t just a drink — it’s a versatile kitchen essential that can elevate both everyday meals and special treats. Here are some creative ways to enjoy it:
Hot Drinks – Froth it into a silky latte, cappuccino, or hot chocolate. Add a splash to English breakfast tea or chai for a naturally creamy finish. Blend with cocoa and cinnamon for a cosy winter warmer.
Breakfast Bowls – Pour over crunchy granola, muesli, or cereal for a refreshing start to the day. Pair with warm porridge for the ultimate oat-on-oat breakfast. Use chilled oat milk for overnight oats — soak them overnight with fruit and spices for a ready-to-go breakfast.
Smoothies & Shakes – Blend with bananas, berries, or mango for a nutrient-packed smoothie. Add protein powder for a post-workout shake that’s vegan and dairy-free. Try a chocolate oat milk smoothie with cocoa, dates, and ice for a guilt-free dessert drink.
Baking & Cooking – Swap it for dairy milk in pancakes, muffins, or cupcakes — no one will taste the difference. Use it in creamy soups, sauces, or even mashed potatoes for a lighter, plant-based twist. Stir into risottos or curries where you’d normally use cream for added creaminess.
Desserts – Turn it into oat milk ice cream with vanilla and maple syrup. Use as the base for vegan custard, rice pudding, or chia seed pudding. Blend into milkshakes with strawberries, chocolate, or peanut butter.
As a Refreshing Drink – Enjoy a chilled glass on its own — it’s simple, clean, and hydrating. Serve flavoured versions (vanilla, chocolate, or cinnamon) at brunches and parties. Pour over ice with a sprig of mint for a cool summer drink.
Whether you’re enjoying it with breakfast, blending it into a smoothie, or using it as a base for vegan cooking and baking, homemade oat milk is endlessly versatile. Once you start experimenting, you’ll never want to go back to shop-bought cartons.
Making oat milk at home is quick, affordable, and satisfying. Not only is it fresher and cheaper than shop-bought, but it’s also kinder to the planet and endlessly customisable. Whether you enjoy it in your morning latte, over cereal, or in a creamy dessert, oat milk is a staple every kitchen should have.
👉 Ready to give it a go? Grab your oats, blend up a batch, and taste the difference today!
Frequently Asked Questions
Does oat milk froth for coffee?
Yes — make barista oat milk by reducing water to 750 ml and/or adding 1 tsp oil.
How long does homemade oat milk last?
Up to 5 days in the fridge, stored in a sealed glass bottle. Shake before pouring.
Can I heat oat milk?
Yes, but gently. Don’t boil — it may thicken.
What do I do with leftover oat pulp?
Mix into porridge, smoothies, muffins, or bread for extra fibre.
If you’re looking for a brunch that feels like a treat but is simple enough to whip up at home, you’re in for a delicious surprise. This Crispy Pancetta & Avocado Smash Toast with Poached Egg is everything you want on a lazy weekend morning: salty, smoky, creamy, crunchy, and just the right amount of indulgent
.The star of the show? Our Smoked Pancetta Slices – perfectly cured, rich in flavour, and crisps up beautifully in the pan. Pair that with fresh sourdough, creamy avocado, and a golden poached egg. You’ve got a café-style dish without leaving your kitchen.
Crispy Pancetta & Avocado Smash Toast with Poached Egg
Crispy smoked pancetta is layered over creamy avocado smash and golden sourdough, topped with a perfectly poached egg and finished with a drizzle of chilli oil. A simple yet indulgent brunch recipe that’s full of flavour and texture.
✔ A flavour-packed brunch in under 20 minutes ✔ Crispy, salty pancetta meets creamy avocado ✔ Easy to adapt – gluten-free bread or veggie alternatives work too ✔ Ingredients available directly from our online shop
Serving Suggestions
This crispy pancetta & avocado smash toast is incredibly versatile, so you can enjoy it in different ways depending on your mood:
Add a little luxury: Sprinkle over some shaved Parmesan or a drizzle of truffle oil. This makes for a brunch that feels restaurant-worthy.
Make it lighter: Swap sourdough for wholegrain rye or gluten-free bread for a fibre boost. This will suit your diet.
Turn up the heat: Love spice? Add sliced fresh chillies or a pinch of chilli flakes. Alternatively, swap the drizzle of chilli oil for sriracha.
Veggie-friendly twist: Replace pancetta with grilled halloumi or roasted mushrooms. This creates a meat-free version.
Brunch board idea: Serve the toasts cut into halves on a platter. Pair them with fresh fruit, pastries, and juice. This is perfect for a family-style brunch spread.
Anytime snack: Enjoy without the poached egg for a quick open-faced sandwich. This makes a great lunch or late-afternoon pick-me-up.
Ready to try this recipe at home? Grab your pack of Smoked Pancetta and browse our full deli range here to stock up on all your kitchen essentials.
When it comes to indulgent recipes that combine simplicity with elegance, few can compete with brioche garlic dough balls paired with a baked camembert dip. If you’re curious about how to make brioche garlic dough balls with a gooey camembert centre, these golden, buttery bites are soft and pillowy, infused with the irresistible aroma of garlic and herbs. What makes this recipe truly special is its centrepiece—a molten camembert, baked to perfection and ready to envelop each dough ball in its creamy richness. This combination is a show-stopper for any occasion, whether you’re hosting a dinner party or treating yourself to an evening of comfort food.
The magic lies in the balance of textures and flavours: the delicate sweetness of the brioche dough, the savoury depth of garlic butter, and the silky, indulgent cheese from the gooey camembert centre. It’s an experience that takes classic garlic bread to an entirely new level. Whether you’re a seasoned cook or a beginner, understanding how to make brioche garlic dough balls with a gooey camembert centre makes this dish approachable yet impressive, guaranteed to leave your guests asking for the recipe. So, if you’re ready to explore a new favourite, grab your ingredients and prepare to create a dish that embodies both the art of baking and the joy of sharing food. Your kitchen is about to smell heavenly! Here is the recipe and guide:
Treat yourself to the ultimate comfort food: soft, fluffy brioche garlic dough balls served with a rich, gooey baked Camembert dip. These golden-brown dough balls are infused with fragrant garlic butter and baked to perfection—crispy on the outside, pillowy on the inside.
Preheat your oven to 180°C (fan)/200°C (conventional).
In a small bowl, combine the minced garlic, melted butter, chopped herbs, salt, and pepper.
Dip each brioche mini bun into the garlic butter mixture, ensuring they’re well coated. Arrange the buns in a single layer in a baking dish or on a baking tray.
Bake in the preheated oven for 10-12 minutes, or until golden brown.
Remove from the oven, sprinkle the grated parmesan over the buns, and return to the oven for an additional 2-3 minutes, or until the cheese is melted and slightly bubbling.
Serve warm alongside the baked camembert.
For the Baked Camembert Dip
Preheat the oven to 180°C (fan)/200°C (conventional).
Fry the bacon lardons in a pan over medium heat until crisp, then set aside.
Remove the camembert from its packaging and place it back into its wooden box (if it has one) or a small oven-safe dish.
Make 2-3 shallow slits on the surface of the cheese and insert the garlic slices, chopped rosemary, and cooked lardons into the cuts.
Drizzle olive oil over the top, then season with salt and pepper.
Drizzle olive oil over the top, then season with salt and pepper.
Bake for 12-15 minutes, or until the cheese is soft and oozy. Let it rest for a couple of minutes before serving.
Serving Suggestion
Present the garlic dough balls around the baked camembert for an inviting centrepiece. For added appeal, you can place the camembert back in its wooden box or a rustic serving dish. Perfect for dipping and sharing!
To make your brioche garlic dough balls with baked camembert truly shine, consider adding a few thoughtful touches to the presentation. Serve the dish straight from the oven in its baking dish for a rustic, inviting feel. For a touch of freshness, garnish the warm dough balls with a sprinkle of chopped parsley or a few sprigs of rosemary. If you’re entertaining, set out small plates or napkins for easy sharing, as guests will love tearing the fluffy dough balls and dipping them into the gooey camembert.
To enhance the flavours, learn how to make brioche garlic dough balls with a gooey camembert centre and accompany this baked camembert appetiser with a selection of extras, such as slices of crisp apple, crunchy celery sticks, or even a handful of toasted walnuts for added texture. A side of tangy cranberry sauce or a drizzle of honey can provide a delightful contrast to the richness of the cheese and bread. This dish is perfect as a centrepiece for gatherings or as a comforting treat for an intimate evening.
Tips & Variations Add a touch of honey or chilli flakes to the garlic butter for a sweet-spicy kick: Swap parsley for rosemary or thyme for a more herby finish or use a flavoured Camembert (e.g. with truffle or garlic) for extra depth in how to make brioche garlic dough balls with a gooey camembert centre.
Imagine a dish that transports you to the serene shores of the sea with every bite. The Sea Scallops with Fresh Herbs & Orange Sauce Recipe is precisely that culinary marvel. This dish marries the natural sweetness of sea scallops with the refreshing zest of orange, creating a flavour profile that dances on your palate.
Fresh herbs elevate the experience, adding aromatic depth and a burst of colour that makes the dish as visually appealing as it is delicious. Perfect for both special occasions and cosy dinners at home, this recipe is designed to impress and delight. Dive into the artistry of cooking sea scallops and discover how these ocean gems can transform your dining experience.
If you’re looking to impress with minimal effort, this Sea Scallops with Fresh Herbs & Orange Sauce recipe is a must-try. Bursting with flavour, naturally gluten-free, and surprisingly simple to prepare, it’s perfect for date nights, dinner parties, or just treating yourself to a restaurant-quality seafood dish at home. Beyond the elegant presentation, this dish offers a beautiful balance of textures and flavours:
Scallops, when seared properly, develop a gorgeous golden crust while staying buttery soft inside.
The orange sauce brings a subtle sweetness and tang, cutting through the richness of the seafood.
Fresh herbs like parsley, thyme and chives add fragrance and a pop of colour, making the dish feel fresh and seasonal.
Even better? This meal is naturally gluten-free, low in carbohydrates, and fits easily into a pescatarian diet—ideal for coeliac guests or those looking to enjoy healthy seafood recipes without sacrificing flavour.
Step-by-Step: How to Cook Sea Scallops with Fresh Herbs & Orange Sauce Recipe :
Sea Scallops with Fresh Herbs and Orange Sauce Recipe
Discover a vibrant and flavourful dish with this Sea Scallops with Fresh Herbs and Orange Sauce recipe. Perfect for seafood enthusiasts, this dish combines tender, perfectly seared sea scallops with a zesty orange sauce, creating a delightful balance of sweet and savoury. Fresh herbs like parsley, thyme, or dill enhance the natural flavours, adding a fragrant and refreshing touch. Quick to prepare yet incredibly impressive, this recipe is ideal for a weeknight dinner or a special occasion. With its elegant presentation and irresistible taste, this scallop dish will surely become a favourite in your repertoire.
Course Main Course, Starter
Cuisine french
Diet Gluten Free, Low Calorie
Keyword Fresh herb scallop dish, Gourmet scallop recipe, Orange sauce for scallops, Pan-seared scallops, Sea Scallops, Sea Scallops Recipe
Pat the scallops dry with kitchen paper to ensure they sear properly. Season both sides with salt and pepper.
Make the Orange Sauce
In a small saucepan, combine the orange juice, orange zest, honey, and white wine vinegar. Bring the mixture to a gentle simmer over medium heat, allowing it to reduce slightly, about 5 minutes. Remove from heat and stir in the butter until smooth and glossy. Set aside.
Cook the Scallops
Heat the olive oil and butter in a large frying pan over medium-high heat. Once the pan is hot and the butter has melted, carefully add the scallops in a single layer, making sure not to overcrowd the pan. Sear the scallops for about 2-3 minutes on each side, or until they are golden and slightly caramelised. Remove from the pan and set aside on a warm plate.
Garnish and Serve
Place the scallops on serving plates. Drizzle the warm orange sauce over the top and sprinkle with the fresh herbs. Serve immediately with a side of crusty bread, steamed vegetables, or a fresh green salad.
Bring your scallop experience to life with themed menus tailored for specific occasions. Whether you’re after a romantic setting or festive grandeur, these menu combinations ensure a well-balanced, flavourful, and visually stunning meal:
Date Night: Create an intimate and indulgent evening with pan-seared scallops served over saffron risotto, alongside tender asparagus drizzled with lemon butter. Finish with a silky vanilla panna cotta topped with citrus glaze. Pair with a glass of unoaked Chardonnay or sparkling elderflower.
Dinner Party: Impress your guests with wild rice pilaf flecked with herbs and toasted almonds, served with roasted baby carrots glazed in honey and thyme. Complement with a bottle of crisp Sauvignon Blanc and finish with a classic lemon tart for a sweet, zesty ending.
Festive Feast: For special celebrations, serve scallops atop creamy parmesan polenta with grilled seasonal vegetables. Add a side of warm sourdough with herbed butter, toast with chilled Champagne, and conclude with a decadent almond cake drizzled in orange blossom syrup.
Healthy Gourmet: Keep things light and fresh with a citrus-dressed rocket and spinach salad, scallops atop a velvety cauliflower purée, and a citrus and berry sorbet trio to finish. A sparkling cucumber mint water or elderflower presse rounds out the wellness vibe perfectly.
Each menu is designed to highlight the versatility of scallops while maintaining balance and sophistication. Mix and match based on seasonality, preferences, or the mood you want to set.
Serving Suggestions
Elevate your Sea Scallops with Fresh Herbs & Orange Sauce Recipe into a luxurious, restaurant-quality meal with carefully curated accompaniments. From grains and greens to wine pairings and indulgent desserts, here’s how to build a stunning menu around this elegant seafood dish.
Grain-Based Companions (to soak up the sauce and add texture)
Lemon and parsley couscous – quick and vibrant, it mirrors the orange and herb notes in the scallops.
Wild rice pilaf with toasted almonds – nutty, aromatic, and a great textural contrast.
Cauliflower purée – smooth and mild, creating a silky bed that lets the scallops shine.
Parmesan polenta – indulgent and creamy with a subtle saltiness that pairs beautifully with citrus.
Saffron risotto – golden and rich with floral notes that complement the fresh herbs.
Garlic and herb mashed potatoes – comforting and satisfying, for a heartier twist.
Vegetable Sides (for colour, crunch, and balance)
Steamed asparagus with lemon zest – light, crisp and just bitter enough to cut the richness.
Roasted baby carrots glazed in honey-thyme – earthy and sweet to echo the orange tones.
Grilled courgette ribbons with olive oil – Mediterranean and delicate.
Non-alcoholic citrus spritzers with herbs like mint or basil.
Sparkling elderflower cordial with cucumber slices – botanical and refreshing.
Final Thoughts
Sea Scallops with Fresh Herbs & Orange Sauce Recipe is more than just a recipe—it’s an experience. From the golden sear of the scallops to the brightness of the citrus and the aromatic lift of fresh herbs, every element comes together in harmony. It’s a dish that proves gourmet doesn’t have to be complicated, and elegance can come from simplicity.
Whether you’re planning a romantic dinner, entertaining friends, or just indulging in something a little special for yourself, this recipe offers a deliciously refined way to celebrate seasonal ingredients and fresh flavours. The versatility in presentation and pairing options also means it can be customised for any occasion—from light summer lunches to festive evening feasts.
If you’re new to scallops, this is a perfect place to start. If you’re already a seafood lover, consider this your new go-to classic. Whichever way you serve it, one thing’s certain: this dish is sure to leave a lasting impression.
Embark on a culinary adventure with this Mutton Curry with Jeera Rice & Naan Bread. It combines the rich flavours of mutton curry with the aromatic allure of jeera rice. Add the comforting touch of naan bread. Whether you’re hosting a dinner or simply treating yourself to a delightful meal, this mutton curry recipe is sure to impress. It has a perfect balance of spices, tender mutton pieces, and fragrant rice. These are complemented by the soft and fluffy naan. This dish offers an experience that satisfies all senses. Let’s dive into the world of flavours and learn how to bring this delightful meal to your table.
Imagine the enticing aroma of mutton curry bubbling away on your gas hob. It fills your kitchen with its rich and inviting fragrance. The tender mutton, cooked to perfection, is bathed in a luscious, flavour-packed gravy. It strikes the perfect balance between spice and savoury notes. Every bite is a delight, especially when paired with the warm, comforting flavours of jeera rice.
Jeera rice, with its subtle cumin aroma, is a match made in heaven for mutton curry. Fluffy basmati rice, prepared with ghee and cumin seeds, brings a nutty depth of flavour. This elevates the meal to new heights. This simple yet elegant side dish adds just the right touch of balance to your plate.
No curry meal is complete without the addition of naan bread. Soft and airy, with a golden exterior brushed lightly with melted butter, naan is the ideal partner to mop up every drop of the mouth-watering gravy. Its texture and taste add a satisfying contrast to the bold and vibrant flavours of the curry.
This combination of mutton curry, jeera rice, and naan bread is a treat for the senses, perfect for a dinner to remember. Whether you’re hosting a gathering or preparing a cosy family meal, this dish is sure to leave everyone thoroughly satisfied. Treat yourself and your loved ones to this timeless classic, packed with flavour and bursting with character.
Here is step by step instructions of how to make Mutton Curry with Jeera Rice & Naan Bread:
Mutton Curry Dinner with Jeera Rice and Naan Bread Recipe
Discover the rich, flavourful delight of Scrumptious Mutton Curry paired perfectly with aromatic Jeera Rice and warm, soft Naan Bread. This mouth-watering dish combines tender, slow-cooked mutton in a medley of spices, creating a hearty curry that bursts with taste in every bite. The lightly spiced jeera-infused rice complements the curry beautifully, while the fluffy naan bread is perfect for scooping up every last bit of the rich sauce. Perfect for family meals or special occasions, this combination is a true celebration of authentic and satisfying flavours. Indulge in a dining experience that brings the essence of traditional cuisine to your table.
Heat the oil or ghee in a large pan over medium heat. Add the cumin seeds, cinnamon stick, cardamoms, cloves, and bay leaf. Fry for a few seconds until fragrant.
Add the sliced onions and sauté until golden brown.
Stir in the ginger and garlic and fry for another minute.
Add the chopped tomatoes and cook until they become soft and the oil starts to separate.
Mix in the ground spices – coriander, cumin, turmeric, and red chilli powder. Cook for another minute.
Add the mutton pieces and stir well, ensuring they are coated with the spice mixture. Cook for about 5-7 minutes.
Lower the heat and stir in the whisked yoghurt, one spoonful at a time, to prevent curdling.
Add 1½ cups of water, cover the pan, and let the curry simmer on low heat for 45-50 minutes (or until the mutton is tender). Stir occasionally. Add more water if required.
Once the mutton is cooked, sprinkle garam masala and give it a final stir. Adjust the salt as needed.
Garnish with freshly chopped coriander leaves before serving.
Preparing the Jeera Rice
Rinse the basmati rice in cold water until the water runs clear, then soak it for 20-30 minutes.
Heat the ghee or oil in a pot. Add the cumin seeds and let them crackle.
Drain the soaked rice and add it to the pot. Stir gently for a minute to coat the rice with the ghee.
add water and season with salt.
Cover with a lid, bring to a boil, then reduce the heat to low. Cook until the water is absorbed and the rice is tender (around 12-15 minutes).
Fluff the rice gently with a fork before serving.
Preparing the Naan Bread
In a mixing bowl, combine the flour, baking powder, salt, and sugar.
Add the yoghurt and milk, mixing to form a dough. Add water a little at a time if needed. Knead for 8-10 minutes until smooth and elastic. Cover with a damp cloth and let it rest for 30 minutes.
Divide the dough into 4 equal portions and roll each into an oval or round shape.
Heat a heavy-bottomed pan or griddle on medium heat. Place the rolled-out naan on the hot surface and cook until bubbles form. Flip and cook the other side until golden spots appear.
Brush the cooked naan with melted butter or ghee.
Serving Suggestions
Plate the mutton curry in a bowl, serve the jeera rice and naan bread on the side, and garnish the dishes with freshly chopped coriander leaves.
Notes
Time management
Efficient time management is key to preparing this delightful meal without feeling rushed. Begin by marinating the mutton, as this step can be done ahead of time, even the night before, to allow the flavours to penetrate deeply. While the mutton is marinating, take the opportunity to prepare the naan dough. Mixing and kneading the dough early on ensures it has ample time to rest and rise, which will result in softer, fluffier naan.As the dough rests and the mutton marinates, you can proceed to rinse and soak the basmati rice. This multitasking approach maximizes your prep time, allowing you to move seamlessly from one task to the next.Once the rice is soaking, set up your cooking area by arranging all necessary ingredients within arm’s reach. This organization helps streamline the cooking process, ensuring you won’t have to pause to look for items. With everything prepped and in place, you can start cooking the mutton curry. Sauté the onions and tomatoes first, then add the marinated mutton. Allow it to cook on medium heat, giving it the occasional stir to prevent sticking and ensure even cooking.While the mutton curry simmers, turn your attention to the jeera rice. Heating the oil and cumin seeds in a pot is a quick process, and you can easily manage this while keeping an eye on the curry. Once the rice is cooking, use the time to roll out the naan dough. Cook the naan on a hot skillet just before serving to ensure they are warm and fresh.By coordinating these steps effectively, you can bring all components of the meal together seamlessly, making the cooking process as enjoyable as the dining experience.
If you’re ready to indulge in a flavour-packed Indian meal, then mutton curry paired with jeera rice and naan bread is the perfect choice. This classic combination brings together aromatic spices, tender meat, and comforting accompaniments, creating a meal that is both hearty and satisfying. Below, we’ll explore some serving ideas to make this dish even more delightful.
Garnishes to Add More Flavour
To take your mutton curry to the next level, don’t forget the garnishes. Freshly chopped coriander leaves sprinkled on top not only add a burst of colour but also enhance the flavours of the curry. For a hint of freshness, you can squeeze some lime juice over the dish before serving. A dollop of thick yoghurt on the side can also balance the richness of the curry with a cooling contrast.
Serving the Mutton Curry
Serve the mutton curry in a wide bowl to showcase its rich, thick gravy. Make sure the chunks of tender mutton are generously coated in the curry, allowing the spices to shine. Provide a small serving ladle so everyone can help themselves to as much of the aromatic curry as they like.
Perfectly Pairing with Jeera Rice
Jeera rice, with its fragrant blend of cumin seeds and fluffy basmati grains, is an ideal partner for mutton curry. Serve the rice on a large platter, fluffing it up gently with a fork to avoid breaking the grains. Place the curry bowl alongside the rice so guests can pour the curry over the rice for a flavourful combination. To give the rice an extra touch of indulgence, you can top it with fried onions or toasted cashews.
Naan Bread for Scooping
Soft, warm naan bread is the perfect utensil for scooping up the curry. Whether you opt for butter naan, garlic naan, or even plain naan, their slightly chewy texture complements the hearty curry beautifully. Serve the naan fresh from the tandoor (or oven), brushed with melted butter or ghee for extra richness. Cut the naan into halves or quarters to make it easier to share and dip.
Side Dishes and Extras
For a complete feast, consider serving some cooling raita on the side. A cucumber and mint raita can work wonders to balance the bold flavours of the curry. Pickles and chutneys, such as mango chutney or lime pickle, also pair wonderfully with the meal, offering tangy and spicy notes. Don’t forget a plate of sliced onions, tomatoes, and cucumbers, lightly seasoned with salt and a sprinkle of chaat masala, to add a fresh element to your spread.
Beverage Pairings
Pair this meal with a chilled glass of lassi – sweet or salted, depending on your preference – for a refreshing drink that complements the spices in the curry. Alternatively, a cup of masala chai at the end of the meal can round off the experience with its warm, spiced notes.
Setting the Table
To give your meal an inviting and authentic feel, consider using traditional Indian tableware such as stainless steel plates or copper bowls. Line the naan bread in a basket with a clean kitchen towel to keep them warm. Small bowls for chutneys and pickles add a charming touch to the presentation.
Make It Your Own
While this is a classic serving suggestion, feel free to get creative and personalise the meal. Add a simple green salad or a vegetable side dish like saag aloo (spinach and potato) for variety. However you choose to serve it, the combination of mutton curry, jeera rice, and naan bread is sure to impress. It will satisfy every palate.
This timeless dish, with its carefully balanced spices and comforting sides, is an excellent choice for everything from family dinners to festive occasions. Enjoy the vibrant flavours and rich textures, and don’t be surprised if your guests come back for seconds!
If you’re looking to bring some variety to your usual snack options, Carrot Hummus with Olive Oil and Paprika is a fantastic choice. This tasty take on traditional hummus offers a unique flavour combination that is both sweet and earthy. Carrots contribute a natural sweetness that complements the rich, creamy texture of chickpeas.
This dish is incredibly flexible and can be enjoyed in a range of situations. Whether you’re planning a picnic, hosting a gathering, or simply after a nutritious snack, Carrot Hummus with Olive Oil and Paprika makes an excellent option. Its bright orange colour is visually striking, making it a great addition to any table.
Furthermore, the ingredients in this recipe offer plenty of health benefits. Carrots are a rich source of beta-carotene, which supports eye health, while chickpeas provide protein and fibre, making this hummus a satisfying and nourishing choice. Olive oil adds a touch of richness, and paprika contributes a gentle kick that balances the flavours wonderfully.
Making Carrot Hummus is simple and requires little effort, making it ideal for both experienced cooks and beginners. The method involves blending cooked carrots with chickpeas, tahini, lemon juice, garlic, and a selection of spices to create a smooth and tasty dip. A final drizzle of olive oil and sprinkle of paprika not only enhances the flavour but also adds to its presentation. For those keen on experimenting, incorporating olive oil and paprika can further elevate the humble carrot hummus.
Include this delightful Carrot Hummus in your snack repertoire and enjoy a refreshing twist on a classic favourite.
To create your own Carrot Hummus with Olive Oil and Paprika, follow the following:
Carrot hummus with olive oil and paprika garnish is a delightful twist on the classic chickpea-based dip, offering a vibrant blend of flavours and colours. This recipe combines the natural sweetness of roasted carrots with the earthy undertones of tahini, balanced perfectly with zesty lemon juice and a hint of garlic. Drizzled with high-quality olive oil and topped with a sprinkling of smoky paprika, this dish not only looks appealing but also provides a depth of taste that’s both hearty and satisfying. Perfect as a dip for warm pita, a spread for sandwiches, or a healthy addition to a mezze platter, it’s a simple yet impressive dish that’s sure to win over guests.
Course Appetizer, Side Dish, Snack, Starter
Cuisine Mediterranean
Diet Vegan, Vegetarian
Keyword Carrot hummus, Carrot hummus recipe, Carrot hummus with olive oil, Carrot hummus with paprika
Preheat your oven to 200°C (180°C fan)/Gas Mark 6.
Spread the chopped carrots on a baking tray, drizzle with 1 tablespoon of olive oil, and season with salt and pepper. Roast in the oven for about 25 minutes or until the carrots are tender and slightly caramelised. Remove from the oven and allow them to cool for a few minutes.
In a food processor, combine the roasted carrots, chickpeas, tahini, lemon juice, garlic, ground cumin, smoked paprika, and 1 tablespoon of olive oil. Blend until smooth and creamy. If the mixture is too thick, add a small amount of water, a tablespoon at a time, until the desired consistency is achieved.
Taste the hummus and adjust seasoning with more salt, pepper, or lemon juice if needed.
Spoon the hummus into a serving bowl. Drizzle with extra olive oil and sprinkle a pinch of smoked paprika on top for garnish.
Serve with warm pitta bread, crudités, or crackers.
Carrot Hummus is a versatile and tasty addition to many meals and snacks. Its distinctive flavour and vibrant colour make it a standout choice for a variety of serving options. One of the simplest and most popular ways to enjoy carrot hummus paired with olive oil and paprika is with fresh vegetable sticks such as cucumber, pepper, and celery. The crisp texture of the vegetables pairs beautifully with the creamy hummus.
Pitta bread is another excellent accompaniment. Warmed and cut into triangles, pitta bread provides a soft and chewy contrast that enhances the overall eating experience. Crackers, especially those with seeds or whole grains, are also a great option for dipping.
For a more filling meal, consider using Carrot Hummus as a spread in sandwiches or wraps. It adds a flavourful and nutritious layer that works well with a variety of fillings, from grilled chicken and roasted vegetables to fresh greens and sliced avocado. Try Carrot Hummus with Olive Oil and Paprika even as a base for an open-faced sandwich topped with ingredients like sliced tomatoes, cucumbers, and sprouts.
If you’re aiming to add a unique touch to your starters, use Carrot Hummus as a topping for crostini. Spread a generous layer on toasted baguette slices and finish with a sprinkle of herbs or a few roasted chickpeas for added texture and flavour.
Carrot Hummus also works wonderfully as a side dish. Serve it alongside grilled meats such as chicken, beef, or lamb for a nutritious and flavour-packed complement. It pairs particularly well with roasted vegetables, enhancing their natural sweetness and adding depth to the dish.
For a gathering or celebration, create a platter featuring Carrot Hummus. Surround it with an assortment of items such as olives, cherry tomatoes, cheese cubes, and a variety of bread and crackers. This not only provides an appealing spread but also ensures there’s something for everyone to enjoy.
Another creative way to incorporate Carrot Hummus is by using it as a salad dressing. Simply thin it out with a little water or extra lemon juice and drizzle it over mixed greens for a healthy and flavourful dressing.
Storing and Shelf Life
To keep your Carrot Hummus fresh, place it in an airtight container and store it in the fridge. It should stay fresh for around 4 to 5 days. For longer preservation, Carrot Hummus with the added olive oil and paprika can be frozen. Use a container suitable for the freezer, ensuring you leave some space at the top to allow for expansion. When stored correctly, it will remain good for up to a month. When you’re ready to enjoy the hummus again, move it from the freezer to the fridge to defrost. Once it has thawed, give it a thorough stir to restore its creamy texture before serving.
Are you looking for a dish that’s both refreshing and invigorating? Look no further than our spicy papaya salad recipe! This dish is packed with vibrant colours and flavours, thanks to the unique combination of ripe papaya and spicy chilli peppers. Picture the natural sweetness of papaya paired with the crisp texture of fresh vegetables like carrots, bell peppers, and bean sprouts, all tied together with a tangy lime dressing. It’s the kind of salad that excites your taste buds and keeps you wanting more.
Perfect for any occasion, this spicy papaya salad is not only a treat for the eyes but also a healthy choice loaded with vitamins and antioxidants. Whether you’re preparing a family meal or hosting friends for a casual get-together, this salad is sure to be a hit. Additionally, it’s incredibly simple to make, requiring very little preparation.
The ingredients are straightforward and fresh, making it a wholesome option that’s ideal for anyone aiming to include more vegetables in their diet. Papaya, renowned for its high vitamin C content, pairs wonderfully with the beta-carotene found in carrots and the fibre provided by bean sprouts. The inclusion of coriander and chilli peppers not only adds a flavourful kick but also brings an extra nutritional benefit.
So, why wait? Get ready to enjoy the bold and delightful combination of sweet, spicy, and tangy tastes with our spicy papaya salad recipe. Whether you’re confident in the kitchen or just starting out, this recipe is a fantastic way to bring something exciting to your table.
To craft this delightful spicy papaya salad, here is the step by step:
Are you looking for a dish that's both refreshing and invigorating? Look no further than our spicy papaya salad recipe! This dish is full of vibrant colours and flavours, thanks to the wonderful combination of ripe papaya and spicy chilli peppers. Picture the sweetness of papaya paired with the crunch of fresh vegetables such as carrots, peppers, and bean sprouts, all tied together with a tangy lime dressing. It’s the sort of salad that brings joy to your taste buds and leaves you wanting more.
Course Appetizer, lunch, Side Dish
Cuisine Thai
Diet Vegetarian
Keyword Fresh papaya salad, How to make papaya salad at home, Papaya salad recipe, Spicy papaya salad, Thai papaya salad, Thai-inspired salad for summer
1red chilli pepper, finely chopped (or less, to taste)
Instructions
Prepare the vegetables
Using a sharp knife or a julienne peeler, slice the green papaya and carrots into thin strips. Place them into a large mixing bowl.
Add the sliced red and yellow bell peppers, bean sprouts, and half of the chopped coriander to the bowl.
Make the dressing
In a small bowl, combine the lime juice, fish sauce, brown sugar, minced garlic, sesame oil, and finely chopped chilli pepper. Mix thoroughly until the sugar has dissolved.
Assemble the salad
Pour the dressing over the vegetable mixture and toss well to ensure everything is evenly coated.
Garnish and serve
Transfer the salad to a serving dish. Garnish with the remaining coriander, sliced chilli pepper, and roasted peanuts, if using.
Serving your spicy papaya salad with style can make all the difference. Begin by arranging the salad on a large, colourful platter to showcase its striking colours. The vibrant orange of the papaya and carrots, the red of the bell pepper, and the fresh green of the coriander create a visual treat that’s hard to resist.
To make your meal more special, think about serving the salad alongside grilled chicken or prawns. The smoky flavours from the grill work wonderfully with the tangy, spicy taste of the salad. If you prefer a vegetarian option, slices of tofu or tempeh are excellent protein-packed additions. These not only make the dish more nourishing but also more satisfying.
For an elegant touch, decorate the salad with extra coriander leaves and a handful of roasted peanuts. This simple addition improves both the taste and the presentation, making it ideal for hosting guests. A squeeze of fresh lime juice just before serving adds a refreshing sharpness that ties the flavours together perfectly.
Whether you’re hosting a dinner party or enjoying a meal with your family, these serving ideas will help you present a dish that looks as good as it tastes. Savour every bite of this delightful salad!
Nutritional Benefits
This spicy papaya salad isn’t just tasty; it’s full of nutrients that can enhance your health. The key ingredient, papaya, is high in vitamin C and antioxidants, which help to strengthen your immune system and combat free radicals. Carrots bring in plenty of beta-carotene, supporting healthy vision and skin. At the same time, the fresh bean sprouts provide fibre and protein, aiding digestion and keeping you feeling satisfied. Coriander, often an underappreciated herb, delivers anti-inflammatory properties and is packed with essential vitamins like A and K.
Adding red chilli peppers to the mix not only gives the salad its spicy flavour but also introduces capsaicin, a compound known to support metabolism and heart health. The lime juice in the dressing is a great source of vitamin C, while fish sauce supplies vital amino acids and minerals. Don’t overlook the roasted peanuts, which add a delightful crunch along with healthy fats and protein.
By preparing this salad with fresh ingredients, you’re choosing a meal that supports overall well-being. Each bite brings together flavours that are not only enjoyable but also beneficial to your body. So, dig into this colourful, nourishing dish and savour the advantages it offers!
Frequently Asked Questions
Can I make this spicy papaya salad ahead of time?
Certainly! You can prepare the individual ingredients beforehand. However, for the best texture and flavour, it’s advisable to mix them together and add the dressing just before serving. This helps the salad stay fresh and crisp.
What can I use as a substitute if I can’t find green papaya?
If green papaya is unavailable, you can use thinly sliced green mango or cucumber as an alternative. Both options offer a similar crisp texture and refreshing flavour.
How should I store leftovers?
Store any leftover salad in an airtight container and place it in the fridge. Although it will remain good for up to two days, this salad is best enjoyed fresh to maintain its vibrant flavours and crispness.
My salad turned out too spicy. How can I fix it?
If your salad is too spicy, you can reduce the heat by adding extra lime juice or a little sugar. This will help balance the flavours and make it less spicy.
Grilling seafood brings out an incredible depth of flavour, making it a favourite for many outdoor cooking enthusiasts. When you think of the perfect summer dish, juicy grilled shrimps and scallops often come to mind. For those searching for the ultimate shrimp and scallops recipe, these seafood delights are not only delicious but also quick and easy to prepare, making them perfect for any grilling occasion. The natural sweetness of shrimps and scallops is heightened when grilled, creating a mouth-watering experience that is hard to match.
Whether you’re hosting a garden barbecue or enjoying a quiet dinner, this recipe is sure to impress your guests and leave them wanting more. The secret to achieving those perfect flavours lies in the marinade and grilling techniques that enhance the seafood. A marinade made with olive oil, garlic, parsley and lemon juice, delightful mix of tangy, sweet, and spicy flavours to the shrimps and scallops, which will excite your palate.
Grilling shrimps and scallops not only enhances their flavour but also creates an appealing presentation. The slight char from the grill provides a lovely visual contrast to the tender seafood, ensuring your dish looks as good as it tastes. As you prepare to light the grill, remember that the simplicity of this recipe is what makes it truly special.
The Juicy Grilled Shrimp and Scallops Recipe is a simple and delicious seafood dish perfect for outdoor grilling. It features fresh shrimp and scallops marinated in a flavourful mixture of olive oil, garlic, lemon juice, and herbs. The seafood is then grilled to perfection, resulting in a tender, smoky, and citrusy dish that can be enjoyed on its own or paired with your favourite sides. Perfect for gatherings or a quick dinner, this recipe is both versatile and satisfying.
Course brunch, lunch, Main Course
Cuisine Mediterranean
Keyword Shrimp and Scallops, Shrimp and Scallops recipe, Shrimp and Scallops skewers
Rinse the shrimps and scallops under cold water, then pat them dry with kitchen paper.
In a medium-sized bowl, whisk together the olive oil, lemon juice, minced garlic, parsley, smoked paprika, salt, and pepper.
Marinate the Seafood
Add the shrimps and scallops to the bowl, ensuring they are evenly coated in the marinade. Cover and refrigerate for 15 minutes to allow the flavours to develop
Prepare the Skewers
If using wooden skewers, soak them in water for at least 10 minutes to prevent them from burning.
Once the seafood has marinated, thread the shrimps and scallops alternately onto the skewers.
Grill the Skewers
Preheat your grill or barbecue to medium-high heat.
Place the skewers on the grill and cook for about 2-3 minutes per side, or until the shrimps are pink and the scallops are opaque. Be careful not to overcook as they can become dry.
Serve
Transfer the skewers to a serving plate and garnish with additional chopped parsley if desired.
Serve immediately with lemon wedges on the side for an extra zing of flavour.
Notes
TipsCleaning and preparing the seafood is essential. Rinse the shrimps under cold water and remove the shell and vein for a tidy result. For scallops, ensure they’re free of any attached side muscles. Pat both dry with kitchen paper to remove excess moisture.Making the marinade is straightforward. Whisk until thoroughly combined. Place the prawns and scallops in a resealable plastic bag, pour the marinade over them, seal the bag, and gently shake to coat. Allow them to marinate in the fridge for at least 30 minutes, but no longer than an hour to prevent over-marinating.Keep a close watch on the seafood as it cooks quickly. Shrimps typically take 2-3 minutes per side until they turn pink and opaque. Scallops need about 3-4 minutes per side, forming a lovely golden crust. Avoid overcooking by taking them off the grill as soon as they are done.Once cooked, allow the seafood to rest for a minute or two before serving. This short resting time helps the juices settle, ensuring every bite is moist and full of flavour. Now you’re ready to enjoy your perfectly grilled prawns and scallops, ideal for any occasion.
Grilled shrimps and scallops go wonderfully with a variety of side dishes and drinks, allowing you to tailor your meal to suit any occasion. For a fresh and vibrant side, try serving a mixed leaf salad with cherry tomatoes, cucumber slices, and a light vinaigrette. The crisp texture of the vegetables pairs beautifully with the tender seafood.
Grilled vegetables such as asparagus, courgette, or peppers make excellent accompaniments, adding both colour and flavour to your plate. For a more filling option, consider a serving of quinoa or couscous mixed with herbs and a splash of lemon juice, which provides a pleasant contrast to the juicy shrimps and scallops.
The choice of drink can also enhance your meal. A chilled, crisp white wine like Sauvignon Blanc or Pinot Grigio works wonderfully, complementing the subtle flavours of the seafood without overwhelming them. If you prefer a non-alcoholic option, sparkling water with a hint of lime or a light iced tea can be excellent alternatives.
For an extra touch of indulgence, serve the shrimps and scallops with a creamy garlic aioli or a tangy mango salsa. These sauces add depth to the flavour and enhance the overall presentation of the dish.
To finish, garnish your plate with fresh herbs such as parsley or coriander and a few lemon wedges. The herbs bring a burst of freshness, while the lemon adds a bright, zesty note that works perfectly with the seafood.
By combining these serving ideas, your grilled shrimps and scallops will take centre stage in a truly memorable meal.
Frequently Asked Questions
Over-marinating can make shrimp and scallops mushy, so stick to the recommended 30 minutes to an hour for marinating. Overcooking is another common issue; keep an eye on the grill and use a meat thermometer to ensure precise cooking. Shrimp should reach 120°F, while scallops should hit 130°F.
If you’re unsure about the quality of your seafood, always check for firmness and a fresh, oceanic smell for shrimp, and creamy white, plump appearance for scallops. These indicators will help you choose the best ingredients for your dish. For those who don’t have a grill, an indoor grill pan or broiler can be a good alternative. Just make sure to adjust the cooking times as necessary and keep an eye on the seafood to avoid overcooking.
To store leftovers, place the grilled shrimp and scallops in an airtight container and refrigerate promptly. Consume them within two days for the best taste. They can be reheated gently on the stove or enjoyed cold in a salad for a quick meal.
These tips should help you navigate any potential pitfalls and ensure a delicious outcome every time you prepare this recipe.
Imagine a dish where tender duck meets a vibrant orange glaze, creating an explosion of flavors that dance on your taste buds. That’s the magic of Duck à l’Orange, a beloved classic in French culinary tradition. This delicious French Duck à l’Orange recipe showcases how simplicity can lead to extraordinary results, making it a must-try for anyone interested in gourmet cooking. Duck à l’Orange is renowned for its unique combination of savory and sweet elements, which create a harmonious and memorable dining experience. The star of the dish is, of course, the duck. Its rich, succulent meat is perfectly complemented by the tangy, citrus-infused sauce. This dish isn’t just a meal; it’s an experience that embodies the elegance and sophistication of French cuisine.
One of the remarkable aspects of this recipe is its adaptability. Whether you’re hosting a fancy dinner party or simply want to treat yourself to something special, Duck à l’Orange is versatile enough to fit any occasion. And the best part? You don’t have to be a professional chef to pull it off. With a bit of preparation and attention to detail, you can master this dish in your own kitchen.
Cooking Duck à l’Orange involves a few essential steps, each contributing to the dish’s final flavour profile. Selecting fresh, high-quality ingredients is crucial, as is understanding the balance of flavours that make this recipe so iconic. From the initial searing of the duck to the careful reduction of the orange sauce, each step is designed to maximize taste and texture.
So, whether you’re new to French cooking or looking to expand your culinary repertoire, Duck à l’Orange offers a delightful challenge with a delicious payoff. Dive into this recipe and discover why it has stood the test of time.
Duck à l’Orange is a timeless dish from French cuisine that combines the richness of duck with the sweet and tangy flavours of orange. Perfect for a special occasion or a sophisticated dinner at home, this recipe is sure to impress guests with its balance of taste and elegance. Let’s take a look at how to prepare this exquisite meal.
Course Main Course
Cuisine french
Keyword Classic French Duck à l’Orange Recipe, Duck à l’Orange
Preheat the oven to 200°C (fan 180°C) or Gas Mark 6. Pat the duck breasts dry with kitchen paper. Lightly score the skin of each duck breast in a criss-cross pattern, ensuring you don’t cut through to the meat. Season generously with salt and black pepper on both sides.
Cooking the Duck Breasts
Heat a large, oven-safe frying pan over medium heat. Place the duck breasts skin-side down in the pan (no oil is needed, as the fat will render out). Cook for about 6–8 minutes, allowing the skin to become golden and crispy. Turn the breasts over and sear the meat side for 2 minutes. Transfer the pan to the preheated oven and roast for an additional 8–10 minutes for medium-rare (or 12–15 minutes if you prefer well-done). Once cooked, remove from the oven and let the duck breasts rest on a warm plate, loosely covered with foil.
Making the Orange Glaze
While the duck rests, prepare the orange glaze. Pour off excess fat from the frying pan, leaving about 1 tablespoon. Return the pan to medium heat. Add the red wine vinegar and caster sugar, stirring until the sugar dissolves and forms a caramel-like consistency. Gradually add the orange juice (including the freshly squeezed 100ml) and chicken stock. Bring the mixture to a simmer and allow it to reduce
Thickening the Sauce
In a small bowl, mix the corn flour with a little water to form a smooth paste. Whisk this into the sauce and cook for another 3–4 minutes, allowing it to thicken. Stir in the orange zest and butter for a glossy finish. Taste and adjust the seasoning if necessary.
Serving
Place each whole duck breast on a serving plate. Drizzle the orange glaze generously over the top, ensuring the skin remains crispy. Garnish with fresh parsley if desired. Serve with your choice of accompaniments, such as roasted potatoes, steamed greens, or a light salad.
Notes
Cooking TipsAchieving culinary success with Duck à l’Orange hinges on mastering a few essential techniques. The star of the dish is undoubtedly the sauce, where balancing sweetness and acidity is key. The orange and sugar bring a natural sweetness, while the white wine vinegar provides the necessary tang. Fine-tuning these elements can make a world of difference, so don’t hesitate to adjust the quantities to suit your palate.Cooking the duck to perfection involves closely monitoring its internal temperature. Use a reliable meat thermometer to ensure the duck reaches an internal temperature of 165°F. This precision helps achieve crispy skin while keeping the meat juicy. An evenly browned exterior is just as crucial, so sear the duck on all sides before transferring it to the oven.The sauce preparation also deserves special attention. Once the orange juice, sugar, and vinegar mixture has reduced by half, the addition of chicken stock and orange liqueur enriches the flavours. To get the perfect consistency, gradually incorporate the corn starch mixture, stirring constantly until the sauce thickens just right.Timing is another critical factor. Allow the duck to rest after roasting; this step helps redistribute the juices, making each bite succulent. Meanwhile, ensure the sauce doesn’t over-reduce; aim for a consistency that lightly coats the back of a spoon without becoming overly thick or concentrated.By mastering these cooking techniques, you’ll not only create an exquisite Duck à l’Orange but also elevate your culinary skills to new heights.
When crafting the perfect meal with Duck à l’Orange, choosing complementary side dishes and beverages can enhance your dining experience. For a classic touch, buttery mashed potatoes are a fantastic choice, providing a creamy, smooth contrast to the crispy, flavourful duck. Alternatively, glazed rainbow carrots offer a sweet and savoury profile that pairs beautifully with the citrusy orange sauce. A fresh arugula salad with a light vinaigrette adds a refreshing, peppery bite that balances the richness of the main dish.
Wine selection is equally important in rounding out your meal. A medium-bodied red wine, such as Pinot Noir, pairs excellently with the duck’s robust flavors, offering subtle fruit notes and balanced acidity. For white wine enthusiasts, a dry Chardonnay is a superb option. Its crisp and clean profile highlights the citrus elements in the sauce while providing a refreshing counterpoint to the savory duck.
If you prefer something non-alcoholic, a sparkling water infused with a splash of orange or lemon can mimic the zesty flavours of the dish and keep your palate refreshed. Alternatively, an iced tea with a hint of citrus could be a delightful choice, offering a balance of sweetness and acidity that complements the meal.
Side dishes and beverages are not mere afterthoughts; they play a crucial role in the overall dining experience. By thoughtfully selecting your pairings, you elevate the classic French Duck à l’Orange recipe, making your meal not just satisfying, but truly memorable.
Common Mistakes to Avoid
Navigating the nuances of Duck à l’Orange can be challenging, but steering clear of a few common missteps can make all the difference. One frequent error is skipping the step of patting the duck dry before seasoning and searing. Excess moisture can prevent the skin from achieving that coveted crispiness, which is a hallmark of this dish.
Another pitfall is neglecting to balance the flavours in the orange sauce. While the sweet and tangy combination is key, an imbalance can overshadow the delicate flavour of the duck. Taste your sauce frequently and adjust the sweetness or acidity as needed.
Overcooking the duck is a mistake that can easily turn this elegant dish into a dry disappointment. Use a meat thermometer to ensure you remove the duck from the oven at the precise moment it reaches 165°F. This step is crucial for maintaining juicy, tender meat.
Failing to strain the sauce can also compromise the dish’s texture. Tiny bits of zest or other solids can create a gritty mouthfeel. For a smooth, velvety finish, take the time to strain the sauce before serving.
Lastly, overlooking the importance of a proper rest period for the duck can result in a less juicy final product. Allowing the meat to rest for about 10-15 minutes after roasting will help the juices redistribute evenly, ensuring each bite is succulent.
By being mindful of these common mistakes, you can master the art of Duck à l’Orange and deliver a dish that is both delicious and impressive. Remember, attention to detail and a willingness to adjust as you go are key components to achieving culinary success with this classic French recipe.
Conclusion
In crafting this Classic French Duck à l’Orange Recipe, you embark on a culinary journey that brings the essence of French cuisine right into your kitchen. The combination of succulent duck and a tangy orange glaze creates a dish that is both sophisticated and satisfying. This recipe isn’t just about following steps; it’s about immersing yourself in the rich traditions of French cooking and creating an experience that is memorable for both you and your guests.
Remember, the key to mastering this dish lies in your attention to detail. From selecting fresh, high-quality ingredients to meticulously balancing the flavours in your orange sauce, each step plays a crucial role in the final outcome. Don’t rush the process. Take your time to ensure that each element is prepared to perfection.
Experimentation is part of the fun. Adjust the sweetness of the sauce, tweak the seasoning, or try different pairings to discover what best suits your palate. The beauty of Duck à l’Orange lies in its versatility and the room it allows for personal touches.
Above all, enjoy the process. Cooking should be a pleasurable experience, and this recipe offers a wonderful opportunity to refine your culinary skills while preparing something truly special. So, gather your ingredients, take a deep breath, and dive into making this classic French dish. Your effort will be rewarded with a meal that dazzles the senses and leaves a lasting impression.
With practice and patience, you’ll soon be serving a Duck à l’Orange that’s sure to impress. Bon appétit!
Picture this: it’s aspring evening, the windows are slightly ajar letting in a cool breeze, and the house is filled with the irresistible aroma of a rich, spicy stew bubbling away on the hob. This Venison Goulash with Vegetables Herbs & Spicy Sauce sounds dreamy, right?
This is Venison Goulash, but not as you’ve known it. We’ve taken the bold, comforting flavours of the classic Eastern European dish and lightened it up with vibrant seasonal veg, tender lean venison, and a touch of springtime spice. It’s rustic, rich, and refreshingly simple – the perfect one-pot dish for feeding the family or impressing guests without the fuss.
The Origins of Goulash
Goulash dates back to the Hungarian plains, where shepherds (gulyás) would cook pots of meat stew over open fires. Paprika, Hungary’s signature spice, gave the dish its signature depth and warmth.
As it travelled across Europe, goulash took on different forms – some thicker and more stew-like, others thinner like soup. But the heart of it stayed the same: slow-cooked meat, comforting spices, and the kind of meal that brings people together.
In our version, British venisonsteps in for a lighter, leaner, more flavourful twist – perfect for the brighter days and lighter appetites of spring. This lighter goulash keeps all the traditional heartiness, but swaps in some vibrant, spring-friendly vegetables and a touch more freshness in the seasoning. Below is the step by step:
Venison Goulash with Vegetables, Herbs, and Spicy Sauce Recipe
Indulge in the exquisite taste of Venison Goulash with Vegetables, Herbs, and Spicy Sauce. This gourmet delight combines tender, slow-cooked venison with a medley of seasonal vegetables and a rich blend of herbs, delivering a unique culinary experience. The dish is finished with a bold, spicy sauce that adds a tantalising kick to each mouthful. Perfect for special occasions, this goulash is an excellent choice for food connoisseurs who appreciate high-quality ingredients and sophisticated flavours. Whether hosting a dinner party or celebrating a significant event, our Venison Goulash promises to impress.
Course Main Course
Cuisine Hungarian
Diet Low Calorie
Keyword healthy goulash recipe with game meat, Venison Goulash recipe, venison recipes
Heat 1 tablespoon of olive oil in a large, heavy-based pan over medium-high heat. Add the diced venison and cook in batches until browned on all sides. Remove the meat and set aside.
Sauté Vegetables
Reducethe heat to medium and add the remaining tablespoon of olive oil to the pan.Stir in the onions, garlic, red peppers, and carrots. Cook gently for 8-10minutes until the vegetables begin to soften.
Build the Flavours
Add the smoked paprika, sweet paprika, and ground cumin to the vegetables, stirring well to coat. Cook for an additional 1-2 minutes until aromatic.
Simmer the Goulash
Return the browned venison to the pan. Stir in the tomato purée, chopped tomatoes, beef stock, dried thyme, bay leaf, caraway seeds and red chilli (if using). Season with salt and black pepper. Bring the mixture to a gentle boil, then reduce the heat to low. Cover with a lid and let it simmer for 1.5 to 2 hours, stirring occasionally, until the meat is tender and the sauce has thickened.
Adjust the Seasoning
Taste the goulash and adjust the seasoning as needed with additional salt, black pepper, or a cayenne pepper if desired.
Serve and Garnish
Remove the bay leaf before serving. Spoon the venison goulash into bowls and sprinkle with fresh parsley. Serve hot with crusty bread, rice, or mashed potatoes.
Why Venison is the Perfect Spring Meat
Venison is one of those secret-weapon ingredients that home cooks are starting to rediscover – and for good reason. It’s lean, protein-rich, full of iron and B vitamins, and it has a beautifully subtle gamey flavour that’s not overpowering.
It’s also incredibly versatile: just as good in a robust winter stew as it is in a lighter spring goulash filled with fresh herbs and colourful veg.
Try this recipe with: Highland Game Venison Steaks from Nicol Retailer – responsibly sourced and perfectly portioned for home cooking.
Serving Suggestions
Venison Goulash is a versatile dish that pairs wonderfully with various sides. Consider serving it over a bed of fluffy mashed potatoes or buttery egg noodles to soak up the delicious sauce. A side of crusty bread is perfect for sopping up every last drop. For presentation, sprinkle freshly chopped parsley over the top to add a pop of colour. This simple garnish not only enhances the dish’s visual appeal but also provides a refreshing contrast to its rich flavours.
To elevate your meal further, consider adding a side of roasted root vegetables like carrots, parsnips, and potatoes. Their natural sweetness and caramelized edges complement the savoury goulash perfectly. For a lighter option, a crisp green salad with a tangy vinaigrette can balance out the richness of the dish, providing a refreshing palate cleanser between bites.
Another delightful pairing is a serving of creamy polenta or grits. Their smooth, velvety texture marries beautifully with the robust goulash, creating a comforting, indulgent combination. For those who enjoy a bit of tang, a dollop of sour cream or a sprinkle of crumbled feta cheese can add an exciting layer of flavour. Other pairing option include:
Herb-buttered new potatoes – Soft, waxy new potatoes are a springtime classic. Toss them with melted butter, chopped parsley and chives for a simple, satisfying side that soaks up the spicy, tomato-rich sauce like a dream. Add a pinch of sea salt and a squeeze of lemon for extra brightness ( optional)
Crusty sourdough with olive oil – No stew is complete without something to mop up the sauce. A thick slice of rustic sourdough, lightly toasted, is ideal. Or go for a seeded crusty loaf with a chewy crumb – perfect for catching every last drop of flavour. Gluten-free? Try a warmed GF roll brushed with olive oil and garlic.
Pearl barley or quinoa – For a wholesome, nutty contrast to the tender venison, serve your goulash over a bed of cooked pearl barley, quinoa, or wild rice. These grains soak up the sauce and add a lovely texture that complements the stew’s softness. Add fresh herbs or a handful of peas to your grains for colour and taste.
Spring greens or a simple salad – To lighten things up, a simple green salad adds freshness and crunch. Think peppery rocket, baby spinach, or lamb’s lettuce with sliced radishes, cucumber and a lemony vinaigrette. The acidity helps cut through the richness of the dish beautifully.
Braised Spring Greens or Asparagus – A warm veg side like braised spring cabbage, steamed green beans, or lightly grilled asparagus offers a fresh, seasonal contrast. Drizzle with olive oil and a sprinkle of sea salt – or top with toasted almonds for extra crunch. Try a dab of herb butter or a shaving of Parmesan for extra indulgence.
Optional Toppings & Garnishes
Add your own twist at the table with these flavour boosters:
A dollop of sour cream or crème fraîche
Chopped fresh parsley, chives, or dill
A few shavings of hard goat’s cheese or grated Pecorino
If you’re on the hunt for the ultimate comfort food, look no further. This Pappardelle pasta with slow-cooked beef mince ragu is the hearty, flavour-packed dish your dinner table has been waiting for. Rich, tender beef cooked low and slow in a deeply savoury tomato sauce, tangled with ribbons of perfectly al dente pappardelle—it’s a recipe that brings pure joy with every bite.
Whether you’re planning a cosy family meal or a special dinner for two, this recipe ticks all the boxes. And the best part? It’s surprisingly simple to make at home.
What is Pappardelle?
Pappardelle is a wide, flat pasta originating from Tuscany. Its broad ribbons are perfect for catching robust, meaty sauces like ragu. If you’ve only ever tried spaghetti or penne, you’re in for a real treat—pappardelle takes pasta night to the next level especially when paired with beef mince ragu.
Why Slow-Cooked Beef Mince Ragu?
There’s something magical about slow-cooked dishes. The flavours develop depth and richness over time, transforming everyday ingredients into something extraordinary. This beef mince ragu is a humble classic that delivers restaurant-quality results in your own kitchen.
Made with seasoned beef mince, aromatic vegetables, red wine, and crushed tomatoes, this ragu simmers gently until the meat is meltingly tender and infused with layers of Italian-inspired flavour, perfect for Pappardelle Pasta with a classic slow-cooked beef mince ragu recipe.
Why You’ll Love This Recipe
✅ Hearty and satisfying ✅ Packed with rich, meaty flavour ✅ Perfect for meal prep and freezing ✅ A true Italian classic you can make at home ✅ Easily customisable for dietary needs
Step-by-Step Cooking Instructions:
Pappardelle Pasta with Slow-Cooked Beef Mince Ragu
Pappardelle pasta with slow-cooked beef mince ragu is the epitome of hearty, comforting cuisine that warms both the body and soul. This dish showcases wide ribbons of pappardelle, their silky texture perfectly suited to cradle the luscious ragu. As the pasta twirls around your fork, it captures every bit of the richly flavoured sauce, creating a symphony of tastes in each bite.The beef mince ragu is the star of this dish, simmered gently over hours to develop layers of deep, savoury flavour. The beef, tender and succulent, is combined with aromatic onions, garlic, and celery, all softened to release their natural sweetness. Tomatoes, cooked until they reach a deep, velvety consistency, lend a subtle tang that balances the richness of the meat. A hint of red wine and a selection of herbs, such as thyme and bay leaf, bring depth and a gentle earthiness to the sauce.
Course lunch, Main Course
Cuisine Italian
Keyword Pappardelle Pasta with Beef Mince Ragu, Pappardelle Pasta with Slow-Cooked Beef Mince Ragu
Heat the olive oil in a large pan over medium heat. Add the chopped onion, carrot, celery, and garlic. Cook gently for 8-10 minutes until softened, stirring occasionally.
Brown the Beef
Increase the heat slightly, add the beef mince, and cook until browned all over. Use a wooden spoon to break up any clumps as it cooks.
Add Flavour
Stir in the dried oregano and tomato purée. Cook for 1-2 minutes to allow the flavours to combine.
Build the Sauce
Pour in the chopped tomatoes, beef stock, and red wine (if using). Add the bay leaf and season with salt and pepper. Stir well to combine.
Slow Cook
Reduce the heat to low, cover the pan with a lid, and let the ragu simmer gently for 2 hours. Stir occasionally and check to ensure it’s not sticking. Add a splash of water if needed.
Cook the Pasta
About 10 minutes before the ragu is ready, bring a large pot of salted water to the boil. Add the pappardelle and cook according to the packet instructions (usually 8-10 minutes). Drain the pasta, reserving a small cup of pasta water.
Combine
Remove the bay leaf from the ragu. Toss the drained pappardelle into the sauce, adding a little of the reserved pasta water if needed to coat the pasta evenly.
Serve
Divide the pasta and ragu between four bowls. Garnish with fresh rosemary sprigs and a generous sprinkle of grated Parmesan. Serve immediately.
To elevate your Pappardelle Pasta with the rich beef mince ragu, pair it with sides and accompaniments that complement the deep, savoury flavours of the dish. Here are some delicious and easy-to-make serving suggestions to transform your meal into an unforgettable Italian-inspired dining experience.
A bowl of beef mince ragu pasta practically begs for a side of warm, crusty bread. Choose a rustic sourdough loaf or a freshly baked Italian ciabatta to soak up the delicious, slow-cooked ragu sauce. Even better? Serve it with homemade garlic bread made with fresh parsley, crushed garlic, and a generous spread of salted butter. The crispy outside and soft, buttery centre offer a satisfying contrast to the silky pasta.
Lighten the meal with a fresh rocket and Parmesan salad. Toss peppery rocket leaves with shaved Parmesan, extra virgin olive oil, lemon juice, and a pinch of sea salt for a zesty bite that cuts through the richness of the ragu. Alternatively, go for a classic Caprese salad with ripe tomatoes, creamy mozzarella, fresh basil leaves, and a drizzle of balsamic glaze.
These salads not only add vibrant colour to your plate but also balance the hearty pasta with freshness and acidity.
A final flourish of freshly grated Parmesan cheese or Grana Padano takes your pappardelle ragu to the next level. These aged cheeses add umami and a nutty sharpness that enhances the rich ragu sauce. For a dairy-free option, try a vegan hard cheese or nutritional yeast for a cheesy flavour.
You can also drizzle a little truffle oil or chilli oil over the top for a gourmet twist. Finish with a handful of chopped parsley or fresh basil to bring freshness and colour to the dish.
Complete your Italian dinner experience with a traditional dessert. A creamy, coffee-soaked tiramisu, a silky vanilla panna cotta, or a scoop of authentic Italian gelato are all perfect endings to your meal. These sweet treats offer a cool, indulgent contrast to the savoury pasta dish and round off the evening on a high note.
If you’re looking for something quick, try chocolate-dipped biscotti or affogato (vanilla ice cream with a shot of espresso).
The Ultimate Italian Meal Awaits
With the right sides and thoughtful pairings, your Pappardelle Pasta with Slow-Cooked Beef Mince Ragu Recipe can become more than just dinner—it becomes an experience. Whether you’re cooking for family, friends, or a romantic date night, these serving suggestions bring out the very best in your dish.
Looking for more Italian dinner ideas or classic pasta recipes? Don’t forget to explore our blog for culinary inspiration straight from the heart of Italy.
Are you ready to discover the magic of crispy saffron rice, otherwise known as Tahdig? This Persian culinary masterpiece is renowned for its flavourful, crispy crust and aromatic saffron-infused rice. Creating the perfect Tahdig might seem challenging, but with Nicol Retailer’s expert tips and quality ingredients, you can achieve restaurant-level results right in your kitchen. Let’s dive into the world of Amazing Tahdig – Crispy Saffron Rice Recipe and elevate your home-cooked meals with this delicious dish.
Tahdig is a celebrated dish in Persian cuisine, cherished for its unique texture and rich flavour. The name “Tahdig” translates to “bottom of the pot,” referring to the golden, crispy layer of rice that forms at the base of the cooking pot. This culinary delight is more than just a side dish; it’s a centerpiece that steals the spotlight at any dining table.
Crafting the ideal Tahdig requires a blend of skill, patience, and top-quality ingredients. High-quality basmati rice and pure saffron are the stars of this dish, providing the essential components for its signature taste and appearance. Nicol Retailer’s selection of premium saffron and basmati rice ensures that you’re starting with the best possible foundation for your culinary creation. This is key for an amazing Tahdig recipe.
Whether you’re new to cooking Persian cuisine or looking to perfect your technique, Nicol Retailer offers the guidance and products you need. Imagine the satisfaction of serving a dish that not only tastes incredible but also looks stunning on the plate. With the right approach and ingredients, you can turn a simple meal into an extraordinary dining experience. So get ready to impress your family and friends with the unforgettable flavours of this amazing crispy saffron rice recipe.
Looking for a step-by-step recipe?
Check out our full recipe for Tahdig with tomato, mint & red onion – easy instructions, and tips for perfect results every time:
Looking for a show-stopping rice dish that’s packed with flavour, texture, and colour? This Tahdig (crispy saffron rice) recipe is the ultimate centrepiece for any meal. Golden, aromatic, and satisfyingly crunchy, this traditional Persian dish is a celebration of simple ingredients cooked with care – and it's easier to make than you might think!Comes with a vibrant, zesty side of cooked tomatoes, fresh mint, and red onion – a match made in food heaven.
Rinse the rice under cold running water several times until the water runs clear. This helps remove excess starch and ensures the grains stay separate during cooking.
Cook the Rice
Bring a large pot of salted water to a boil. Add the rinsed rice and cook for 5–7 minutes, or until the grains are partially cooked but still firm in the centre. Drain and set aside.
Prepare the Tahdig Base
In a small bowl, combine the plain yoghurt, 1 tablespoon of the saffron water, 2 tablespoons of the melted butter, and 1 cup of the partially cooked rice. Mix well until the rice is coated.
Assemble the Dish
In a non-stick pot or pan, heat the vegetable oil and the remaining melted butter over medium heat. Spread the yoghurt-rice mixture evenly over the bottom of the pan to create the base layer.
Cook the Tahdig
Cover the pot with a clean kitchen towel or tea towel to absorb excess moisture, then place the lid tightly over it. Reduce the heat to low and let the rice cook for about 30–40 minutes. The base will develop a golden, crisp crust while the steam cooks the rest of the rice.
Prepare the Tomato Side
While the rice steams, heat 1 tbsp olive oil in a small frying pan. Add the chopped tomatoes and cook for 5–7 minutes until softened.
Stir in the red onion, mint, salt, and pepper to taste. Remove from heat and set aside.
Serve the Tahdig:
To release the Tahdig, carefully run a spatula around the sides of the pan. Place a large plate over the pan and quickly invert it to flip the rice out. You should see a beautiful golden crust.Serve hot with the warm tomato-mint-red onion mixture spooned on the side or over the rice.
Notes
Tips
Creating the perfect Tahdig can be a bit tricky for beginners, but with some essential tips, you’ll be on your way to mastering this delightful dish. Start by ensuring your basmati rice is parboiled correctly; it should be partially cooked but still firm. Use a non-stick pot to make flipping the Tahdig onto a serving platter easier and to prevent sticking. Patience is key—allow the rice to cook slowly on low heat to achieve that coveted golden, crispy crust without burning. Use a clean kitchen towel under the pot lid to absorb excess moisture and ensure a crispy texture.Lastly, resist the urge to check on your Tahdig frequently; lifting the lid too often can disrupt the cooking process. With Nicol Retailer’s top-notch ingredients, your first attempt at Tahdig will be a delicious success.
Tahdig isn’t just delicious – it’s interactive. The moment you flip the pan and reveal that crispy layer is a theatrical moment that never fails to impress. An amazing Tahdig dish can be the highlight of your dinner party.
Plus, with premium ingredients from Nicol Retailer, like high-quality basmati rice and aromatic saffron, your homemade Tahdig will look and taste restaurant-worthy.
Serving suggestion
If you’ve never tried Tahdig, prepare to fall in love. This Persian classic is so much more than a side dish – it’s a culinary masterpiece that transforms humble rice into a golden, crispy delight. Whether you’re planning a dinner party, a family gathering, or a quiet night in, Amazing Tahdig – Crispy Saffron Rice Recipe is guaranteed to elevate your meal and wow your guests.
Tahdig is the ultimate crowd-pleaser, pairing beautifully with a wide range of mains. Serve it alongside:
Traditional Persian favourites like Ghormeh Sabzi or Fesenjan
Its crispy base and tender saffron-infused rice make it the ideal complement to both bold and subtle flavours. The contrast in textures and the aromatic warmth of saffron create a satisfying dish that holds its own or enhances any main course. Want to make your Tahdig even more eye-catching? Garnish it like a pro:
Sprinkle over slivered almonds or chopped pistachios for a satisfying crunch and a burst of vibrant colour
Add a handful of fresh herbs such as parsley, dill, or coriander for a fresh, fragrant finish
A squeeze of lemon just before serving can brighten the whole dish
These simple additions don’t just boost the flavour – they also turn your Tahdig into a centrepiece that looks as stunning as it tastes. When following an amazing saffron and rice recipe, such garnishes can elevate the dish visually.
Tahdig is a celebration of texture, flavour, and tradition. Whether you’re preparing a Persian feast or simply looking for something different, this crispy saffron rice dish is guaranteed to bring a touch of elegance and excitement to your table.
There’s a certain magic in a slow-braised oxtail stew that speaks to the soul. This classic dish, with its roots in traditional British cooking, embodies the essence of comfort food. Imagine the tender meat, falling off the bone, enveloped in a rich, aromatic sauce—every bite a testament to the slow-cooking process. It’s the kind of meal that brings warmth on a cold evening, making it an ideal choice for family gatherings. For those wanting to try this at home, our Slow-braised Oxtail in rich Red Wine Sauce with Vegetables and Herbs Recipe will guide you through every step.
The beauty of slow-braising lies in the way it allows flavours to meld and develop over time. The oxtail, simmered gently in a rich red wine sauce, absorbs all the wonderful aromas and becomes incredibly tender. It’s not just about the meat, though. The vegetables—carrots, celery, leeks, and those delightful small silver onions—play a crucial role, adding layers of sweetness and depth to the dish. Herbs like thyme, bay leaves, and parsley infuse the stew with their fragrant essence, creating a symphony of flavours in this Slow-braised Oxtail in rich Red Wine Sauce with Vegetables and Herbs Recipe.
This dish isn’t one to be rushed. It requires a bit of patience and a slow hand, but the reward is worth every minute. As the stew simmers away, the kitchen fills with an irresistible aroma, building anticipation for the meal to come. Whether you’re an experienced cook or new to the kitchen, preparing a slow-braised oxtail stew is an experience that offers both a culinary challenge and a deep sense of satisfaction. Here is the Slow-braised Oxtail in rich Red Wine Sauce with Vegetables and Herbs Recipe:
Slow-Braised Oxtail in Rich Red Wine Sauce with Vegetables and Herbs
Slow-braised oxtail in a sumptuous red wine sauce is a classic dish that delights the palate. The oxtail is gently cooked over several hours, allowing it to become tender and flavourful. It is accompanied by a medley of vegetables and herbs, which infuse the dish with aromatic and earthy notes. The rich sauce, infused with red wine, adds a depth of taste that perfectly complements the hearty meat. This dish offers a comforting and satisfying experience, perfect for a cosy meal.
Course Main Course
Cuisine African, English
Keyword ox tail, slow-braised oxtail in rich red wine sauce with vegetables
Season the oxtail pieces with salt and black pepper, then lightly coat them in flour, shaking off any surplus
Browning the Oxtail:
In a large, heavy-based casserole dish, heat the olive oil over a medium-high flame. Add the oxtail in batches, ensuring not to overcrowd the dish. Brown the pieces on all sides, then remove them from the dish and set aside
Sautéing the Vegetables:
Inthe same dish, add the carrots, celery, and silver onions. Sauté for about 5minutes until they begin to soften. Add the crushed garlic and tomato purée cooking for an additional 2 minutes.
Building the Sauce:
Pour in the red wine and bring to a boil, allowing it to reduce by half. Scrape any bits from the bottom of the dish for added flavour. Add the beef stock, bay leaves, and thyme, then return the oxtail to the dish
Cooking:
Lower the flame to a gentle simmer, cover the dish with a lid, and let it cook slowly for about 3 hours, or until the oxtail is tender and falling off the bone. Stir occasionally and check the liquid levels, adding a little more stock if needed.
Final Touches
Once cooked, remove the bay leaves and thyme sprigs. Adjust the seasoning with more salt and black pepper to taste.
Serving:
Garnishwith fresh parsley and serve the oxtail with creamy mashed potatoes or crustybread to soak up the sauce
Notes
Tips and Tricks
To achieve a deeper flavour in your oxtail stew, consider adding a splash of balsamic vinegar or a piece of dark chocolate near the end of the cooking process. These additions will enhance the sauce’s richness, giving it an extra layer of complexity.Ensure the oxtail browns properly by not overcrowding the pot during the searing stage. Brown the meat in batches if necessary to achieve a beautiful crust on each piece, which will contribute significantly to the overall flavour.While the stew is simmering, periodically skim off any excess fat that rises to the surface. This will keep the sauce from becoming greasy and will result in a more refined final dish.If you have the time, allow the stew to cool completely once it has finished cooking, then refrigerate it overnight. This resting period allows the flavours to meld and deepen. The next day, simply reheat the stew gently on the stovetop before serving.For a more luxurious texture, consider straining the sauce through a fine-mesh sieve after removing the meat and vegetables. This step will give you a silky smooth sauce, which you can then pour back over the oxtail and vegetables.Lastly, don’t be afraid to adjust the seasoning. Taste the stew throughout the cooking process and add salt and pepper as needed to achieve the perfect balance.
For a dish like oxtail stew, choosing the right ingredients is essential for creating depth and richness. The oxtail itself is the star, so opt for pieces with a good balance of meat and bone. These bones will release a gelatinous goodness during cooking, contributing to a luxurious sauce. Purchase your oxtail from a reputable butcher to ensure quality and freshness.
Beyond the oxtail, vegetables are fundamental in building the stew’s flavour profile. Carrots and celery add a natural sweetness, while leeks bring a subtle, earthy taste. The small silver onions are particularly special, offering a delicate sweetness and maintaining their shape throughout the cooking process. Each vegetable should be fresh and vibrant, as their quality will directly affect the final dish.
Herbs play a vital role in this Slow-braised Oxtail in rich Red Wine Sauce with Vegetables and Herbs Recipe. A bouquet garni consisting of thyme, bay leaves, and parsley will infuse the stew with a fragrant aroma. If you can, use fresh herbs, as they provide a more robust flavour compared to dried varieties.
The red wine used for both marinating and cooking should be of decent quality, as its flavour will concentrate during the long braising process. Opt for a wine that you would enjoy drinking, as it will elevate the dish. Additionally, good beef stock is necessary to complement the richness of the oxtail and wine, creating a cohesive and harmonious flavour profile.
Serving Suggestions
To fully enjoy your oxtail stew, consider pairing it with complementary sides. Creamy mashed potatoes are a classic choice, their smooth texture providing a perfect counterpoint to the rich and hearty stew. Alternatively, crusty bread can be used to mop up every bit of the delicious sauce, adding a satisfying crunch to each bite.
Buttered seasonal greens, such as tender green beans or sautéed kale, offer a fresh and vibrant contrast, balancing the deep flavours of the dish. Polenta, either creamy or grilled, can also be a delightful accompaniment, absorbing the robust sauce beautifully.
When serving, use shallow bowls to showcase the colourful mix of meat and vegetables in your Slow-braised Oxtail in rich Red Wine Sauce with Vegetables and Herbs Recipe, and garnish with freshly chopped parsley for a touch of freshness and colour. A glass of the same red wine used in the cooking process can enhance the dining experience, tying together the flavours of the meal.
For a special touch, consider serving the stew with a side of caramelised shallots or roasted garlic cloves, which can add an extra layer of sweetness and depth. These small additions can make your meal feel even more luxurious and indulgent, ensuring your guests leave the table fully satisfied.
Conclusion and Final Thoughts
Creating a slow-braised oxtail stew is a culinary journey that rewards patience and effort with a dish rich in flavour and comfort. The long, gentle braising process transforms the oxtail into a melt-in-the-mouth delight, complemented by a rich red wine sauce and tender vegetables. It’s an opportunity to bring loved ones together around a meal that exudes warmth and tradition. Whether served with creamy mashed potatoes, crusty bread, or buttered greens, each element comes together to offer a satisfying and memorable dining experience in this Slow-braised Oxtail in rich Red Wine Sauce with Vegetables and Herbs Recipe. By following these steps and tips, you’ll not only master a classic dish but also create a new favourite for special occasions and cosy nights in.
Burrata, an exquisite gem in the world of cheese, hails from the beautiful landscapes of Italy. Its unique composition—a delicate mozzarella shell encasing a creamy core—makes it a true delight for the senses. Pairing it with roasted pistachios honey and balsamic glaze can elevate the experience even further. As you slice into it, the soft interior oozes out, promising a luxurious culinary experience.
This Italian treasure has gained a well-deserved reputation among food enthusiasts and chefs alike. Its mild, milky flavour pairs seamlessly with a wide variety of ingredients, making it a versatile addition to any dish. Today, we explore a remarkable recipe that marries the lush texture of Burrata with the crunch of roasted pistachios, the natural sweetness of honey, and the tangy depth of balsamic glaze.
Imagine the moment you first encounter Roasted Pistachio Burrata with Honey & Balsamic Glaze. The visual appeal alone is enough to make your mouth water: the golden-green pistachios scattered over the creamy white Burrata, glistening with honey, all elegantly drizzled with dark balsamic glaze. Each element is chosen not just for its flavour but also for its ability to create a balanced, harmonious dish.
The contrast between the smooth Burrata and the crunchy pistachios creates a textural symphony that will make each bite an adventure. The honey adds a floral sweetness, while the balsamic glaze provides a sophisticated tanginess, resulting in a dish that’s complex yet accessible. This combination elevates a simple cheese into something truly special, making it a must-try for anyone looking to impress at their next dinner gathering.
Stay tuned as we guide you through crafting this delightful recipe, ensuring you capture the essence of Italian cuisine right in your own kitchen.
Roasted Pistachio Burrata with Honey & Balsamic Glaze Recipe
Looking for an easy yet elegant appetiser that will impress your guests? This Roasted Pistachio Burrata is a game-changer! Creamy Burrata di Puglia, crunchy roasted pistachios, sweet honey, and tangy balsamic glaze come together in a flavour-packed dish that’s perfect for any occasion. Serve it with crusty bread, focaccia, or crackers for the ultimate indulgence!
Preheat your oven to 180°C (350°F). Spread the chopped pistachios on a baking tray. Drizzle with 1 tablespoon of olive oil and season with a pinch of salt and pepper. Toss to coat evenly.
Place the tray in the oven and roast for about 8-10 minutes, or until the pistachios are golden and fragrant. Keep an eye on them to avoid burning. Once done, set aside to cool.
Assemble the Dish:
Place the burrata balls on a serving platter. Carefully tear them open to expose the creamy interior.
Drizzle the remaining olive oil over the burrata. Scatter the roasted pistachios generously on top. Drizzle the honey and balsamic glaze over the cheese and pistachios.
Garnish with fresh basil or thyme leaves. Season with additional salt and pepper, if desired. Serve immediately with crusty bread on the side.
Roasted pistachios bring an exceptional depth to this dish, enhancing both flavour and texture in a way that’s hard to match. When you roast pistachios, they develop a rich, nutty aroma and a satisfying crunch that beautifully balances the creamy Burrata. This delightful texture contrast elevates the dish’s overall appeal, making each bite a unique experience.
In addition to their culinary virtues, pistachios are a powerhouse of nutrients. They are rich in protein, healthy fats, and antioxidants, which are beneficial for heart health and can support weight management. Including roasted pistachios in your meals is a delectable way to enjoy these health perks.
Their unique flavour profile also enhances the dish’s complexity. The nutty notes of roasted pistachios pair perfectly with the mild, creamy Burrata, adding an intriguing layer of taste that makes the dish stand out. The process of roasting intensifies their flavour, bringing out subtle, earthy tones that complement the other ingredients beautifully.
Roasted pistachios also add visual appeal to the dish. Their vibrant green and golden hues create a stunning contrast against the creamy white Burrata, making the dish as visually enticing as it is delicious. This not only makes for an Instagram-worthy presentation but also enhances your overall dining experience.
So, next time you’re looking to impress your guests, remember that the humble pistachio can transform your Roasted Pistachio Burrata with Honey & Balsamic Glaze into a culinary masterpiece.
Why You’ll Love This Recipe:
✅ Quick & Easy – Ready in just 10 minutes! ✅ Perfect for Entertaining – A guaranteed crowd-pleaser. ✅ Balanced Flavours – Creamy, crunchy, sweet, and savoury in one bite. ✅ Instagram-Worthy – A beautiful dish that looks as good as it tastes!
The Harmony of Honey and Balsamic Glaze
Honey brings a natural sweetness that beautifully complements the rich creaminess of Burrata. Its floral notes subtly enhance the cheese’s mild flavour, creating a delightful contrast that is neither too sweet nor overpowering. The honey adds a golden hue that glistens against the white Burrata, adding an inviting visual appeal.
Balsamic glaze, on the other hand, introduces a tangy richness that balances the sweetness of the honey and the creaminess of the Burrata. Made by reducing balsamic vinegar, this glaze has a concentrated flavour with a hint of sweetness, offering a deep, slightly acidic note that enriches the overall taste profile of the dish. The dark, glossy drizzle of balsamic glaze not only adds a sophisticated touch but also creates an appealing contrast against the honey and Burrata.
Together, honey and balsamic glaze work in perfect harmony, elevating the dish to a new level of culinary sophistication. The interplay of sweet and tangy, creamy and crunchy, ensures each bite is a well-rounded flavour experience. When combined with the roasted pistachios, these elements create a balanced and cohesive dish that is both visually stunning and tantalising to the taste buds. This thoughtful combination of ingredients ensures your Roasted Pistachio Burrata with Honey & Balsamic Glaze will be a memorable addition to any meal.
Serving Suggestions and Pairings
Roasted Pistachio Burrata with Honey & Balsamic Glaze is not just a feast for the palate but also a versatile addition to any table. To fully enjoy its flavours, consider serving it with a fresh, crusty loaf of sourdough or artisanal bread. The bread’s texture complements the creamy Burrata, allowing you to savour every bit of this delightful dish.
For a refreshing balance, pair it with a salad of rocket, cherry tomatoes, and thinly sliced red onions. Dress the salad lightly with olive oil and a splash of lemon juice to enhance the dish’s vibrant flavours. The peppery notes of the rocket and the sweetness of the tomatoes provide a wonderful contrast to the rich, creamy Burrata..
Whether for a dinner party or a quiet evening at home, these serving suggestions will elevate your Roasted Pistachio Burrata with Honey & Balsamic Glaze to a memorable dining experience.
Conclusion
Roasted Pistachio Burrata with Honey & Balsamic Glaze brings together an exquisite blend of flavours and textures that will captivate your palate. The creamy Burrata, paired with the nutty crunch of roasted pistachios, creates a delightful textural contrast that is both luxurious and satisfying. The addition of honey introduces a natural sweetness, while the balsamic glaze adds a rich, tangy depth, making every bite a harmonious symphony of taste.
This dish is more than just a culinary delight; it is an experience that combines simplicity and elegance in every mouthful. Whether you are hosting a dinner party or enjoying a quiet evening at home, this recipe will undoubtedly impress your guests and make you the star of the kitchen.
Preparing Roasted Pistachio Burrata with Honey & Balsamic Glaze is straightforward, requiring minimal effort for maximum impact. The roasting of the pistachios and the simple assembly of ingredients ensure that even novice cooks can achieve stunning results. Plus, its visual appeal makes it perfect for sharing on social media, creating a dish that is as beautiful as it is delicious.
Incorporating this recipe into your repertoire not only showcases your culinary skills but also brings a touch of Italian sophistication to your dining table. With its balanced flavours and eye-catching presentation, this dish is sure to become a favourite in your household.
So why not give it a try? With the luxurious creaminess of Burrata, the crunchy allure of roasted pistachios, and the delightful blend of honey and balsamic glaze, this recipe promises to be a memorable addition to your culinary adventures.
Searching for a dish that marries gourmet flair with simplicity? The Delicious Bresaola Salad with Balsamic Glaze Recipe is exactly what you need. This salad features delicate bresaola, an air-dried cured beef from Northern Italy, which adds a touch of sophistication to any meal. The rich balsamic glaze melds beautifully with the fresh ingredients, creating a symphony of flavours that will captivate your taste buds.
What makes this salad truly special is its versatility. It’s perfect whether you’re entertaining guests at a dinner party or simply treating yourself to a nutritious lunch. The combination of bresaola with mixed salad leaves, cherry tomatoes, and shaved Granarolo Grana Padano is not only visually appealing but also a delightful treat for the palate. The addition of toasted pine nuts and fresh basil leaves brings both texture and freshness to the dish, making it a well-rounded and satisfying option, especially with this Bresaola Salad with Balsamic Glaze recipe.
Opting for high-quality ingredients is essential for this recipe. The choice of bresaola can significantly impact the overall flavour, so it’s worth investing in a premium selection. Similarly, a well-crafted balsamic glaze, with a perfect balance of sweetness and acidity, will elevate the taste of the salad, ensuring every bite is a harmonious blend of flavours.
Whether you’re a seasoned cook or a kitchen novice, this Bresaola Salad with Balsamic Glaze recipe is straightforward and quick to prepare, yet it never fails to impress. The elegance of the bresaola combined with the simplicity of the preparation makes it a must-try dish for any food enthusiast. Enjoy the delightful blend of textures and flavours that make this salad a standout choice for any occasion.
Why You’ll Love This Recipe
High in protein & low in fat – Bresaola is a lean, cured beef that’s full of flavor without extra calories.
Quick & easy – This salad takes just 15 minutes to prepare.
Perfect for any occasion – Enjoy as an appetiser, side dish, or light lunch.
Here is the recipe and easy to follow instructions:
If you're looking for a light, flavourful, and protein-packed dish, this Bresaola Salad with Balsamic Glaze is the perfect choice! Made with thinly sliced air-dried beef, fresh rocket leaves, and a drizzle of rich balsamic glaze, this dish is a quick and elegant appetiser or light meal.This recipe is ideal for those searching for healthy salads, Italian appetizers, keto-friendly meals, low-carb recipes, high-protein salads, quick and easy dishes, gourmet salads, balsamic glaze recipes, and gluten-free salads.
Course Appetizer, brunch, lunch, Side Dish
Cuisine Italian
Diet Gluten Free, Kosher, Low Calorie
Keyword Delicious Bresaola Salad with Balsamic Glaze recipe, healthy salads
Start by washing and drying the rocket leaves thoroughly. Place them in a large salad bowl.
Halve the cherry tomatoes and add them to the bowl.
Finely slice the red onion and mix with the rocket and tomatoes
Add Bresaola and Cheese:
Arrange the bresaola slices evenly over the salad.
Scatter the Granarolo Grana Padano shavings across the top.
Add Nuts:
Toast the walnuts in a dry pan over medium heat for a few minutes until lightly golden, stirring frequently. Allow them to cool slightly, then sprinkle over the salad.
Dress the Salad:
Drizzle the olive oil and balsamic glaze evenly over the salad.
Season with salt and freshly ground black pepper to your preference.
Serve
Gently toss the salad to combine all the ingredients. Serve immediately on plates or in bowls.
Notes
The balsamic glaze is the finishing touch. Select a high-quality glaze that balances sweetness with a hint of acidity. This will enhance the overall taste, making every bite a delightful experience.
Serving Suggestions
To elevate your Bresaola Salad with Balsamic Glaze recipe to new heights, consider pairing it with the perfect beverage and side dishes. A well-chosen drink can significantly enhance the dining experience. For a non-alcoholic option, a sparkling water infused with a hint of lemon or lime provides a zesty, palate-cleansing effect.
In terms of side dishes, a warm, crusty baguette is an excellent choice. The bread’s crunchy exterior and soft interior complement the textures within the salad, providing a satisfying crunch alongside the delicate bresaola and fresh vegetables. Roasted vegetables are another fantastic accompaniment. Consider roasting bell peppers, courgettes, and red onions with a drizzle of olive oil and a sprinkle of sea salt. Their caramelised sweetness and tender texture add a delightful contrast to the salad’s fresh and crisp elements.
For an added layer of indulgence, you might want to include a selection of cheeses on the side. While shaved Granarolo Grana Padano already enriches the salad, a small cheese board featuring soft cheeses like brie or camembert and a few robust varieties like aged cheddar or blue cheese can offer an array of complementary flavours. Freshly cracked black pepper and a touch of olive oil on the cheese board can make the experience even more enjoyable.
If you’re aiming for a more substantial meal, a side of herbed couscous or quinoa salad can be a hearty addition. Lightly seasoned with lemon zest, olive oil, and fresh herbs, these grains provide a nutritious and filling complement to the bresaola salad.
Lastly, don’t underestimate the power of presentation. Serve the salad on a large, rustic wooden board or a chic ceramic platter. The visual appeal will make the dish even more inviting, ensuring that your Bresaola Salad with Balsamic Glaze Recipe is not just a meal, but a memorable culinary experience.
Common Mistakes to Avoid
Preparing the perfect Bresaola Salad with Balsamic Glaze requires attention to detail to avoid common pitfalls. One frequent error is using inferior bresaola, which can be overly salty or lack depth of flavour. Investing in high-quality bresaola ensures a rich and satisfying taste.
Overdressing the salad is another mistake to avoid. A heavy hand with the balsamic glaze can overwhelm the delicate balance of ingredients. Aim for a light drizzle to enhance, not overpower, the flavours.
Timing is also crucial. Preparing the salad too far in advance can result in wilted leaves and a less vibrant presentation. Assemble the salad just before serving to maintain its fresh and appealing appearance.
Be mindful of the quantity of pine nuts. While they add a delightful crunch, too many can dominate the texture. A moderate sprinkle ensures the perfect balance.
Imagine sinking your teeth into a sandwich packed with the rich, smoky taste of slow-cooked ribs, combined with the refreshing crunch of coleslaw. That’s what you get with a Memphis-Style BBQ Rib Sandwich with Coleslaw—a culinary delight that hails from the heart of the American South. The Memphis approach to barbecue is all about perfecting the balance between sweet, tangy, and smoky flavours, creating an unforgettable experience for your taste buds.
This type of BBQ is known for its dry rubs and its love of pork, especially ribs. The ribs are often slow-cooked to achieve tender, fall-off-the-bone perfection. When paired with a tangy and creamy coleslaw, this sandwich becomes a symphony of textures and tastes that will make any meal special.
Whether you’re a seasoned BBQ enthusiast or a newbie looking to explore new recipes, the Memphis-Style BBQ Rib Sandwich with Coleslaw is a must-try. Not only is it a crowd-pleaser, but it also brings a touch of authenticity to your barbecue gatherings. Imagine the delight on your guests’ faces as they bite into this succulent sandwich, bursting with flavours that are both bold and well-balanced.
Incorporating this dish into your menu will elevate your cooking repertoire, allowing you to bring a taste of Memphis right to your kitchen. So, get ready to impress your family and friends with this mouth-watering recipe that combines the best of Memphis barbecue with the fresh zest of coleslaw. Step-by-Step Instructions:
Memphis-Style BBQ Rib Sandwich with Coleslaw Recipe
Memphis-Style BBQ Rib Sandwich with Coleslaw – A Southern Classic! Savour the bold, smoky flavours of Memphis-style BBQ with this mouth-watering rib sandwich! Tender, fall-off-the-bone ribs are smothered in a rich, tangy BBQ sauce and nestled between soft, toasted bread. Topped with crisp, creamy coleslaw for the perfect balance of heat and crunch, this sandwich delivers an irresistible bite every time. Whether you're hosting a summer cookout or just craving authentic Southern BBQ, this flavour-packed sandwich is a must-try. Get ready to taste Memphis in every bite!
Course lunch, Main Course, Snack
Cuisine English, french, USA
Keyword BBQ recipe, Memphis-Style BBQ Rib Sandwich with Coleslaw, Memphis-Style BBQ Rib Sandwich with Coleslaw recipe
In a small bowl, mix together the smoked paprika, garlic powder, onion powder, brown sugar, cayenne pepper, salt, and black pepper.
Rub the ribs with vegetable oil and then coat evenly with the spice mix.
Cook the Ribs:
Place the ribs on a baking tray lined with foil. Cover tightly with another sheet of foil.
Bake in the preheated oven for 2 hours or until tender.
Once cooked, remove the top foil and brush the ribs with barbecue sauce.
Increase the oven temperature to 220°C (430°F) and bake for an additional 10-15 minutes to caramelise the sauce.
Prepare the Coleslaw:
In a large bowl, combine the cabbage, carrot, and red onion.
Ina small bowl, whisk together the mayonnaise, apple cider vinegar, mustard, salt, and black pepper.
Pour the dressing over the vegetables and toss well. Refrigerate until needed.
Assemble the Sandwiches:
Slice the brioche buns in half and butter each side lightly.
Toast the buns on a hot pan or grill until golden.
Cut the ribs into sections to fit the buns, removing the bones as you go.
Place the rib meat onto the bottom half of each bun.
Top with a generous portion of coleslaw.
Finish with the top half of the bun and serve immediately.
Notes
Tips
Preparing the ribs is essential for achieving the perfect Memphis-Style BBQ Rib Sandwich with Coleslaw. For the best flavour, allow the ribs to marinate in the fridge for at least two hours, or preferably overnight. Cover the ribs during marination to let the spices penetrate the meat deeply.When you’re ready to cook, remove the ribs from the fridge and let them sit at room temperature for about 30 minutes. This helps in achieving even cooking. Whether you opt for grilling or baking, brushing the ribs with olive oil before cooking will help achieve that desirable caramelised finish.The goal is to achieve a tender, fall-off-the-bone texture with a smoky, slightly charred crust. Periodically basting the ribs with Memphis-style BBQ sauce as they cook will infuse them with an irresistible blend of sweet, tangy, and smoky flavours.
Memphis-style barbecue is famous for its slow-smoked meats and bold, tangy sauces. Unlike some other regional styles, Memphis BBQ often uses a dry rub packed with spices to create a deep, flavourful crust before the ribs are smoked to perfection. While some enjoy ribs dry, others love them slathered in a sweet, tangy, tomato-based sauce that gives them that signature sticky, finger-licking goodness.
Why You’ll Love This Sandwich
Perfect balance of flavours: The smoky ribs pair beautifully with the creamy, tangy coleslaw.
Great for gatherings: Impress your guests at BBQs, game nights, or weekend cookouts.
Authentic Southern taste: A true Memphis classic that brings the taste of the South to your kitchen.
Cooking Techniques
Cooking the ribs to perfection is crucial for a memorable Memphis-Style BBQ Rib Sandwich with Coleslaw. Whether you prefer grilling or baking, both methods will deliver succulent results.
For the grill method, start by preheating your grill to a medium heat. Lightly brush the ribs with olive oil to prevent sticking and place them on the grill. Cover and cook for approximately 90 minutes, turning occasionally. Basting the ribs with Memphis-style BBQ sauce throughout the cooking process will ensure they absorb maximum flavour. The grill method imparts a distinct smoky essence that enhances the overall taste.
If you opt for the oven method, preheat your oven to 150°C (300°F). Arrange the seasoned ribs on a baking tray and cover them with aluminium foil. Bake for about two and a half to three hours, basting with BBQ sauce every 30 minutes. Once the ribs are tender, remove the foil and increase the oven temperature to 200°C (400°F). Continue baking for an additional 10 minutes to achieve a caramelised finish on the ribs.
Both methods aim to produce tender, fall-off-the-bone ribs with a delightful smoky, slightly charred crust. Each basting session with Memphis-style BBQ sauce infuses the ribs with a delicious blend of sweet, tangy, and smoky notes, making them irresistible.
Serving Suggestions
Elevate your Memphis-Style BBQ Rib Sandwich with Coleslaw by pairing it with classic Southern sides that complement its robust flavours. Consider serving corn on the cob slathered with butter and sprinkled with a dash of paprika. Baked beans with a hint of molasses and bacon provide a hearty addition, while a crisp green salad with a light vinaigrette offers a refreshing contrast.
For an authentic barbecue experience, whip up some homemade potato salad or serve crispy sweet potato fries on the side. These options not only add variety but also enhance the overall meal.
To quench your thirst, iced tea or a chilled beer makes an excellent accompaniment. If you prefer non-alcoholic options, try a zesty lemonade or a fruity iced drink to balance the smoky flavours of the sandwich.
Presentation is crucial; arrange the sandwiches on a platter and garnish with fresh herbs for an appealing touch. Serve your sides in attractive bowls to create a visually pleasing spread that will impress your guests.
This careful attention to detail in both flavour and presentation ensures a memorable dining experience, capturing the essence of Memphis barbecue in every bite.
Meatloaf is more than just a meal; it’s a culinary tradition that has graced British dining tables for generations. This hearty dish embodies the essence of comfort food, offering both nostalgia and satisfaction with every bite. As you embark on your journey to create the perfect meatloaf, you’ll find that it’s not just about the ingredients but also the love and care you put into its preparation. Follow this guide to achieve the perfect meatloaf recipe.
Why You’ll Love This Meatloaf Recipe
Easy to Make – Requires simple ingredients and minimal prep time.
Juicy and Flavourful – The perfect blend of ground beef, breadcrumbs, and seasonings for a moist and tasty loaf.
Customisable – Add your favourite seasonings or mix-ins like cheese, vegetables, or spices.
Make-Ahead Friendly – Prepare in advance and reheat for a hassle-free meal.
Well-made meatloaf can transform an ordinary evening into a memorable feast. With its robust flavours and inviting aroma, it’s no wonder that meatloaf remains a beloved staple. From weeknight dinners to special family gatherings, this dish has a unique ability to bring people together. Imagine slicing into a perfectly cooked meatloaf, revealing its moist, flavourful interior, and seeing the delight on your loved ones’ faces. That’s the magic of meatloaf.
Whether you’re a novice in the kitchen or a seasoned cook, mastering the art of meatloaf is both rewarding and enjoyable. The process is straightforward yet allows for creativity, making it an excellent recipe for those looking to experiment with different herbs and spices. Plus, the joy of serving a home-cooked meatloaf, knowing you’ve crafted it with your own hands, is unmatched.
In this guide, we’ll walk you through the steps to create a meatloaf. By following our tips and tricks, you’ll be well-equipped to make a meatloaf that’s not only delicious but also a feast for the eyes. Let’s get started on this culinary adventure and make every meal a celebration with the perfect meatloaf.
The Ultimate Classic Meatloaf Recipe – Comfort Food at Its Best! There’s nothing quite like a juicy, flavour-packed meatloaf fresh out of the oven. It’s hearty, satisfying, and pure comfort food—the kind of meal that brings back childhood memories and makes your kitchen smell amazing! This classic meatloaf recipe is easy to make, incredibly tender, and packed with rich, savoury flavours. The secret? A perfect blend of seasoned ground meat, onions, garlic, and breadcrumbs, plus a mouth-watering sweet and tangy glaze that caramelises beautifully in the oven.
Preheat your oven to 180°C (160°C fan) or gas mark 4.
In a frying pan, heat the olive oil over medium heat. Add the chopped onion and garlic, and cook until softened. Set aside to cool slightly.
Mix the Meatloaf:
In a large bowl, combine the minced beef, cooked onion and garlic, grated carrot, breadcrumbs, beaten egg, Worcestershire sauce, tomato purée, salt, and pepper. Mix thoroughly with your hands until all ingredients are well combined.
Shape the Meatloaf:
Transfer the meat mixture to a lined baking tray. Shape it into a loaf approximately 20cm long.
Prepare the Glaze:
In a small bowl, mix together the ketchup, brown sugar, and mustard. Spread the glaze evenly over the top of the meatloaf.
Bake:
Place the meatloaf in the preheated oven and bake for about 45 minutes, or until the meat is cooked through and the glaze is caramelised.
Rest and Serve:
Allow the meatloaf to rest for a few minutes before slicing. Garnish with parsley (optional). Serve with mashed potatoes or a fresh salad.
Notes
Preparation Tips
Preparation is key to nailing that perfect meatloaf recipe. Start by gently mixing your ingredients using your hands; this ensures an even distribution of flavours without overworking the meat, which can result in a dense texture. When shaping your meatloaf, opt for forming it on a baking tray rather than using a tin. This method promotes even cooking and prevents the loaf from retaining excess moisture. Aim for a uniform thickness across the loaf, which helps in achieving consistent doneness throughout.Before placing the meatloaf in the oven, consider letting it rest for a few minutes. This allows the breadcrumbs and other binders to absorb the moisture fully, ensuring a cohesive mixture. If you’re adding a glaze, apply a thin layer initially, and then add more during the final stages of baking for a beautifully caramelised finish. Remember, patience is vital; rushing the preparation steps can lead to an underwhelming result.Lastly, if you wish to add extra vegetables like carrots or onions, make sure they are finely chopped or grated. This ensures they blend seamlessly into the meat mixture, contributing to both the flavour and texture of your classic meatloaf.
The traditional method for cooking meatloaf involves baking it in the oven, a technique that yields consistent results with a deliciously crisp crust. Preheat your oven to 180°C (350°F) and prepare your meat mixture, shaping it into a loaf on a lined baking tray. Cover the loaf with foil for the first half of the cooking process to help retain moisture, then remove the foil to allow the top to brown beautifully.
For those looking to experiment with different textures and flavours, alternative cooking methods can be a delightful change. Using a slow cooker is a fantastic option for those who prefer a softer, more succulent meatloaf. Simply shape the meat mixture and place it in the slow cooker, then set it on low for 6-8 hours. The result is a meatloaf that is incredibly tender and infused with rich flavours.
Grilling is another exciting technique that introduces a smoky taste to the meatloaf. Shape the mixture into a loaf and place it on a preheated grill, cooking over indirect heat. Monitor closely and turn occasionally to ensure even cooking without burning.
Serving Suggestions
Meatloaf pairs beautifully with a range of side dishes that can enhance its hearty flavours. Classic mashed potatoes are a popular choice, offering a creamy contrast to the robust meatloaf. Green beans sautéed with garlic and butter provide a crisp, fresh complement. For a more vibrant plate, consider a crisp green salad with a tangy vinaigrette or roasted root vegetables, which add both texture and depth of flavour. If you’re looking for something a bit different, try serving slices of meatloaf on a bed of creamy polenta, or tuck them into a rustic bread roll for a mouth-watering sandwich.
Garnishes can also elevate the presentation of your meatloaf meal. Fresh herbs such as parsley or chives add a pop of colour and a touch of freshness. A drizzle of gravy or a spoonful of tangy tomato chutney can also enhance the dish. Whether you’re hosting a cosy family dinner or a larger gathering, these serving suggestions will help you create a memorable and delicious meal centred around your perfect meatloaf.
Common Mistakes to Avoid
Creating the perfect meatloaf can sometimes be tricky, but by avoiding a few common mistakes, you’ll be well on your way to success. One frequent issue is overmixing the meat mixture, which can result in a tough, dense loaf. Mix just until the ingredients are combined to maintain a tender texture. Another common pitfall is using lean meats, which can lead to dryness. Opt for minced meats with a higher fat content to keep your meatloaf moist and succulent.
It’s also essential to ensure that your meatloaf holds together well. Binding agents like eggs and soaked breadcrumbs play a crucial role here. Make sure these components are evenly distributed throughout the mixture. Allowing the meatloaf to rest for a few minutes after cooking will also help it retain its shape when sliced.
Avoid under-seasoning by being generous with your herbs and spices. Freshly chopped parsley, thyme, and a hint of smoked paprika can enhance the overall flavour. Lastly, monitor the internal temperature carefully. A meatloaf cooked to an internal temperature of at least 70°C (160°F) ensures it’s both safe and juicy. By paying attention to these details, you’ll create a meatloaf that’s not only delicious but also a delight to serve.
Storing and Reheating Leftovers
Storing your meatloaf properly ensures you can enjoy its delicious flavours even days after cooking. Once cooled, wrap the meatloaf tightly in cling film or store it in an airtight container to keep it fresh in the fridge for up to four days. If you plan to keep it longer, freezing is a great option. Slice the meatloaf and place baking paper between the layers before freezing to prevent sticking. This makes it easy to defrost only the amount you need. When it comes to reheating, do so gently to maintain moisture and flavour. Preheat your oven to a low temperature, cover the meatloaf slices with foil, and heat until warmed through. This method prevents the meat from drying out. Alternatively, meatloaf makes a fantastic cold sandwich filling, perfect for a quick and satisfying meal. Whether you choose to reheat or enjoy it cold, properly stored leftovers can bring the comforting taste of meatloaf to your table with minimal effort. This approach not only preserves the dish’s delightful texture but also maximises its flavour, making sure no bite goes to waste.
Few dishes evoke the comforting essence of British cuisine quite like a Beef Stew Pie with Homemade Puff Pastry Recipe. Picture tender beef simmered in a rich, flavourful sauce, enveloped in golden, flaky puff pastry. It’s more than just a meal; it’s a culinary hug, perfect for warming you up on a chilly evening or impressing guests at a dinner party. In this blog post, we’ll uncover the secrets to making this classic pie, ensuring you get a delicious, hearty dish every time. Whether you’re new to baking or a seasoned pro, our step-by-step guide will help you master this beloved recipe.
Why You’ll Love This Beef Stew Pie
✅ Melt-in-your-mouth beef – Slow-cooked to perfection ✅ Buttery, flaky pastry – Homemade for extra indulgence ✅ Rich, comforting flavours – Perfect for colder months ✅ Make-ahead friendly – Prep the filling in advance
In this guide, you’ll learn how to make the best homemade puff pastry and a deeply flavourful beef stew filling, creating a restaurant-quality Beef Stew Pie with Homemade Puff Pastry Recipe:
Nothing beats the rich, hearty flavours of a Beef Stew Pie wrapped in buttery, flaky homemade puff pastry. This dish combines slow-cooked, tender beef in a savory gravy with a golden, crisp pastry crust—perfect for a cozy family dinner or a special occasion.In this guide, you'll learn how to make the best homemade puff pastry and a deeply flavourful beef stew filling, creating a restaurant-quality pie at home.
Course Main Course
Cuisine English
Keyword Beef pie, Beef pie recipe, Beef Stew Pie with Homemade Puff Pastry recipe
Toss the diced beef in plain flour, salt, and pepper.
Heat vegetable oil in a large pot over medium heat. Brown the beef in batches, ensuring each piece is well-seared. Remove and set aside.
In the same pot, add the onion and garlic, cooking until softened.
Add the carrots, celery, and mushrooms, and cook for an additional 5 minutes.
Return the beef to the pot and stir in the beef stock, tomato puree, Worcestershire sauce, and dried thyme. Season with salt and pepper.
Bring to a boil, then reduce the heat and let it simmer gently for about 1.5 hours, or until the beef is tender and the sauce has thickened.
Make the Puff Pastry:
In a large bowl, mix the flour and a pinch of salt. Add the cubed butter and, using your fingertips, rub the butter into the flour until the mixture resembles coarse breadcrumbs
Gradually add the cold water, mixing with a knife until the dough starts to come together. Be careful not to overwork it.
Wrap the dough in cling film and chill in the fridge for 20 minutes.
On a floured surface, roll the dough into a rectangle. Fold the top third down and the bottom third up, as if folding a letter. Rotate the dough 90 degrees and repeat this rolling and folding process three more times, chilling for 15 minutes between each turn. This method, known as laminating, creates the flaky layers that puff pastry is famous for.
Assemble the Pie:
Preheat your oven to 200°C (180°C fan)/Gas Mark 6.
Roll out two-thirds of the puff pastry on a floured surface and use it to line the base and sides of a pie dish.
Pour the beef stew into the pastry-lined dish.
Roll out the remaining pastry to create a lid. Place it over the stew, trimming any excess and pressing the edges to seal. Make a small slit in the centre to allow steam to escape
Bake for 30-40 minutes or until the pastry is golden and crisp.
Serve:
Allow the pie to cool for a few minutes before serving hot with your choice of vegetables or a fresh green salad.
When it comes to serving your Beef Stew Pie with Homemade Puff Pastry Recipe, the options are endless. This hearty pie is wonderfully complemented by creamy mashed potatoes that soak up the rich gravy, providing a perfect balance of textures. For a touch of freshness, consider serving it alongside buttered green beans or a crisp garden salad, adding vibrant colours and a refreshing crunch to your plate.
If you’re in the mood for something more indulgent, why not whip up some roasted root vegetables? Carrots, parsnips, and sweet potatoes roasted with a drizzle of olive oil and a sprinkle of sea salt offer a deliciously sweet and savoury contrast to the pie’s deep flavours.
For a classic British experience, a side of mushy peas and a dollop of tangy chutney can elevate your meal to a new level of comfort. Don’t forget a generous jug of gravy for extra richness! Serve the Beef Stew Pie with Homemade Puff Pastry Recipe straight from the oven, garnished with freshly chopped parsley or thyme, which not only adds a splash of colour but also enhances the aromatic experience. Whether you’re hosting a dinner party or enjoying a cosy night in, these serving suggestions will make your Beef Stew Pie the star of the meal.
Storage and Reheating
If you find yourself with leftover Beef Stew Pie with Homemade Puff Pastry Recipe, proper storage and reheating can make all the difference in preserving its deliciousness. Place any leftovers in an airtight container and refrigerate for up to three days. When you’re ready to enjoy the pie again, avoid the microwave as it tends to make the puff pastry lose its crispiness. Instead, preheat your oven to 180°C (160°C fan) and reheat the pie until it’s thoroughly warmed through, ensuring that the pastry remains beautifully flaky.
For an added touch, you can cover the pie with aluminium foil to prevent the pastry from over-browning while it reheats. This method also helps retain the moisture within the beef stew filling, keeping it succulent and flavourful. If you’re in a hurry, reheating a single portion works well in a toaster oven too. Just be sure to keep an eye on it to avoid burning the edges. By following these tips, you can savour every last bite of your Beef Stew Pie with Homemade Puff Pastry Recipe, even as leftovers.
This Beef Stew Pie with Homemade Puff Pastry Recipe is the ultimate comfort food that combines all the best elements of a savory pie. Tender beef stew, aromatic vegetables, and flaky puff pastry come together in a dish that’s perfect for cozying up during the colder months. While making the pastry from scratch takes a little more time, the results are well worth the effort. Give it a try, and impress your loved ones with this timeless, delicious Beef Stew Pie with Homemade Puff Pastry Recipe!
Okonomiyaki, often hailed as Japan’s answer to the savoury pancake, is a dish that captures the essence of comfort food with a unique twist. Hailing from Osaka and Hiroshima, this delightful dish is a staple in Japanese households and street food markets alike. But what exactly makes this Japanese savoury pancake so special? Mastering the delicious Okonomiyaki recipe lies in its harmonious blend of textures and flavours, all combined to create a truly satisfying meal.
The term “Okonomiyaki” translates to “grill as you like,” and this flexibility is what sets it apart. Whether you’re a seafood lover, a meat enthusiast, or a vegetarian, this dish can be tailored to suit your palate. Imagine a hearty pancake filled with finely chopped cabbage, eggs, and grated yam, all brought together with a smooth, flavourful batter. It’s then cooked to golden perfection and topped with a rich, freshly made Okonomiyaki sauce, mayonnaise, and a sprinkle of bonito flakes.
This Delicious Okonomiyaki Recipe will guide you through the process of creating this culinary masterpiece in your own kitchen. With easy-to-follow steps and a focus on fresh, quality ingredients, you’ll be well on your way to mastering this iconic dish. From the foundational batter to the final touches, every aspect of this recipe is designed to bring out the best in each ingredient, resulting in a pancake that’s both light and flavourful.
So, if you’re looking to explore the rich world of Japanese cuisine, starting with Okonomiyaki is an excellent choice. Dive into this Delicious Okonomiyaki Recipe and experience the joy of crafting a dish that is both traditional and adaptable, making it a perfect addition to your culinary repertoire. Here is the recipe and step by step instruction:
Delicious Okonomiyaki Recipe with Freshly made Okonomiyaki Sauce
The Delicious Okonomiyaki Recipe provides an easy-to-follow guide for making this traditional Japanese savoury pancake. The dish combines flour, eggs, cabbage, and other ingredients, such as pork or seafood, to create a flavourful meal. The batter is mixed with the fillings, then cooked on a hot griddle until both sides are golden brown. It is typically garnished with okonomiyaki sauce, mayonnaise, seaweed flakes, and bonito flakes. This recipe is known for its versatility, allowing for personal preferences in terms of ingredients and toppings, making it a delightful option for any occasion.
Course Breakfast, Snack
Cuisine Asian-inspired
Keyword Delicious Okonomiyaki Recipe for Four, Japanese pancake, Japanese savoury pancake, Okonomiyaki Recipe
In a medium-sized bowl, combine the tomato ketchup, Worcestershire sauce, and soy sauce. Stir well until they are fully blended.
Add the honey or sugar to the mixture, stirring until it dissolves completely. If you prefer a slightly sweeter sauce, you can adjust the amount to taste.
Pour in the oyster sauce and mix thoroughly. This will give the sauce a richer depth of flavour.
If you're using Dijon mustard, add it now and stir until it's evenly distributed. This step is optional but adds a hint of tanginess to the sauce.
Taste the sauce and adjust any of the ingredients to your liking. You can add more soy sauce for saltiness, more ketchup for sweetness, or more Worcestershire sauce for tang.
Once you're satisfied with the taste, transfer the sauce toa small serving bowl or jar.
Making the Okonomiyaki
Start by sifting plain flour into a large mixing bowl, ensuring a smooth and lump-free base. Gradually add water, whisking continuously to blend it seamlessly with the flour. Once you achieve a smooth mixture, crack in the eggs and beat until well combined.
Add the eggs and mix well.
Fold in the cabbage, one of the sliced spring onions, and the carrots until well combined.
Cook the Okonomiyaki
Heat a non-stick frying pan or griddle over medium heat and add a little oil.
Pour a quarter of the batter onto the pan, shaping it into a round pancake about 2cm thick.
Place a few slices of pork belly or bacon on top of the pancake.
Cook for about 4-5 minutes on one side until golden brown, then flip and cook the other side for another 4-5 minutes.
Cook for about 4-5 minutes on one side until golden brown, then flip and cook the other side for another 4-5 minutes.
Add the Toppings
Once cooked, transfer the okonomiyaki to a serving plate.
Brush the top with okonomiyaki sauce and drizzle with mayonnaise.
Garnish with the remaining spring onion and pickled ginger if using.
Serve
Serve hot and enjoy this delightful Japanese pancake with friends or family.
Notes
Tips
Batter – The key to an ideal batter consistency lies in its thickness. It should be thick enough to hold its shape on a spoon but still fluid enough to pour easily. If it’s too thick, add a bit more dashi; if it’s too runny, incorporate a little more flour.A helpful tip is to let the batter rest for about 15 minutes. This resting period allows the flour to fully absorb the liquid, creating a cohesive mixture that enhances the pancake’s texture. During this time, the flavours meld together, making each bite incredibly delicious.Follow these steps meticulously, and you’ll have a batter that’s ready to transform into a mouth-watering Japanese savoury pancake.Pancake – To avoid common pitfalls, ensure the pan isn’t overcrowded, which can make flipping difficult and lead to uneven cooking. Maintain a medium heat to prevent burning the outside while leaving the inside undercooked. If you find the edges are browning too quickly, reduce the heat slightly and extend the cooking time.As the pancake cooks, you’ll notice the delightful aroma of the cabbage and dashi mingling, creating an irresistible scent that will have everyone eagerly waiting to tuck in.
Presentation is key when serving Okonomiyaki. A drizzle of mayonnaise and a generous helping of freshly made Okonomiyaki sauce atop your pancake not only adds flavour but also visual appeal. For an authentic touch, sprinkle bonito flakes and a handful of chopped spring onions. Pair your creation with traditional Japanese side dishes such as edamame or miso soup. As for drinks, a chilled glass of green tea complements the dish wonderfully, offering a refreshing contrast to the rich flavours.
To further enhance your dining experience, serve your Okonomiyaki on a hot plate to keep it warm throughout the meal. The heat intensifies the flavours, making each bite more enjoyable. Garnishing with pickled ginger or a squeeze of lemon can add a refreshing zing, balancing the savoury notes of the dish.
For those who enjoy a bit of spice, a sprinkle of shichimi togarashi (Japanese seven-spice blend) can add a delightful kick. Additionally, serving with a side of steamed rice can help to round out the meal, providing a satisfying and filling experience. Embrace the artistry of plating and let your creativity shine as you present this delicious Japanese savoury pancake to your delighted guests.
Customising Your Okonomiyaki
One of the best things about the Delicious Okonomiyaki Recipe is how easily it can be customised to fit your preferences. Whether you lean towards seafood, meat, or vegetarian options, there’s room for everyone at the Okonomiyaki table. Popular additions include succulent prawns, tender slices of pork belly, or even gooey cheese for an extra burst of indulgence.
If you have dietary restrictions, the recipe can be adapted without losing its charm. Swap regular flour for a gluten-free alternative or omit the eggs to make it vegan-friendly. The key is to experiment and find combinations that excite your taste buds.
Seasonal vegetables can also be a great addition. Think of thinly sliced mushrooms, sweet corn, or bell peppers to add a vibrant touch to your Japanese savoury pancake. For a spicy kick, consider incorporating finely chopped chillies or a dash of chilli powder into the batter.
The joy of this Delicious Okonomiyaki Recipe lies in its flexibility. Whether you’re hosting a dinner party or cooking a weeknight meal, customising your Okonomiyaki ensures that it will always be a delightful and personalised culinary experience.
Ratatouille, originating from the sun-soaked region of Provence in France, is a cherished dish that embodies the essence of Mediterranean cooking. This Provençal Vegetable Stew not only delights the palate but also celebrates the abundance of summer vegetables. The perfect vegetable ratatouille is a vibrant and colourful dish that brings together a medley of aubergines, courgettes, tomatoes, and peppers, all cooked to perfection with aromatic herbs and a drizzle of olive oil
What makes ratatouille particularly appealing is its versatility. Whether served hot or at room temperature, it fits seamlessly into various meal settings. It can be the star of the show as a main course or serve as a delightful side dish complementing a range of proteins. For those seeking a vegetarian or vegan option, ratatouille stands out as a hearty and satisfying choice, rich in both flavour and nutrients.
The beauty of ratatouille lies in its simplicity and the quality of its ingredients. Provençal cuisine is known for its emphasis on fresh, local produce, and this dish is no exception. The selection of vegetables, bursting with natural flavours, forms the foundation of a successful ratatouille. When cooked with care, each vegetable retains its integrity, contributing to a harmonious blend of tastes and textures.
Cooking ratatouille is not just about following a recipe; it’s an experience that engages the senses. The process of chopping and preparing the vegetables, the aromatic scent of herbs like basil and thyme filling the kitchen, and the gentle simmering that melds the flavours together all add to the charm of this dish.
Ratatouille also holds a certain rustic charm, reminiscent of countryside cooking where meals are prepared with love and shared with family and friends. It’s a dish that encourages communal dining, inviting everyone to gather around the table and enjoy the simple pleasures of good food and company.
In many ways, ratatouille is a testament to the beauty of uncomplicated cooking. With just a few fresh ingredients and some basic techniques, you can create a dish that is both wholesome and indulgent. Whether you’re new to cooking or a seasoned chef, ratatouille offers a rewarding culinary adventure that highlights the best of what nature has to offer.
Enjoy your homemade vegetable ratatouille either as a main course or as a charming side dish. This classic French dish is a medley of fresh vegetables, typically including courgettes, aubergines, and tomatoes, cooked to perfection with fragrant herbs. Its rich flavours and vibrant colours make it a wonderful addition to any meal, offering both a healthy and delicious option for your dining experience. Whether you're serving it at a dinner party or enjoying it as a comforting meal at home, vegetable ratatouille is sure to impress.
Begin by preparing all the vegetables as described in the ingredients list. This will make the cooking process smoother.
In a large pan, heat the olive oil over medium heat. Add the finely chopped onion and cook until it becomes translucent, which should take about 5 minutes. Stir in the minced garlic and cook for an additional minute.
Add the chopped red and yellow peppers to the pan. Cook them for about 5 minutes until they start to soften.
Incorporate the diced aubergine and sliced courgettes into the pan. Stir well and continue to cook for another 5 minutes, allowing them to soften.
Add the chopped tomatoes, thyme, and oregano to the pan. Season with salt and pepper to taste. Stir everything together to combine well.
Reduce the heat to low and cover the pan with a lid. Let the mixture simmer gently for about 30 minutes, stirring occasionally. The vegetables should become tender and the flavours will blend together beautifully.
Once cooked, remove the pan from the heat. Garnish the ratatouille with fresh basil leaves before serving.
Cooking ratatouille to perfection requires a delicate balance of techniques to ensure each vegetable retains its shape while contributing to the overall harmony of flavours. Once the vegetables have been layered in your chosen dish, the next step is to cook them slowly to meld the flavours without turning the vegetables to mush.
Begin by covering your dish with a lid or aluminium foil. This helps to trap the steam and moisture, allowing the vegetables to cook evenly and retain their natural juices. Place the dish on the hob over low heat, allowing it to simmer gently. Patience is key here, as this slow cooking method can take up to an hour but results in a rich and flavourful stew.
Alternatively, you can opt for baking the ratatouille in the oven. Preheat your oven to a moderate temperature, around 180°C (350°F). Place the covered dish in the oven and let it bake for approximately 45 minutes to an hour. Baking offers a slightly different texture, giving the vegetables a tender yet firm bite. Halfway through, you may want to uncover the dish to allow some of the liquid to evaporate, concentrating the flavours further.
During cooking, it’s important to monitor the ratatouille occasionally. Check to ensure that the vegetables are cooking evenly and give the dish a gentle stir if necessary. This ensures that the flavours are well-distributed throughout the stew.
Another technique to enhance the flavour profile is to finish the dish with a brief rest period. After cooking, allow the ratatouille to sit, covered, for about 15 minutes before serving. This resting time lets the flavours continue to develop and meld together, offering a more cohesive taste experience.
While the traditional method involves slow cooking, you can also use a pressure cooker for a quicker version. However, be mindful that the rapid cooking might slightly alter the texture of the vegetables.
Regardless of the method chosen, the goal remains the same: to create a dish where each vegetable stands out yet harmonises beautifully with the others, offering a taste of Provençal cuisine at its finest.
Serving suggestions
Ratatouille can elevate any meal with its rich, layered flavours and vibrant presentation. For a casual yet satisfying option, serve it with a slice of crusty baguette or a side of fluffy couscous. These simple accompaniments help to soak up the delightful juices of the Provençal Vegetable Stew, making each bite truly delightful.
For those seeking a more elaborate dining experience, consider pairing ratatouille with grilled meats or fish. Its robust flavours complement a variety of proteins, enhancing the overall meal. A beautifully seared piece of chicken or a succulent fillet of fish can transform your ratatouille into a gourmet feast.
Ratatouille also works wonderfully as a topping for pasta or rice. The sauce-like consistency of the dish blends seamlessly with these bases, creating a comforting and wholesome meal. For a lighter option, consider serving it over a bed of quinoa or bulgur wheat, adding an extra layer of texture and nutrition.
Presentation plays a crucial role in making your ratatouille look as appetising as it tastes. Opt for a shallow serving bowl or a large platter to showcase the vibrant colours of the vegetables. Arrange the vegetables artfully, and finish with a drizzle of extra virgin olive oil and a scattering of fresh basil leaves to enhance the dish’s visual appeal.
For a unique twist, try serving ratatouille as a warm starter or appetiser. Spoon it into individual ramekins and top with a sprinkle of cheese before popping them under the grill for a few minutes. The result is a deliciously gooey and flavourful beginning to any meal.
Ratatouille can also be served cold or at room temperature, making it a versatile option for picnics or casual gatherings. Simply spoon it into a serving dish and let your guests enjoy its rich flavours at their leisure. With so many serving possibilities, ratatouille is sure to become a favourite in your culinary repertoire.
Storing Leftovers
Storing leftover ratatouille is straightforward and helps to prolong the enjoyment of this delightful Provençal Vegetable Stew. After cooking, let the ratatouille cool to room temperature before transferring it to an airtight container. This step is crucial for maintaining the freshness and preventing condensation, which can affect the texture of the dish.
When storing in the refrigerator, the ratatouille will remain good for up to five days. If you plan to keep it longer, consider freezing it. Divide the stew into individual portions and place them in freezer-safe containers. Label each container with the date to keep track of its freshness. Frozen ratatouille can be stored for up to three months, making it a convenient option for future meals.
Reheating ratatouille is best done gently to preserve its flavours and textures. If using the hob, place the stew in a saucepan over low to medium heat, stirring occasionally until it is warmed through. This method helps to maintain the integrity of the vegetables while ensuring even heating.
For a quicker option, the microwave can be used. Place the ratatouille in a microwave-safe dish, cover it with a microwave-safe lid or wrap, and heat on low power in short intervals. Stir between each interval to ensure even heating and to prevent any hot spots.
If reheating from frozen, it’s best to thaw the ratatouille in the refrigerator overnight. This gradual thawing process helps to retain the dish’s quality. Once thawed, reheat using your preferred method, either on the hob or in the microwave.
Ratatouille also makes a fantastic meal prep option, allowing you to enjoy a nutritious and flavourful dish throughout the week. With proper storage and gentle reheating, your ratatouille will remain as delightful as when it was freshly made.
There’s a timeless elegance to Beef Wellington with Roast Potatoes and Green Beans that sets it apart from other dishes. This classic British creation is not just food; it’s a statement. When you bring this to the table, you’re presenting a work of art. Picture this: a tender beef fillet, luxuriously wrapped in mushroom duxelles and savoury prosciutto, all encased in golden puff pastry. This Beef Wellington with Roast Potatoes & Green Beans Recipe offers each bite as a symphony of textures and flavours, from the crispy exterior to the juicy, flavourful beef inside.
The magic of Beef Wellington lies in its layers. The beef fillet is the star, but it’s the supporting cast of mushrooms and Parma ham (prosciutto) that takes it to the next level. The mushrooms, finely chopped and sautéed, provide an earthy depth that balances the richness of the beef. The prosciutto adds a salty, savoury touch that complements the whole ensemble. And then there’s the puff pastry – golden, flaky, and absolutely irresistible.
Accompanying this main act are perfectly roasted potatoes and vibrant green beans, adding a delightful contrast in texture and flavour. Preparing Beef Wellington with Roast Potatoes & Green Beans Recipe will impress any guest. Green beans, with their fresh crunch, bring a burst of colour and a lightness that balances the dish beautifully.
Making Beef Wellington might seem daunting, but with a bit of patience and attention to detail, it’s entirely achievable in your own kitchen. It’s the perfect choice for special occasions or whenever you feel like treating yourself and your loved ones to something truly extraordinary. Let’s dive into the process and discover how to create this iconic dish that never fails to impress.
Beef Wellington with Roast Potatoes and Green Beans Recipe
Ah, Beef Wellington, a classic dish that graces many a British table, particularly for those occasions that call for something a bit special. Imagine a succulent piece of beef fillet, seasoned to perfection, wrapped snugly in a layer of mushrooms sautéed with herbs, all enveloped in a golden, flaky puff pastry. The preparation requires a touch of patience and precision, but the result is a stunning centrepiece that’s sure to impress.To accompany this splendid dish, let’s talk about roast potatoes. These aren’t just any potatoes; they are crispy on the outside, fluffy on the inside, with a sprinkling of sea salt and perhaps a dash of rosemary. The key is to parboil them first, ensuring the edges are roughened up, so they achieve that sought-after crunch when roasted.And then there are the green beans, offering a fresh, vibrant contrast to the richness of the Wellington and the comforting warmth of the potatoes. Simply blanched and then tossed in a bit of butter, they retain their snap and bring a splash of colour to the plate.Together, this trio forms a meal that’s as much about the flavours as it is about the textures and colours. It’s an ode to the joys of good food, where each bite tells its own delicious story. So, why not treat yourself and your loved ones to this delightful experience?
Pre heat the oven to 200°C (180°C fan)/Gas Mark 6.
Season the beef fillet with salt and pepper. Heat the olive oil in a frying pan over medium-high heat and sear the beef all over until browned. Remove and allow to cool.
For the mushroom duxelles, finely chop the mushrooms and sauté them in olive oil until they release their moisture and develop a rich, earthy aroma.
Place a layer of cling film on a flat surface. Lay the Parma ham slices slightly overlapping on the cling film and then spread the mushrooms on top,
Brush the beef with mustard, place it on the mushroom layer, and roll tightly using the cling film. Refrigerate for 15 minutes.
Roll out the puff pastry on a floured surface. Remove the cling film from the beef and place it on the pastry. Wrap the pastry around the beef, sealing the edges. Brush with beaten egg.
Place on a baking tray and bake in the oven for 25-30 minutes until golden brown
Prepare the Roast Potatoes
Parboil the potatoes in a saucepan of salted water for 10 minutes. Drain and allow to steam dry.
Toss the potatoes in olive oil, salt, and pepper. Spread them on a baking tray and roast in the oven alongside the Wellington for 45 minutes or until crispy.
Prepare the Green Beans
Boil the green beans in a saucepan of salted water for 4-5minutes until tender. Drain and toss in butter, salt, and pepper.
Serve
Allow the Beef Wellington to rest for 10 minutes before slicing. Serve with the roast potatoes and green beans on the side. Enjoy your meal!
Notes
TipsPreparation is the foundation for achieving a seamless blend of flavours. Start by patting the beef fillet dry and seasoning it generously with salt and pepper. Searing the beef quickly on all sides in a hot pan with olive oil will lock in the juices, ensuring a succulent centre. Allow the beef to cool before proceeding to maintain its tenderness.Roll out the puff pastry on a floured surface and carefully wrap it around the beef parcel. Seal the edges with the beaten egg yolks, which will also give the pastry a golden glaze during baking. For best results, chill the wrapped Wellington for another 15 minutes before baking.
The way you present your Beef Wellington can make a significant impact on the dining experience. Beef Wellington with Roast Potatoes & Green Beans Recipe should be presented beautifully. Begin by slicing the Wellington with a sharp knife to reveal its beautiful, intricate layers. The cross-section should showcase the succulent beef, earthy mushroom duxelles, and crispy puff pastry, all wrapped in savoury prosciutto.
Arrange each slice artfully on warm plates, ensuring that the layers are visible to your guests. Place the golden roast potatoes and vibrant green beans around the slices, creating a visually appealing contrast of colours and textures.
To add a touch of elegance, garnish the plate with a sprig of fresh thyme or parsley. These small details not only enhance the visual appeal but also add a subtle hint of fresh aroma to the dish.
Don’t forget about the ambience. Set the table with your best crockery, polished cutlery, and perhaps a few candles to create an inviting atmosphere. The presentation extends beyond the plate to the entire dining experience, making your meal memorable for all the right reasons.
By paying attention to these serving suggestions, you can turn a simple meal into a grand feast, leaving a lasting impression on your guests.
Common Mistakes
Crafting the perfect Beef Wellington is an impressive feat, but even seasoned cooks can run into a few hiccups along the way. One common issue is a soggy pastry. To avoid this, ensure your mushroom duxelles is thoroughly cooked to eliminate any excess moisture. Also, make sure your beef fillet has cooled completely before wrapping it in prosciutto and pastry. When following a Beef Wellington with Roast Potatoes & Green Beans Recipe, timing is crucial.
Another pitfall is overcooking the beef. A reliable meat thermometer is your best friend here. Aim for an internal temperature of 54°C for medium-rare, taking into account that the meat will continue to cook slightly as it rests after baking. Always rest your Beef Wellington before slicing to allow the juices to redistribute evenly.
If you find your pastry isn’t crisping up as it should, double-check that your oven is fully preheated to the correct temperature. Brushing the pastry with beaten egg yolks can add a lovely golden finish and a bit of extra crunch.
Timing is crucial in achieving that perfect balance of textures. Overcooking or undercooking any component can throw off the entire dish. Keep an eye on your oven and be prepared to adjust cooking times slightly based on your specific oven and the thickness of your beef fillet.
For those struggling with wrapping the beef tightly, using cling film can make the process much easier. It helps to create a snug, uniform shape that will bake evenly.
Lastly, always taste your duxelles and prosciutto layer before assembly. Ensuring they’re properly seasoned will make all the difference in the final flavour. With these tips in mind, you’re well on your way to mastering this culinary classic.
With this comprehensive guide, you’re now equipped to create a spectacular Beef Wellington with Roast Potatoes and Green Beans. It’s a dish that marries sophistication and heartiness, perfect for making any meal special. The blend of tender beef, earthy mushrooms, and savoury prosciutto, all enveloped in flaky puff pastry, ensures a memorable dining experience. The golden roast potatoes and vibrant green beans add the perfect finishing touches, balancing the rich flavours with their delightful textures. Don’t be daunted by the process; take it step-by-step, and you’ll find it incredibly rewarding. Embrace the journey and enjoy the accolades that come with mastering this culinary classic Beef Wellington with Roast Potatoes & Green Beans Recipe.
Get ready to enjoy a culinary masterpiece that marries the hearty essence of cauliflower with the luxurious charm of melted cheese. This Cauliflower Bake Recipe with a Cheesy Twist is the ultimate comfort food, delivering a warm and satisfying experience that could effortlessly become a regular favourite in your dining line-up. With its creamy texture and sumptuous taste, it’s perfect for both laid-back family meals and more sophisticated soirées with friends.
What makes this Cauliflower Bake Recipe with a Cheesy Twist truly special is the inclusion of fresh herbs, which infuse the dish with a lively and fragrant essence. A sprinkle of parsley, thyme, or chives can boost the flavour, turning each mouthful into a delightful journey. The vibrant taste of these herbs marries well with the rich cheese sauce, resulting in a delicious medley of tastes and aromas.
This recipe is also incredibly versatile, allowing for numerous variations to suit different dietary needs and preferences. Whether you’re catering to vegetarians or simply looking to incorporate more vegetables into your diet, this dish is a fantastic option. The cauliflower provides a substantial base, while the cheese and herbs elevate it to something truly special.
Preparing this Ultimate Cauliflower Bake Recipe with a Cheesy Twist, involving simple steps that even novice cooks can follow with ease. The result is a dish that looks as impressive as it tastes, making it a wonderful addition to any table. With its combination of wholesome ingredients and rich, comforting flavours.
Here’s how to make this delightful cauliflower bake, step by step:
There's something truly comforting about a cheesy cauliflower bake with fresh herbs, a dish that wraps you in warmth and delight with every bite. Imagine tender florets of cauliflower bathed in a rich, creamy cheese sauce, bubbling away in the oven until golden and irresistible.When the bake emerges, it's a sight to behold — golden and inviting. Each mouthful offers a wonderful contrast of creamy sauce, tender cauliflower, and the aromatic herbs weaving through. It’s a dish that invites you to savour each moment, bringing a sense of home and happiness to the table. Perfect for a cosy evening or as a delightful side
Preheat your oven to 200°C (180°C fan) or Gas Mark 6.
Prepare the Cauliflower
Bring a large pot of salted water to the boil. Add the cauliflower florets and cook for about 5 minutes until slightly tender. Drain well using a colander and set aside.
Make the Cheese Sauce
In a saucepan, melt the butter over medium heat. Stir in the flour and cook for about 2 minutes, stirring continuously, to form a paste. Gradually whisk in the milk, ensuring no lumps form. Continue to cook, stirring constantly, until the sauce thickens.
Add the Cheese
Remove the sauce pan from the heat and stir in most of the cheddar and parmesan cheese, leaving a bit for the topping. Mix until the cheese is fully melted and the sauce is smooth. Season with salt and black pepper to taste.
Combine and Bake
Place the cauliflower in a baking dish. Pour the cheese sauce over the cauliflower, ensuring it is evenly coated. Sprinkle the remaining cheese on top.
Bake
Place the dish in the preheated oven and bake for 25-30minutes, or until the top is golden and bubbling.
Once baked, remove from the oven and sprinkle with chopped parsley and chives.
Serve
Allow to cool slightly before serving warm.
Notes
When selecting your produce, look for a firm and white cauliflower with no dark spots or blemishes. The fresher the produce, the better the flavour and texture of your dish will be. For the herbs, choose vibrant, aromatic leaves to enhance the overall taste.After removing the dish from the oven, allow it to rest for a few minutes. This resting period helps the bake set and makes it easier to serve.
This cheesy cauliflower bake offers a wealth of serving options, making it a flexible choice for any meal. For a casual family lunch, consider pairing it with a vibrant green salad dressed in a light vinaigrette. The crispness of the salad will complement the rich and creamy texture of the bake, providing a balanced dining experience.
For more substantial fare, this bake works wonderfully as a side dish. Serve it alongside roasted meats like chicken, lamb, or beef. The robust flavours of the meat will be beautifully enhanced by the cheesy, herb-infused cauliflower. If you prefer seafood, grilled fish or prawns can also pair well, adding a lightness that balances the dish’s richness.
Vegetarians can enjoy this bake as a main course. To make it even more filling, consider adding some cooked quinoa or couscous on the side. These grains will absorb any extra cheese sauce and add a delightful texture contrast.
For special occasions or gatherings, present this dish in individual ramekins for a touch of elegance. Garnish each portion with a sprinkle of fresh herbs, such as chives or parsley, to add a burst of colour and flavour. A light dusting of paprika or a drizzle of truffle oil can further elevate the presentation, impressing your guests.
For a more rustic approach, serve the bake directly from the baking dish at the centre of the table, encouraging family-style sharing. This creates a warm and inviting atmosphere, perfect for holidays or casual get-togethers.
No matter how you choose to serve it, this cheesy cauliflower bake will bring comfort and satisfaction to your dining experience.
Popular Variations
To add a different twist to your cheesy cauliflower bake, consider incorporating some cooked bacon or diced chicken for extra protein. You can also boost the vegetable content by adding spinach, peas, or mushrooms, which will provide additional texture and nutrients. For those who enjoy a bit of heat, a pinch of chilli flakes or a dash of hot sauce can spice up the cheese sauce beautifully.
Experimenting with different cheeses can also yield delightful results. Try using a combination of cheeses like mozzarella for extra gooeyness or a bit of blue cheese for a stronger, more pungent flavour. For a Mediterranean touch, mix in some sun-dried tomatoes and olives.
If you’re looking to keep the dish lighter, consider using a reduced-fat cheese and swapping out the double cream for a lighter alternative like Greek yoghurt. These adjustments can help reduce the overall calorie content while still maintaining a rich and satisfying flavour.
By trying out these variations, you can keep this beloved dish exciting and cater to a wide range of tastes and dietary preferences.
When it comes to comfort food that warms the heart and soul, few dishes can match the pleasure of a Braised Beef Short Ribs Recipe. At Nicol Retailer Limited, we take pride in slow-cooked meals that fill your kitchen with inviting aromas and create a welcoming atmosphere for loved ones around the table. Our Hearty Braised Beef Short Ribs with Polenta captures this culinary tradition perfectly. The meat becomes tender and succulent, easily falling off the bone, while the rich, luscious sauce adds a depth of flavour that is both comforting and sophisticated. Enjoy Braised Beef Short Ribs with Polenta and feel the warmth in every bite.
The method of braising not only enhances the flavour but also ensures that the meat retains its moisture and tenderness. With the added complexity of a red wine sauce, this dish transforms into a gourmet experience. Whether you are an experienced cook or a beginner, the recipe is straightforward and rewarding, promising to impress anyone who tastes it.
At Nicol Retailer Limited, we believe that quality ingredients are key to any successful dish. Locally sourced beef and robust red wine like Shiraz or Cabernet Sauvignon make a noticeable difference in the final result. For the best outcome, ensure you use the best ingredients in your Braised Beef Short Ribs with Polenta.
The essence of this dish lies in its ability to bring people together, providing a memorable dining experience that celebrates the joy of home-cooked food. The combination of slow-cooked beef short ribs and creamy polenta is bound to become a favourite in your household. Braised Beef Short Ribs with Polenta is a dish that embodies comfort and togetherness.
Here is our step-by-step cooking guide:
Braised Beef Short Ribs with Polenta and Red Wine Sauce Recipe
This Braised Beef Short Ribs recipe is a true testament to the art of slow cooking, bringing out the best in each ingredient. The combination of tender beef, creamy polenta, and a rich red wine sauce creates a dish that's not only flavourful but also comforting. The layers of taste and texture make it an excellent choice for a special dinner or a cosy family meal.
Course Main Course
Cuisine France
Keyword Beef Short Ribs, Beef Short Ribs recipe, Braised beef, Braised Beef Short Ribs with Polenta and Red Wine Sauce, Slow Cooked Teriyaki Beef Recipe
Season the beef short ribs generously with salt and pepper.
Heat the olive oil in a large ovenproof pot over medium-high heat. Add the ribs and brown them on all sides, about 8-10 minutes. Remove the ribs and set aside.
In the same pot, add the onion, carrots, celery, and garlic. Cook for about 5minutes until the vegetables start to soften.
Stir in the tomato purée and cook for another 2 minutes.
Pour in the red wine, scraping up any browned bits from the bottom of the pot.
Add the beef stock, thyme, and bay leaves. Return the ribs to the pot, making sure they are mostly submerged in the liquid.
Bring to a gentle simmer, then cover the pot and transfer it to the preheated oven. Cook for 2.5 to 3 hours or until the meat is tender and falling off the bone.
Prepare the Polenta
In a saucepan, bring the water to a boil. Gradually whisk in the polenta, reducing the heat to low.
Cook, stirring frequently, for about 30 minutes or until the polenta is thick and smooth
Stir in the butter and Parmesan cheese, then season with salt and pepper to taste.
Finish the Dish
Once the ribs are cooked, remove them from the pot and keep warm.
Skim any excess fat from the surface of the sauce, then bring the sauce to a boil and reduce it slightly until it thickens.
To Serve
Spoon the creamy polenta onto plates.
Place short ribs on top of each serving of polenta
Drizzle with the rich red wine sauce.
Garnish the dish by scattering chopped fresh tomatoes over the top, adding a burst of colour and freshness. Sprinkle a few chopped basil or parsley leaves to provide an aromatic and vibrant touch.
Notes
When selecting tomatoes for garnish, opt for those that are firm yet ripe, ensuring a balance of sweetness and acidity. Fresh herbs for the garnish will add a burst of colour and flavour to your dish. Make sure to have all these ingredients ready before you begin, as it will streamline the cooking process and ensure you achieve the best possible result.Cooking Polenta To achieve perfectly creamy polenta, bring water or chicken stock to a boil in a saucepan. Gradually whisk in the polenta, ensuring there are no lumps. Lower the heat and let it simmer, stirring frequently, until the polenta thickens and becomes creamy. This usually takes about 20-25 minutes. Stirring consistently helps to prevent the polenta from sticking to the bottom of the pan and ensures a smooth texture.As the polenta cooks, it will begin to pull away from the sides of the pan. At this point, stir in butter and grated Parmesan cheese to add richness and depth to the flavour. Continue to stir until the cheese is fully melted and incorporated. The butter and cheese enhance the polenta’s creamy consistency, making it an ideal accompaniment to the braised beef short ribs.
Achieving tender meat is key to this dish’s success. One important aspect to remember is the slow cooking process, which allows the collagen in the meat to break down, resulting in a melt-in-the-mouth texture. Ensure that the liquid in the pot just covers the ribs to keep them moist throughout cooking.
A common mistake is rushing the browning process. Take your time to ensure each side of the ribs is well browned, as this step develops the dish’s depth of flavour. Proper browning is crucial for the perfect Braised Beef Short Ribs with Polenta.
When making the polenta, patience is essential. Stir it consistently to avoid lumps and achieve a smooth consistency. If you find that the polenta is becoming too thick, you can always add a bit more water or even some milk to loosen it up while stirring. A slow and steady approach will yield the creamiest results.
If you’re short on time, you can prepare the beef short ribs a day in advance. After braising, let the ribs cool in the sauce, then refrigerate. The next day, simply reheat them gently before serving. This can actually enhance the flavours as the meat continues to absorb the sauce.
For added depth, consider using a combination of beef stock and chicken stock. This mix can provide a more rounded flavour to the sauce without overpowering the beef. Fresh herbs like rosemary and parsley can also be added towards the end of cooking for a burst of freshness.
If you prefer a thicker sauce, you can remove the ribs once they’re done and let the sauce simmer on the stove for a bit longer to reduce further. Alternatively, you can mix a small amount of cornflour with water and stir it into the sauce to thicken it.
Lastly, don’t forget to taste as you go. Adjust the seasoning of the sauce with salt and pepper as needed to suit your preferences. Little tweaks along the way can make a significant difference in the final outcome.
Suggestions for Serving
To create an eye-catching presentation, arrange the beef short ribs on a large serving dish, nestled on a generous portion of creamy polenta. Drizzle the red wine sauce over the meat and polenta, allowing it to cascade enticingly around the dish. Garnish with fresh thyme leaves for a touch of greenery and an aromatic hint that complements the rich flavours. Present Braised Beef Short Ribs with Polenta beautifully to impress your guests.
For a rustic yet elegant touch, consider serving the dish in individual bowls, perfect for a more casual dining experience. This way, each guest gets a portion of the succulent beef, creamy polenta, and rich sauce all in one bowl, making it easy to enjoy every element together.
Accompany the meal with a simple green salad dressed in a light vinaigrette. The fresh, crisp salad provides a pleasant contrast to the rich and hearty main course. A loaf of crusty bread on the side is also a great addition, perfect for mopping up any remaining sauce.
If you wish to add a bit of seasonal flair, roasted root vegetables such as carrots, parsnips, and turnips make an excellent side dish. The natural sweetness of the roasted vegetables pairs beautifully with the savoury beef and polenta.
To complete the meal, consider a light dessert such as a fruit tart or sorbet, offering a refreshing end to the rich main course. A cheese board with a selection of hard and soft cheeses, nuts, and dried fruits also provides a delightful conclusion to the meal.
Lastly, presentation is key. Using high-quality serving dishes and paying attention to garnishing can elevate the visual appeal, making the meal not only delicious but also a feast for the eyes. Enjoy the process of creating a beautiful and inviting dining experience that will surely impress your guests.
The Moroccan Lamb Tagine is a traditional North African dish that brings a wonderful mix of flavours and aromas into your home. This classic recipe showcases succulent lamb paired with the natural sweetness of apricots and the hearty texture of chickpeas. With an assortment of vibrant spices and fresh herbs, every bite of this dish is a burst of flavours.
Introduction to Moroccan Lamb Tagine
A significant part of Moroccan cuisine, tagines are named after the earthenware pot in which they are cooked. The unique design of the tagine pot, with its conical lid, allows steam to circulate and ensures that the meat remains tender and juicy. However, even without this special pot, the Moroccan Lamb Tagine can still be made with impressive results using a Dutch oven or slow cooker.
The origins of the Moroccan Lamb Tagine date back centuries, with influences from Berber, Arab, and Andalusian cultures. It’s a dish that not only tastes good but also tells a story of a rich culinary heritage. The combination of sweet and savoury ingredients, along with aromatic spices, exemplifies the essence of Moroccan cooking.
This dish is ideal for both special occasions and everyday meals, offering a hearty and satisfying option that is both nutritious and flavourful. The lamb, cooked slowly to absorb the spices and sweetness from the apricots, results in a dish that is rich in taste and deeply comforting. Preparing a Moroccan Lamb Tagine at home is more than just cooking; it’s an experience that brings the vibrant and colourful world of Moroccan cuisine into your kitchen.
Here is the recipe:
Moroccan Lamb Tagine with Apricots, Chickpeas, Vegetables, Spices, and Fresh Herbs
Savour a delightful Moroccan Lamb Tagine infused with apricots, chickpeas, vegetables, spices, and fresh herbs – a perfect dish to enjoy with loved ones!
Season the lamb chunks with salt and pepper. Heat 1 tablespoon of olive oil in a large, heavy-based pan or tagine over medium-high heat. Brown the lamb in batches, ensuring it's well-sealed on all sides. Remove the lamb and set aside
Cook the Vegetables
In the same pan, reduce the heat to medium and add the remaining olive oil. Add the chopped onion and garlic, cooking until softened and golden, about 5 minutes.
Spice It Up
Stir in the ground cumin, coriander, cinnamon, ginger, turmeric, and cayenne pepper, if using. Cook for 1 minute until the spices release their fragrance.
Simmer the Tagine
Return the lamb to the pan, along with the chopped tomatoes and stock. Bring to a gentle simmer, cover, and cook for 45 minutes
Add Sweetness and Vegetables
Stir in the apricots, chickpeas, carrots, red pepper, courgette, aubergine, lemon zest, and honey. Continue to simmer, covered, for another 30-40 minutes until the lamb and vegetables are tender.
Finish with Herbs
Just before serving, stir in the fresh coriander and mint. Taste and adjust seasoning as needed.
Serve
Serve the lamb tagine hot with couscous or bread, allowing everyone to enjoy the rich, aromatic flavours.
Notes
Whilst the traditional method for making Moroccan Lamb Tagine involves using a tagine pot, modern alternatives like Dutch ovens and slow cookers can achieve similar results. The tagine pot’s design, with its conical lid, allows for optimal steam circulation, which helps the meat stay tender and moist. For those who don’t have this traditional cookware, a Dutch oven is an excellent substitute. When using a Dutch oven, keep the heat low to prevent the contents from burning, and stir occasionally to ensure even cooking.
Slow Cooker
For the slow cooker method, follow the initial steps of searing the lamb and sautéing the vegetables on the hob. Then transfer everything, including the apricots, chickpeas, and stock, into the slow cooker. Set it on low and let it cook for six to eight hours. This method is especially convenient for busy days, as it requires minimal supervision while delivering a richly flavoured dish.
Oven
If you prefer using the oven, preheat it to a low temperature, around 150°C (300°F). After browning the lamb and softening the vegetables on the hob, transfer them to an oven-safe pot. Add the apricots, chickpeas, and stock, then cover with a lid and place it in the oven for approximately two hours. This method mimics the slow-cooking environment of a tagine pot, ensuring the dish remains succulent and aromatic.
Ingredients
The magic of Moroccan Lamb Tagine lies in its carefully selected ingredients. At the heart of the dish is the lamb, ideally bone-in pieces like shoulder or shank for added flavour. The apricots introduce a subtle sweetness that complements the rich meat, while chickpeas add texture and protein. A medley of vegetables such as onions, carrots, and courgettes enhance the dish’s nutritional profile and provide a balance of flavours. However, it is the spices that enhance the tagine: cumin, coriander, cinnamon, and ginger combine to create a warm and aromatic base. Fresh herbs like coriander and parsley finish the dish with a burst of colour and freshness.
To enhance the enjoyment of your Moroccan Lamb Tagine, serve it with a side of fluffy couscous, which perfectly absorbs the aromatic sauce. Alternatively, a warm, crusty bread is an excellent choice to mop up every last bit of the delicious juices. A fresh green salad with a citrus vinaigrette can provide a refreshing contrast, balancing the richness of the tagine. Roasted vegetables, such as aubergines or bell peppers, can also make a colourful and nutritious addition to the meal. For a more authentic experience, consider serving the tagine directly from the pot, encouraging a communal style of dining where everyone can help themselves. Garnishing with fresh coriander or parsley not only adds a burst of colour but also enhances the dish’s fresh flavours. A sprinkle of toasted almonds or sesame seeds can introduce a delightful crunch, adding texture to the dish. For those who enjoy a bit of spice, a side of harissa paste can offer an extra kick. Complement the meal with a Moroccan mint tea, which aids digestion and provides a soothing end to the feast.
Conclusion
The Moroccan Lamb Tagine with apricots and chickpeas presents a harmonious blend of savoury and sweet, enhanced by a rich array of spices. This dish embodies the essence of Moroccan cuisine, making it an exceptional addition to any meal plan. The slow-cooking process ensures that the lamb is tender and infused with the vibrant flavours of the apricots, chickpeas, and spices. Whether prepared in a traditional tagine pot, a Dutch oven, or a slow cooker, the result is consistently flavourful and satisfying. This recipe offers not only a delicious meal but also a way to explore the culinary traditions of Morocco in your own kitchen. Preparing a Moroccan Lamb Tagine can be a delightful experience.
Crispy vegetable tempura offers a delightful way to enjoy a variety of fresh vegetables encased in a light, airy batter. This traditional Japanese dish has won the hearts of food lovers worldwide, thanks to its unique texture and the versatility of ingredients. Making vegetable tempura at home provides an opportunity to explore different vegetables and perfect the technique in your own kitchen.
The origins of tempura date back to the 16th century when Portuguese missionaries introduced the concept of frying food in batter to Japan. Over the centuries, it has evolved into a staple of Japanese cuisine, known for its delicate crunch and the subtle interplay of flavours, especially in crispy vegetable tempura.
The essence of good tempura lies in its simplicity. A minimalistic approach ensures that the natural flavours of the vegetables are highlighted. By using a basic batter of plain flour, cornflour, baking powder, salt, and ice-cold water, you can achieve the quintessential lightness that defines this dish, particularly when making crispy vegetable tempura.
One of the joys of making tempura is the freedom to experiment with a wide range of vegetables. Whether you prefer the sweetness of sweet potatoes or the earthiness of mushrooms, there’s something for everyone. The key is to maintain a consistent size and thickness for even cooking, ensuring each piece is perfectly coated and fried, resulting in the perfect crispy vegetable tempura.
The experience of preparing and enjoying homemade crispy vegetable tempura is both rewarding and educational, offering a glimpse into the artistry of Japanese culinary traditions.
Crispy, Crunchy, Delicious: Vegetable Tempura like you've never experienced before!Indulge in the satisfying crunch of perfectly fried vegetables, coated in a light and airy batter. Paired with a delightful dipping sauce that enhances the flavours and leaves you craving for more.Experience the ultimate satisfaction of biting into a piece of vegetable tempura, with each bite bursting with flavour and texture. Perfect for a quick snack or a tasty appetiser. Treat yourself to a plate of vegetable tempura today and elevate your snacking experience to a whole new level.
Course Appetizer, Side Dish, Snack
Cuisine Asian-inspired
Diet Vegan, Vegetarian
Keyword Crispy Vegetable Tempura with Dipping Sauce
Ina large bowl, combine the plain flour, cornflour, and baking powder. Gradually whisk in the sparkling water until you achieve a smooth batter. Be careful not to overmix; a few lumps are fine.
Prepare the vegetables by slicing them as directed. Keep the pieces relatively uniform to ensure even cooking.
Cooking the Tempura
Heat vegetable oil in a deep pan or wok to around 180°C (350°F). To test, drop a small amount of batter into the oil; it should sizzle and rise to the surface immediately.
Dip each vegetable piece into the batter, ensuring they are coated evenly. Carefully lower them into the hot oil, frying in batches to avoid overcrowding.
Fry each batch for about 2-3 minutes or until the tempura is crisp and lightly golden. Remove with a slotted spoon and drain on kitchen paper. Season with salt while still hot.
Making the Dipping Sauce
In a small bowl, combine soy sauce, rice vinegar, mirin, ginger, spring onion,and sesame oil. Mix well.
Serving
Arrange the tempura vegetables on a serving platter. Serve immediately with the dipping sauce on the side.
Suggestions for Serving
Serving crispy vegetable tempura with an eye for detail can elevate the dining experience. Arrange the tempura pieces on a serving platter with a touch of artistry, perhaps using a garnish of fresh herbs like coriander or chives. A few slices of lemon can add a burst of colour and a hint of zest, making the presentation visually appealing.
For a complete meal, consider pairing your tempura with other Japanese favourites. A bowl of steaming noodles or a side of delicate sushi can complement the light, crispy texture of the tempura beautifully. You could also serve it alongside a simple bowl of steamed rice and miso soup for a well-rounded, traditional Japanese meal.
Individual dipping bowls for the sauce can add a touch of elegance to the presentation. Ensure each guest has their own small bowl of the delightful dipping sauce , allowing them to enjoy the tempura at their own pace.
To add variety, include a selection of tempura vegetables on the platter. The contrasting colours and flavours can create an inviting visual feast, showcasing the appeal of crispy vegetable tempura.
Finally, for a more informal setting, serve the tempura as part of a sharing platter, allowing everyone to pick and choose their favourite pieces. This communal style of eating not only makes the meal more interactive but also highlights the versatility and appeal of crispy vegetable tempura.
Typical Mistakes and How to Prevent When Tempura Vegetables
A frequent issue in tempura preparation is ending up with a batter that’s too thick, leading to a heavy coating. Ensuring the batter is slightly thinner than pancake batter can help achieve the desired lightness. Another common mistake is not maintaining the oil temperature. Use a kitchen thermometer to keep it between 170-180°C to ensure the tempura crisps up properly.
Avoid overcrowding the pan, as this can lower the oil temperature and result in soggy tempura. Fry in small batches to maintain consistent heat. Additionally, cutting vegetables into uniform sizes ensures even cooking, preventing overcooked or undercooked pieces.
To keep the batter cold, place the mixing bowl in a larger bowl filled with ice. Cold batter creates a better texture for making crispy vegetable tempura. If the batter starts warming up, refrigerate it for a few minutes. You may also consider using Tempura Batter Mix instead to save time.
Lastly, drain excess oil using a wire rack instead of kitchen roll to prevent sogginess. By paying attention to these details, you can ensure a delightful and authentic crispy vegetable tempura experience.
Avocados, with their creamy texture and rich flavour, have become a staple in many kitchens around the world. Their versatility allows them to be used in a variety of dishes, from salads and sandwiches to smoothies and desserts. One innovative way to enjoy this beloved fruit is by making breaded avocado wedges. For those looking for a great snack, the Perfectly Crispy Breaded Avocado Wedges Recipe offers a delightful combination of textures, with a crispy outer layer encasing the smooth, buttery avocado inside.
What makes breaded avocado wedges particularly appealing is their ability to be both a delicious treat and a nutritious snack. When you bite into a perfectly breaded wedge, you experience a satisfying crunch followed by the rich, creamy taste of the avocado. This contrast in textures makes it a unique and enjoyable eating experience.
Moreover, breaded avocado wedges can be easily customised to suit your taste preferences. Whether you prefer a hint of spice, a burst of fresh herbs, or a touch of cheese, the recipe can be adapted to meet your needs. This flexibility makes them a great option for entertaining guests or simply enjoying a tasty snack at home.
These wedges are also an excellent way to introduce avocados to those who might be hesitant to try them in their raw form. The familiar breaded coating can make the avocado more approachable and enjoyable for a wider audience. Whether you choose to fry or bake them, breaded avocado wedges are a delightful way to elevate your avocado game and try something new.
Breaded avocado wedges are a delightful treat that brings together the creamy richness of avocados with a crispy outer layer. These wedges are perfect for snacking, adding a unique twist to traditional appetizers. The process involves coating slices of ripe avocado in a seasoned bread crumb mixture, ensuring every bite is full of flavour. Once coated, the wedges are either baked or fried to achieve that satisfying crunch. The contrast between the smooth interior and the crunchy exterior makes breaded avocado wedges a must-try for anyone looking to enjoy a delicious and inventive dish. They can be served with a variety of dips, such as spicy mayo or tangy lime aioli, to enhance their taste further. Whether you're hosting a gathering or just indulging in a treat for yourself, these avocado wedges are sure to impress.
– Arrange the wedges on a platter with fresh herbs and a sprinkle of sea salt for an appealing presentation.
– Serve alongside a crisp salad or as part of a tapas spread to impress your guests.
Another delightful way to enjoy your avocado wedges is by incorporating them into a light and refreshing summer meal. You can serve them with a chilled gazpacho or a tangy ceviche for a vibrant and colourful spread. Alternatively, consider placing them inside a wrap with some grilled chicken, fresh veggies, and a drizzle of lime juice for a quick and satisfying lunch option.
For a more substantial meal, pair your wedges with a hearty grain bowl. Think quinoa or brown rice topped with roasted vegetables, a dollop of hummus, and a sprinkle of toasted seeds. The creamy avocado wedges will add a lovely texture and richness to the dish, making it a well-rounded and nutritious choice.
If you’re hosting a gathering, why not create an avocado-themed platter? Alongside your breaded wedges, include some guacamole, sliced avocado with a dash of chilli flakes, and avocado toast bites. This will not only look visually appealing but also cater to various taste preferences.
Finally, for a touch of indulgence, consider serving the wedges with a cheesy dip. A warm, melty cheese sauce or a classic blue cheese dip can add a rich and comforting element to the crispy avocado wedges, making them an irresistible treat for any occasion.
Nutritional Advantages
Avocados are a powerhouse of nutrients, making them an excellent addition to your diet. They contain a wealth of monounsaturated fats, which are known to support heart health by reducing bad cholesterol levels. Additionally, avocados are high in fibre, aiding in digestion and promoting a feeling of fullness, which can be beneficial for weight management.
Rich in vitamins such as Vitamin E and Vitamin C, avocados contribute to healthy skin and a robust immune system. They also provide a good amount of potassium, which helps regulate blood pressure and maintain proper muscle function.
When preparing breaded avocado wedges, there are several ways to retain or even enhance their nutritional benefits. Baking the wedges instead of frying them can reduce the amount of added fat, making for a lighter and healthier snack. Opting for wholemeal breadcrumbs instead of white breadcrumbs can increase the fibre content, adding to the dish’s nutritional profile.
Pairing your avocado wedges with nutrient-rich dips, such as a low-fat yoghurt dip or a homemade salsa, can further boost their health benefits. For those following a vegan diet, using aquafaba as an egg substitute can provide a plant-based alternative without compromising on taste or texture.
Incorporating these methods can help you enjoy your delicious breaded avocado wedges while reaping the numerous health benefits avocados offer.
Variations and Enhancements
Elevate your delicious breaded avocado wedges with these creative twists:
– Mix finely chopped fresh herbs such as parsley or coriander into the breadcrumb mixture for an added burst of freshness.
– Add a sprinkle of smoked paprika, cumin, or chilli powder to the breadcrumbs for an extra layer of flavour.
– For a touch of indulgence, incorporate grated Parmesan cheese into the breadcrumb mixture.
– Try using different types of breadcrumbs, such as panko or wholemeal, to vary the texture and nutritional content.
– For a hint of sweetness, drizzle the cooked wedges with a balsamic glaze or a touch of honey.
These variations will make your avocado wedges uniquely yours and offer exciting new taste experiences each time you make them. Enjoy experimenting with these ideas and delight in the results!
Baked sweet potatoes are a culinary delight, combining simplicity with rich, satisfying flavours. This baked sweet potatoes recipe not only brings essential vitamins and minerals but also their natural sweetness, making them an ideal base for an array of delicious fillings. Baking sweet potatoes enhances their caramelised notes, offering a delectable contrast to savoury ingredients.
One of the most appealing aspects of baked sweet potatoes is their versatility. They can be enjoyed as a main course or as a hearty side dish. Additionally, they are suitable for various dietary preferences, being both gluten-free and vegetarian. Whether you’re catering to a large family dinner or preparing a simple meal for yourself, baked sweet potatoes are a reliable choice that never disappoints.
Today’s recipe combines corn, and black beans to create a flavourful and nutritious filling. Each ingredient brings its own unique texture and taste, resulting in a harmonious blend that complements the sweet, tender flesh of the baked potatoes. The combination of spices such as cumin and smoked paprika adds a delightful depth of flavour, turning a simple meal into something special.
Another advantage of baked sweet potatoes is their ease of preparation. With just a few basic steps, you can create a wholesome and satisfying dish. The process requires minimal effort, yet the results are incredibly rewarding. This makes baked sweet potatoes an excellent option for busy weekdays or relaxed weekends.
So, whether you’re an experienced cook or just starting out, baked sweet potatoes offer an accessible and delightful way to enjoy a nutritious meal. With the right ingredients and a bit of creativity, you can transform this humble root vegetable into a culinary masterpiece. Here is the recipe below:
Baked Sweet Potatoes filled with Corn and Black Beans
Enjoy your delightful baked sweet potatoes, bursting with flavor and nutrients, filled with a satisfying mix of black beans and corn that will leave your taste buds tingling with joy!
Preheat your oven to200°C (180°C fan-assisted). Wash the sweet potatoes thoroughly and pierce each one several times with a fork. Place them on a baking tray and bake in the preheated oven for about 45 minutes or until they are tender when pierced with a fork.
Prepare the Filling
While the sweet potatoes are baking, heat the olive oil in a frying pan over medium heat. Add the sweetcorn, black beans, ground cumin, smoked paprika, salt, and pepper. Stir well and cook for about 5-7 minutes, until the mixture is heated through and the flavours combine nicely. Set aside.
Assemble the Dish
Once the sweet potatoes are cooked, remove them from the oven and let them cool slightly. Carefully cut a slit down the centre of each sweet potato and gently push the ends to open them up. Use a fork to fluff the insides a bit.
Fill the Sweet Potatoes
Divide the black bean and corn mixture evenly among the four sweet potatoes, spooning it into the centre of each.
Garnish and Serve
Once ready, remove the sweet potatoes from the oven. Garnish with fresh coriander, if desired, and serve immediately.
Notes
Having ingredients on hand will streamline your cooking experience. In addition to the primary ingredients, you might want to have some optional garnishes ready, such as chopped fresh coriander or sour cream. These can add an extra layer of flavour and visual appeal to your final dish.Ensuring you have everything prepped and measured before you start cooking will make the entire process smoother and more enjoyable.
Once your Baked Sweet Potatoes are ready, it’s time to assemble and serve them with flair. Carefully slice each sweet potato lengthwise, creating an opening for the filling. Generously spoon the corn, diced sweet potatoes, and black bean mixture into the cavity of each potato. For an added touch, consider garnishing with chopped fresh coriander or a dollop of sour cream. Serve alongside a crisp green salad or avocado slices for a balanced meal. Presentation is key, so take a moment to arrange the sweet potatoes on a platter, ensuring they look as appetising as they taste.
Wrapping up
This recipe for Baked Sweet Potatoes filled with corn, diced sweet potatoes, and black beans is a true testament to how simple ingredients can come together to create a flavourful and wholesome dish. The combination of textures and the balance of sweet and savoury notes make it a standout option for both everyday meals and special occasions. It’s a versatile dish that caters to various dietary preferences and is bound to become a staple in your culinary repertoire.
What makes this recipe even more appealing is its ease of preparation. With a few basic steps and minimal effort, you can create a meal that’s not only delicious but also packed with nutrients. The process is straightforward, making it perfect for both novice cooks and seasoned chefs looking for a reliable go-to recipe.
Serving this dish is a pleasure in itself. The vibrant colours of the sweet potatoes, corn, and black beans make for an inviting presentation that is sure to whet anyone’s appetite. Adding optional garnishes like chopped coriander or a dollop of sour cream can enhance both the visual appeal and the flavour profile, making your dish even more delightful.
This recipe also offers plenty of room for creativity. Feel free to experiment with additional ingredients or spices to suit your taste. Whether you prefer a spicier kick or a hint of citrus, the filling can be adapted to reflect your personal preferences. It’s a great opportunity to get creative in the kitchen and make the dish truly your own.
In summary, these Baked Sweet Potatoes are not just a meal; they are an experience of taste and satisfaction. The ease of preparation combined with the depth of flavour ensures that this dish will be a favourite in your household. I look forward to hearing your feedback and any unique twists you might add. Enjoy your cooking adventure and the delicious results that follow!
If you fancy a delightful twist on the classic hot dog, this Hot Dog with Loaded Bean Chilli recipe is just what you need. Imagine combining a beloved sausage with a hearty bean chilli; it elevates a simple meal into a flavourful feast. This dish perfectly balances spice and savoury goodness, making it an ideal choice for a casual family dinner or a gathering with friends. Whether you’re a hot dog enthusiast or just exploring new recipes, this unique combination is certain to impress.
The beauty of this recipe lies in its versatility. Not only does it bring together classic elements in a novel way, but it also allows you to customise each serving to suit different tastes. Fancy a bit more heat? Simply adjust the chilli powder. Prefer a creamier topping? A dollop of sour cream or Greek yoghurt will do the trick. The possibilities are almost endless with this hot dog and loaded bean chilli combination.
Imagine the scene: a warm summer evening, a table laden with fresh buns, perfectly cooked sausages, and a pot of steaming bean chilli. Your guests can mix and match toppings like grated cheddar cheese, chopped fresh coriander, and even sliced avocado to create their ideal hot dog. The vibrant colours and inviting aromas make this dish not just a treat for the palate, but also a feast for the eyes. A hot dog with loaded bean chilli will surely impress.
This Hot Dog with Bean Chilli Recipe masterfully blends the comforting essence of a hot dog with the hearty flavours of bean chilli, making it a superb option for a range of dining experiences. The harmony of spicy, savoury, and creamy components results in a thoroughly gratifying dish that will surely please your family and friends.
Course Appetizer, brunch, lunch, Main Course, party food, snacks
Cuisine Geman
Keyword Hot Dog Recipe, Hot Dog with Bean Chilli Recipe
Consider these delightful serving ideas to enhance your Hot Dog with Bean Chilli experience:
Arrange the hot dogs on a rustic wooden platter, allowing your guests to see the beautiful assembly. Accompany the platter with small bowls filled with an array of toppings, letting each person customise their hot dog to their liking.
Create a visually appealing table setting with colourful napkins and vibrant plates. This adds a festive touch and makes the meal feel special.
Add a side dish of crunchy coleslaw or a fresh green salad to complement the rich, savoury flavours of the hot dog. The crisp textures and refreshing tastes will balance the meal perfectly.
Set up a casual, buffet-style arrangement for a relaxed atmosphere. This is perfect for outdoor gatherings or family get-togethers, allowing everyone to serve themselves at their own pace.
Consider providing a few additional condiments like mustard, ketchup, or hot sauce. These classic toppings can add an extra layer of flavour and make the meal even more enjoyable.
If you’re hosting a themed party, decorate the table to match. For a summer barbecue vibe, use gingham tablecloths and mason jars filled with wildflowers. This creates a charming, relaxed setting that everyone will appreciate.
For an elegant touch, serve the hot dogs with gourmet toppings like caramelised onions, roasted peppers, or even a drizzle of truffle oil. These additions can elevate the dish and surprise your guests with unexpected flavours while enjoying a hot dog with loaded bean chilli.
If children are among your guests, consider offering mini hot dog buns and sausages. This makes the meal more manageable for little hands and adds an element of fun.
Lastly, think about the presentation of the bean chilli. Serve it in a beautiful pot or bowl that keeps it warm throughout the meal. A slow cooker works well for this purpose, ensuring that every serving is just as hot and delicious as the first, perfect for your hot dog with loaded bean chilli.
Variations to Explore
If you’re keen to explore different variations of this recipe, consider these suggestions to add your personal touch and create diverse flavour profiles:
Different Types of Beans or Sausages:
– Substitute the mixed beans with chickpeas or pinto beans or turtle beans for a change in texture. These alternatives can offer a different bite and complement the spices beautifully.
– Try different sausages, such as, Frankfurt, bratwurst or spicy chorizo, for a unique taste. These options bring distinct flavours that can elevate the entire hot dog with loaded bean chilli.
Creative Twists for Diverse Flavour Profiles:
– Add a spoonful of smoky barbecue sauce to the bean chilli for a sweet and smoky flavour that pairs well with the savoury sausage.
– Incorporate chopped chipotle peppers in chilli sauce for an extra kick of heat. The smoky, spicy profile of chipotle peppers adds depth to the chilli.
Garlic knots are a beloved delicacy that offers a delightful blend of flavours, combining the comforting taste of freshly baked bread with the robust aromas of garlic, parsley, and Parmesan cheese. Originating from Italian-American cuisine, these delectable treats have gained popularity worldwide, becoming a favourite for their simple yet irresistible taste. Our Garlic Knots Recipe with Parsley and Parmesan Cheese allows you to recreate this delicious snack in the comfort of your home. Ideal for both casual gatherings and more formal occasions, garlic knots are an excellent addition to any menu.
Their appeal lies not only in their taste but also in their texture. The soft, chewy interior contrasts beautifully with the slightly crisp, golden-brown exterior, making each bite a delightful experience. The inclusion of garlic, parsley, and Parmesan cheese elevates these knots beyond ordinary bread rolls, adding layers of flavour that make them stand out.
Whether you’re an experienced baker or a novice in the kitchen, our Garlic Knots Recipe is straightforward and easy to follow, ensuring you can achieve perfect results every time. Garlic knots are versatile enough to be served as a side dish, appetiser, or even as a snack on their own. Their fragrant aroma and exquisite taste will undoubtedly make them a hit at any event or meal.
So, gather your ingredients and prepare to indulge in the deliciousness of garlic knots. With this Garlic Knots Recipe, you’ll bring a touch of Italian-American culinary magic to your table, delighting your taste buds and impressing your guests.
Freshly Baked Garlic Knots with Parsley and Parmesan Cheese
These Garlic Knots are the perfect combination of buttery, garlicky goodness, topped with fresh parsley and grated parmesan cheese. A delightful treat for any occasion, whether you're hosting a party or simply craving a delicious snack. Imagine the aroma of freshly baked bread filling your kitchen, the taste of warm, soft dough melting in your mouth. These Garlic Knots will have you coming back for more with each savoury bite.
Course Appetizer, party food, Side Dish, snacks
Cuisine Italian
Keyword Baked Garlic Knots with Parsley and Parmesan Cheese, Garlic Knots recipe
In a large mixing bowl, add the white bread flour mix and gradually add the warm water and 2 tablespoons of olive oil. Mix until a dough forms.
Knead the dough on a lightly floured surface for about 10 minutes until it is smooth and elastic.
Place the dough in a lightly oiled bowl, cover with a damp cloth, and leave to rise in a warm place for about 1 hour or until it has doubled in size.
Shape the Knots
Preheat your oven to 200°C (180°C fan) or gas mark 6.
Once the dough has risen, punch it down to release the air. Divide it into 12 equal portions.
Roll each portion into a rope about 20cm long and tie into a loose knot, tucking the ends underneath.
Prepare the Garlic Mixture
Ina small bowl, mix the melted butter with the chopped garlic
Bake the Knots
Place the knots on a baking tray lined with parchment paper.
Brush each knot generously with the garlic butter mixture.
Bake in the preheated oven for 15-20 minutes, or until golden brown
Add the Toppings
Once baked, remove the knots from the oven.
While still warm, brush with the remaining garlic butter, and sprinkle with parsley and parmesan cheese.
Serve
Serve the garlic knots warm as a delightful side or a snack. Enjoy with a dipping sauce of your choice, if desired.
Notes
Tips
For an extra touch, consider adding a light drizzle of olive oil over the knots. This will give them a slight sheen and further enrich their flavour profile. You can also add a pinch of sea salt for an added layer of texture and taste. When using parsley and Parmesan, aim for a balance that allows both ingredients to shine without one overpowering the other. This careful addition will enhance not just the flavour but also the visual appeal, making your garlic knots as attractive as they are delicious. These finishing touches transform your garlic knots from simple bread rolls into a gourmet delight, worthy of any special occasion or casual get-together.
Suggestions for Serving
Garlic knots can be enjoyed in a variety of ways, making them a versatile addition to your dining experience. Pair them with an array of dips and sauces to elevate their flavour. A marinara sauce provides a classic Italian touch, while a creamy garlic aioli offers an additional layer of taste. They also complement soups and salads perfectly, adding a satisfying crunch and depth of flavour to your meal. For a more indulgent option, serve them alongside a rich cheese fondue or a warm spinach and artichoke dip.
For those who enjoy a bit of spice, consider serving garlic knots with a spicy arrabbiata sauce or a tangy barbecue dip. These options provide a delightful contrast to the buttery, garlicky goodness of the knots. If you’re hosting a gathering, garlic knots make an excellent appetiser that guests can easily enjoy while mingling. Arrange them on a platter with a variety of dipping sauces to cater to different tastes and preferences.
Another creative serving suggestion is to use garlic knots as a base for mini sandwiches. Slice them open and fill them with your favourite ingredients, such as mozzarella, basil, and sun-dried tomatoes, for a tasty Italian-inspired snack. They can also be served as a side dish with main courses like pasta, grilled meats, or roasted vegetables, enhancing the overall dining experience with their robust flavours.
For a unique twist, consider incorporating garlic knots into a brunch menu. Serve them with scrambled eggs, smoked salmon, and cream cheese for a delightful morning treat. Their versatility and delicious taste make this Garlic Knots Recipe is a fantastic addition to any meal, whether you’re looking to impress guests or simply enjoy a cosy dinner at home.
Spaghetti and meatballs in tomato sauce is a beloved classic that has charmed households for generations. This dish, with its harmonious blend of tender meatballs and rich tomato sauce, served over a bed of al dente spaghetti, is the epitome of comfort food. Its appeal lies in its simplicity and the way it brings people together around the dinner table. Try this Spaghetti and Meatballs in Tomato Sauce Recipe to enjoy this classic at home.
The origins of spaghetti and meatballs can be traced back to Italian-American cuisine, where immigrants adapted traditional Italian recipes to the ingredients available in America. Over time, it has evolved into a cherished meal, known for its hearty and satisfying nature. This Spaghetti and Meatballs in Tomato Sauce Recipe captures that evolution and brings it to your kitchen.
One of the dish’s defining characteristics is the balance of flavours. The meatballs, often a mix of beef and pork, are seasoned with a blend of herbs and spices that complement the tanginess of the tomato sauce. This combination creates a symphony of tastes that is both robust and comforting. The tomato sauce itself is usually made from fresh tomatoes, simmered with garlic, onions, and herbs, resulting in a sauce that is both rich and aromatic. You can follow the Spaghetti and Meatballs in Tomato Sauce Recipe for detailed steps.
What makes spaghetti and meatballs in tomato sauce truly special is its versatility. It can be dressed up for a dinner party or kept simple for a weeknight family meal. The process of making it can also be a communal activity, with family members gathering to roll meatballs or stir the sauce, adding to the dish’s charm. Thus, using the Spaghetti and Meatballs in Tomato Sauce Recipe can turn cooking into a delightful family experience.
Ultimately, the enduring popularity of spaghetti and meatballs in tomato sauce is a testament to its timeless appeal and the joy it brings to those who prepare and savour it.
Here’s how you can prepare a flawless version of this beloved meal:
Our delectable recipe marries succulent meatballs with a luscious tomato sauce, all atop al dente spaghetti. This delightful and fulfilling meal will undoubtedly leave you yearning for more. Whether you're in search of a substantial dinner or wish to indulge in a comforting dish, our Spaghetti and Meatballs is bound to satisfy your cravings. Each mouthful offers a harmonious blend of tastes that will surely have you reaching for another serving.
Course Main Course
Cuisine Italian
Keyword Spaghetti and Meatballs in Tomato Sauce Recipe, Spaghetti and Meatballs Recipe
In a large bowl, mix together the beef mince, finely chopped onion, crushed garlic, breadcrumbs, egg, parsley, grated Parmesan, salt, and pepper.
Shape the mixture into balls, aiming for a size slightly smaller than a golf ball to ensure they cook evenly.
Heat 2 tablespoons of olive oil in a large frying pan over medium heat. Add the meatballs and cook until browned on all sides. Remove from the pan and set aside.
Make the Tomato Sauce
In the same pan, add 1 tablespoon of olive oil and sauté the finely chopped onion until soft.
Add the crushed garlic and cook for another minute.
Stir in the chopped tomatoes, sugar, dried oregano, salt, tomato purée and pepper. Let it simmer for 20 minutes, stirring occasionally.
Cook the Spaghetti
In the meantime, cook the spaghetti in a large pot of salted boiling water according to the packet instructions until al dente. Drain and set aside.
Combine and Serve
Add the browned meatballs to the tomato sauce and simmer for another 15 minutes until the meatballs are cooked through.
While the sauce and meatballs are simmering, bring a large pot of salted water to aboil. Add the spaghetti and cook according to the package instructions until al dente. Drain and set aside.
Divide the spaghetti among four plates and top with the meatballs and tomato sauce. Serve hot, garnished with basil and grated Parmesan cheese if desired.
Notes
Tips
Using fresh garlic and onions is vital for the sauce, as they offer a robust aromatic base. Olive oil should be extra virgin for the best flavour. Fresh basil and oregano elevate the sauce’s taste, making it aromatic and well-rounded. Red chilli flakes can add a hint of heat, depending on your preference.To balance the acidity of the tomatoes sauce, consider adding a touch of sugar. Season with salt and pepper to taste. Continue to cook the sauce until it thickens slightly, stirring occasionally to prevent it from sticking to the pan.Making the meatballs It’s important to mix meatballs ingredients gently with your hands, avoiding overworking the meat to keep the meatballs light and airy. Shape the mixture into balls, aiming for a size slightly smaller than a golf ball to ensure they cook evenly. To enhance their flavour, heat a bit of olive oil in a frying pan over medium-high heat and sear the meatballs until they develop a golden-brown crust on all sides. This step not only adds a delightful texture but also locks in the juices, keeping the meatballs moist and succulent.
Suggestions for Pairing and Serving
A wonderful complement to spaghetti and meatballs in tomato sauce is a fresh, crisp green salad with a tangy vinaigrette. This helps to balance the richness of the main dish. Garlic bread is another fantastic accompaniment, perfect for soaking up any remaining sauce and adding a satisfying crunch.
For a non-alcoholic option, sparkling water with a slice of lemon offers a refreshing alternative, cutting through the dish’s richness without overpowering it.
Leftovers can be creatively repurposed. Meatballs can be used in a delicious meatball sub, topped with extra sauce and melted cheese. They can also be added to a hearty vegetable soup, providing an additional layer of flavour and protein. Another variation to try is incorporating a dash of balsamic vinegar into the sauce, adding a sweet and tangy dimension to the dish. This Spaghetti and Meatballs in Tomato Sauce Recipe offers so much versatility.
Experimenting with these suggestions can make your meal even more enjoyable. Share your unique takes on this classic dish with Nicol Retailer Limited or fellow cooking enthusiasts, and discover new ways to appreciate this timeless favourite.
Teriyaki beef is a beloved dish that brings together the best of both Japanese and Western culinary traditions. It features a harmonious blend of sweet, savoury, and slightly tangy notes, thanks to the signature teriyaki sauce. Originating from Japan, the term “teriyaki” refers to a cooking technique where foods are grilled or broiled with a glaze of soy sauce, mirin, and sugar. However, our Slow Cooked Teriyaki Beef Recipe takes this traditional method and transforms it into a succulent, tender delight that requires minimal effort but delivers maximum flavour.
The beauty of this dish lies in its simplicity and the ease with which it can be prepared. The slow cooker does most of the heavy lifting, allowing you to focus on other tasks while your meal gently simmers to perfection. The key to achieving that melt-in-your-mouth texture is the slow cooking process, which allows the beef to absorb all the flavours from the marinade in this slow cooked teriyaki beef recipe, resulting in a rich and complex taste profile.
Whether you’re planning a weeknight dinner or a special occasion meal, this teriyaki beef slow cooked recipe fits the bill. It’s versatile enough to serve with a variety of sides, from classic steamed rice to a medley of stir-fried vegetables. Plus, it’s a dish that appeals to both young and old alike, making it a crowd-pleaser at any gathering.
Perfect for those who appreciate the art of slow cooking, this recipe is a must-try for anyone looking to expand their culinary repertoire. The dish is both comforting and exotically flavoured, showcasing everything great about a slow cooked teriyaki beef recipe. With a few basic ingredients and a bit of patience, you’ll be rewarded with a meal that is nothing short of spectacular.
Slow-cooked Teriyaki Beef dishes are a true delight for the senses. Imagine tender beef simmering for hours in a rich and flavourful teriyaki sauce, absorbing every nuance of the marinade. The result is a meal that’s not only succulent but also deeply infused with the sweet and savoury notes of soy sauce, ginger, garlic, and a hint of honey.Preparing this dish requires patience, as the beef needs time to reach its peak tenderness. However, the wait is undeniably worth it. As the meat slowly cooks, it develops a depth of flavour that quicker cooking methods simply can't achieve. The aromas that fill your kitchen will have everyone eagerly anticipating mealtime.
Trim any excess fat from the beef and cut it into large chunks. Place the beef pieces in a slow cooker.
1 kg beef chuck or brisket
Make the Teriyaki Sauce
In a mixing bowl, combine the soy sauce, water, brown sugar, garlic, ginger, Mirin honey, and sesame oil. Stir until the sugar has dissolved.
120 ml soy sauce, 120 ml water, 100 g brown sugar, 3 cloves garlic, minced, 1 tbsp fresh ginger, grated, 2 tbsp honey, 1 tbsp sesame oil, 2 tbsp Mirin
Cook the Beef
Pour the teriyaki sauce over the beef in the slow cooker. Cover and cook on low heat for 6 to 7 hours or until the beef is tender and easily pulled apart with a fork.
Thicken the Sauce
Once the beef is cooked, remove it from the slow cooker and set aside. In a small bowl, mix the cornflour with 2 tablespoons of water to create a slurry. Pour this mixture into the sauce in the slow cooker and stir well. Cook on high for 15-20 minutes or until the sauce has thickened
2 cornflour
Serve
Return the beef to the thickened sauce and stir to coat. Serve the teriyaki beef hot, garnished with toasted sesame seeds and sliced spring onions.
2 tbsp sesame seeds, toasted, 4 spring onions, finely sliced
Suggestions for Serving
For an enticing meal, consider pairing your slow cooked teriyaki beef with a side of steamed jasmine or basmati rice. These types of rice provide a fragrant and fluffy base that absorbs the rich teriyaki sauce beautifully. Alternatively, you could use a bowl of egg noodles or soba noodles for a different but equally delicious experience.
To introduce some freshness and crunch to your meal, incorporate a selection of stir-fried or steamed vegetables. Broccoli, bell peppers, snap peas, and baby corn are fantastic options that add both texture and colour to your plate. For a more elaborate side, you could prepare a simple Asian-inspired salad with mixed greens, sliced cucumbers, and a light sesame dressing, beautifully complementing the teriyaki beef recipe.
If you’re looking for something more unique, consider serving the teriyaki beef in lettuce wraps. Simply spoon some beef and sauce into large lettuce leaves, and top with shredded carrots and sliced spring onions for a delightful and light alternative, making your slow cooked teriyaki beef recipe a versatile dish.
For an added touch of elegance and flavour, sprinkle some toasted sesame seeds over the dish just before serving. Finely sliced spring onions also make a wonderful garnish, adding a bit of sharpness and a vibrant green hue. Fresh coriander leaves can provide an extra layer of aroma and a burst of freshness to complement this slow cooked teriyaki beef recipe.
Accompanying your meal with pickled ginger or kimchi can bring a tangy contrast to the rich, savoury beef, offering a balanced and satisfying dining experience. If you prefer a heartier side, a simple miso soup can serve as a warming and comforting addition to your slow cooked teriyaki beef recipe.
Don’t forget to set the scene with the right tableware. Using bowls and chopsticks can elevate the overall dining experience, making your meal feel even more special. For a final flourish, consider serving a light, fruity dessert such as mango slices or a bowl of mixed berries to cleanse the palate and round off the meal perfectly after enjoying a delicious slow cooked teriyaki beef.
Frequent Mistakes to Avoid
When preparing your slow cooked teriyaki beef recipe, several common errors can detract from the final dish. One of the most frequent mistakes is using the wrong cut of beef. Ensure you select a cut suitable for slow cooking, such as chuck roast or brisket, which will become tender and flavourful over time.
Incorrectly measuring ingredients can also lead to an imbalance in the sauce. It’s crucial to follow the recipe closely, ensuring you measure soy sauce, sugar, and other components accurately. An imbalance can make the sauce too salty or too sweet, affecting the overall taste of your slow cooked teriyaki beef recipe.
Avoid overcrowding the slow cooker, as this can hinder the even distribution of heat and flavours. The beef should be submerged in the marinade, but not packed too tightly. This allows for optimal cooking and flavour absorption in your slow cooked teriyaki beef recipe.
Another mistake is frequently lifting the lid of the slow cooker. Each time the lid is removed, heat escapes, potentially extending the cooking time and disrupting the slow cooking process. Patience is essential to achieving the melt-in-your-mouth texture that makes this dish special.
Failing to properly thicken the sauce is another common error. The cornflour slurry should be mixed in about 30 minutes before serving to achieve the desired consistency. If not done correctly, the sauce can remain too thin and fail to cling to the beef in your slow cooked teriyaki beef recipe.
Lastly, consider the overall presentation. A well-prepared dish can be marred by poor plating. Take the time to garnish and pair the beef with appropriate sides to enhance the dining experience of your slow cooked teriyaki beef recipe.
By keeping these tips in mind, you’ll be well on your way to mastering the art of making a slow cooked teriyaki beef recipe, ensuring a delicious and satisfying meal every time.
Sticky Toffee Pudding is a quintessential British dessert that has won the hearts of sweet enthusiasts worldwide. This rich treat showcases a moist sponge cake filled with dates, all covered in a luxurious toffee sauce. Perfect for those who desire a decadent dessert like Perfect Sticky Toffee Pudding, it’s suitable for special occasions or simply as a comforting treat. Mastering this recipe will undoubtedly leave a lasting impression.
While it might seem like a daunting task, making Sticky Toffee Pudding at home is quite straightforward with the right guidance. This beloved pudding combines simple ingredients in a way that produces an extraordinary result. You’ll find that the key to its unique texture lies in the use of dates, which contribute to its distinctive richness and moistness. Once you’ve mastered the basic techniques for Perfect Sticky Toffee Pudding, you can experiment with various tweaks and personal touches to make the recipe truly your own.
In this post, we’ll walk you through each step, from selecting the finest ingredients to perfecting the baking process. Get ready to delight your senses with a pudding that epitomises the warmth and indulgence of traditional British baking. Truly, mastering Perfect Sticky Toffee Pudding is a rewarding experience.
Sticky Toffee Pudding is a delightful British classic that has captured the taste buds of dessert lovers everywhere. This sumptuous dessert features a moist sponge cake infused with dates, generously drenched in a luscious toffee sauce. It's an ideal treat for those who crave something rich and indulgent. Whether you're celebrating a special occasion or simply want to enjoy a comforting dessert, mastering this recipe will surely impress.
Preheat your oven to 180°C (160°C fan) or Gas Mark 4. Grease four individual pudding moulds or ramekins with butter.
Place the chopped dates and bicarbonate of soda into a bowl. Pour over the boiling water, stir, and set aside to soak while you prepare the rest of the ingredients.
In a mixing bowl, cream together the butter and caster sugar until light and fluffy. Beat in the eggs one at a time, ensuring each is fully incorporated before adding the next. Stir in the vanilla extract.
Gently fold in the flour, followed by the milk, until you have a smooth batter. Finally, stir in the date mixture, including any remaining liquid.
Divide the batter evenly between the prepared moulds or ramekins, and place them on a baking tray.
Bake in the preheated oven for 20-25 minutes, or until the puddings are well-risen and firm to the touch. A skewer inserted into the centre should come out clean.
While the puddings are baking, prepare the toffee sauce. Combine the muscovado sugar, butter, cream, and black treacle in a saucepan over medium heat. Stir until the sugar has dissolved and the sauce is smooth and bubbling gently.
Once the puddings are ready, remove them from the oven and let them cool for a minute. Run a knife around the edges to loosen, and then turn them out onto serving plates.
Pour the warm toffee sauce generously over each pudding and serve immediately. Enjoy your sticky toffee puddings with a dollop of cream or a scoop of vanilla ice cream if desired.
Notes
Tips
For those seeking alternatives, coconut sugar can replace brown sugar for a different depth of flavour, or a gluten-free flour blend can be used if required. By using high-quality ingredients, you’ll be well on your way to crafting a pudding that captures the essence of this beloved British dessert.During the baking process, it’s important to keep an eye on the pudding to avoid overbaking, as this can result in a dry texture. Follow the specified baking times closely, and use a skewer to test for doneness. The skewer should come out clean when inserted into the centre of the pudding.
Suggestions for Sticky Toffee Pudding Serving
For an exceptional Sticky Toffee Pudding experience, serve the warm pudding generously topped with toffee sauce. Complementing the rich flavours, a scoop of vanilla ice cream or a dollop of clotted cream offers a delightful contrast in texture and temperature. These additions not only enhance the taste but also provide a luxurious feel to the dessert, making it an ultimate Perfect Sticky Toffee Pudding.
Consider individual servings in elegant dishes, perhaps adorned with a sprig of fresh mint for a touch of colour and freshness. If you want to add a festive flair, a light dusting of icing sugar can give a visually appealing finish. For a more extravagant presentation, you might drizzle a bit of extra toffee sauce around the plate or add some chopped nuts like pecans or walnuts for added texture.
Pairing the pudding with a warm beverage such as tea, coffee, or even a hot toddy can elevate the overall dining experience. For a summer twist, serve the pudding with a side of fresh berries or a tangy fruit compote to balance the sweetness.
If you are entertaining guests, prepare everything in advance and warm the pudding just before serving to ensure it’s at its best. With these serving suggestions, your Sticky Toffee Pudding will not only taste incredible but also look stunning on the plate, truly making it a Perfect Sticky Toffee Pudding.
Solving Common Problems
Dry texture can be avoided by being mindful of baking times. Always check the pudding a few minutes before the suggested time to ensure it isn’t overbaked. Excess liquid leading to a soggy pudding may result from inaccurate measurements or insufficient draining of the dates. Ensuring your dates are properly drained after soaking is crucial.
If your toffee sauce turns out too thin, it may need a bit more simmering time. Allow it to simmer until it thickens to the desired consistency, but take care not to let it burn. Should the sauce be too thick, gently reheat it while stirring in a bit more double cream to achieve the perfect consistency.
Uneven cooking can be an issue if the oven temperature isn’t consistent. Ensure your oven is properly preheated and consider rotating the pudding halfway through baking if necessary. Greasing your baking dish or pudding moulds well will also help in preventing the pudding from sticking, making it easier to release and serve.
Commonly Asked Questions
Can I prepare Sticky Toffee Pudding in advance?
Yes, you can make both the pudding and the sauce a day ahead. Store them separately, and reheat before serving to ensure they retain their quality.
How should I store leftovers?
Leftovers can be kept in an airtight container in the fridge for up to three days. When ready to enjoy again, reheat in the oven or microwave, adding extra toffee sauce if necessary to keep the pudding moist.
Is it possible to freeze Sticky Toffee Pudding?
Absolutely, both the pudding and the sauce can be frozen. Wrap them tightly to prevent freezer burn, and they will keep for up to two months. Thaw them in the fridge overnight before reheating.
What should I do if my pudding turns out too dry?
If the pudding is too dry, it may have been overbaked. Check the pudding a few minutes before the recommended baking time to avoid this issue. Adding a bit more toffee sauce when serving can also help to moisten the pudding.
Can I make a gluten-free version?
Yes, a gluten-free flour blend can replace self-raising flour. Ensure all other ingredients used are gluten-free to make the pudding suitable for those with gluten intolerances.
The Mini Beef and Ale Pies Recipe offers a delightful way to enjoy a British classic in a convenient, individual serving. Perfect for impressing guests or simply enjoying a comforting meal, these miniature pies are sure to become a favourite in your culinary repertoire. This Mini Beef and Ale Pies Recipe is both delightful and practical.
The allure of these miniature pies lies in their rich filling and convenient size. With tender beef enveloped in a hearty ale sauce, each bite provides a satisfying contrast between the succulent interior and the crisp, flaky exterior. Their individual portions make them excellent as appetisers or as part of a more substantial meal. This Mini Beef and Ale Pies Recipe truly stands out.
What sets this Beef and Ale Pies Recipe apart is its versatility. The filling, a mix of beef slow-cooked in ale with aromatic vegetables and herbs, can be adjusted to suit different tastes. Whether you prefer a darker stout for a deep, rich flavour or a traditional English bitter for a lighter touch, the choice of ale can transform the character of the dish. Thus, the Mini Beef and Ale Pies Recipe offers versatility.
Another benefit of these mini pies is their suitability for advanced preparation. The beef filling can be made ahead of time, allowing the flavours to meld and develop. This makes the final assembly on the day of your event quick and straightforward, ensuring a stress-free cooking experience. The Mini Beef and Ale Pies Recipe allows for preparation in advance.
To create the perfect mini beef and ale pies, here is the recipe:
The Mini Beef and Ale Pie Recipe is a cherished British staple, perfect for any event. These petite pies combine the robust flavours of slow-cooked beef and ale with the delightful crunch of golden pastry, offering a taste of traditional British cuisine in a compact form. Ideal for both cosy family meals and sophisticated gatherings, these pies cater to various occasions and preferences.
Course Main Course, snacks
Cuisine English
Keyword Beef and Ale Pie Recipe, Mini Beef and Ale Pie Recipe
Pre heat the oven to 200°C (180°C fan) or Gas Mark 6.
In a large pan, heat a splash of olive oil over medium heat.
Add the onion, garlic, carrots, and celery. Cook until they start to soften.
Toss the beef with flour, salt, and pepper.
Increase the heat, add the beef to the pan, and cook until browned on all sides.
Stir n the tomato puree and cook for another minute.
Pour in the ale, scraping up any bits from the bottom of the pan.
Add the beef stock, Worcestershire sauce, and thyme. Stir well.
Reduce the heat, cover the pan, and let it simmer for 1 hour or until the beef is tender and the sauce has thickened. Stir occasionally.
Once done, let the filling cool slightly.
Assembly and Baking
Roll out the shortcrust pastry on a floured surface.
Cut out circles to line the bases of individual pie tins and larger circles for the lids.
Line the tins with the pastry, fill each with the beef mixture, and cover with the pastry lids. Press the edges to seal.
Make a small cut in the centre of each pie to allow steam to escape.
Brush the tops with beaten egg for a golden finish.
Brush the tops with beaten egg for a golden finish.
Serving
Serve hot, ideally with mashed potatoes and seasonal greens for a complete meal.
Notes
Tips
Select cuts such as chuck or brisket, which become tender and flavourful when slow-cooked. For the ale, opt for a dark stout or a traditional English bitter to add depth to the filling. Ensure your shortcrust pastry is of good quality for the best results. The remaining ingredients, like onions, carrots, garlic, and tomato purée, enhance the richness of the beef and ale mixture.Having these ingredients on hand ensures you can effortlessly create the mini beef and ale pies. Proper selection of beef and ale will significantly influence the dish’s overall flavour, so choose wisely. The egg wash gives the pies a beautiful golden finish, making them visually appealing and delicious.
Suggestions for Serving
When it comes to serving mini beef and ale pies, consider pairing them with an array of complementary sides to enhance their savoury appeal. Creamy mashed potatoes are a classic choice, as their smooth texture balances the richness of the pie filling. Alternatively, buttery new potatoes offer a delightful bite that contrasts with the flaky pastry. The classic sides complement the Mini Beef and Ale Pies Recipe perfectly.
For a touch of freshness, serve the pies alongside steamed seasonal vegetables. Carrots, peas, and green beans are excellent options that add both colour and nutritional value to the meal. A crisp garden salad with a light vinaigrette can also provide a refreshing counterpoint to the hearty pies. The sides enhance the Mini Beef and Ale Pies Recipe.
To elevate the presentation, arrange the pies on a rustic wooden board or place each one in an individual ramekin. This not only adds a charming touch but also makes for easy serving. Garnishing with a sprig of thyme can add a hint of elegance and a subtle reminder of the flavours contained within the pies.
For a more indulgent experience, consider adding a rich gravy or a robust ale sauce on the side. This can be drizzled over the pies or served in a small jug for guests to pour themselves. The additional sauce enhances the pies’ flavour and makes each bite even more enjoyable.
By thoughtfully pairing these mini beef and ale pies with a variety of sides and presenting them in an appealing manner, you can create a memorable dining experience that highlights the best of British cuisine.
Tips for Storage and Reheating
Leftover pies should be allowed to cool completely before storage. Place them in an airtight container and refrigerate for up to three days. If you prefer to freeze them, ensure they are well wrapped in cling film or aluminium foil before placing them in a freezer bag. Frozen pies can be stored for up to three months. This Mini Beef and Ale Pies Recipe ensures the pies remain tasty even after storage.
When it’s time to reheat, preheat your oven to 180°C (160°C fan)/350°F/Gas Mark 4. Place the pies on a baking tray and cover with foil to prevent the pastry from over-browning. Heat for 15-20 minutes, or until thoroughly warmed through. For frozen pies, allow them to thaw in the refrigerator overnight before reheating. Proper reheating is crucial for the Mini Beef and Ale Pies Recipe.
If you are short on time, you can use a microwave for reheating. Place a pie on a microwave-safe plate and cover it with a microwave-safe lid or another plate to prevent it from drying out. Heat on medium power for 2-3 minutes, checking periodically to ensure it’s heated evenly. Be mindful that reheating in the microwave may result in a softer pastry.
To maintain the pies’ delightful texture and flavour, avoid reheating more than once. The initial cooling and proper storage are key to ensuring the quality of the pies remains intact. If you find the pastry is not as crisp as desired after reheating, a few minutes under the grill can help restore its texture.
By following these storage and reheating tips, you can enjoy the full taste and quality of your mini beef and ale pies even after the initial baking, making them a convenient option for quick, satisfying meals.
Toad in the Hole with Onion Gravy is a cherished classic in British cuisine, epitomising the essence of comfort food. Hailing from England, this dish marries simple ingredients to craft a meal that is both hearty and fulfilling. Central to the recipe are succulent sausages, typically pork, encased in a light, fluffy Yorkshire pudding batter. The outcome is a delightful mix of textures and flavours, with the crisp batter providing a perfect counterpoint to the juicy sausages.
One of the delightful aspects of Toad in the Hole is its versatility. While traditional pork sausages are commonly used, there is room for variation. Cumberland or Lincolnshire sausages can provide a regional twist, each bringing its unique spice blend to the dish. Some even prefer experimenting with different meats or vegetarian alternatives, ensuring the dish caters to a wide range of tastes and dietary preferences.
Accompanying the Toad in the Hole is the essential onion gravy. This rich, flavourful sauce, made from caramelised onions and beef stock, adds depth and complements the savoury notes of the sausages and batter. The combination of these elements creates a meal that is not only delicious but also deeply satisfying.
Whether you’re cooking for a family gathering or simply craving a taste of home, Toad in the Hole with Onion Gravy offers a taste of British culinary tradition that is both comforting and delicious.
Here is a detailed recipe and a step-by-step guide on how to prepare Toad in the Hole with Onion Gravy:
Toad in the Hole with Onion Gravy is a beloved staple in British cuisine, embodying the essence of comfort food. Originating from the heart of England, this dish combines simple ingredients to create a meal that is both satisfying and hearty. At its core, it features succulent sausages, often pork, baked within a light, airy Yorkshire pudding batter. The result is a harmonious blend of flavours and textures, with the crispiness of the batter contrasting beautifully with the juicy sausages.
Course Main Course
Cuisine English
Keyword Toad in the Hole, Toad in the Hole with Onion Gravy Recipe
Heat your oven to220°C (200°C fan)/425°F/gas mark 7.
Prepare the Sausages
Place the sausages in a large ovenproof dish. Drizzle with 1 tablespoon of vegetable oil. Cook in the oven for 10 minutes until they begin to brown.
Make the Batter
While the sausages are cooking, prepare the batter. In a mixing bowl, sift the plain flour and season with salt and pepper. Make a well in the centre and add the eggs. Whisk together, gradually adding the milk, until the batter is smooth and lump-free.
Cook the Toad in the Hole
Remove the sausages from the oven. Pour the batter over the sausages and return the dish to the oven. Cook for 25-30 minutes until the batter is puffed up and golden brown.
Prepare the Gravy
While the toad in the hole is cooking, heat 1 tablespoon of olive oil in a large pan over medium heat. Add the sliced onions and slowly cook the onions down for 45-50 mins, stirring occasionally until sticky and caramelised
Add the flour and stir well, coating all of the onions. Cook for a minute, then add the vinegar. Turn up the heat and reduce by half, which should take about 2 minutes. Whisk a little to make sure the flour doesn’t form lumps. Pour in the stock, bring to a boil, and cook for 6-8 minutes.
Transfer the onion gravy to a blender and blend until smooth. Put the onion gravy back into the saucepan and bring to a simmer and cook for 5 minutes, until thickened. Season with salt, pepper, and Worcestershire sauce.
Serve
Once cooked, take the toad in the hole out of the oven and pour onion gravy over it. Garnish with fresh thyme. Serve while hot and accompanied by your choice of vegetables or potatoes.
Notes
Choosing the right sausages is key. Butcher’s sausages or high-quality supermarket options with a good meat content are recommended. Traditional pork sausages are the go-to choice, but Cumberland or Lincolnshire varieties can offer a delightful regional twist.The vegetable oil is used to ensure a crisp, well-cooked base for the batter and sausages. Plain flour, eggs, and milk are the fundamental components of the batter, providing the perfect texture and rise when baked. A pinch of salt in the batter enhances its taste, while a bit of pepper adds a subtle kick. Adjust these seasonings to suit your preference. Ensure all ingredients are at room temperature before you begin, as this will help the batter combine more smoothly and rise better in the oven.
Suggestions for Serving
To present your Toad in the Hole with Onion Gravy in the most appealing way, consider pairing it with some traditional and complementary sides. Creamy mashed potatoes make an excellent choice, providing a smooth, buttery texture that contrasts nicely with the crispness of the Yorkshire pudding batter. Another classic option is steamed vegetables, such as peas and carrots, which add a burst of colour and freshness to the plate.
For a bit of a twist, roasted root vegetables can also work wonderfully, especially in the colder months. Think along the lines of roasted parsnips, carrots, and perhaps some sweet potatoes. Their natural sweetness and caramelised edges will harmonise beautifully with the savoury sausages and rich onion gravy.
Adding a sprinkle of freshly chopped parsley or thyme over the dish just before serving can enhance the presentation with a pop of green and a hint of herby freshness. If you prefer a bit more bite, consider using chives or a small amount of rosemary.
To elevate the dining experience further, consider serving the meal with a side of tangy pickled red cabbage or a simple green salad dressed with a light vinaigrette. These additions can cut through the richness of the dish, offering a well-balanced meal.
For those who enjoy a bit of heat, a dollop of wholegrain mustard or a splash of Worcestershire sauce on the side can provide a pleasant kick that complements the flavours of the Toad in the Hole and its accompanying onion gravy.
By carefully selecting your side dishes and garnishes, you can create a well-rounded and visually appealing meal that enhances the hearty and comforting nature of Toad in the Hole with Onion Gravy.
Ultimately, Toad in the Hole with Onion Gravy is more than just a meal; it’s a slice of British culinary heritage. Perfect for family dinners or special occasions, it promises a taste of home that is both nostalgic and delicious. By following this Toad in the Hole Recipe by nicol retailer, you can recreate a classic that will surely become a favourite at your table. Enjoy the process and savour every bite of this timeless British dish!
If you’re seeking an enticing vegan dish that combines unique textures and bold flavours, look no further than Jackfruit Bao Buns. These fluffy steamed buns, filled with a savoury jackfruit mixture, offer a delightful twist on the traditional bao and are perfect for any occasion. What sets these bao buns apart is the jackfruit filling, which mimics the texture of pulled meat while offering a distinct taste that blends seamlessly with the soft, pillowy dough.
Jackfruit, known for its meat-like consistency, becomes incredibly flavourful when seasoned properly. Adding Fine Sea Salt to the mix ensures the filling has a balanced, rich taste without any additives, enhancing the natural flavours of the ingredients. The combination of soy sauce, hoisin sauce, and a touch of ginger and garlic creates a filling that is both savoury and slightly sweet, making each bite a flavourful experience.
Whether you’re hosting a dinner party or looking for a comforting weeknight meal, these Jackfruit Bao Buns are sure to impress. They offer a versatile option for those adhering to a plant-based diet and can easily be adapted to suit various flavour preferences. With the right ingredients and a bit of patience, you can create a dish that not only looks impressive but tastes fantastic as well.
This recipe is ideal for both seasoned cooks and those new to vegan cooking, providing a straightforward yet rewarding culinary endeavour. So, gather your ingredients and get ready to enjoy a taste sensation that’s sure to become a favourite in your home.
Jackfruit Bao Bun with a Savoury Filling is a delightful culinary creation that combines the soft, fluffy texture of the bao bun with the unique taste of jackfruit. This Asian-inspired dish is perfect for those who enjoy exploring new flavours and textures. The bao bun itself is made from a simple dough, steamed to perfection, and has a slight sweetness that complements the savoury filling.
In a large bowl, combine the flour, caster sugar, baking powder, and salt. In a separate small bowl, mix the yeast with the warm water and let it sit for about 5 minutes until foamy. Add the yeast mixture and vegetable oil to the dry ingredients. Mix until a dough forms. Knead the dough on a lightly floured surface for about 10 minutes until smooth and elastic. Place the dough in a greased bowl, cover with a damp cloth, and let it rise in a warm place for about 1 hour or until doubled in size
Prepare the Filling
Drained the jackfruit. Trim the firm, pointed ends off each triangular piece of jackfruit (you can still use them if you prefer) and gently press each piece so that it separates into individual strands and absorbs more of the cooking sauce. Set aside.
Heat the vegetable oil in a pan over medium heat. Add the onion, garlic, and ginger, and sauté until the onion is translucent. Add the shredded jackfruit, soy sauce, hoisin sauce, tamarind sauce and sesame oil. Stir well and cook for about 10 minutes until the jackfruit is tender and well coated. Add the red pepper, cooking for an additional 5 minutes. Season with salt and black pepper. Remove from heat and set aside
Shape and Steam the Bao
Once the dough has risen, punch it down and divide it into 8 equal pieces. Roll each piece into a ball and flatten each ball into an oval shape, approximately 10cm long.
Lightly brush one side with oil and fold in half to create a bun shape. Prepare a steamer lined with parchment paper. Place the buns inside, ensuring they are not touching.
Cover and steam over medium heat for 10-12 minutes until the buns are puffed and cooked through.
Assembling the Bao Buns
Once the buns are steamed, carefully open them and fill a bao bun with pulled jackfruit filling, drizzling with extra hoisin sauce if desired. Finish garnishing each filled bao bun with white and black sesame seeds, and chopped fresh coriander leaves.
Notes
Tips for Shaping:
Ensure the filling is well-centred to avoid uneven cooking.If you find the dough sticking to your hands, lightly flour your hands to make handling easier. Shaping the bao buns might require a bit of practice, but it’s a fun and rewarding process. Don’t worry if the first few attempts aren’t perfect; the buns will still be delicious. Properly sealed buns help in achieving that delightful, fluffy texture without losing any of the savoury filling inside. Enjoy the process and look forward to tasting these delectable bao bu
Suggestions for Serving
For a complete meal, consider pairing your Savoury Jackfruit Bao Buns with refreshing side dishes and thoughtful presentation touches. A fresh cucumber salad, lightly dressed with rice vinegar and sesame oil, adds a crisp and refreshing contrast to the rich filling of the bao buns. Alternatively, a simple mix of pickled vegetables like carrots, radishes, and red onions offers a tangy counterbalance to the savoury jackfruit filling.
For an added burst of flavour, serve the bao buns with a side of dipping sauce. A mixture of soy sauce, rice vinegar, a touch of sesame oil, and a sprinkle of chilli flakes makes for a delicious dip that complements the buns beautifully.
When it comes to presentation, arranging the buns in a bamboo steamer basket adds an authentic and charming touch to your meal. Sprinkling sesame seeds or finely chopped spring onions over the buns before serving can enhance both the visual appeal and the texture.
For those looking to elevate the dining experience further, consider serving the bao buns with a pot of hot green tea. The tea’s subtle bitterness pairs well with the savoury and slightly sweet flavours of the bao buns, providing a well-rounded meal experience.
If you’re hosting guests, these presentation and serving suggestions can turn a simple meal into a memorable culinary event. The attention to detail in pairing and presentation not only enhances the taste but also makes the meal visually appealing, ensuring that your Jackfruit Bao Buns are the highlight of the dining experience. Enjoy this delightful vegan recipe that brings together flavour, texture, and a touch of elegance.
The allure of French cuisine is undeniable, with its elegant flavours and time-honoured techniques. Among its most cherished dishes is the Beef Bourguignon, a rich, savoury stew that epitomises the art of slow cooking. Originating from the Burgundy region, this dish brings together simple ingredients transformed by a meticulous cooking process.
This classic dish transports your taste buds straight to the heart of France. While adhering to traditional techniques, a few unique touches set it apart. These subtle enhancements elevate the overall experience, making each bite an indulgent pleasure. Here is the recipe and instructions below:
Beef Bourguignon is a classic French dish that epitomises the art of slow cooking. This hearty stew features tender beef simmered in a rich red wine sauce, enhanced by the flavours of bacon, mushrooms, onions, and aromatic herbs. The dish requires patience, but the results are worth every minute.
Pre heat your oven to 160°C (140°C fan) or Gas Mark 3.
In a large ovenproof casserole dish, heat 1 tablespoon of olive oil over medium heat. Add the diced bacon and cook until crispy. Remove with a slotted spoon and set aside.
In the same dish, add the beef cubes in batches, browning them on all sides. Remove and set aside with the bacon,
Add the remaining olive oil to the dish. Sauté the chopped onion and sliced carrots until softened. Add the garlic and cook for an additional minute.
Return the beef and bacon to the dish. Sprinkle over the flour and stir well to coat the meat.
Pour in the red wine and beef stock. Stir in the tomato purée and add the bouquet garni. Season with salt and pepper.
Bring the mixture to a simmer. Cover the casserole dish and transfer it to the preheated oven. Cook for 2.5 to 3 hours, until the beef is tender.
About 30 minutes before serving, melt the butter in a frying pan over medium heat. Add the pearl onions and cook until golden brown. Add the mushrooms and sauté until tender.
Add a splash of brandy towards the end of the cooking process. Remove the casserole from the oven. Stir in the cooked mushrooms and onions. Adjust the seasoning as necessary. Garnish with fresh parsley before serving.
Enjoy this classic French dish with crusty bread or creamy mashed potatoes
Notes
Professional Tips
To capture the authentic essence of Beef Bourguignon, selecting the right ingredients is paramount:
Beef: Choose cuts such as beef chuck or brisket, which become tender and flavourful through slow cooking.
Wine: A high-quality Burgundy or robust Pinot Noir is crucial, as its flavours intensify during the cooking process.
Vegetables and Herbs: Traditional ingredients include onions, carrots, and mushrooms. Additionally, a bouquet garni of thyme, bay leaves, and parsley is essential.
Stock: Use a rich beef stock to enhance the depth of the stew.
Suggestions for Serving
Beef Bourguignon pairs beautifully with a range of side dishes that complement its rich flavours. For a classic option, serve it with creamy mashed potatoes, which soak up the luscious sauce perfectly. Alternatively, crusty bread can provide a delightful contrast in texture and is excellent for mopping up the stew. Buttered noodles also make a wonderful accompaniment, offering a traditional touch that many enjoy.
When presenting the dish, a sprinkle of freshly chopped parsley adds a vibrant splash of colour and a hint of freshness. This simple garnish not only enhances the visual appeal but also provides a subtle contrast to the rich, hearty stew. Serve the Beef Bourguignon in a deep dish or bowl to keep the warmth and let the aromas waft invitingly.
For an added touch of elegance, you might consider a light salad on the side. A mix of fresh greens with a simple vinaigrette can offer a refreshing counterbalance to the rich main course. If you prefer vegetables, lightly steamed green beans or sautéed spinach can add both colour and nutrition to your meal.
To round off your French-inspired meal, consider a cheese course or a light dessert like a fruit tart. These additional touches can transform a simple dinner into a memorable dining occasion, celebrating the flavours and techniques of classic French cuisine.
Nicol Retailer’s Unique Touch
Nicol Retailer’s Beef Bourguignon includes a few imaginative enhancements that elevate this classic dish. One standout feature is the brandy finish. By adding a splash of cooking brandy towards the end of the cooking process, the sauce is enriched with a nuanced depth that differentiates it from traditional recipes. This touch not only enhances the flavour profile but also adds a layer of sophistication.
Another noteworthy twist is the herb infusion. While a bouquet garni is standard, Nicol Retailer suggests incorporating freshly chopped parsley just before serving. This addition brings a burst of freshness that contrasts beautifully with the stew’s richness, providing a lively finish to each bite.
Additionally, Nicol Retailer’s method emphasises careful marination. By marinating the beef in wine, brandy, and herbs for a minimum of four hours, but ideally overnight, the meat absorbs a deep, complex flavour, ensuring it remains tender throughout the slow cooking process. This step, although requiring patience, is crucial for achieving the dish’s signature taste.
Moreover, the choice of vegetables—onions, carrots, and mushrooms—are prepared in a way that maintains their texture and flavour. By slicing the vegetables slightly chunky, they not only complement the tender beef but also contribute to the stew’s hearty, rustic character.
Lastly, Nicol Retailer’s attention to the quality of wine used in the dish sets it apart. Recommending a high-quality Burgundy or robust Pinot Noir ensures that the flavours of the wine are fully integrated into the stew, intensifying as they cook down to create a sauce with remarkable depth.
These thoughtful touches and meticulous methods make Nicol Retailer’s Beef Bourguignon a distinctive and delightful interpretation of the classic French dish.
The vibrant orange hue of butternut squash not only brightens up the table but also signifies its rich nutritional value. Packed with vitamins, minerals, and antioxidants, butternut squash is a powerhouse of goodness. When transformed into a soup, it retains its nutritional benefits while offering a delightful taste experience.
The beauty of butternut squash soup lies in its simplicity. A few fresh ingredients come together to create a harmonious blend of flavours that can be enjoyed by all. Whether you’re seeking a quick weekday dinner or an elegant starter for a dinner party, this soup fits the bill.
Its versatility means you can tailor the recipe to suit your preferences, adding spices, herbs, or other ingredients to make it uniquely yours. The process of making this soup is also quite therapeutic – from the roasting of the squash to the blending of the ingredients, every step adds to the anticipation of the final dish.
Here is a step-by-step recipe to create a delightful butternut squash soup from scratch.
Savour the rich, comforting flavours of butternut squash soup, an ideal dish for the cooler months. This velvety soup is simple to prepare and presents a marvellous combination of sweet and savoury notes that will warm you from within. Not only is this butternut squash soup a delight to cook, but it also provides a soothing treat that is bound to become a beloved staple at the dining table. Whether shared with family or enjoyed in solitude, this soup serves as the perfect companion on any brisk day.
Begin by peeling and dicing the butternut squash into small cubes. Ensure all other vegetables are properly prepared as well.
Heat the olive oil in a large pot over medium heat. Add the chopped onion and garlic, and sauté for about 5 minutes until the onion becomes translucent.
Incorporate the diced carrot and butternut squash into the pot. Stir the mixture well, allowing the vegetables to coat with the oil and onion mixture.
Pour in the vegetable stock and add the ground nutmeg. Stir to combine all ingredients. Bring the mixture to a gentle boil, then reduce the heat to low. Cover the pot and let it simmer for about 30 minutes, or until the vegetables are tender.
Once the vegetables are cooked through, remove the pot from the heat. Use an immersion blender to puree the soup until smooth. Alternatively, you can carefully transfer the soup in batches to a countertop blender.
Season the soup with salt and pepper according to your taste. If desired, stir in a swirl of double cream or coconut milk for added richness.
Serve the soup hot, garnished with fresh parsley if you wish. Enjoy your warm, comforting butternut squash soup
Notes
TipsFor the best results, choose a firm, unblemished butternut squash. Quality ingredients make a significant difference, so it’s worth visiting Nicol Retailer online to ensure you’re getting the freshest produce available.Additionally, you may want to keep some spices and herbs on hand. Nutmeg and cinnamon can add a warm, sweet note, while fresh thyme or sage can introduce an aromatic complexity. If you enjoy a bit of heat, a pinch of cayenne pepper can also be a nice touch.
To boost the taste of your butternut squash soup, play around with various spices and herbs. Nutmeg and cinnamon can bring out the squash’s inherent sweetness, while fresh thyme or sage can introduce aromatic depth.
For an even creamier soup, consider adding a swirl of double cream or coconut milk. If you prefer a bit of crunch, garnish with roasted nuts or seeds just before serving.
Experimenting with different seasoning blends can also yield delightful results. A hint of curry powder can give the soup a twist, while smoked paprika can add a subtle smokiness. For those who enjoy a bit of spice, a pinch of cayenne pepper can provide a gentle kick.
Incorporating acidic elements like a squeeze of lemon juice or a splash of apple cider vinegar can also enhance the overall flavour profile. These additions can balance the soup’s sweetness and add a refreshing contrast.
Another way to enrich the taste is by using flavoured oils. A drizzle of truffle oil or chilli oil can add a gourmet touch to your butternut squash soup, making it feel extra special.
Fresh herbs such as parsley, coriander, or chives can be sprinkled on top for a burst of colour and an extra layer of flavour.
By experimenting with these tips, you can customise your butternut squash soup to suit your taste preferences, creating a dish that’s both unique and delicious.
Suggestions for Serving
Butternut squash soup pairs beautifully with a variety of accompaniments, making it a versatile choice for any meal. One delightful option is to serve it with a crusty loaf of bread, perfect for dipping and soaking up every last drop of the soup’s rich, velvety goodness. A fresh green salad can add a refreshing contrast, offering a crisp texture that balances the soup’s creamy consistency.
For a more filling meal, consider pairing the soup with a hearty sandwich. Options like a classic grilled cheese or a roasted vegetable panini can complement the soup’s flavours and provide a satisfying bite. Additionally, a side of roasted or steamed vegetables can further enhance the nutritional value and variety of your meal.
Garnishing your butternut squash soup can also elevate the dining experience. A sprinkle of freshly chopped herbs such as parsley, coriander, or chives can add a burst of colour and an extra layer of flavour. A drizzle of olive oil or a touch of cream can create an appealing visual effect, while a dash of paprika or a few roasted nuts or seeds can introduce an interesting textural contrast.
If you’re serving the soup for a special occasion or dinner party, consider adding a gourmet touch with flavoured oils like truffle or chilli oil. These small additions can make your butternut squash soup feel extra special and impress your guests.
By exploring different serving options and garnishes, you can transform a simple butternut squash soup into a memorable and satisfying meal.
Jollof Rice is a lively and flavourful dish that holds a special place in many West African countries. Renowned for its rich tomato base and aromatic spices, Jollof Rice transcends being merely a meal; it is a cultural experience. Whether served at a family gathering or a festive celebration, this dish consistently delights. Originating from the Wolof people of Senegal and The Gambia, Jollof Rice has since evolved into a culinary favourite across West Africa, with each nation adding its own distinct twist.
The dish is marked by its deep red hue, derived from a mixture of tomatoes and red bell peppers. The heat of Scotch bonnet peppers adds a punch, while the aromatic blend of thyme and curry powder imparts depth to the dish. Fresh onions and garlic enhance its fragrant appeal, making it enticing from the moment it begins to cook.
Jollof Rice is more than just food; it is a celebration of West African culinary heritage, bringing people together with its rich tastes and vibrant presentation. Here is a step-by-step guide to making authentic and delicious Jollof Rice
Jollof Rice is a vibrant and flavourful dish that is a staple in many West African countries. Known for its rich tomato base and aromatic spices, Jollof Rice is not just a meal; it's an experience. Whether you're enjoying it at a family gathering or a festive celebration, this dish never fails to impress.
Rinse the rice thoroughly in cold water to remove excess starch, then set aside.
Blend the tinned tomatoes, red bell peppers, and optional scotch bonnet pepper until smooth.
Cooking
In a large pot, heat the olive oil over medium heat. Add the chopped onion and garlic, and cook until softened. Add the tomato paste and fry for another 2 minutes.
Stir in the ground ginger, thyme, and curry powder, and cook for another minute.
Add the blended tomato and pepper mix to the pot. Cook on medium heat for about10-15 minutes until the sauce reduces and thickens.
Pour in the chicken stock and bring to a boil,
Add the rice to the pot, stir well, and season with salt and black pepper
Cover the pot, reduce the heat to low, and allow the rice to cook for 25-30 minutes, or until the rice is cooked and has absorbed the liquid. Stir occasionally to prevent sticking
Once cooked, fluff the rice with a fork.
Garnish with fresh parsley if desired and serve hot.
Notes
Tips
Common pitfalls to avoid include adding too much water, which can result in mushy rice, and cooking on too high a heat, which can cause the rice to burn before it is fully cooked. If the rice appears too dry during cooking, you can add a little more stock or water to achieve the desired consistency.To achieve an authentic smoky flavour, let the rice cook undisturbed for the final few minutes, allowing a slight crust to form at the bottom of the pot. This adds a distinctive touch to the dish that is highly prized in West African cuisine.
Cooking Methods
Different techniques can be employed to cook Jollof Rice, each yielding distinct results:
Stovetop Method: This classic method involves cooking the rice on a low flame. It requires attentive monitoring to ensure the rice absorbs the sauce fully and cooks evenly. This method is particularly favoured for achieving a slight crust at the bottom, enhancing the dish with an authentic smoky flavour.
Oven Method: Baking Jollof Rice in the oven provides a consistent heat source, which helps prevent the bottom from burning. To use this method, transfer the mixed rice and sauce into an oven-safe dish, cover with foil, and bake at 180°C (350°F) for about 30-40 minutes. This technique can produce a slightly different texture but is equally flavourful.
Pressure Cooker Method: For those short on time, a pressure cooker can expedite the process while preserving the dish’s robust flavours. Combine the blended mixture, stock, and rinsed rice in the pressure cooker, ensuring the liquid covers the rice adequately. Cook on high pressure for about 15 minutes, then let it naturally release the pressure. This method delivers tender rice in a fraction of the time.
No matter which method you choose, attention to detail is crucial. Ensure the rice absorbs the sauce entirely, as this is key to achieving the rich, savoury taste that defines Jollof Rice. The stovetop and pressure cooker methods are excellent for capturing the traditional essence of the dish, while the oven method offers a hands-off approach for those who prefer minimal supervision. Each method has its own unique advantages, allowing you to tailor the cooking process to your preferences and schedule.
Suggestions for Serving
Jollof Rice is versatile and pairs well with a variety of side dishes that enhance its rich flavours. Here are some popular accompaniments:
Fried Plantains: Sweet and caramelised, fried plantains offer a delightful contrast to the savoury rice.
Grilled Chicken or Beef: Marinated and grilled meats add a robust flavour, complementing the aromatic spices of the Jollof Rice.
Mixed Vegetable Salad: A fresh salad with a light dressing can provide a refreshing balance to the dish.
Fried Fish: Crispy on the outside and tender on the inside, fried fish pairs excellently with the rice’s rich tomato base.
For a vibrant presentation, serve Jollof Rice on a large platter and garnish with sliced onions or fresh herbs to add a touch of colour. These side dishes not only enhance the overall meal but also add variety, making your dining experience more enjoyable.
Variations and Enhancements
Jollof Rice is a dish that lends itself well to various adaptations, allowing you to explore different flavours and ingredients to suit your preferences. Here are some popular variations:
Seafood Jollof
Infuse your Jollof Rice with a coastal essence by incorporating seafood such as prawns, mussels, or calamari. These ingredients not only add a unique taste but also elevate the dish’s visual appeal. To prepare, simply add the seafood towards the end of the cooking process to avoid overcooking and maintain their tender texture.
Vegetable Jollof
For a healthier twist, you can enrich your Jollof Rice with an assortment of fresh vegetables. Common additions include peas, carrots, green beans, and bell peppers. These not only contribute to the nutritional value of the meal but also introduce vibrant colours and a variety of textures.
Coconut Jollof
Adding coconut milk can transform your Jollof Rice into a rich and creamy delight. The subtle sweetness and creamy texture of the coconut milk provide a pleasant contrast to the spices, creating a harmonious blend of flavours. Simply replace a portion of the stock with coconut milk and proceed with the recipe as usual.
For those who enjoy experimenting, here are a few more suggestions to personalise your Jollof Rice:
Smoked Turkey or Chicken: Introducing smoked meats such as turkey or chicken can add a deep, smoky flavour that complements the tomato base. Dice the meat into bite-sized pieces and mix it into the rice during the final stages of cooking to distribute the flavours evenly.
Mushrooms: Adding mushrooms can provide an umami boost to your Jollof Rice. Their earthy flavour and meaty texture make them a great addition, particularly for vegetarians or those looking to reduce their meat consumption. Sauté the mushrooms until they release their moisture before mixing them into the rice.
Spice Levels: Tailoring the spice level to your preference is an easy way to make the dish your own. You can increase the heat by adding more Scotch bonnet peppers or tone it down for a milder version. Adjust the quantity of spices like curry powder and thyme to suit your taste.
These variations not only keep your Jollof Rice exciting but also allow you to cater to different dietary needs and flavour profiles. Whether you stick to the classic recipe or venture into new territory, the versatility of Jollof Rice ensures that it remains a beloved dish in your culinary repertoire.
Cooking lamb shanks is truly a rewarding experience for any chef, as it results in tender, flavourful meat that is perfect for a comforting meal. The recipe below will guide you through the steps to create a mouth-watering dish that will impress your family and friends. Remember to take your time and follow the instructions closely to ensure that your lamb shanks turn out perfectly. From seasoning to slow cooking, this recipe will showcase the delicious flavours of the lamb shank in a way that will leave everyone at the table satisfied and impressed. Enjoy the process of cooking this delightful dish and savour every bite of the tender, flavourful meat.
Cooking lamb shanks is a delightful experience that rewards the chef with tender, flavourful meat, perfect for a comforting meal. A Lamb Shank Recipe offers a delectable opportunity to indulge in rich flavours and savoury aromas. Whether you're a seasoned cook or a beginner, this dish can be a triumph on your table.
Pre heat the oven to 160°C (140°C fan) or gas mark 3.
Season the lamb shanks with salt and pepper.
In a large ovenproof casserole dish, heat the olive oil over medium-high heat. Brown the lamb shanks on all sides, then remove and set aside.
In the same dish, add the onions, garlic, carrots, and celery. Cook for about 5minutes until the vegetables begin to soften.
Stir in the tinned tomatoes, beef stock, tomato purée, rosemary, and thyme. Bring to a simmer.
Return the lamb shanks to the dish, ensuring they are mostly covered with the sauce.
Cover the casserole dish with a lid and place it in the oven. Cook for 2 to 2.5 hours or until the lamb is tender and falling off the bone.
Once cooked, remove from the oven and check seasoning. Adjust with salt and pepper if necessary.
Serve the lamb shanks with mashed potatoes or crusty bread to soak up the delicious sauce. Enjoy your meal!
Notes
Choosing the Ideal Lamb Shank
Selecting the right lamb shank is essential for achieving the best results in your dish. Look for lamb shanks that display a vibrant pink colour, indicating freshness, and ensure there is a good layer of fat, which adds flavour during cooking. It’s important to choose shanks that are evenly sized to ensure they cook uniformly.Ensure the lamb shanks you pick are free from any strong odours, as this could indicate the meat is not fresh. Also, inspect the packaging for any signs of damage or leaks. High-quality shanks should have a firm texture and a pleasant, mild scent.By taking the time to choose the perfect lamb shank, you set the foundation for a delicious and satisfying meal. The quality of the meat plays a significant role in the final taste and texture of your dish, making this step a crucial part of the cooking process.
Suggestions for Serving
Pairing your lamb shank with the right side dishes enhances the overall dining experience. Creamy mashed potatoes make an excellent choice, as their smooth texture complements the tender lamb and absorbs the rich sauce. Alternatively, a buttery polenta offers a delightful contrast and adds a touch of rustic charm to your plate. If you’re looking for a lighter option, consider serving the lamb shank with a zesty salad, which provides a refreshing balance to the rich flavours. Steamed green beans or asparagus are also wonderful choices, bringing a touch of brightness and crunch to the meal.
When plating, place the lamb shank on a bed of your chosen side, allowing the sauce to pool around the edges. Drizzle the lamb with the aromatic sauce from the casserole dish, ensuring each bite is infused with flavour. A sprinkle of freshly chopped herbs, such as parsley or thyme, can add a vibrant splash of colour and an additional layer of taste.
For a touch of indulgence, a basket of warm, crusty bread can be an excellent accompaniment, perfect for mopping up the delicious sauce.
Storing and Warming Leftovers
Leftover lamb shank can be just as delicious the next day if stored and reheated properly. Start by allowing the lamb to cool to room temperature before transferring it to an airtight container. This step prevents condensation from forming inside the container, which can make the meat soggy. Store the container in the refrigerator, where it will keep for up to three days.
When it comes time to reheat, gentle methods work best to maintain the lamb’s tenderness and flavour. Place the lamb shank in a saucepan and add a splash of water or stock. This extra liquid helps keep the meat moist as it warms. Heat over a low flame, occasionally turning the meat to ensure even warming. Covering the saucepan with a lid can also help retain moisture.
For those who prefer using a microwave, place the lamb in a microwave-safe dish and cover it with a microwave-safe lid or cling film with a few holes poked in it. Reheat on a medium setting in short intervals, checking the meat frequently to avoid overcooking. Adding a little liquid to the dish before microwaving can also help maintain moisture.
If you have a larger amount of leftovers, consider repurposing them into a new dish. Shredded lamb shank can be added to stews, soups, or even used as a filling for sandwiches and wraps. This not only reduces waste but also offers a tasty twist on your original meal.
Proper storage and reheating techniques ensure that your lamb shank remains as delightful as when it was first cooked, allowing you to enjoy the rich flavours and tender texture once again.
Donburi is a beloved part of Japanese cuisine, blending simplicity with hearty fulfilment. This dish primarily features a bowl of rice topped with assorted ingredients, providing a base for culinary innovation. The charm of donburi is in its adaptability, making it suitable for a variety of tastes and preferences.
For those who enjoy eggs, a donburi topped with a perfectly runny egg yolk is the height of comfort. The creamy yolk blends effortlessly with the savoury toppings and rice, creating a seamless mix of flavours and textures. This combination not only pleases the palate but also offers a nourishing meal.
Whether you’re a seasoned cook or a beginner in the kitchen, making an authentic donburi at home is a gratifying experience. The method is straightforward yet allows for plenty of personalisation, making it a perfect dish for any event. Below is a Donburi Recipe to try.
Donburi with Tender Beef and Runny Egg Yolk Recipe
Bring the warmth of Japanese home cooking to your kitchen with our Home-Style Beef Donburi recipe. Featuring succulent beef slices simmered in a traditional sauce and a soft-cooked egg with a beautifully runny yolk, this dish is both satisfying and simple to make. Ideal for both busy weeknights and leisurely weekends, the rich flavours of the beef meld beautifully with the creamy egg and fluffy rice. Impress your family and friends with this timeless Japanese favourite that's both nourishing and delicious.
Cook the Rice – Rinse the rice under cold water until the water runs clear. Drain and place in a rice cooker with 2 cups of water. Cook according to the rice cooker's instructions.
Cook the Beef
In a bowl, mix the soy sauce, mirin, sake, and sugar. Stir until the sugar dissolves.
Prepare the Beef In a large pan, heat a bit of oil over medium heat. Add the onion and cook until soft and translucent.
Add the beef slices to the pan with the onions and pour over the sauce mixture. Cook for about 3-5 minutes, stirring occasionally, until the beef is just cooked through.
Cook the Egg
In a separate pan, gently fry the eggs sunny side up until the whites are set but the yolks remain runny.
Toasting the Sesame Seeds
Place the sesame seeds in a frying pan over medium heat, heat raw sesame seeds until golden brown and fragrant, stirring occasionally with a wooden spoon. Remove from heat and immediately transfer to a plate to cool completely
Assemble the Donburi
Divide the cooked rice among four bowls. Top each with the beef and onion mixture.
Place a fried egg on top of each bowl.
Sprinkle with chopped spring onions and the toasted sesame Seeds.
Serve with pickled ginger on the side ( optional).
Pairing Donburi with Other Meals
Donburi is a versatile dish that pairs well with a variety of side dishes and beverages. Consider serving it alongside a crisp, fresh salad to balance the richness of the beef and egg. A simple cucumber and wakame seaweed salad dressed in rice vinegar can provide a refreshing contrast. Alternatively, a bowl of miso soup offers a comforting and complementary element, enhancing the umami experience.
For those who enjoy a bit of crunch, tempura vegetables or prawns make an excellent accompaniment. The light, crispy texture of tempura adds an enjoyable contrast to the softness of the donburi ingredients. Another option is pickled vegetables, such as daikon or pickled ginger, which introduce a tangy note that cuts through the richness.
When it comes to beverages, green tea or sake make excellent choices. Green tea, with its light, astringent flavour, cleanses the palate and balances the savoury notes of the donburi. Sake, whether served warm or chilled, complements the dish’s depth and complexity. For a non-alcoholic alternative, consider a lightly flavoured sparkling water with a hint of citrus to refresh the taste buds.
These pairings not only enhance the donburi experience but also provide a well-rounded meal that is both satisfying and harmonious.
Suggestions for Plating and Serving
To create an appealing presentation, start by distributing the rice evenly in a deep bowl, providing a base for the other ingredients. Arrange the sliced beef attractively over the rice, ensuring even coverage. Place the perfectly cooked egg gently atop the beef, allowing the runny yolk to cascade over the dish when pierced.
For a visually striking and flavour-enhancing touch, sprinkle sliced spring onions over the top. Their bright green hue and fresh taste add a delightful contrast to the rich components of the donburi. A light scattering of sesame seeds introduces a hint of nuttiness and a subtle crunch, enhancing the texture.
A dash of shichimi togarashi, a Japanese spice mix, can add a mild kick, balancing the savoury flavours with a bit of heat and complexity. For a final flourish, consider placing a few pickled ginger slices on the side of the bowl. The ginger’s vibrant colour and tangy taste can refresh the palate and complement the dish’s overall profile.
When plating, think about the harmony of colours and textures, making the dish not only appetising but also visually appealing. A well-presented donburi can elevate the dining experience, making each bite as enjoyable to look at as it is to eat.
This French Toast Recipe with a savoury twist will undoubtedly bring a refreshing change to your breakfast table. Envision the harmonious blend of flavours as the tender French toast, made from thick slices of brioche or sourdough, pairs perfectly with the delicate taste of smoked salmon. The dish is further enhanced by a tangy lemon dill hollandaise sauce, adding a layer of sophistication and zest.
Ideal for those mornings when you want something extraordinary, this recipe brings together simple yet high-quality ingredients to create a meal that’s both comforting and elegant. The richness of the French toast provides a satisfying base, while the smoked salmon offers a savoury contrast that makes each bite intriguing and delightful. The lemon dill hollandaise sauce, with its fresh, citrusy notes and aromatic dill, brings everything together in a harmonious balance.
It’s not just the taste that makes this dish special; the presentation is equally captivating. Picture golden-brown French toast slices layered with vibrant pink smoked salmon and drizzled with the creamy, light-yellow hollandaise sauce. A garnish of fresh dill sprigs adds a touch of green, making the dish visually appealing and inviting.
Whether you are planning a quiet morning alone, a family breakfast, or entertaining friends for brunch, this French toast with smoked salmon and lemon dill hollandaise is a versatile choice. It’s sophisticated enough for special occasions yet simple enough to prepare any day you crave something a bit out of the ordinary. Enjoy the pleasure of crafting and savouring a breakfast that feels both indulgent and fresh.
Here is the recipe to create this delightful dish:
French Toast with Smoked Salmon and Lemon Dill Hollandaise
This dish blends the richness of French toast with the savoury taste of smoked salmon, all enhanced by a zesty hollandaise sauce. Perfect for a special breakfast or brunch!
Course Breakfast, brunch
Cuisine french
Keyword French toast recipe, hollandise recipe, smoked salmon recipe
In a large bowl, whisk together eggs, milk, vanilla extract, and salt
Heat a skillet over medium heat and add a small amount of butter
Dip each slice of bread into the egg mixture, ensuring both sides are well-coated. Cook until golden brown on both sides then remove from pan
Keep warm until ready to serve
Make the Lemon Dill Hollandaise
Gently heat the Hollandaise Sauce in a pan until it simmers then turn off
Add the butter and lemon juice dill to the Hollandaise Sauce and mix well
Assemblethe Dish
Place two slices of French toast on each plate and apply creme Fraiche
Top each serving with two slices of smoked salmon
Drizzle the lemon dill hollandaise sauce over the salmon and toast
Garnish with additional fresh dill
Serve immediately and enjoy this delicious blend of flavours
Notes
For a delightful breakfast experience, serve this dish with light accompaniments such as a crisp green salad or a selection of roasted vegetables. The freshness of the greens or the warmth of the roasted vegetables will complement the rich and savoury notes of the French toast with smoked salmon. To add an extra layer of flavour, consider including a simple vinaigrette dressing for the salad or a sprinkle of herbs over the roasted vegetables.For beverages, fresh orange juice or a citrus-infused water will add a refreshing touch to your breakfast spread.This dish also works beautifully for a leisurely weekend brunch or as a celebratory breakfast for special occasions such as birthdays or anniversaries. Its sophisticated presentation and intricate flavours make it suitable for impressing guests, whether you’re hosting a small gathering or a more formal brunch event.If you wish to offer more variety, consider serving the French toast with additional toppings such as capers, red onion slices, or a side of cream cheese. These can provide additional texture and taste, making each bite a unique experience. A platter with these extra toppings can also allow your guests to customise their portions according to their preferences.
Commonly Asked Questions
Many of our readers have questions about this recipe, so we’ve compiled some answers to help you perfect your French toast with smoked salmon and lemon dill hollandaise.
Can I prepare the French toast in advance?
Yes, you can prepare the French toast a day ahead. Store it in the fridge and reheat in a pan or oven just before serving to maintain its texture.
What are some variations for this recipe?
For a different take, you can replace smoked salmon with smoked trout or even omit the fish entirely for a vegetarian version. Adding a pinch of cayenne pepper to the hollandaise sauce can give the dish a spicy kick.
How should I store leftovers?
Store any leftovers in an airtight container in the fridge for up to two days. When reheating, do so gently to preserve the texture and flavour of both the toast and the hollandaise sauce.
Can I use a different type of bread?
Absolutely. While brioche and sourdough are recommended for their texture and flavour, you can experiment with other types of bread like challah or multigrain. Using slightly stale bread helps absorb the egg mixture better.
What side dishes complement this meal?
Light accompaniments like a crisp green salad or roasted vegetables pair wonderfully with this dish. Fresh fruit can also add a refreshing contrast.
Can this recipe be scaled up for a larger gathering?
Yes, this recipe can easily be scaled up to serve more people. Simply adjust the quantities of the ingredients accordingly and prepare the components in batches if needed.
There’s something wonderfully satisfying about creating a lasagne that replaces traditional pasta layers with slices of aubergine. This version is hearty, flavourful, and offers a delightful twist on a classic Italian dish. The combination of rich tomato sauce, creamy ricotta, and melty mozzarella makes for a delicious meal that’s perfect for vegetarians or anyone aiming to increase their vegetable intake. It’s a comforting dish that’s easy to prepare and sure to become a favourite at your table. Explore this recipe to bring a touch of Italy into your home with a healthy and wholesome approach.
To craft this delicious Aubergine Lasagne, you’ll need a selection of fresh and high-quality ingredients. Here’s what you’ll need:
Aubergine Lasagne is a delicious twist on the classic Italian dish, incorporating the rich flavours of aubergine, parmesan, tomato sauce, ricotta cheese, and melted mozzarella. Enjoy this flavourful and satisfying meal with a side salad or some crusty bread.
Preheat your oven to 200°C (180°C fan)/Gas Mark 6. Lay the aubergine slices on a baking tray, brush with olive oil, and season with salt and pepper. Roast in the oven for about 20 minutes until they are soft and slightly golden. Remove from the oven and set aside.
Make the Tomato Sauce: In a large pan, heat the remaining olive oil over medium heat. Add the onion and garlic and sauté until the onion is soft. Add the chopped tomatoes, tomato purée, oregano, and basil. Season with salt and pepper. Simmer for about 15 minutes until the sauce thickens slightly.
Prepare the Cheese Mixture: In a bowl, combine the ricotta cheese, half of the Parmesan cheese, and the egg. Mix until smooth and well combined. Season with a little salt and pepper.
Assemble the Lasagne: In a baking dish, spread a thin layer of the tomato sauce on the bottom. Place 3 lasagne sheets over the sauce. Layer with half of the aubergine slices, half of the ricotta mixture, a third of the mozzarella slices, and a third of the remaining tomato sauce. Repeat with another layer of lasagne sheets, the rest of the aubergine, remaining ricotta mixture, another third of mozzarella, and a third of tomato sauce. Top with the final layer of lasagne sheets, the rest of the tomato sauce, the remaining mozzarella, and sprinkle with the remaining Parmesan
Bake the Lasagne: Cover the dish with foil and bake in the preheated oven for 25 minutes. Remove the foil and bake for another 15 minutes, or until the top is bubbly and golden brown.
Allow the lasagne to rest for a few minutes before slicing. Serve warm with a side salad or garlic bread, if desired. Enjoy your homemade aubergine lasagne!
Notes
Serving Ideas
Aubergine Lasagne pairs beautifully with a range of sides. A crisp green salad with a light vinaigrette offers a refreshing contrast to the rich, hearty lasagne. Alternatively, a slice of rustic bread can be perfect for mopping up the savoury tomato sauce. For added freshness, sprinkle chopped fresh basil or parsley on top before serving. Another great side option is roasted vegetables, which can be seasoned with olive oil, garlic, and herbs to create a harmonious meal. These additions not only enhance the visual appeal of your dish but also provide delightful textural and flavour contrasts, making your meal both satisfying and memorable.
Making an Aubergine Lasagne with melty mozzarella can be a gratifying culinary journey, especially when it results in a dish that is both comforting and full of flavour. This recipe allows you to transform simple ingredients into a meal that showcases the richness of Italian cuisine while also promoting a healthier lifestyle by incorporating more vegetables. The careful layering of aubergines, ricotta, parmesan, and mozzarella, all enveloped in a luscious tomato sauce, creates a symphony of tastes and textures that is sure to delight.
This dish is versatile and can be adapted to suit your preferences or dietary requirements. For instance, you can experiment with different types of cheeses or add other vegetables such as spinach or courgettes for an extra layer of flavour and nutrition. For those who prefer a bit of heat, a sprinkle of red pepper flakes in the tomato sauce can add a subtle kick.
As with many traditional recipes, the key to a successful Aubergine Lasagne lies in the quality of your ingredients and the care taken during preparation. Fresh, firm aubergines, high-quality cheeses, and a well-seasoned tomato sauce are essential for achieving the best results.
Serving Aubergine Lasagne can be a joyful experience, whether you’re hosting a casual family dinner or a more formal gathering. Pairing it with complementary sides and beverages, as suggested earlier, can enhance the meal and create a memorable dining experience. The visual appeal of a well-baked lasagne, with its golden, bubbly top, is sure to impress your guests and entice their appetites.
This recipe not only offers a delicious meal but also provides an opportunity to enjoy the process of cooking. The methodical steps involved in preparing and assembling the lasagne allow you to savour each moment, from slicing the aubergines to layering the ingredients. The aroma of the baking lasagne filling your kitchen is a delightful preview of the flavours to come.
Incorporating ingredients from Nicol retailer Limited can add a unique touch to your lasagne, ensuring you have access to high-quality products that can elevate your dish. By experimenting with different variations and making use of fresh, high-quality ingredients, you can make this Aubergine Lasagne your own.
In summary, Aubergine Lasagne with melty mozzarella is a hearty, flavourful dish that brings the essence of Italian cooking into your home. With its rich layers and comforting taste, it’s bound to become a beloved recipe in your culinary repertoire. Enjoy the process and the delicious results of this wholesome and satisfying meal.
If you’re looking for a recipe to serve as a special breakfast on Christmas Day morning while unwrapping Christmas presents, then look no further: Scrambled Egg & Smoked Salmon Croissants for Christmas. It is quick to make and made with delicious croissants.
Scrambled Egg & Smoked Salmon Croissants for Christmas
Scrambled Egg & Smoked Salmon Croissants for ChristmasIndulge in these delightful croissants, filled with creamy scrambled eggs and rich smoked salmon, perfect for a festive breakfast or brunch. The buttery pastry complements the savoury filling, creating a delicious treat for the holiday season. Pair with a glass of freshly squeezed orange juice or a cup of hot tea for a truly comforting experience. Celebrate the joy of Christmas with this delectable dish that is sure to impress your family and friends.
Course Breakfast
Cuisine English, french
Keyword Butter Croissant, St Pierre Butter Croissant
Warm the St Pierre All Butter Croissants following the instructions on the packaging.
Meanwhile, prepare the scrambled eggs by whisking the eggs with milk and seasoning with pepper.
Gently heat the eggs in a non-stick pan over a low heat with plenty of butter, stirring occasionally until softly cooked but not overdone. Stir in the chopped fresh chives at the end.
Slice the warm All Butter Croissants in half and spread cream cheese on the bottom half.
Add the fluffy scrambled eggs and a layer of smoked salmon, finishing with a few more chives before placing the top half of the croissant on.
As the holiday season approaches, it’s the perfect time to explore new and delightful recipes that cater to everyone’s tastes and dietary preferences. One such dish that deserves a place at your festive table is the Baked Mixed Nut Roast. This delicious and hearty recipe is packed with a variety of nuts, tangy cranberries, and earthy Paris Brown Chestnut Mushrooms, making it an excellent choice for vegetarians and a tempting option for anyone seeking a nutritious and satisfying meal.
This delightful nut roast is perfect for any occasion, combining the earthy flavours of chestnut mushrooms with the sweetness of cranberries. Follow this recipe for a dish that’s sure to please.
The Baked Mixed Nut Roast is a delightful dish perfect for a hearty meal. It combines the rich flavours of various nuts, tart cranberries, and the earthy tones of Paris Brown Chestnut Mushrooms. This nut roast is a fantastic choice for those seeking a satisfying vegetarian option.It is perfect for serving with your favourite sides, such as roasted vegetables or a fresh salad. This dish is not only a celebration of ingredients but also a great centrepiece for any dinner gathering, offering both flavour and a sense of comfort.
Course Main Course
Cuisine English
Keyword Nut roast, Nut roast for christmas, nut roast recipes
Preheat your oven to 180°C (160°C fan)/350°F/gas mark 4. Line a loaf tin with baking paper.
Roughly chop the nuts or pulse them in a food processor until they are coarsely ground. Set aside.
Heat the olive oil in a frying pan over medium heat. Add the onion and garlic, and sauté until softened. Add the mushrooms, carrot, and celery. Cook until the vegetables are soft and any liquid from the mushrooms has evaporated
In a large bowl, combine the cooked vegetables, ground nuts, lentils, breadcrumbs, and cranberries. Add the soy sauce, tomato purée, mixed herbs, and season with salt and pepper. Mix everything thoroughly until well combined
Spoon the mixture into the prepared loaf tin, pressing down to ensure it's tightly packed.
Place the loaf tin in the preheated oven and bake for 40-45 minutes, or until the nut roast is firm and golden on top.
Allow the nut roast to cool in the tin for a few minutes before carefully turning it out onto a serving plate. Slice and serve warm, perhaps with your favourite vegetables or a gravy.
Notes
To make your Baked Mixed Nut Roast visually appealing, arrange it thoughtfully on a serving platter. Garnish with fresh herbs or a handful of whole cranberries for a festive flair. Pair the nut roast with vibrant side dishes such as roasted vegetables, creamy mashed potatoes, or a fresh green salad for a balanced meal. Consider enhancing the dish with a rich mushroom gravy or a tangy cranberry sauce, both of which add depth of flavour and a touch of indulgence. For a bit of variety, you could also offer a light balsamic glaze or a zesty herb vinaigrette. These accompaniments not only elevate the taste but also provide contrasting textures that complement the nut roast beautifully. With these thoughtful pairings, your holiday meal will be both memorable and delicious.
Banana shallots are a unique type of allium with a sweet flavour, perfect for those who want to avoid the sharpness of regular onions. They are incredibly versatile, suitable for everything from salads to stews, and they are easy to prepare. Their mild taste enhances dishes without overpowering them, making them a staple for chefs and home cooks. Banana shallots pair well with herbs like thyme and rosemary and can be enhanced with wine or vinegar. When buying, choose firm, unblemished ones. Store in a cool, dry place for freshness. They are a delicious addition to any kitchen.
Getting Banana Shallots Ready
When it comes to preparing banana shallots, a few simple steps can ensure you get the best out of this delightful ingredient. Start by trimming both ends of the shallot with a sharp knife. This will make it easier to remove the outer skin. Next, make a shallow incision along the length of the shallot’s skin. This cut should be just deep enough to penetrate the outer layer, without slicing into the flesh underneath. Once the incision is made, gently peel away the skin, revealing the smooth, glossy shallot inside.
After peeling, the banana shallot is ready for slicing, dicing, or chopping, depending on your recipe’s requirements. For precise cuts, always use a sharp knife. If you need finely chopped shallots, hold the shallot firmly and slice it lengthwise into thin strips, then cross-cut the strips to achieve a fine dice. For slices or rings, simply cut the shallot crosswise at your desired thickness.
Banana shallots can be prepared in advance and stored in the fridge for a short period. However, it’s best to use them soon after cutting to retain their flavour and texture. If you need to prepare a large batch, you can store the chopped shallots in an airtight container in the refrigerator for up to a few days. For longer storage, you might consider freezing them. Spread the chopped shallots on a baking sheet in a single layer and freeze until solid, then transfer them to a freezer-safe container or bag. This method prevents them from clumping together, making it easy to use only the amount you need later on.
For those who enjoy making stocks or broths, the trimmings from banana shallots can be an excellent addition. Instead of discarding the ends and skins, collect them in a bag and store them in the freezer until you have enough to add to your stock pot. This not only reduces waste but also enhances the depth of flavour in your homemade stocks.
Another handy tip is to use a mandoline for uniform slices, especially when you need thin, even rings for garnishes or salads. This tool can save time and ensure that your slices are consistently even, which can be particularly useful for recipes requiring uniform cooking times.
If you find the flavour of raw banana shallots too strong for your liking, you can mellow it by soaking the chopped shallots in cold water for about ten minutes before using them. This technique helps to reduce their pungency while retaining their crunchy texture, making them more palatable for salads and other raw dishes.
Whether you are finely dicing them for a vinaigrette or slicing them into rings for a tart, preparing banana shallots properly can make a significant difference in your cooking. By following these straightforward steps, you can ensure that this versatile ingredient is always ready to enhance your favourite recipes.
Culinary Uses for Banana Shallots
Banana shallots seamlessly integrate into various culinary applications, offering a gentle, sweet note that enhances both simple and elaborate recipes. When used raw, they bring a subtle onion-like flavour to salads, making them a great addition to vinaigrettes or salsas. Their mildness ensures they do not overpower the dish but rather complement the other ingredients.
In cooked dishes, banana shallots truly shine. Their natural sweetness becomes more pronounced when caramelised, making them an excellent base for sauces and stews. They pair well with ingredients like garlic, thyme, and rosemary, forming a harmonious foundation for savoury recipes. Adding a splash of wine or a touch of balsamic vinegar can further enhance their depth, creating a rich, nuanced flavour profile.
Banana shallots are perfect for slow-cooked dishes such as casseroles and braises, where their sweetness and delicate texture meld beautifully with other components. They can also be used to prepare classic dishes like French onion soup, where their sweetness provides a delightful twist.
For a delicious side dish, sauté banana shallots with mushrooms and herbs. The combination of earthy mushrooms and sweet shallots creates a mouth-watering accompaniment to meats and poultry. Alternatively, roast them with a drizzle of olive oil and a sprinkle of sea salt to bring out their natural sugars and create a deliciously sweet and tender side.
Banana shallots can be pickled as well, adding a tangy, sweet crunch to sandwiches and salads. The pickling process softens their bite while retaining their characteristic flavour, making them a versatile condiment.
They are also a fantastic addition to marinades. Their mild flavour helps tenderise meats while adding a subtle sweetness. When making a marinade, combine finely chopped banana shallots with ingredients like olive oil, lemon juice, garlic, and herbs for a flavourful infusion that elevates the dish.
In baking, banana shallots can be used to enhance savoury tarts and quiches. Their sweet flavour complements creamy cheeses and fresh vegetables, resulting in a well-balanced dish that is both satisfying and flavourful.
Incorporating banana shallots into stir-fries adds a layer of sweetness that balances the savoury and spicy elements typical of these dishes. They cook quickly, making them ideal for the fast-paced nature of stir-frying.
For those who enjoy experimenting in the kitchen, try using banana shallots in a reduction sauce. Combine them with red wine and a touch of honey to create a luxurious sauce that pairs beautifully with steaks or roasted vegetables.
By exploring the versatility of banana shallots, you can discover numerous ways to enhance your meals with their unique flavour. Whether used raw or cooked, they offer a sweet, nuanced taste that enriches a wide range of dishes.
Recipes that Highlight Banana Shallots
anana shallots bring a unique sweetness and depth to a variety of recipes, making them a cherished ingredient in many kitchens. For a start, try incorporating them into a classic French onion soup. Their natural sweetness adds an extra layer of flavour, making the soup even more comforting and rich. Simply caramelise the banana shallots until they are golden and tender, then add them to your broth along with a splash of white wine for a delightful twist on this traditional dish.
Another fantastic way to showcase banana shallots is in a tart or quiche. Pair them with ingredients like creamy goat cheese, fresh spinach, or roasted red peppers. Their mild sweetness perfectly complements the richness of the cheese and the freshness of the vegetables, creating a balanced and flavourful meal. Simply sauté the shallots until soft, then mix them with your other ingredients and bake in a pastry shell until golden and set.
For a simple yet elegant side dish, try roasting banana shallots with a drizzle of olive oil, sea salt, and a sprinkle of fresh herbs such as thyme or rosemary. The roasting process enhances their natural sugars, resulting in a sweet and tender dish that pairs beautifully with roasted meats or grilled vegetables.
Banana shallots also shine in a red wine reduction sauce, perfect for drizzling over steak or roasted vegetables. To make this sauce, sauté finely chopped banana shallots in a bit of butter until they are soft and translucent. Add red wine, a touch of honey, and a sprig of fresh thyme, then simmer until the sauce has reduced and thickened. This rich, flavourful sauce adds a gourmet touch to any meal.
Incorporating banana shallots into marinades is another excellent way to enjoy their unique flavour. Combine finely chopped banana shallots with olive oil, lemon juice, garlic, and your favourite herbs to create a delicious marinade that tenderises meats and infuses them with a subtle sweetness. This is particularly effective for chicken, pork, or lamb.
Stir-fries are another great application for banana shallots. Their quick cooking time and mild flavour make them ideal for these fast-paced dishes. Simply slice the shallots thinly and add them to your stir-fry along with your favourite vegetables, proteins, and sauces. The banana shallots will add a sweet note that balances the savoury and spicy elements typically found in stir-fries.
Lastly, try pickling banana shallots to add a tangy crunch to sandwiches and salads. Simply slice the shallots thinly and soak them in a mixture of vinegar, sugar, and spices. After a few hours, they will be ready to use as a zesty condiment that enhances the flavours of your dishes.
You can purchase banana shallots from Nicol Retailer Limited by visiting
In the realm of culinary excellence, few products are as integral as Urzante Olive Oil. With a rich legacy embedded in Spanish cuisine, Urzante has been synonymous with quality and flavour for over fifty years. Thanks to modern shopping conveniences, you can now enjoy this exceptional product by purchasing it online.
Getting to Know Urzante Olive Oil
The roots of Urzante date back to the 1950s when the Marín family started their olive oil enterprise. Rich in olive oil heritage, the villages near the Ebro and Queiles rivers in Spain set an ideal scene.
This Spanish Olive Oil is perfect for those wanting a premium oil with a pleasant flavour, rich aromas, and free from excessive bitterness. You can find Urzante Olive Oil online at Nicol Retailer Limited, offering a versatile addition to your culinary creations, enhancing both raw and cooked dishes with its rich flavour and aroma.
Culinary Flexibility
One of the standout features of Urzante Olive Oil is its culinary versatility. From baking and frying to dressing salads and marinating meats, this olive oil proves to be an indispensable kitchen companion.
Urzante Olive Oil is perfect for sautéing vegetables, grilling seafood, or even baking savoury pastries. Its balanced flavour complements a wide array of ingredients, making it a versatile choice for both everyday cooking and special occasions. The oil’s consistency ensures that it blends well with spices and herbs, allowing you to create complex, layered flavours with ease.
Whether you are drizzling it over a fresh Caprese salad, using it as a base for marinades, or employing it for frying, Urzante’s quality remains evident. The high smoke point of the Olive Pomace Oil variant is particularly useful for high-heat cooking methods, while the Extra Virgin Olive Oil is ideal for cold dishes and dressings. This flexibility allows you to choose the right type of oil for each culinary task, ensuring optimal results every time.
Urzante Olive Oil embodies a commitment to tradition and quality, making it a superior choice for any kitchen. Its versatility is unmatched, whether you’re preparing a simple salad or a complex gourmet dish.By integrating Urzante Olive Oil into your daily cooking, you not only elevate the taste of your dishes but also contribute to a balanced and nutritious diet. Its versatility and quality make it a must-have in any kitchen, enabling you to experiment with a variety of cooking techniques and recipes.
Where to Buy Urzante Olive Oil
Nicol Retailer Limited now stocks the popular and premier Urzante Olive Oil, available for online delivery. Invest in Urzante Olive Oil and bring a touch of Mediterranean excellence to your table with every meal. Shop now.
Discover the world of delicious ramen noodles with a variety of mouth-watering recipes that are sure to satisfy your cravings. Ramen, a beloved dish originating from Japan, has taken the culinary world by storm with its perfect combination of rich broth, tender noodles, and a medley of toppings. Whether you’re a novice or a seasoned cook, creating a delightful bowl of ramen at home is a rewarding experience.
One of the charms of ramen noodles is their ability to be both a quick meal and a gourmet delight. A simple packet can be transformed into a nourishing meal by adding a few fresh ingredients. Try topping your noodles with spring onions, mushrooms, or tofu for a touch of sophistication.
Ramen noodles also pair well with vegetarian ingredients. Use a vegetable broth base and pile on an array of veggies like bell peppers, broccoli, and corn. For added protein, include tofu cubes or edamame. This version is perfect for those seeking a meat-free yet satisfying meal.
For those who love a challenge, making homemade ramen noodles can be a rewarding experience. Crafting your own broth and noodles allows you to personalise every aspect of the dish, making each bite a testament to your culinary skills.
Ramen noodles are also perfect for gatherings with friends and family. Create a ramen bar with a variety of toppings, and let everyone build their own customised bowl. It’s a fun way to enjoy good food and great company.
So, why not embrace the delicious world of ramen noodles? With endless possibilities and combinations, you’re sure to find recipes that delight your taste buds and bring warmth to your kitchen.
Here’s a simple recipe to get you started.
This recipe is just the beginning. Feel free to experiment with different broths, proteins, and vegetables to tailor the dish to your taste. Whether you prefer spicy, miso, or vegetarian options, ramen offers endless possibilities for creativity in the kitchen. Enjoy the comforting warmth and rich flavours of this iconic dish with every slurp!
If you have a passion for ramen noodles, you're in for a treat. This delightful dish has captured hearts and taste buds around the globe, and for good reason. Whether you're a seasoned home cook or just starting out, there's always something exciting to discover in the world of ramen. Here are some ideas to inspire your culinary journey and elevate your ramen game.
Nori sheets or sesame seeds or chilli flakes (optional toppings)
Instructions
In a large pot, heat the sesame oil over medium heat. Add the minced garlic and grated ginger, sautéing for 1-2 minutes until fragrant
Pour in the chicken or vegetable stock, bringing it to a gentle boil. Stir in the soy sauce and miso paste until fully dissolved
Add the ramen noodles to the pot and cook according to the package instructions ,usually around 3-4 minutes
Introduce the cooked chicken or tofu, mushrooms, and spinach or pak choi to the pot. Allow them to heat through for another 2-3 minutes.
Taste the broth and adjust seasoning with salt and pepper as needed.
Divide the noodles and broth between two bowls. Top each bowl with a soft-boiled egg, halved. Garnish with spring onions and any additional toppings you prefer such as nori sheets, sesame seeds, or chilli flakes.
Fresh Purple Heritage Carrots are a splendid and wholesome addition to any kitchen, offering a delightful variation from the usual orange variety. These vibrant vegetables have an illustrious history, dating back to ancient times when they were more commonly found than the now prevalent orange carrot. The striking purple hue of these carrots is not just eye-catching but also a testament to their rich heritage and the variety of nutrients they offer.
The distinctive colour of purple carrots is due to the presence of anthocyanins, powerful antioxidants that contribute significantly to their health benefits. Anthocyanins are not only responsible for the captivating purple shade but also offer a range of health advantages, including improving cardiovascular health and enhancing cognitive functions. This sets them apart from their orange counterparts, making them a preferred choice for those keen on boosting their diet with nutrient-dense foods.
Incorporating purple carrots into your meals is an easy way to add a burst of colour and nutrition. These carrots are versatile and can be used in a myriad of dishes. Whether added raw to salads, roasted alongside other vegetables, or used in more inventive recipes, their vibrant colour and unique flavour make them a standout ingredient. For those keen on experimenting in the kitchen, purple carrots can bring a new dimension to both traditional and contemporary dishes, ensuring a visually appealing and nutritionally enhanced meal.
Purple carrots have also found a place in various global cuisines, appreciated not just for their nutritional profile but also for their ability to enhance the aesthetic appeal of a dish. In many cultures, the visual presentation of food is nearly as important as taste, and the inclusion of purple carrots can transform an ordinary dish into a feast for the eyes. Whether you are preparing a simple family meal or an elaborate dinner party spread, these carrots can add that extra touch of elegance and nutrition.
Embracing Fresh Purple Heritage Carrots in your diet is a wonderful way to combine tradition with modern nutritional science. Their appealing colour, combined with their health benefits, makes them an excellent choice for anyone looking to diversify their vegetable intake while enjoying the pleasures of cooking and eating.
Culinary Applications
In the culinary world, purple carrots shine for their versatility and ability to enhance a wide range of dishes with their vibrant colour and unique taste. These carrots can be roasted, steamed, or enjoyed raw, adding both visual appeal and flavour to meals. One of the simplest ways to enjoy them is by incorporating them into salads. Shredded or thinly sliced, they offer a delightful crunch and a burst of colour that can make even the most basic salad visually appealing.
Roasting purple carrots is another excellent method to highlight their natural sweetness. Tossing them with a bit of olive oil, salt, and pepper before placing them in the oven can create a delicious side dish that pairs well with a variety of main courses. For an added layer of flavour, consider adding herbs like rosemary or thyme, which complement the earthy notes of the carrots.
Purple carrots also lend themselves well to soups and stews. Their colour can make a traditional carrot soup more intriguing, and their taste blends seamlessly with other vegetables. Try a creamy carrot and ginger soup, where the spice of the ginger enhances the sweetness of the carrots, resulting in a comforting and nutritious dish.
For those who enjoy baking, purple carrots can be used to give a modern twist to classic recipes. Carrot cake made with purple carrots not only tastes wonderful but also has an eye-catching purple hue that can surprise and delight guests. Similarly, adding grated purple carrots to muffin or bread recipes can infuse them with both moisture and a splash of colour.
Incorporating purple carrots into pickling recipes is another way to enjoy their flavour and colour. Pickled purple carrots can be a vibrant addition to charcuterie boards, sandwiches, and salads, offering a tangy crunch that contrasts beautifully with other ingredients.
Stir-fries are another great way to include purple carrots in your diet. They cook quickly and pair well with a variety of proteins and other vegetables. Simply slice them into matchsticks and toss them into a hot pan with some oil, garlic, and your choice of seasonings for a quick and healthy meal.
Where to buy
Purple heritage carrots are now available at Nicol Retailer, known for delivering fresh produce and groceries straight to your home. They take pride in sourcing the best and freshest ingredients, ensuring every carrot keeps its natural sweetness and vibrant colour. Whether you’re preparing a hearty stew or a colourful salad, these carrots will enhance your culinary creations. Shop Now:
In summary, Fresh Purple Heritage Carrots are a remarkable addition to any diet, offering both nutritional benefits and aesthetic appeal. Their rich history and distinctive colour set them apart from the more common orange variety, making them a unique choice for those keen on diversifying their vegetable intake.
Transform your meals with our Hasselback Butternut Squash Recipe. A twist on the traditional roasted butternut squash, this recipe brings both flair and flavour to your dinner table. With carefully scored slices, each piece absorbs more seasoning, delivering a delightful taste in every bite. This versatile dish can be enjoyed as a side for any main course or stand alone as a vegetarian delight. Made from the freshest squash and spiced with herbs and a touch of garlic, it’s sure to impress family and friends. Perfect for autumn gatherings or holiday feasts, add this show-stopping recipe to your kitchen repertoire.
Discover a new way to enjoy butternut squash with our Hasselback Butternut Squash Recipe. Perfect for vegetarians and vegans, this delightful dish is both tasty and nutritious. With just a few ingredients, including olive oil, garlic, and your favourite herbs, you'll create a visually appealing side dish that's full of flavour. The recipe's unique cutting technique ensures each piece absorbs all the seasoning, making every bite delicious. Easy to follow and quick to prepare, this recipe will soon become a staple in your kitchen.
Preheat your oven to 200°C (400°F). Peel the butternut squash, cut it in half lengthwise, and scoop out the seeds. Place the halves flat side down on a cutting board.
Using a sharp knife, make thin slices across each squash half, cutting about three-quarters of the way through. Be careful not to slice all the way to the bottom.
In a small bowl, mix together the olive oil, honey or maple syrup, minced garlic, salt, and pepper.
Place the squash halves on a baking tray. Brush them generously with the olive oil mixture, ensuring it seeps into the slices. Cover with foil and bake in the oven for 30 minutes.
Remove the foil and bake for an additional 15-20 minutes, or until the squash is tender and slightly caramelised on the edges.
Once cooked, transfer the squash to a serving platter. Sprinkle with fresh thyme and the optional pecan & pomegranate seeds.
Follow our simple steps to create a delicious traditional gooseberry dessert. Whether you are a seasoned cook or a beginner, our recipe is easy to follow below and ensures great results every time.
Experience the timeless taste of gooseberries combined with the perfect balance of sweetness and tartness. This recipe uses natural ingredients to bring out the authentic flavour that everyone loves. This traditional gooseberry dessert is versatile and suitable for any event, from family dinners to festive gatherings. Impress your guests with a delightful treat that is sure to become a favourite.
Gooseberry crumble is a classic British dessert featuring tangy gooseberries topped with a buttery, crumbly mixture. Serve warm with custard or cream for a comforting treat.
Preheat Oven – Set your oven to 180°C (160°C fan) or gas mark 4.
Drain the gooseberries from the tin and spread them evenly in a medium-sized ovenproof dish. Add the vanilla extract and gently stir to combine.
In a large bowl, mix the flour and oats. Add the chilled diced butter and rub it into the dry ingredients using your fingertips until the mixture resembles coarse breadcrumbs. Stir in the caster sugar and cinnamon if using.
Evenly distribute the crumble mixture over the gooseberries, ensuring all the fruit is covered.
Place the dish in the preheated oven and bake for about 25-30 minutes, or until the top is golden and the fruit is bubbling around the edges.
Remove from the oven and allow to cool slightly. Serve warm with vanilla custard or cream.
Notes
Enjoy this delightful and easy-to-make gooseberry crumble, perfect for a cosy dessert.
In the world of culinary delights, garnishes often add the final touch that transforms a good dish into a great one. Whether you’re topping off a soup or adding a crunch to your salad, these crispy fried onions offer an excellent solution for those looking to maintain a balanced diet.
These onions have been meticulously crafted to meet the needs of those who are mindful of their diet. Made with high-quality ingredients, they cater to a range of dietary preferences and restrictions, ensuring that everyone can enjoy a bit of extra crunch in their meals. With their gluten-free composition, they are suitable for those with gluten intolerance or anyone looking to reduce gluten in their diet.
A Healthier Crunch with Half the Calories
Traditional fried onions are undeniably tasty, yet they often come with an unwelcome serving of calories and fats. Cheeky Gluten Free Crispy Fried Onions, however, offer a lighter alternative. They boast half the calories of their traditional counterparts while retaining the satisfying crunch we all love. The key to their appeal lies in their ability to maintain flavour without compromising on nutritional benefits. Made with quality ingredients, they cater to those who are mindful of their health and calorie intake. Choosing Cheeky Gluten Free means opting for a garnish that’s kinder to your waistline while still being deliciously crispy.
Versatile Uses in Everyday Cooking
Cheeky Gluten Free Crispy Fried Onions bring a remarkable versatility to your everyday cooking. Their delightful crunch and savoury taste make them a perfect addition to a multitude of dishes. Imagine the burst of texture they add when sprinkled over a fresh green salad or the satisfying bite they bring to a gourmet burger. These onions can also be stirred into creamy mashed potatoes for an unexpected twist, or layered onto a hearty casserole for added depth and flavour.
Beyond the usual suspects, consider using them to top a bowl of pasta or mix them into your morning omelette. They can even be used as a topping for homemade pizzas, adding a crispy element that pairs wonderfully with melted cheese and tangy tomato sauce. For those who enjoy experimenting in the kitchen, try incorporating them into bread dough or muffin batter for a crunchy surprise.
Their gluten-free nature ensures that they are suitable for a variety of dietary preferences, allowing everyone to enjoy their benefits. Whether you’re preparing a weeknight dinner or crafting a special meal for guests, Cheeky Gluten Free Crispy Fried Onions can enhance your culinary creations effortlessly. They are particularly useful for adding a quick, flavourful touch to dishes when you’re pressed for time but still want to impress.
With Cheeky Gluten Free Crispy Fried Onions, the possibilities are nearly endless. Their ability to complement both simple and complex recipes makes them a staple for anyone who loves to cook and explore new culinary horizons.
A Simple Pantry Essential
Imagine reaching for a versatile ingredient that effortlessly adds a burst of crunch and flavour to your meals. Cheeky Gluten Free Crispy Fried Onions are that very ingredient, a staple that deserves a spot in every kitchen. These onions come pre-cooked and ready to use, saving you time and effort in meal preparation. Whether you’re whipping up a quick weeknight dinner or preparing an elaborate feast, their convenience cannot be overstated.
Their long shelf life and easy storage make them an excellent choice for busy households. Simply store them in a cool, dry place and ensure the package is sealed after each use to maintain their crispiness and flavour. This straightforward storage solution means they are always ready when you need them, eliminating the hassle of last-minute grocery runs or elaborate prep work.
What sets Cheeky Gluten Free Crispy Fried Onions apart is their ability to seamlessly blend into a variety of dishes. Their versatility means they can be used as a topping, a mix-in, or even as a secret ingredient in baking. This flexibility allows you to experiment and get creative in the kitchen, enhancing both everyday meals and special dishes alike.
Perfect for those moments when you’re pressed for time but still want to add a touch of sophistication to your cooking, these onions are a game-changer. Their gluten-free nature also ensures that everyone at the table can enjoy their delicious crunch without dietary concerns. So, whether you’re a culinary novice or a seasoned chef, having Cheeky Gluten Free Crispy Fried Onions on hand will undoubtedly make meal preparation easier and more enjoyable.
Enhance Your Culinary Creations
Cheeky Gluten Free Crispy Fried Onions are a fantastic way to add both taste and texture to a wide array of dishes. Their versatility makes them an essential ingredient, capable of enhancing everything from simple salads to elaborate casseroles. Available at Nicol Retailer, they are convenient to purchase and store, making meal preparation straightforward. Embrace the chance to include Cheeky Gluten Free Crispy Fried Onions in your pantry and discover how they can elevate your everyday cooking to new heights. SHOP NOW:
Elegant, refreshing, and beautifully balanced, this lemon and lavender soft ice dessert is a refined example of modern fine-dining. Moreover, it is also made achievable at home. Created using Arla Slower Melt Soft Ice Mix, the soft ice delivers a luxuriously smooth texture. This texture holds its shape longer. Therefore, it is ideal for plated desserts.
Culinary lavender has long been used in desserts for its delicate floral aroma, and should always be used sparingly. This is advised by BBC Good Food.
Follow the step-by-step instructions below to recreate this restaurant-style dessert for dinner parties or special occasions. You can also impress with minimal fuss.
Lemon & Lavender Soft Ice with Blueberry-Basil Compote and Almond Tuile
This elegant fine-dining soft ice dessert combines silky lemon-lavender soft ice with a vibrant blueberry-basil compote and crisp almond tuiles for a refined, restaurant-style finish. Made using Arla Slower Melt Soft Ice Mix, the dessert offers exceptional smoothness and stability, perfect for plated presentation. Balanced with citrus, floral notes, and fresh herbs, it’s an impressive yet achievable dessert ideal for dinner parties and special occasions. Premium ingredients supplied by Nicol Retailer ensure professional results at home.
Course Dessert, Fine Dining Dessert
Cuisine Contemporary British, french, Modern European
Prepare the Arla Slower Melt Soft Ice Mix according to the manufacturer’s instructions.
Strain and stir back into the remaining mix.
Strain and stir back into the remaining mix.
Add honey if using.
Chill thoroughly, then churn in an ice-cream or soft-ice machine until smooth, light, and soft-serve in texture.
Transfer to a piping bag and keep frozen until plating.
Make the Blueberry–Basil Compote
Place blueberries, sugar, and lemon juice in a saucepan.
Simmer gently for 6–8 minutes until the fruit softens and releases juices.
Remove from heat, stir in basil, and allow to cool completely.
Bake the Almond Tuiles
Preheat oven to 180°C (160°C fan).
Mix flour, sugar, ground almonds, salt, and melted butter to form a smooth batter.
Spoon small rounds onto a lined baking tray and spread thin.
Sprinkle with flaked almonds
Bake for 8–10 minutes until golden.
Shape while warm over a rolling pin if desired. Cool until crisp.
Plate the Dessert (Fine-Dining Style)
Spoon a small pool of blueberry–basil compote onto each chilled plate.
Pipe or quenelle the lemon-lavender soft ice alongside.
Add an almond tuile for height and crunch.
Garnish with lemon zest, basil, or edible flowers.
Notes
For best results, prepare the Arla Slower Melt Soft Ice Mix according to the instructions and chill thoroughly before churning to achieve a smooth, stable soft-serve texture. Gently infusing the lemon zest and culinary lavender enhances the flavour while keeping the dessert balanced and refined.For a gluten-free version, simply replace the plain flour in the almond tuiles with a gluten-free flour blend or rice flour, ensuring all other ingredients are certified gluten-free. Chilling serving plates before plating will help the soft ice maintain its shape longer, making this dessert ideal for fine-dining presentation at home or in professional kitchens.
This dessert is made using Arla Slower Melt Soft Ice Mix, available from Nicol Retailer, a trusted supplier of professional-quality ingredients for home cooks and caterers — a high-quality base that delivers exceptional texture and flavour, perfect for elevated desserts like this: https://nicolretailer.com/product/arla-slower-melt-soft-ice-mix-2ltr/
Serving Suggestions
Serve this lemon and lavender soft ice dessert immediately on chilled plates to preserve its smooth, creamy texture and refined presentation. It pairs beautifully with light, citrus-led accompaniments such as fresh berries, shortbread crumbs, or a drizzle of honey for added sweetness. For a fine-dining finish, add crisp almond tuiles or edible flowers to create height and contrast on the plate. This dessert works perfectly as a restaurant-style finale, a sophisticated dinner-party dessert, or an elegant option for special occasions.
Sometimes the most memorable dishes are built on simple ingredients, treated with care. This saffron-roasted carrot recipe is a perfect example. Humble carrots are transformed into an elegant, flavour-packed dish using delicate saffron, citrus, honey and crunchy roasted nuts.
Ideal as a starter, side dish or vegetarian main, this recipe brings warmth, colour and Mediterranean flair to any table. Whether you’re hosting guests or cooking a comforting meal at home, it impresses.
Why Saffron Works Beautifully with Carrots
Saffron has long been prized in Mediterranean and Middle Eastern cooking for its floral aroma, golden colour and subtle depth of flavour. When paired with naturally sweet carrots, saffron enhances their earthiness without overpowering them.
As the carrots roast, the saffron infuses the dish with warmth and colour. Meanwhile, honey and orange amplify the natural sweetness. The result is a beautifully balanced dish that feels indulgent yet light.
Roasting carrots at a high temperature allows their natural sugars to caramelise, creating a tender interior and lightly crisp edges. This method intensifies flavour while keeping the texture satisfying and vibrant.
The addition of orange zest and juice lifts the dish. It prevents it from becoming overly sweet and adds a fresh citrus note. This perfectly complements the saffron. Discover the nutritional benefits of carrots.
How to Make Saffron-Roasted Carrots with Honey, Orange & Roasted Nuts
This saffron-roasted carrot recipe with honey, orange, yoghurt and roasted nuts is simple to prepare yet delivers rich flavour and elegant presentation. By gently roasting carrots with fragrant saffron strands and citrus then finishing with creamy yoghurt and crunchy nuts, it brings together sweetness, warmth and texture. Follow the ingredients list and step-by-step instructions below to create a versatile Mediterranean-inspired dish. It works beautifully as a starter, side or vegetarian main.
Saffron-Roasted Carrots with Honey, Orange & Yoghurt
Saffron-Roasted Carrots with Honey, Orange & Yoghurt is a vibrant Mediterranean-inspired dish that combines tender roasted carrots with fragrant saffron, citrus brightness and creamy yoghurt. Gently caramelised in the oven, the carrots absorb the delicate floral notes of saffron while honey and orange enhance their natural sweetness. Finished with a cooling yoghurt base and fresh herbs, this elegant yet simple recipe is perfect as a vegetarian main, festive side dish or refined sharing plate. Ideal for home cooks seeking flavourful, wholesome and visually stunning dishes using premium saffron.
Course Mezze, Sharing Plate, Side Dish, Starter, Vegetarian Main
Cuisine Mediterranean, Middle East, Modern European
Place saffron strands in a small bowl with warm water and leave for 5 minutes until fragrant and golden.
Roast the Carrots
Preheat oven to 200°C / 180°C fan / Gas Mark 6.
Place carrots on a roasting tray and toss with olive oil, honey, orange zest and juice.
Add the saffron infusion, season with salt and pepper, and mix well.
Roast for 30–35 minutes, turning once, until tender and caramelised.
Serve
Spoon yoghurt onto a serving platter
Arrange the warm saffron-roasted carrots on top.
Finish with fresh herbs and toasted nuts if using.
Notes
This saffron-roasted carrot recipe is designed to highlight the natural sweetness of carrots while allowing the delicate aroma and golden colour of saffron to shine. Roasting at a high temperature encourages gentle caramelisation without drying the vegetables, while the addition of honey and orange enhances flavour balance. For best results, use whole saffron strands rather than ground saffron and add the yoghurt just before serving to preserve its creamy texture. This dish works beautifully as a starter, side dish or vegetarian main and can be easily adapted for vegan or low-salt diets.
This saffron-roasted carrot dish is incredibly versatile:
Serve as a starter, plated with yoghurt and herbs
Enjoy as a side dish with roasted meats, grilled fish or halloumi
Present as a vegetarian main with flatbreads or grains
Add to sharing platters or mezze spreads
It works beautifully warm or at room temperature, making it perfect for gatherings and make-ahead menus.
A Dish for Modern Diets
This recipe is naturally vegetarian and gluten-free, and can easily be adapted for vegan diets by using plant-based yoghurt and maple syrup instead of honey. It’s also relatively low in sodium and rich in vitamins and antioxidants, making it both nourishing and satisfying.
Ingredient Quality Matters
With a recipe this simple, ingredient quality makes all the difference. By using premium saffron strands and fresh produce sourced from Nicol Retailer Limited, you ensure the best flavour, aroma and visual appeal every time.
Whether you’re cooking for family, guests or customers, this dish delivers consistent results and refined flavour.
Final Thoughts
Saffron-Roasted Carrots with Honey, Orange, Yoghurt & Roasted Nuts is proof that vegetables can be the star of the table. Elegant, comforting and full of Mediterranean character, it’s a recipe you’ll return to again and again.