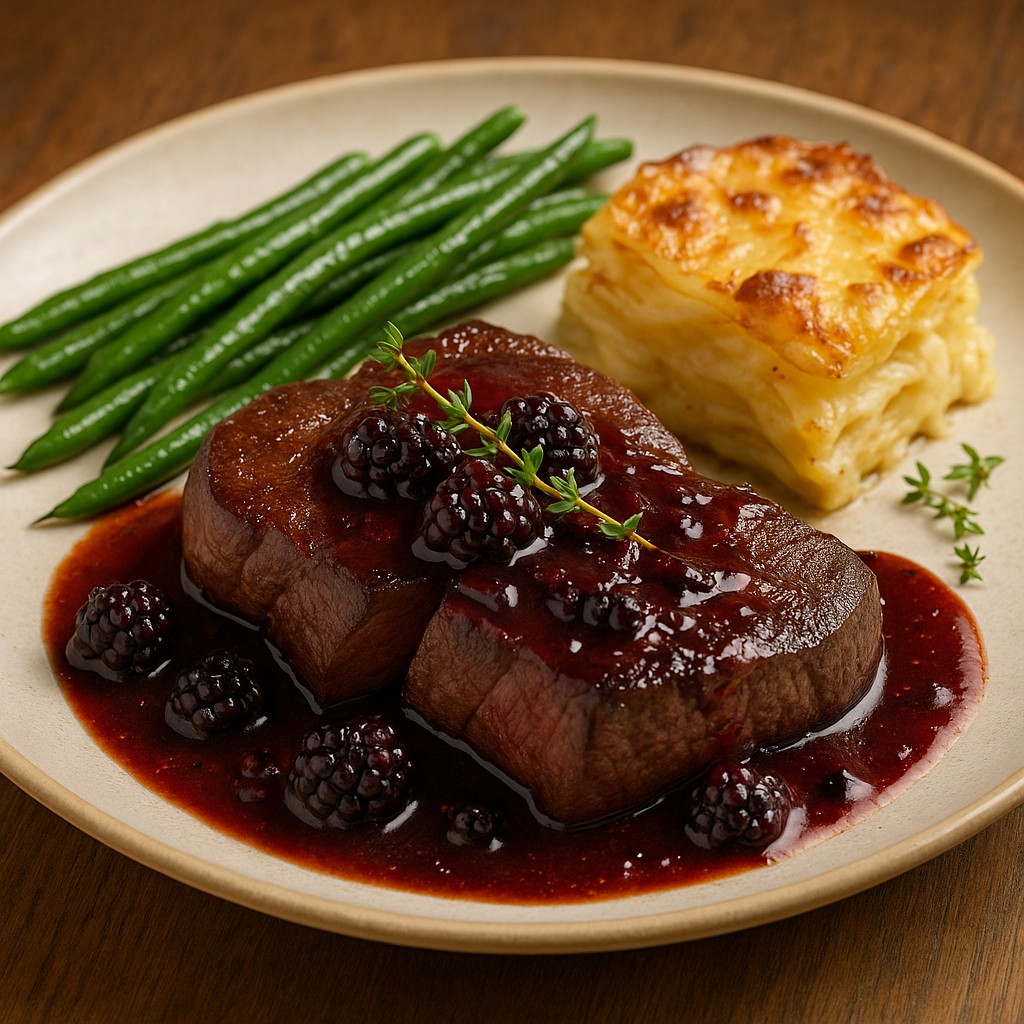
Posted on

How to Make Delicious Jollof Rice

Jollof Rice is a lively and flavourful dish that holds a special place in many West African countries. Renowned for its rich tomato base and aromatic spices, Jollof Rice transcends being merely a meal; it is a cultural experience. Whether served at a family gathering or a festive celebration, this dish consistently delights. Originating from the Wolof people of Senegal and The Gambia, Jollof Rice has since evolved into a culinary favourite across West Africa, with each nation adding its own distinct twist.

The dish is marked by its deep red hue, derived from a mixture of tomatoes and red bell peppers. The heat of Scotch bonnet peppers adds a punch, while the aromatic blend of thyme and curry powder imparts depth to the dish. Fresh onions and garlic enhance its fragrant appeal, making it enticing from the moment it begins to cook.

Jollof Rice is more than just food; it is a celebration of West African culinary heritage, bringing people together with its rich tastes and vibrant presentation. Here is a step-by-step guide to making authentic and delicious Jollof Rice

Delicious Jollof Rice Recipe

Print Recipe
Jollof Rice is a vibrant and flavourful dish that is a staple in many West African countries. Known for its rich tomato base and aromatic spices, Jollof Rice is not just a meal; it's an experience. Whether you're enjoying it at a family gathering or a festive celebration, this dish never fails to impress.
Course Main Course
Cuisine African
Keyword Jollof rice, Jollof Rice Recipe
Prep Time 15 minutes
Cook Time 45 minutes
Servings 4 People

Instructions

Preparation

  • Rinse the rice thoroughly in cold water to remove excess starch, then set aside.
  • Blend the tinned tomatoes, red bell peppers, and optional scotch bonnet pepper until smooth.

Cooking

  • In a large pot, heat the olive oil over medium heat. Add the chopped onion and garlic, and cook until softened. Add the tomato paste and fry for another 2 minutes.
  • Stir in the ground ginger, thyme, and curry powder, and cook for another minute.
  • Add the blended tomato and pepper mix to the pot. Cook on medium heat for about10-15 minutes until the sauce reduces and thickens.
  • Pour in the chicken stock and bring to a boil,
  • Add the rice to the pot, stir well, and season with salt and black pepper
  • Cover the pot, reduce the heat to low, and allow the rice to cook for 25-30 minutes, or until the rice is cooked and has absorbed the liquid. Stir occasionally to prevent sticking
  • Once cooked, fluff the rice with a fork.
  • Garnish with fresh parsley if desired and serve hot.

Notes

Tips

Common pitfalls to avoid include adding too much water, which can result in mushy rice, and cooking on too high a heat, which can cause the rice to burn before it is fully cooked. If the rice appears too dry during cooking, you can add a little more stock or water to achieve the desired consistency.
To achieve an authentic smoky flavour, let the rice cook undisturbed for the final few minutes, allowing a slight crust to form at the bottom of the pot. This adds a distinctive touch to the dish that is highly prized in West African cuisine.

Cooking Methods

Different techniques can be employed to cook Jollof Rice, each yielding distinct results:

Stovetop Method: This classic method involves cooking the rice on a low flame. It requires attentive monitoring to ensure the rice absorbs the sauce fully and cooks evenly. This method is particularly favoured for achieving a slight crust at the bottom, enhancing the dish with an authentic smoky flavour.

Oven Method: Baking Jollof Rice in the oven provides a consistent heat source, which helps prevent the bottom from burning. To use this method, transfer the mixed rice and sauce into an oven-safe dish, cover with foil, and bake at 180°C (350°F) for about 30-40 minutes. This technique can produce a slightly different texture but is equally flavourful.

Pressure Cooker Method: For those short on time, a pressure cooker can expedite the process while preserving the dish’s robust flavours. Combine the blended mixture, stock, and rinsed rice in the pressure cooker, ensuring the liquid covers the rice adequately. Cook on high pressure for about 15 minutes, then let it naturally release the pressure. This method delivers tender rice in a fraction of the time.

No matter which method you choose, attention to detail is crucial. Ensure the rice absorbs the sauce entirely, as this is key to achieving the rich, savoury taste that defines Jollof Rice. The stovetop and pressure cooker methods are excellent for capturing the traditional essence of the dish, while the oven method offers a hands-off approach for those who prefer minimal supervision. Each method has its own unique advantages, allowing you to tailor the cooking process to your preferences and schedule.

Suggestions for Serving

Jollof Rice is versatile and pairs well with a variety of side dishes that enhance its rich flavours. Here are some popular accompaniments:

Fried Plantains: Sweet and caramelised, fried plantains offer a delightful contrast to the savoury rice.

Grilled Chicken or Beef: Marinated and grilled meats add a robust flavour, complementing the aromatic spices of the Jollof Rice.

Mixed Vegetable Salad: A fresh salad with a light dressing can provide a refreshing balance to the dish.

Fried Fish: Crispy on the outside and tender on the inside, fried fish pairs excellently with the rice’s rich tomato base.

For a vibrant presentation, serve Jollof Rice on a large platter and garnish with sliced onions or fresh herbs to add a touch of colour. These side dishes not only enhance the overall meal but also add variety, making your dining experience more enjoyable.

Variations and Enhancements

Jollof Rice is a dish that lends itself well to various adaptations, allowing you to explore different flavours and ingredients to suit your preferences. Here are some popular variations:

Seafood Jollof

Infuse your Jollof Rice with a coastal essence by incorporating seafood such as prawns, mussels, or calamari. These ingredients not only add a unique taste but also elevate the dish’s visual appeal. To prepare, simply add the seafood towards the end of the cooking process to avoid overcooking and maintain their tender texture.

Vegetable Jollof

For a healthier twist, you can enrich your Jollof Rice with an assortment of fresh vegetables. Common additions include peas, carrots, green beans, and bell peppers. These not only contribute to the nutritional value of the meal but also introduce vibrant colours and a variety of textures.

Coconut Jollof

Adding coconut milk can transform your Jollof Rice into a rich and creamy delight. The subtle sweetness and creamy texture of the coconut milk provide a pleasant contrast to the spices, creating a harmonious blend of flavours. Simply replace a portion of the stock with coconut milk and proceed with the recipe as usual.

For those who enjoy experimenting, here are a few more suggestions to personalise your Jollof Rice:

Smoked Turkey or Chicken: Introducing smoked meats such as turkey or chicken can add a deep, smoky flavour that complements the tomato base. Dice the meat into bite-sized pieces and mix it into the rice during the final stages of cooking to distribute the flavours evenly.

Mushrooms: Adding mushrooms can provide an umami boost to your Jollof Rice. Their earthy flavour and meaty texture make them a great addition, particularly for vegetarians or those looking to reduce their meat consumption. Sauté the mushrooms until they release their moisture before mixing them into the rice.

Spice Levels: Tailoring the spice level to your preference is an easy way to make the dish your own. You can increase the heat by adding more Scotch bonnet peppers or tone it down for a milder version. Adjust the quantity of spices like curry powder and thyme to suit your taste.

These variations not only keep your Jollof Rice exciting but also allow you to cater to different dietary needs and flavour profiles. Whether you stick to the classic recipe or venture into new territory, the versatility of Jollof Rice ensures that it remains a beloved dish in your culinary repertoire.

Posted on

How to Make a Delicious Lamb Shank Recipe

Cooking lamb shanks is truly a rewarding experience for any chef, as it results in tender, flavourful meat that is perfect for a comforting meal. The recipe below will guide you through the steps to create a mouth-watering dish that will impress your family and friends. Remember to take your time and follow the instructions closely to ensure that your lamb shanks turn out perfectly. From seasoning to slow cooking, this recipe will showcase the delicious flavours of the lamb shank in a way that will leave everyone at the table satisfied and impressed. Enjoy the process of cooking this delightful dish and savour every bite of the tender, flavourful meat.

Lamb Shank Recipe

Print Recipe
Cooking lamb shanks is a delightful experience that rewards the chef with tender, flavourful meat, perfect for a comforting meal. A Lamb Shank Recipe offers a delectable opportunity to indulge in rich flavours and savoury aromas. Whether you're a seasoned cook or a beginner, this dish can be a triumph on your table.
Course Main Course
Cuisine English
Keyword cooking lamb shank, Lamb shank recipe, nicol retailer lamb shank recipe
Prep Time 20 minutes
Cook Time 2 hours 30 minutes
Servings 4 People

Equipment

  • 1 Heavy-based casserole dish
  • 1 Sharp knife
  • 1 Chopping board
  • 1 Wooden spoon for stirring

Ingredients

Instructions

  • Pre heat the oven to 160°C (140°C fan) or gas mark 3.
  • Season the lamb shanks with salt and pepper.
  • In a large ovenproof casserole dish, heat the olive oil over medium-high heat. Brown the lamb shanks on all sides, then remove and set aside.
  • In the same dish, add the onions, garlic, carrots, and celery. Cook for about 5minutes until the vegetables begin to soften.
  • Stir in the tinned tomatoes, beef stock, tomato purée, rosemary, and thyme. Bring to a simmer.
  • Return the lamb shanks to the dish, ensuring they are mostly covered with the sauce.
  • Cover the casserole dish with a lid and place it in the oven. Cook for 2 to 2.5 hours or until the lamb is tender and falling off the bone.
  • Once cooked, remove from the oven and check seasoning. Adjust with salt and pepper if necessary.
  • Serve the lamb shanks with mashed potatoes or crusty bread to soak up the delicious sauce. Enjoy your meal!

Notes

Choosing the Ideal Lamb Shank

Selecting the right lamb shank is essential for achieving the best results in your dish. Look for lamb shanks that display a vibrant pink colour, indicating freshness, and ensure there is a good layer of fat, which adds flavour during cooking. It’s important to choose shanks that are evenly sized to ensure they cook uniformly.
Ensure the lamb shanks you pick are free from any strong odours, as this could indicate the meat is not fresh. Also, inspect the packaging for any signs of damage or leaks. High-quality shanks should have a firm texture and a pleasant, mild scent.
By taking the time to choose the perfect lamb shank, you set the foundation for a delicious and satisfying meal. The quality of the meat plays a significant role in the final taste and texture of your dish, making this step a crucial part of the cooking process.

Suggestions for Serving

Pairing your lamb shank with the right side dishes enhances the overall dining experience. Creamy mashed potatoes make an excellent choice, as their smooth texture complements the tender lamb and absorbs the rich sauce. Alternatively, a buttery polenta offers a delightful contrast and adds a touch of rustic charm to your plate. If you’re looking for a lighter option, consider serving the lamb shank with a zesty salad, which provides a refreshing balance to the rich flavours. Steamed green beans or asparagus are also wonderful choices, bringing a touch of brightness and crunch to the meal.

When plating, place the lamb shank on a bed of your chosen side, allowing the sauce to pool around the edges. Drizzle the lamb with the aromatic sauce from the casserole dish, ensuring each bite is infused with flavour. A sprinkle of freshly chopped herbs, such as parsley or thyme, can add a vibrant splash of colour and an additional layer of taste.

For a touch of indulgence, a basket of warm, crusty bread can be an excellent accompaniment, perfect for mopping up the delicious sauce.

Storing and Warming Leftovers

Leftover lamb shank can be just as delicious the next day if stored and reheated properly. Start by allowing the lamb to cool to room temperature before transferring it to an airtight container. This step prevents condensation from forming inside the container, which can make the meat soggy. Store the container in the refrigerator, where it will keep for up to three days.

When it comes time to reheat, gentle methods work best to maintain the lamb’s tenderness and flavour. Place the lamb shank in a saucepan and add a splash of water or stock. This extra liquid helps keep the meat moist as it warms. Heat over a low flame, occasionally turning the meat to ensure even warming. Covering the saucepan with a lid can also help retain moisture.

For those who prefer using a microwave, place the lamb in a microwave-safe dish and cover it with a microwave-safe lid or cling film with a few holes poked in it. Reheat on a medium setting in short intervals, checking the meat frequently to avoid overcooking. Adding a little liquid to the dish before microwaving can also help maintain moisture.

If you have a larger amount of leftovers, consider repurposing them into a new dish. Shredded lamb shank can be added to stews, soups, or even used as a filling for sandwiches and wraps. This not only reduces waste but also offers a tasty twist on your original meal.

Proper storage and reheating techniques ensure that your lamb shank remains as delightful as when it was first cooked, allowing you to enjoy the rich flavours and tender texture once again.

Posted on

The Perfect Donburi Recipe for Egg Lovers

Donburi is a beloved part of Japanese cuisine, blending simplicity with hearty fulfilment. This dish primarily features a bowl of rice topped with assorted ingredients, providing a base for culinary innovation. The charm of donburi is in its adaptability, making it suitable for a variety of tastes and preferences.

For those who enjoy eggs, a donburi topped with a perfectly runny egg yolk is the height of comfort. The creamy yolk blends effortlessly with the savoury toppings and rice, creating a seamless mix of flavours and textures. This combination not only pleases the palate but also offers a nourishing meal.

Whether you’re a seasoned cook or a beginner in the kitchen, making an authentic donburi at home is a gratifying experience. The method is straightforward yet allows for plenty of personalisation, making it a perfect dish for any event. Below is a Donburi Recipe to try.

Donburi with Tender Beef and Runny Egg Yolk Recipe

Print Recipe
Bring the warmth of Japanese home cooking to your kitchen with our Home-Style Beef Donburi recipe. Featuring succulent beef slices simmered in a traditional sauce and a soft-cooked egg with a beautifully runny yolk, this dish is both satisfying and simple to make. Ideal for both busy weeknights and leisurely weekends, the rich flavours of the beef meld beautifully with the creamy egg and fluffy rice. Impress your family and friends with this timeless Japanese favourite that's both nourishing and delicious.
Course Main Course
Cuisine Japanese
Keyword Donburi, Donburi recipe
Prep Time 30 minutes
Cook Time 1 hour
Servings 4 People

Ingredients

Instructions

  • Cook the Rice – Rinse the rice under cold water until the water runs clear. Drain and place in a rice cooker with 2 cups of water. Cook according to the rice cooker's instructions.

Cook the Beef

  • In a bowl, mix the soy sauce, mirin, sake, and sugar. Stir until the sugar dissolves.
  • Prepare the Beef In a large pan, heat a bit of oil over medium heat. Add the onion and cook until soft and translucent.
  • Add the beef slices to the pan with the onions and pour over the sauce mixture. Cook for about 3-5 minutes, stirring occasionally, until the beef is just cooked through.

Cook the Egg

  • In a separate pan, gently fry the eggs sunny side up until the whites are set but the yolks remain runny.

Toasting the Sesame Seeds

  • Place the sesame seeds in a frying pan over medium heat, heat raw sesame seeds until golden brown and fragrant, stirring occasionally with a wooden spoon. Remove from heat and immediately transfer to a plate to cool completely

Assemble the Donburi

  • Divide the cooked rice among four bowls. Top each with the beef and onion mixture.
  • Place a fried egg on top of each bowl.
  • Sprinkle with chopped spring onions and the toasted sesame Seeds.
  • Serve with pickled ginger on the side ( optional).

Pairing Donburi with Other Meals

Donburi is a versatile dish that pairs well with a variety of side dishes and beverages. Consider serving it alongside a crisp, fresh salad to balance the richness of the beef and egg. A simple cucumber and wakame seaweed salad dressed in rice vinegar can provide a refreshing contrast. Alternatively, a bowl of miso soup offers a comforting and complementary element, enhancing the umami experience.

For those who enjoy a bit of crunch, tempura vegetables or prawns make an excellent accompaniment. The light, crispy texture of tempura adds an enjoyable contrast to the softness of the donburi ingredients. Another option is pickled vegetables, such as daikon or pickled ginger, which introduce a tangy note that cuts through the richness.

When it comes to beverages, green tea or sake make excellent choices. Green tea, with its light, astringent flavour, cleanses the palate and balances the savoury notes of the donburi. Sake, whether served warm or chilled, complements the dish’s depth and complexity. For a non-alcoholic alternative, consider a lightly flavoured sparkling water with a hint of citrus to refresh the taste buds.

These pairings not only enhance the donburi experience but also provide a well-rounded meal that is both satisfying and harmonious.

Suggestions for Plating and Serving

To create an appealing presentation, start by distributing the rice evenly in a deep bowl, providing a base for the other ingredients. Arrange the sliced beef attractively over the rice, ensuring even coverage. Place the perfectly cooked egg gently atop the beef, allowing the runny yolk to cascade over the dish when pierced.

For a visually striking and flavour-enhancing touch, sprinkle sliced spring onions over the top. Their bright green hue and fresh taste add a delightful contrast to the rich components of the donburi. A light scattering of sesame seeds introduces a hint of nuttiness and a subtle crunch, enhancing the texture.

A dash of shichimi togarashi, a Japanese spice mix, can add a mild kick, balancing the savoury flavours with a bit of heat and complexity. For a final flourish, consider placing a few pickled ginger slices on the side of the bowl. The ginger’s vibrant colour and tangy taste can refresh the palate and complement the dish’s overall profile.

When plating, think about the harmony of colours and textures, making the dish not only appetising but also visually appealing. A well-presented donburi can elevate the dining experience, making each bite as enjoyable to look at as it is to eat.

Posted on

Ultimate French Toast Recipe with a Savoury Twist

This French Toast Recipe with a savoury twist will undoubtedly bring a refreshing change to your breakfast table. Envision the harmonious blend of flavours as the tender French toast, made from thick slices of brioche or sourdough, pairs perfectly with the delicate taste of smoked salmon. The dish is further enhanced by a tangy lemon dill hollandaise sauce, adding a layer of sophistication and zest.

Ideal for those mornings when you want something extraordinary, this recipe brings together simple yet high-quality ingredients to create a meal that’s both comforting and elegant. The richness of the French toast provides a satisfying base, while the smoked salmon offers a savoury contrast that makes each bite intriguing and delightful. The lemon dill hollandaise sauce, with its fresh, citrusy notes and aromatic dill, brings everything together in a harmonious balance.

It’s not just the taste that makes this dish special; the presentation is equally captivating. Picture golden-brown French toast slices layered with vibrant pink smoked salmon and drizzled with the creamy, light-yellow hollandaise sauce. A garnish of fresh dill sprigs adds a touch of green, making the dish visually appealing and inviting.

Whether you are planning a quiet morning alone, a family breakfast, or entertaining friends for brunch, this French toast with smoked salmon and lemon dill hollandaise is a versatile choice. It’s sophisticated enough for special occasions yet simple enough to prepare any day you crave something a bit out of the ordinary. Enjoy the pleasure of crafting and savouring a breakfast that feels both indulgent and fresh.

Here is the recipe to create this delightful dish:

French Toast with Smoked Salmon and Lemon Dill Hollandaise

Print Recipe
This dish blends the richness of French toast with the savoury taste of smoked salmon, all enhanced by a zesty hollandaise sauce. Perfect for a special breakfast or brunch!
Course Breakfast, brunch
Cuisine french
Keyword French toast recipe, hollandise recipe, smoked salmon recipe
Prep Time 15 minutes
Cook Time 45 minutes
Servings 4 People

Ingredients

Instructions

Prepare the French Toast

  • In a large bowl, whisk together eggs, milk, vanilla extract, and salt
  • Heat a skillet over medium heat and add a small amount of butter
  • Dip each slice of bread into the egg mixture, ensuring both sides are well-coated. Cook until golden brown on both sides then remove from pan
  • Keep warm until ready to serve

Make the Lemon Dill Hollandaise

  • Gently heat the Hollandaise Sauce in a pan until it simmers then turn off
  • Add the butter and lemon juice dill to the Hollandaise Sauce and mix well

Assemblethe Dish

  • Place two slices of French toast on each plate and apply creme Fraiche
  • Top each serving with two slices of smoked salmon
  • Drizzle the lemon dill hollandaise sauce over the salmon and toast
  • Garnish with additional fresh dill
  • Serve immediately and enjoy this delicious blend of flavours

Notes

For a delightful breakfast experience, serve this dish with light accompaniments such as a crisp green salad or a selection of roasted vegetables. The freshness of the greens or the warmth of the roasted vegetables will complement the rich and savoury notes of the French toast with smoked salmon. To add an extra layer of flavour, consider including a simple vinaigrette dressing for the salad or a sprinkle of herbs over the roasted vegetables.
For beverages,  fresh orange juice or a citrus-infused water will add a refreshing touch to your breakfast spread.
This dish also works beautifully for a leisurely weekend brunch or as a celebratory breakfast for special occasions such as birthdays or anniversaries. Its sophisticated presentation and intricate flavours make it suitable for impressing guests, whether you’re hosting a small gathering or a more formal brunch event.
If you wish to offer more variety, consider serving the French toast with additional toppings such as capers, red onion slices, or a side of cream cheese. These can provide additional texture and taste, making each bite a unique experience. A platter with these extra toppings can also allow your guests to customise their portions according to their preferences.

Commonly Asked Questions

Many of our readers have questions about this recipe, so we’ve compiled some answers to help you perfect your French toast with smoked salmon and lemon dill hollandaise.

Can I prepare the French toast in advance?

Yes, you can prepare the French toast a day ahead. Store it in the fridge and reheat in a pan or oven just before serving to maintain its texture.

What are some variations for this recipe?

For a different take, you can replace smoked salmon with smoked trout or even omit the fish entirely for a vegetarian version. Adding a pinch of cayenne pepper to the hollandaise sauce can give the dish a spicy kick.

How should I store leftovers?

Store any leftovers in an airtight container in the fridge for up to two days. When reheating, do so gently to preserve the texture and flavour of both the toast and the hollandaise sauce.

Can I use a different type of bread?

Absolutely. While brioche and sourdough are recommended for their texture and flavour, you can experiment with other types of bread like challah or multigrain. Using slightly stale bread helps absorb the egg mixture better.

What side dishes complement this meal?

Light accompaniments like a crisp green salad or roasted vegetables pair wonderfully with this dish. Fresh fruit can also add a refreshing contrast.

Can this recipe be scaled up for a larger gathering?

Yes, this recipe can easily be scaled up to serve more people. Simply adjust the quantities of the ingredients accordingly and prepare the components in batches if needed.

Posted on

Aubergine Lasagne Recipe with Melty Mozzarella

There’s something wonderfully satisfying about creating a lasagne that replaces traditional pasta layers with slices of aubergine. This version is hearty, flavourful, and offers a delightful twist on a classic Italian dish. The combination of rich tomato sauce, creamy ricotta, and melty mozzarella makes for a delicious meal that’s perfect for vegetarians or anyone aiming to increase their vegetable intake. It’s a comforting dish that’s easy to prepare and sure to become a favourite at your table. Explore this recipe to bring a touch of Italy into your home with a healthy and wholesome approach.

To craft this delicious Aubergine Lasagne, you’ll need a selection of fresh and high-quality ingredients. Here’s what you’ll need:

Aubergine Lasagna Recipe

Print Recipe
Aubergine Lasagne is a delicious twist on the classic Italian dish, incorporating the rich flavours of aubergine, parmesan, tomato sauce, ricotta cheese, and melted mozzarella. Enjoy this flavourful and satisfying meal with a side salad or some crusty bread.
Course Main Course
Cuisine Italian
Diet Vegetarian
Keyword Aubergine Lasagna Recipe, Aubergine Recipe
Prep Time 15 minutes
Cook Time 1 hour 30 minutes
Servings 4 People
Calories 474

Ingredients

Instructions

  • Preheat your oven to 200°C (180°C fan)/Gas Mark 6. Lay the aubergine slices on a baking tray, brush with olive oil, and season with salt and pepper. Roast in the oven for about 20 minutes until they are soft and slightly golden. Remove from the oven and set aside.
  • Make the Tomato Sauce: In a large pan, heat the remaining olive oil over medium heat. Add the onion and garlic and sauté until the onion is soft. Add the chopped tomatoes, tomato purée, oregano, and basil. Season with salt and pepper. Simmer for about 15 minutes until the sauce thickens slightly.
  • Prepare the Cheese Mixture: In a bowl, combine the ricotta cheese, half of the Parmesan cheese, and the egg. Mix until smooth and well combined. Season with a little salt and pepper.
  • Assemble the Lasagne: In a baking dish, spread a thin layer of the tomato sauce on the bottom. Place 3 lasagne sheets over the sauce. Layer with half of the aubergine slices, half of the ricotta mixture, a third of the mozzarella slices, and a third of the remaining tomato sauce. Repeat with another layer of lasagne sheets, the rest of the aubergine, remaining ricotta mixture, another third of mozzarella, and a third of tomato sauce. Top with the final layer of lasagne sheets, the rest of the tomato sauce, the remaining mozzarella, and sprinkle with the remaining Parmesan
  • Bake the Lasagne: Cover the dish with foil and bake in the preheated oven for 25 minutes. Remove the foil and bake for another 15 minutes, or until the top is bubbly and golden brown.
  • Allow the lasagne to rest for a few minutes before slicing. Serve warm with a side salad or garlic bread, if desired. Enjoy your homemade aubergine lasagne!

Notes

Serving Ideas

Aubergine Lasagne pairs beautifully with a range of sides. A crisp green salad with a light vinaigrette offers a refreshing contrast to the rich, hearty lasagne. Alternatively, a slice of rustic bread can be perfect for mopping up the savoury tomato sauce. For added freshness, sprinkle chopped fresh basil or parsley on top before serving. Another great side option is roasted vegetables, which can be seasoned with olive oil, garlic, and herbs to create a harmonious meal. These additions not only enhance the visual appeal of your dish but also provide delightful textural and flavour contrasts, making your meal both satisfying and memorable.

Nutrition

Calories: 474kcal | Carbohydrates: 51g | Protein: 20g | Fat: 21g | Saturated Fat: 9g | Polyunsaturated Fat: 2g | Monounsaturated Fat: 9g | Trans Fat: 0.01g | Cholesterol: 84mg | Sodium: 291mg | Potassium: 255mg | Fiber: 2g | Sugar: 2g | Vitamin A: 453IU | Vitamin C: 0.1mg | Calcium: 265mg | Iron: 2mg

Making an Aubergine Lasagne with melty mozzarella can be a gratifying culinary journey, especially when it results in a dish that is both comforting and full of flavour. This recipe allows you to transform simple ingredients into a meal that showcases the richness of Italian cuisine while also promoting a healthier lifestyle by incorporating more vegetables. The careful layering of aubergines, ricotta, parmesan, and mozzarella, all enveloped in a luscious tomato sauce, creates a symphony of tastes and textures that is sure to delight.

This dish is versatile and can be adapted to suit your preferences or dietary requirements. For instance, you can experiment with different types of cheeses or add other vegetables such as spinach or courgettes for an extra layer of flavour and nutrition. For those who prefer a bit of heat, a sprinkle of red pepper flakes in the tomato sauce can add a subtle kick.

As with many traditional recipes, the key to a successful Aubergine Lasagne lies in the quality of your ingredients and the care taken during preparation. Fresh, firm aubergines, high-quality cheeses, and a well-seasoned tomato sauce are essential for achieving the best results.

Serving Aubergine Lasagne can be a joyful experience, whether you’re hosting a casual family dinner or a more formal gathering. Pairing it with complementary sides and beverages, as suggested earlier, can enhance the meal and create a memorable dining experience. The visual appeal of a well-baked lasagne, with its golden, bubbly top, is sure to impress your guests and entice their appetites.

This recipe not only offers a delicious meal but also provides an opportunity to enjoy the process of cooking. The methodical steps involved in preparing and assembling the lasagne allow you to savour each moment, from slicing the aubergines to layering the ingredients. The aroma of the baking lasagne filling your kitchen is a delightful preview of the flavours to come.

Incorporating ingredients from Nicol retailer Limited can add a unique touch to your lasagne, ensuring you have access to high-quality products that can elevate your dish. By experimenting with different variations and making use of fresh, high-quality ingredients, you can make this Aubergine Lasagne your own.

In summary, Aubergine Lasagne with melty mozzarella is a hearty, flavourful dish that brings the essence of Italian cooking into your home. With its rich layers and comforting taste, it’s bound to become a beloved recipe in your culinary repertoire. Enjoy the process and the delicious results of this wholesome and satisfying meal.

Posted on

Scrambled Egg & Smoked Salmon Croissants for Christmas Recipe

If you’re looking for a recipe to serve as a special breakfast on Christmas Day morning while unwrapping Christmas presents, then look no further: Scrambled Egg & Smoked Salmon Croissants for Christmas. It is quick to make and made with delicious croissants.

Scrambled Egg & Smoked Salmon Croissants for Christmas

Print Recipe
Scrambled Egg & Smoked Salmon Croissants for Christmas
Indulge in these delightful croissants, filled with creamy scrambled eggs and rich smoked salmon, perfect for a festive breakfast or brunch. The buttery pastry complements the savoury filling, creating a delicious treat for the holiday season. Pair with a glass of freshly squeezed orange juice or a cup of hot tea for a truly comforting experience. Celebrate the joy of Christmas with this delectable dish that is sure to impress your family and friends.
Course Breakfast
Cuisine English, french
Keyword Butter Croissant, St Pierre Butter Croissant
Prep Time 20 minutes
Servings 4 People

Ingredients

Instructions

  • Warm the St Pierre All Butter Croissants following the instructions on the packaging.
  • Meanwhile, prepare the scrambled eggs by whisking the eggs with milk and seasoning with pepper.
  • Gently heat the eggs in a non-stick pan over a low heat with plenty of butter, stirring occasionally until softly cooked but not overdone. Stir in the chopped fresh chives at the end.
  • Slice the warm All Butter Croissants in half and spread cream cheese on the bottom half.
  • Add the fluffy scrambled eggs and a layer of smoked salmon, finishing with a few more chives before placing the top half of the croissant on.
  • Serve with your chosen celebratory drink.
Posted on

Baked Mixed Nut Roast Recipe

As the holiday season approaches, it’s the perfect time to explore new and delightful recipes that cater to everyone’s tastes and dietary preferences. One such dish that deserves a place at your festive table is the Baked Mixed Nut Roast. This delicious and hearty recipe is packed with a variety of nuts, tangy cranberries, and earthy Paris Brown Chestnut Mushrooms, making it an excellent choice for vegetarians and a tempting option for anyone seeking a nutritious and satisfying meal.

This delightful nut roast is perfect for any occasion, combining the earthy flavours of chestnut mushrooms with the sweetness of cranberries. Follow this recipe for a dish that’s sure to please.

Baked Mixed Nut Roast

Print Recipe
The Baked Mixed Nut Roast is a delightful dish perfect for a hearty meal. It combines the rich flavours of various nuts, tart cranberries, and the earthy tones of Paris Brown Chestnut Mushrooms. This nut roast is a fantastic choice for those seeking a satisfying vegetarian option.
It is perfect for serving with your favourite sides, such as roasted vegetables or a fresh salad. This dish is not only a celebration of ingredients but also a great centrepiece for any dinner gathering, offering both flavour and a sense of comfort.
Course Main Course
Cuisine English
Keyword Nut roast, Nut roast for christmas, nut roast recipes
Prep Time 45 minutes
Cook Time 1 hour
Servings 4

Instructions

  • Preheat your oven to 180°C (160°C fan)/350°F/gas mark 4. Line a loaf tin with baking paper.
  • Roughly chop the nuts or pulse them in a food processor until they are coarsely ground. Set aside.
  • Heat the olive oil in a frying pan over medium heat. Add the onion and garlic, and sauté until softened. Add the mushrooms, carrot, and celery. Cook until the vegetables are soft and any liquid from the mushrooms has evaporated
  • In a large bowl, combine the cooked vegetables, ground nuts, lentils, breadcrumbs, and cranberries. Add the soy sauce, tomato purée, mixed herbs, and season with salt and pepper. Mix everything thoroughly until well combined
  • Spoon the mixture into the prepared loaf tin, pressing down to ensure it's tightly packed.
  • Place the loaf tin in the preheated oven and bake for 40-45 minutes, or until the nut roast is firm and golden on top.
  • Allow the nut roast to cool in the tin for a few minutes before carefully turning it out onto a serving plate. Slice and serve warm, perhaps with your favourite vegetables or a gravy.

Notes

To make your Baked Mixed Nut Roast visually appealing, arrange it thoughtfully on a serving platter. Garnish with fresh herbs or a handful of whole cranberries for a festive flair. Pair the nut roast with vibrant side dishes such as roasted vegetables, creamy mashed potatoes, or a fresh green salad for a balanced meal.
Consider enhancing the dish with a rich mushroom gravy or a tangy cranberry sauce, both of which add depth of flavour and a touch of indulgence. For a bit of variety, you could also offer a light balsamic glaze or a zesty herb vinaigrette.
These accompaniments not only elevate the taste but also provide contrasting textures that complement the nut roast beautifully. With these thoughtful pairings, your holiday meal will be both memorable and delicious.
Posted on

Banana Shallots: The Perfect Addition to Your Recipes

Discover Banana shallots @ nicol retailer limited

Banana shallots are a unique type of allium with a sweet flavour, perfect for those who want to avoid the sharpness of regular onions. They are incredibly versatile, suitable for everything from salads to stews, and they are easy to prepare. Their mild taste enhances dishes without overpowering them, making them a staple for chefs and home cooks. Banana shallots pair well with herbs like thyme and rosemary and can be enhanced with wine or vinegar. When buying, choose firm, unblemished ones. Store in a cool, dry place for freshness. They are a delicious addition to any kitchen.

Getting Banana Shallots Ready

When it comes to preparing banana shallots, a few simple steps can ensure you get the best out of this delightful ingredient. Start by trimming both ends of the shallot with a sharp knife. This will make it easier to remove the outer skin. Next, make a shallow incision along the length of the shallot’s skin. This cut should be just deep enough to penetrate the outer layer, without slicing into the flesh underneath. Once the incision is made, gently peel away the skin, revealing the smooth, glossy shallot inside.

After peeling, the banana shallot is ready for slicing, dicing, or chopping, depending on your recipe’s requirements. For precise cuts, always use a sharp knife. If you need finely chopped shallots, hold the shallot firmly and slice it lengthwise into thin strips, then cross-cut the strips to achieve a fine dice. For slices or rings, simply cut the shallot crosswise at your desired thickness.

Banana shallots can be prepared in advance and stored in the fridge for a short period. However, it’s best to use them soon after cutting to retain their flavour and texture. If you need to prepare a large batch, you can store the chopped shallots in an airtight container in the refrigerator for up to a few days. For longer storage, you might consider freezing them. Spread the chopped shallots on a baking sheet in a single layer and freeze until solid, then transfer them to a freezer-safe container or bag. This method prevents them from clumping together, making it easy to use only the amount you need later on.

For those who enjoy making stocks or broths, the trimmings from banana shallots can be an excellent addition. Instead of discarding the ends and skins, collect them in a bag and store them in the freezer until you have enough to add to your stock pot. This not only reduces waste but also enhances the depth of flavour in your homemade stocks.

Another handy tip is to use a mandoline for uniform slices, especially when you need thin, even rings for garnishes or salads. This tool can save time and ensure that your slices are consistently even, which can be particularly useful for recipes requiring uniform cooking times.

If you find the flavour of raw banana shallots too strong for your liking, you can mellow it by soaking the chopped shallots in cold water for about ten minutes before using them. This technique helps to reduce their pungency while retaining their crunchy texture, making them more palatable for salads and other raw dishes.

Whether you are finely dicing them for a vinaigrette or slicing them into rings for a tart, preparing banana shallots properly can make a significant difference in your cooking. By following these straightforward steps, you can ensure that this versatile ingredient is always ready to enhance your favourite recipes.

Culinary Uses for Banana Shallots

Banana shallots seamlessly integrate into various culinary applications, offering a gentle, sweet note that enhances both simple and elaborate recipes. When used raw, they bring a subtle onion-like flavour to salads, making them a great addition to vinaigrettes or salsas. Their mildness ensures they do not overpower the dish but rather complement the other ingredients.

In cooked dishes, banana shallots truly shine. Their natural sweetness becomes more pronounced when caramelised, making them an excellent base for sauces and stews. They pair well with ingredients like garlic, thyme, and rosemary, forming a harmonious foundation for savoury recipes. Adding a splash of wine or a touch of balsamic vinegar can further enhance their depth, creating a rich, nuanced flavour profile.

Banana shallots are perfect for slow-cooked dishes such as casseroles and braises, where their sweetness and delicate texture meld beautifully with other components. They can also be used to prepare classic dishes like French onion soup, where their sweetness provides a delightful twist.

For a delicious side dish, sauté banana shallots with mushrooms and herbs. The combination of earthy mushrooms and sweet shallots creates a mouth-watering accompaniment to meats and poultry. Alternatively, roast them with a drizzle of olive oil and a sprinkle of sea salt to bring out their natural sugars and create a deliciously sweet and tender side.

Banana shallots can be pickled as well, adding a tangy, sweet crunch to sandwiches and salads. The pickling process softens their bite while retaining their characteristic flavour, making them a versatile condiment.

They are also a fantastic addition to marinades. Their mild flavour helps tenderise meats while adding a subtle sweetness. When making a marinade, combine finely chopped banana shallots with ingredients like olive oil, lemon juice, garlic, and herbs for a flavourful infusion that elevates the dish.

In baking, banana shallots can be used to enhance savoury tarts and quiches. Their sweet flavour complements creamy cheeses and fresh vegetables, resulting in a well-balanced dish that is both satisfying and flavourful.

Incorporating banana shallots into stir-fries adds a layer of sweetness that balances the savoury and spicy elements typical of these dishes. They cook quickly, making them ideal for the fast-paced nature of stir-frying.

For those who enjoy experimenting in the kitchen, try using banana shallots in a reduction sauce. Combine them with red wine and a touch of honey to create a luxurious sauce that pairs beautifully with steaks or roasted vegetables.

By exploring the versatility of banana shallots, you can discover numerous ways to enhance your meals with their unique flavour. Whether used raw or cooked, they offer a sweet, nuanced taste that enriches a wide range of dishes.

Recipes that Highlight Banana Shallots

anana shallots bring a unique sweetness and depth to a variety of recipes, making them a cherished ingredient in many kitchens. For a start, try incorporating them into a classic French onion soup. Their natural sweetness adds an extra layer of flavour, making the soup even more comforting and rich. Simply caramelise the banana shallots until they are golden and tender, then add them to your broth along with a splash of white wine for a delightful twist on this traditional dish.

Another fantastic way to showcase banana shallots is in a tart or quiche. Pair them with ingredients like creamy goat cheese, fresh spinach, or roasted red peppers. Their mild sweetness perfectly complements the richness of the cheese and the freshness of the vegetables, creating a balanced and flavourful meal. Simply sauté the shallots until soft, then mix them with your other ingredients and bake in a pastry shell until golden and set.

For a simple yet elegant side dish, try roasting banana shallots with a drizzle of olive oil, sea salt, and a sprinkle of fresh herbs such as thyme or rosemary. The roasting process enhances their natural sugars, resulting in a sweet and tender dish that pairs beautifully with roasted meats or grilled vegetables.

Banana shallots also shine in a red wine reduction sauce, perfect for drizzling over steak or roasted vegetables. To make this sauce, sauté finely chopped banana shallots in a bit of butter until they are soft and translucent. Add red wine, a touch of honey, and a sprig of fresh thyme, then simmer until the sauce has reduced and thickened. This rich, flavourful sauce adds a gourmet touch to any meal.

Incorporating banana shallots into marinades is another excellent way to enjoy their unique flavour. Combine finely chopped banana shallots with olive oil, lemon juice, garlic, and your favourite herbs to create a delicious marinade that tenderises meats and infuses them with a subtle sweetness. This is particularly effective for chicken, pork, or lamb.

Stir-fries are another great application for banana shallots. Their quick cooking time and mild flavour make them ideal for these fast-paced dishes. Simply slice the shallots thinly and add them to your stir-fry along with your favourite vegetables, proteins, and sauces. The banana shallots will add a sweet note that balances the savoury and spicy elements typically found in stir-fries.

Lastly, try pickling banana shallots to add a tangy crunch to sandwiches and salads. Simply slice the shallots thinly and soak them in a mixture of vinegar, sugar, and spices. After a few hours, they will be ready to use as a zesty condiment that enhances the flavours of your dishes.

 You can purchase banana shallots from Nicol Retailer Limited by visiting  

Posted on

Discover Urzante Olive Oil at Nicol Retailer

In the realm of culinary excellence, few products are as integral as Urzante Olive Oil. With a rich legacy embedded in Spanish cuisine, Urzante has been synonymous with quality and flavour for over fifty years. Thanks to modern shopping conveniences, you can now enjoy this exceptional product by purchasing it online.

Getting to Know Urzante Olive Oil

The roots of Urzante date back to the 1950s when the Marín family started their olive oil enterprise. Rich in olive oil heritage, the villages near the Ebro and Queiles rivers in Spain set an ideal scene.

This Spanish Olive Oil is perfect for those wanting a premium oil with a pleasant flavour, rich aromas, and free from excessive bitterness. You can find Urzante Olive Oil online at Nicol Retailer Limited, offering a versatile addition to your culinary creations, enhancing both raw and cooked dishes with its rich flavour and aroma.

Culinary Flexibility

One of the standout features of Urzante Olive Oil is its culinary versatility. From baking and frying to dressing salads and marinating meats, this olive oil proves to be an indispensable kitchen companion.

Urzante Olive Oil is perfect for sautéing vegetables, grilling seafood, or even baking savoury pastries. Its balanced flavour complements a wide array of ingredients, making it a versatile choice for both everyday cooking and special occasions. The oil’s consistency ensures that it blends well with spices and herbs, allowing you to create complex, layered flavours with ease.

Whether you are drizzling it over a fresh Caprese salad, using it as a base for marinades, or employing it for frying, Urzante’s quality remains evident. The high smoke point of the Olive Pomace Oil variant is particularly useful for high-heat cooking methods, while the Extra Virgin Olive Oil is ideal for cold dishes and dressings. This flexibility allows you to choose the right type of oil for each culinary task, ensuring optimal results every time.

Urzante Olive Oil embodies a commitment to tradition and quality, making it a superior choice for any kitchen. Its versatility is unmatched, whether you’re preparing a simple salad or a complex gourmet dish.By integrating Urzante Olive Oil into your daily cooking, you not only elevate the taste of your dishes but also contribute to a balanced and nutritious diet. Its versatility and quality make it a must-have in any kitchen, enabling you to experiment with a variety of cooking techniques and recipes.

Where to Buy Urzante Olive Oil

Nicol Retailer Limited now stocks the popular and premier Urzante Olive Oil, available for online delivery. Invest in Urzante Olive Oil and bring a touch of Mediterranean excellence to your table with every meal. Shop now.

Posted on

Delicious Ramen Noodles Recipe

Discover the world of delicious ramen noodles with a variety of mouth-watering recipes that are sure to satisfy your cravings. Ramen, a beloved dish originating from Japan, has taken the culinary world by storm with its perfect combination of rich broth, tender noodles, and a medley of toppings. Whether you’re a novice or a seasoned cook, creating a delightful bowl of ramen at home is a rewarding experience.

One of the charms of ramen noodles is their ability to be both a quick meal and a gourmet delight. A simple packet can be transformed into a nourishing meal by adding a few fresh ingredients. Try topping your noodles with spring onions, mushrooms, or tofu for a touch of sophistication.

Ramen noodles also pair well with vegetarian ingredients. Use a vegetable broth base and pile on an array of veggies like bell peppers, broccoli, and corn. For added protein, include tofu cubes or edamame. This version is perfect for those seeking a meat-free yet satisfying meal.

For those who love a challenge, making homemade ramen noodles can be a rewarding experience. Crafting your own broth and noodles allows you to personalise every aspect of the dish, making each bite a testament to your culinary skills.

Ramen noodles are also perfect for gatherings with friends and family. Create a ramen bar with a variety of toppings, and let everyone build their own customised bowl. It’s a fun way to enjoy good food and great company.

So, why not embrace the delicious world of ramen noodles? With endless possibilities and combinations, you’re sure to find recipes that delight your taste buds and bring warmth to your kitchen.

Here’s a simple recipe to get you started.

This recipe is just the beginning. Feel free to experiment with different broths, proteins, and vegetables to tailor the dish to your taste. Whether you prefer spicy, miso, or vegetarian options, ramen offers endless possibilities for creativity in the kitchen. Enjoy the comforting warmth and rich flavours of this iconic dish with every slurp!

Delicious Ramen Noodles

Print Recipe
If you have a passion for ramen noodles, you're in for a treat. This delightful dish has captured hearts and taste buds around the globe, and for good reason. Whether you're a seasoned home cook or just starting out, there's always something exciting to discover in the world of ramen. Here are some ideas to inspire your culinary journey and elevate your ramen game.
Course Main Course, Soup
Cuisine Japanese
Keyword Japanese noodles, Japanese ramel soup
Prep Time 10 minutes
Cook Time 30 minutes
Servings 2 People

Ingredients

Instructions

  • In a large pot, heat the sesame oil over medium heat. Add the minced garlic and grated ginger, sautéing for 1-2 minutes until fragrant
  • Pour in the chicken or vegetable stock, bringing it to a gentle boil. Stir in the soy sauce and miso paste until fully dissolved
  • Add the ramen noodles to the pot and cook according to the package instructions ,usually around 3-4 minutes
  • Introduce the cooked chicken or tofu, mushrooms, and spinach or pak choi to the pot. Allow them to heat through for another 2-3 minutes.
  • Taste the broth and adjust seasoning with salt and pepper as needed.
  • Divide the noodles and broth between two bowls. Top each bowl with a soft-boiled egg, halved. Garnish with spring onions and any additional toppings you prefer such as nori sheets, sesame seeds, or chilli flakes.