A Comforting, Gourmet Vegetarian Dish Created by Nicol Retailer Limited: Crispy Maitake Mushroom Risotto. Crispy Maitake Mushroom Risotto | Nicol Retailer Limited offers a delightful culinary experience perfect for a comforting meal.
There’s something undeniably special about a bowl of risotto — the way it soothes, satisfies, and feels like a warm embrace after a long day. And when you elevate that comfort classic with the nutty, earthy tones of maitake mushrooms, you step into gourmet territory. This delights both the palate and the soul. This is precisely what Crispy Maitake Mushroom Risotto | Nicol Retailer Limited has achieved.
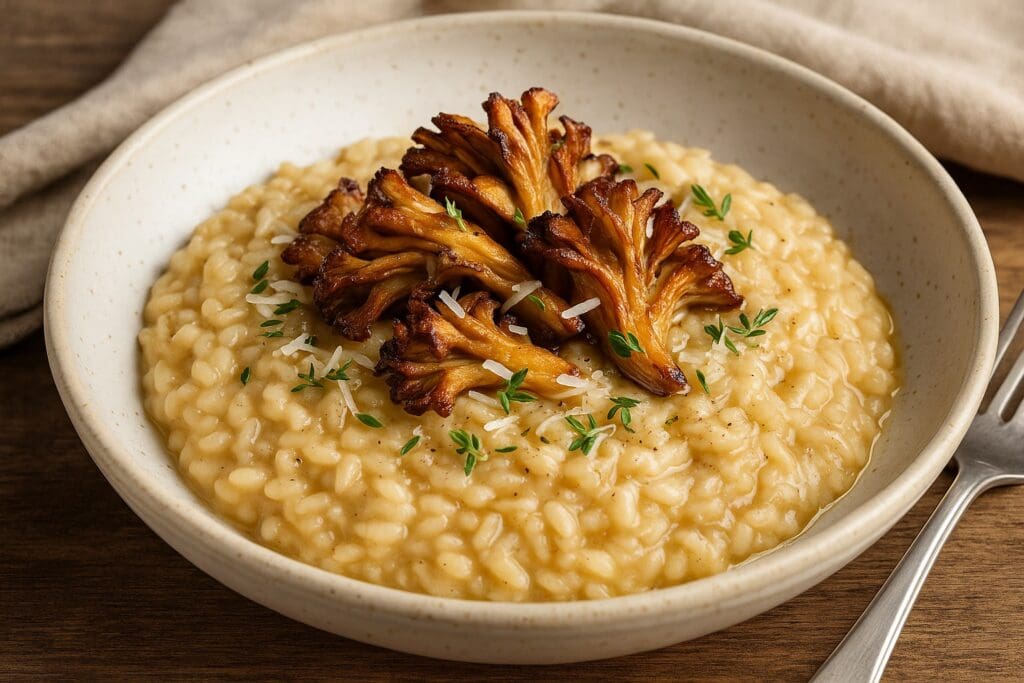
This Crispy Maitake Mushroom Risotto with Parmesan & Thyme Butter captures everything we love about home cooking and fine dining in one dish. It is rich, creamy, aromatic, and deeply satisfying. Each spoonful is layered with texture: velvety arborio rice infused with thyme and butter. It’s topped with crispy, golden maitake mushrooms that bring a burst of umami with every bite.
Made with premium Maitake Mushrooms (500g) from Nicol Retailer Limited, this recipe celebrates the beauty of simple, high-quality ingredients. These are turned into something truly exceptional. This is why the Crispy Maitake Mushroom Risotto | Nicol Retailer Limited is unique.
Why You’ll Love This Recipe
This isn’t just another risotto — it’s a sensory experience. The maitake mushrooms (also known as hen-of-the-woods) have a beautifully meaty texture. They crisp up perfectly in butter. Meanwhile, the risotto base remains creamy and comforting. Here’s why Crispy Maitake Mushroom Risotto | Nicol Retailer Limited is irresistible:
- Restaurant-quality flavour with ingredients you can easily find at home.
- Rich, earthy aroma from the maitake mushrooms and thyme butter.
- Naturally vegetarian and gluten-free, with simple swaps for vegan diets.
- Ready in under 45 minutes, yet elegant enough for dinner parties.
Each bite tells a story of warmth, flavour, and craft. This is exactly what Nicol Retailer Limited stands for: premium ingredients that make everyday meals feel extraordinary.
Recipe
There’s something irresistibly comforting about the slow rhythm of making risotto. The gentle stirring, the rich aroma of garlic and butter, and that moment when the rice turns perfectly creamy. This Crispy Maitake Mushroom Risotto with Parmesan & Thyme Butter transforms a humble classic into an elegant, restaurant-quality dish. It is bursting with earthy, nutty flavour.
Using premium Maitake Mushrooms (500g) from Nicol Retailer Limited, this recipe celebrates the magic of simple ingredients done right. The maitake — also known as hen of the woods — brings deep umami and a delicate crispiness. This beautifully complements the creamy risotto base. Whether you’re planning a cosy dinner for two or an indulgent weekend meal, this dish promises warmth, comfort, and a touch of gourmet flair in every bite. Here is the recipe for Crispy Maitake Mushroom Risotto | Nicol Retailer Limited:

Crispy Maitake Mushroom Risotto with Parmesan & Thyme Butter
Ingredients
- 400 g Maitake Mushrooms (hen-of-the-woods)
- 250 g arborio rice
- 1 ltr vegetable stock, warm
- 1 small onion, finely diced
- 2 garlic cloves, minced
- 75 ml dry white wine
- 2 tbsp olive oil
- 2 tbsp butter (plus extra for finishing)
- 50 g grated parmesan (or vegan alternative)
- 1 tsp thyme leaves
- Sea salt and black pepper, to taste
- truffle oil for drizzling (optional)
Instructions
Crisp the Maitake
- Tear the mushrooms into large pieces. Heat 1 tbsp olive oil and a little butter in a large pan. Sauté the maitake over medium-high heat until golden and crisp (5–7 mins). Remove and set aside for topping.
Start the Risotto
- In the same pan, add another tbsp of olive oil. Sauté onion and garlic until soft and fragrant. Add rice and toast for 1–2 mins until slightly translucent.
Deglaze & Simmer
- Pour in the white wine, stirring until absorbed. Add warm vegetable stock, one ladle at a time, stirring gently between each addition. Continue for about 20 minutes, or until the risotto is creamy and the rice is tender but al dente
Add Flavour & Finish
- Stir in butter, parmesan, thyme, and half the crispy maitake. Adjust seasoning with salt and pepper.
Serve Beautifully
- Spoon the risotto into bowls and top with the remaining crispy mushrooms. Drizzle lightly with truffle oil and finish with extra parmesan and fresh thyme.
Notes
Nutrition
Serving Suggestions & Pairings
Every spoonful of this Crispy Maitake Mushroom Risotto with Parmesan & Thyme Butter feels like a warm embrace — rich, aromatic, and deeply satisfying. To make the experience even more unforgettable, pair it with flavours and textures that enhance its creamy, earthy character.
For a lighter meal, serve your risotto alongside:
- Rocket salad with lemon vinaigrette — its peppery freshness cuts through the richness.
- Garlic-roasted asparagus or tenderstem broccoli for colour and crunch.
- Caramelised shallots or roasted cherry tomatoes for a sweet contrast.
If you’re hosting, a basket of warm artisan bread drizzled with olive oil makes the perfect finishing touch — ideal for soaking up every last drop of creamy sauce.
Seasonal Twists
One of the joys of risotto is how easily it adapts to the seasons:
- In spring, add green peas or asparagus tips for brightness.
- In autumn, fold in roasted butternut squash or sage for an earthy depth.
- In winter, stir through a touch of truffle oil or porcini powder for luxurious warmth.
Each variation keeps the dish exciting while highlighting the quality of the Maitake Mushrooms — their flavour is the heart of the recipe.
A Dining Experience to Remember
Serve this dish in warm bowls with a drizzle of melted butter, a sprinkle of fresh thyme, and a few extra crisp maitake pieces on top. Light a candle, pour your favourite wine, and let the gentle aroma of thyme and garlic fill the room.
This risotto isn’t just food — it’s a moment of calm, crafted with love and quality ingredients from Nicol Retailer Limited, where gourmet inspiration meets everyday simplicity.
Conclusion
Some dishes comfort you — others completely captivate you. This Crispy Maitake Mushroom Risotto with Parmesan & Thyme Butter is one of those rare recipes that does both. From the first creamy bite to the last crisp piece of golden maitake mushroom, it’s a symphony of texture and flavour — rustic, indulgent, and effortlessly elegant.
What makes this risotto truly special is the quality of the ingredients. Using premium Maitake Mushrooms (500g)
from Nicol Retailer Limited, every forkful carries deep umami richness and natural sweetness. This turns an everyday meal into a fine-dining experience. This is the essence of Crispy Maitake Mushroom Risotto | Nicol Retailer Limited.
Whether you’re preparing it for loved ones, serving it as a show-stopping vegetarian main, or simply treating yourself to something extraordinary, this dish proves that comfort food can also be artful and inspiring.
Created with care. Crafted with flavour. Delivered by Nicol Retailer Limited — bringing the world’s finest ingredients to your kitchen.
🛒 Shop This Recipe – Crispy Maitake Mushroom Risotto
Recreate this creamy, crispy Maitake Mushroom Risotto with Parmesan & Thyme Butter using premium ingredients from Nicol Retailer Limited. Each product is carefully selected to bring gourmet flavour and quality to your kitchen.
- 🍄 Maitake Mushrooms (500g) – The star ingredient, offering deep umami flavour and a crisp, golden texture.
- 🧈 Butter & Olive Oil – For a rich, velvety risotto base.
- 🧄 Garlic & Fresh Herbs – Adds fragrance and warmth to your dish.
- 🧂 Gourmet Parmesan Cheese – Brings creamy, salty balance to the mushrooms.
- 🍷 White Wine or Stock Base – Essential for classic risotto texture and depth.
All premium ingredients are available to buy from Nicol Retailer Limited — your trusted UK supplier of gourmet, vegetarian, and Mediterranean cooking essentials.