Posted on

The Ultimate Quinoa Recipe: Stuffed Bell Peppers with a Twist

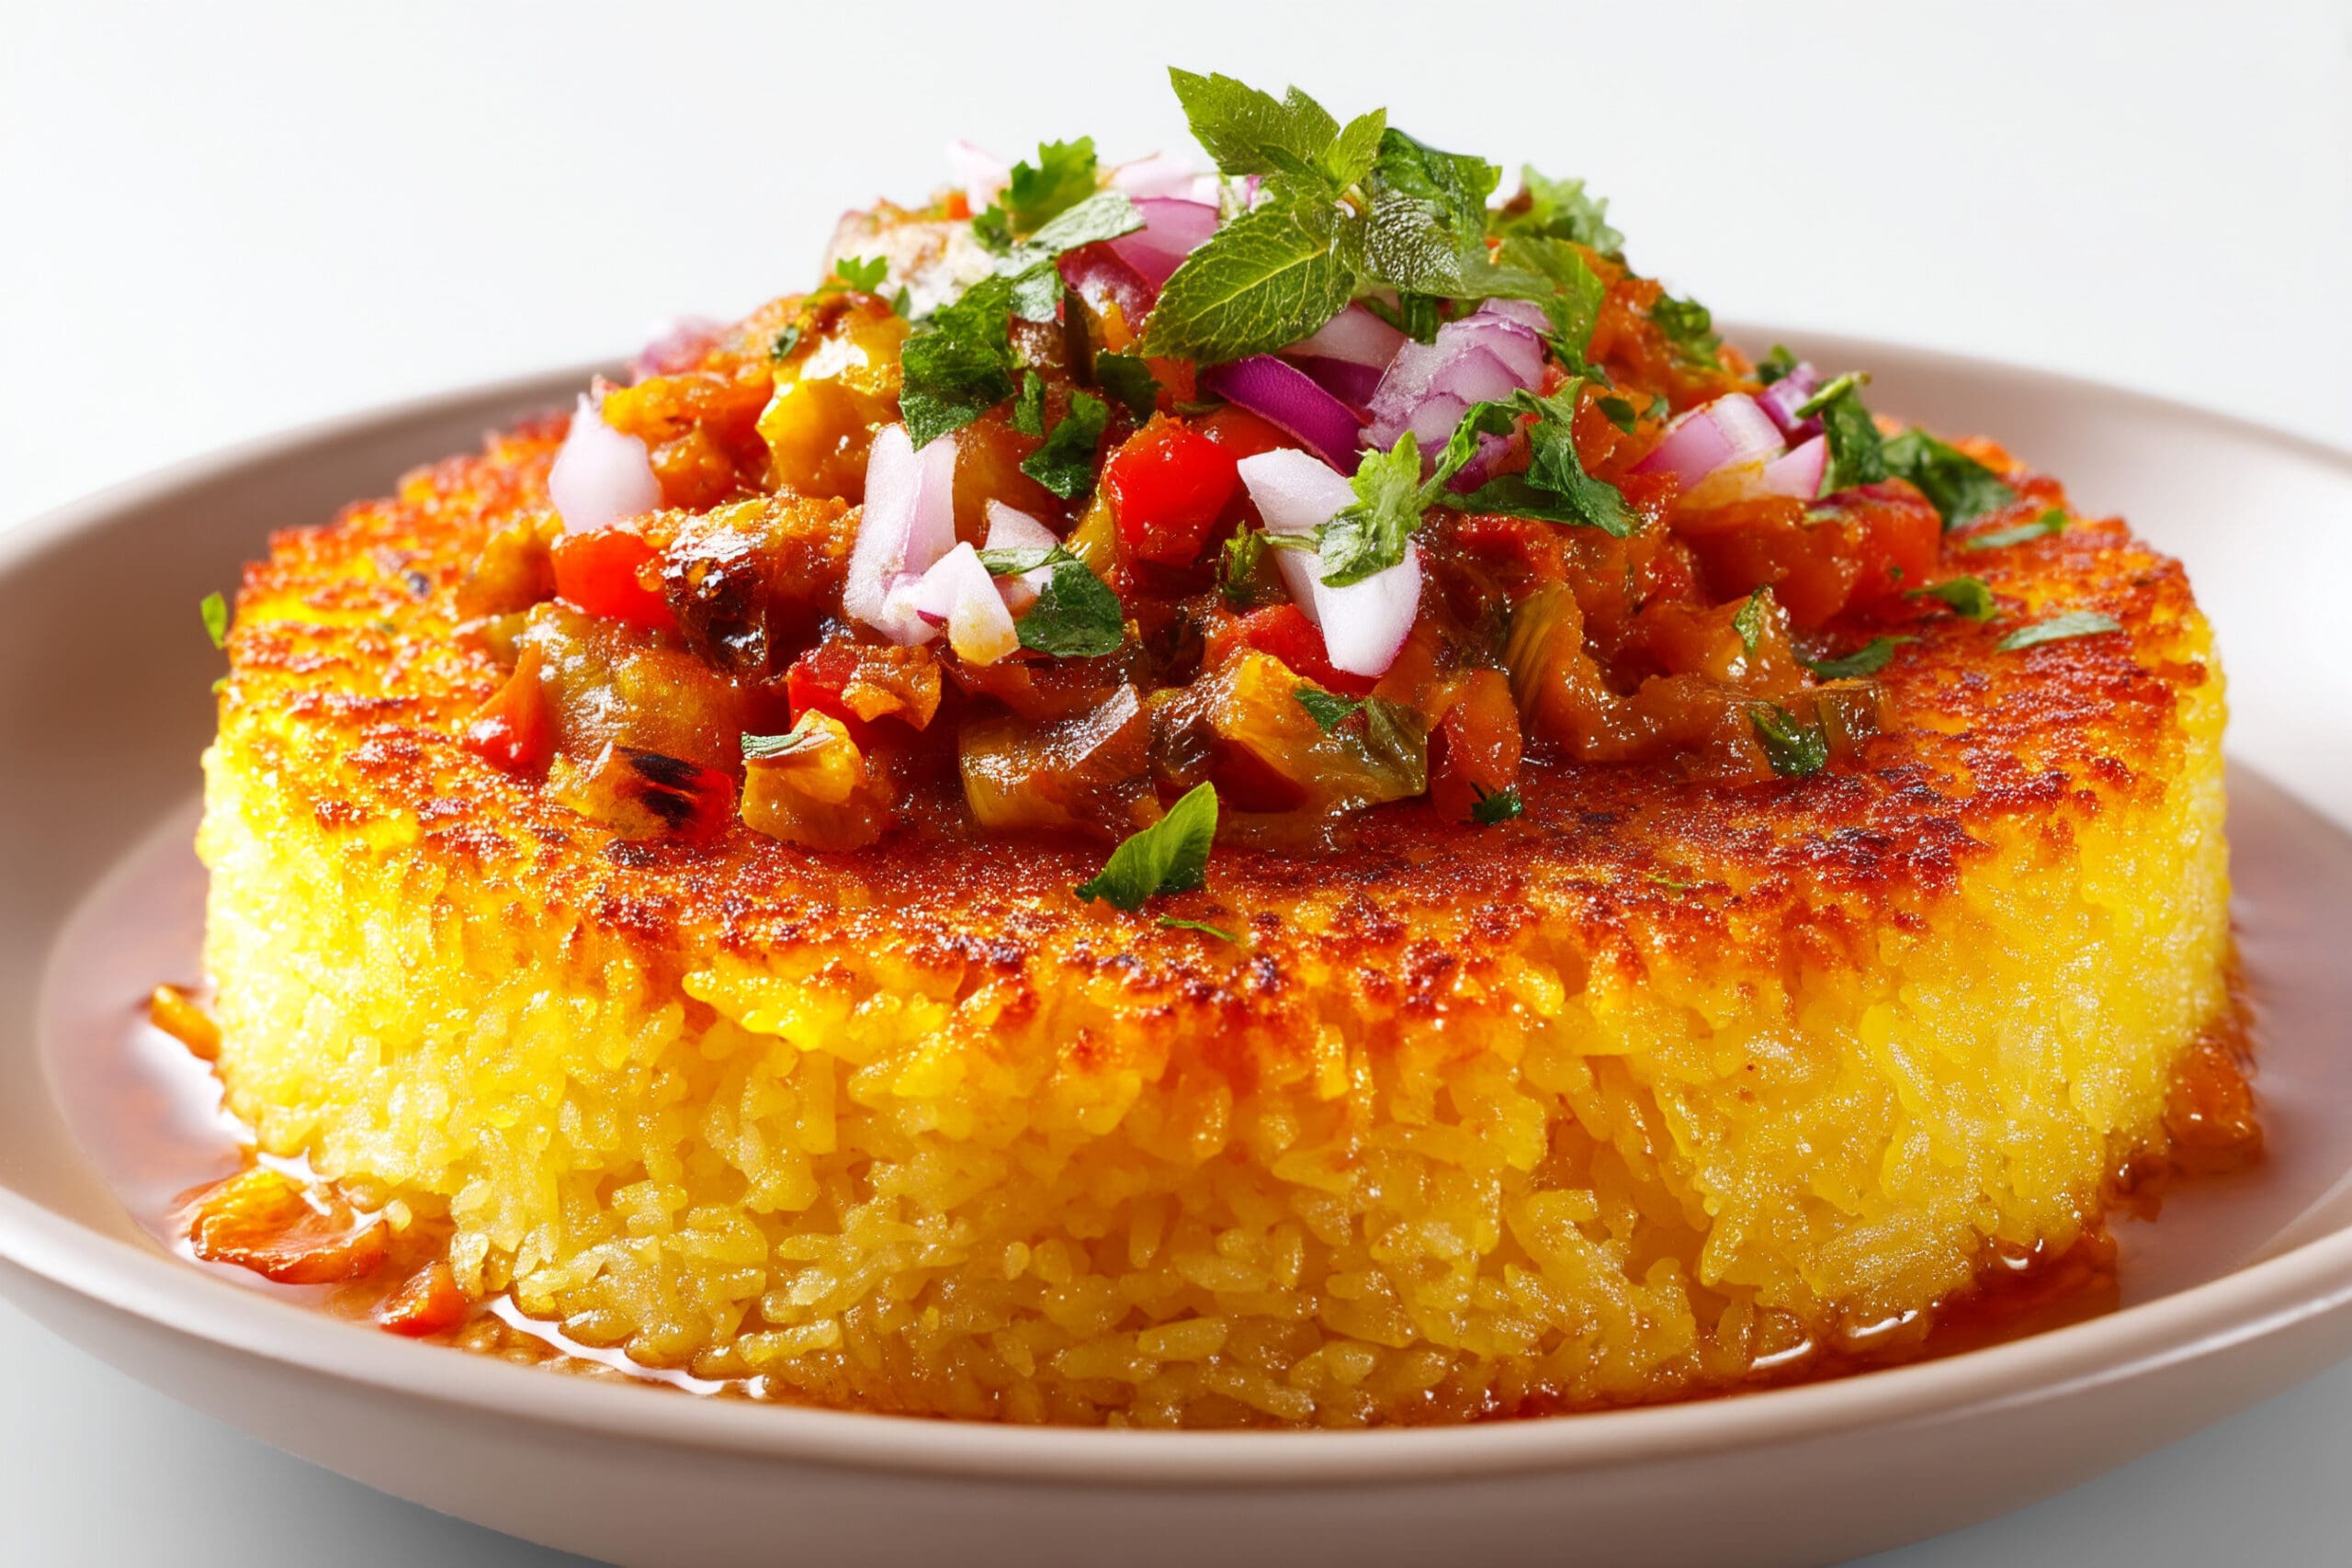
Craving a meal that’s both nutritious and bursting with flavour? Our Stuffed Bell Peppers Recipe is just what you need! Imagine biting into a colourful bell pepper, overflowing with a hearty mix of quinoa, sweet corn, and black beans. It’s a feast for your eyes and your taste buds! This quinoa recipe is perfect for anyone looking to add a little excitement to their dinner routine. Whether you’re cooking for your family, hosting friends, or just treating yourself, The Ultimate Quinoa Recipe: Stuffed Bell Peppers with a Twist are sure to impress.

So, what makes this dish so special? For one, it’s incredibly versatile. You can easily customise the filling to suit your tastes. Want a bit more spice? Add some chopped jalapeños. Looking for extra protein? Toss in some shredded chicken or tofu. The options are endless for The Ultimate Quinoa Recipe: Stuffed Bell Peppers with a Twist!

Another reason to love this recipe is its simplicity. Even if you’re not a seasoned chef, you’ll find the steps straightforward and easy to follow. Plus, the ingredients for this ultimate quinoa recipe are easily accessible and likely already in your pantry.
But let’s not forget the health benefits. This recipe is packed with vitamins, minerals, and fibre, making it a nutritious choice for any meal. The combination of quinoa and black beans provides a hearty dose of plant-based protein, while the bell peppers add a delightful crunch and a splash of colour to your plate. This truly is the ultimate quinoa recipe.
Ready to get started? Grab your apron and let’s dive into the world of stuffed bell peppers!

Stuffed Bell Peppers with Quinoa, Sweet Corn, and Black Beans Recipe

Print Recipe
Looking for a healthy, colourful, and absolutely delicious meal that’s perfect for any day of the week? These Stuffed Bell Peppers with Quinoa, Sweet Corn, and Black Beans are everything you need – hearty, high-protein, and completely plant-based! Plus, they’re gluten-free, budget-friendly, and easy to prep ahead.
Course Main Course
Diet Vegetarian
Keyword Stuffed Bell Peppers with Quinoa, Sweet Corn, and Black Beans Recipe
Prep Time 20 minutes
Cook Time 35 minutes
Servings 4 People
Calories 5

Instructions

Prepare the Bell Peppers

  • Preheat your oven to 190°C (375°F). Slice the tops off the bell peppers and remove the seeds and membranes inside. If needed, carefully trim the bottoms so they stand upright, but avoid cutting through to the hollow. Place them upright in a lightly greased baking dish.

Cook the Quinoa

  • In a medium saucepan, bring the quinoa and vegetable stock (or water) to a boil. Reduce the heat to low, cover, and simmer for about 15 minutes, or until the quinoa is tender and the liquid has been absorbed. Fluff with a fork and set aside.

Prepare the Filling

  • Heat the olive oil in a large pan over medium heat. Add the onion and cook until soft, about 3–4 minutes. Stir in the garlic, cumin, smoked paprika, and chilli powder (if using) and cook for another minute, until fragrant.
  • Add the sweetcorn, black beans, and diced tomato to the pan, stirring well. Cook for 3–4 minutes, until heated through. Stir in the cooked quinoa and season with salt and pepper to taste.

Stuff the Peppers

  • Generously spoon the quinoa mixture into the hollowed-out bell peppers, pressing gently to fill them completely. If you like, sprinkle grated cheddar cheese over the top of each stuffed pepper.

Bake

  • Cover the dish with aluminium foil and bake in the preheated oven for 25 minutes. Remove the foil and bake for another 10 minutes, or until the peppers are tender and the Mozzarella Vegan cheese (if used) is melted and golden.

Garnish and Serve

  • Remove the stuffed peppers from the oven and let them cool slightly. Sprinkle with chopped coriander, if desired, and serve warm.

Notes

Tips
– If you have extra filling, serve it on the side or save it for another meal.
– For a non-vegan version, simply skip the cheddar cheese or mozzarella cheese.

Nutrition

Calories: 5kcal | Carbohydrates: 0.5g | Protein: 0.2g | Fat: 0.4g | Saturated Fat: 0.1g | Polyunsaturated Fat: 0.1g | Monounsaturated Fat: 0.3g | Sodium: 1mg | Potassium: 20mg | Fiber: 0.2g | Sugar: 0.1g | Vitamin A: 253IU | Vitamin C: 0.04mg | Calcium: 6mg | Iron: 0.4mg

Serving Suggestions

Looking for the perfect way to serve your stuffed bell peppers? Here are some fantastic ideas to elevate your meal:

  • Garnishes – Add a pop of colour and flavour with fresh cilantro, a squeeze of lime juice, or a sprinkle of tangy feta cheese. These simple toppings can make a big difference and add an extra layer of deliciousness to The Ultimate Quinoa Recipe: Stuffed Bell Peppers with a Twist.
  • Accompaniments – Pair your stuffed peppers with a fresh green salad drizzled with a light vinaigrette. The crispness of the salad will complement the hearty stuffed peppers beautifully. Another great side is a dollop of creamy guacamole, which adds a rich and satisfying texture to your plate.
  • Dips and Sauces – Elevate your dish by serving it with a side of spicy salsa or a cool, refreshing cucumber yogurt dip. These sauces can enhance the flavours and provide a delightful contrast to the warm stuffed peppers.
  • Breads and Grains – Serve your stuffed peppers alongside a slice of crusty garlic bread or a small portion of fluffy couscous. These sides are perfect for soaking up any extra juices and adding a satisfying crunch to your meal.

Recipe Variations

Ready to take your Stuffed Bell Peppers Recipe to the next level? Let’s talk variations! Have you ever thought about adding a Mediterranean twist? Try stuffing your peppers with a mix of quinoa, black olives, sun-dried tomatoes, and a sprinkle of feta cheese. The combination of flavours will transport you straight to a seaside taverna! This ultimate quinoa recipe really shines in its adaptability.


For those who love a bit of heat, consider mixing in some chopped jalapeños or a dash of cayenne pepper. You could even add a smoky chipotle sauce to the filling for a bold, spicy kick. How about adding some diced avocado for a creamy texture that balances out the spice?


If you’re looking to boost the protein content, shredded chicken or crumbled tofu makes a fantastic addition. You can also experiment with different grains like wild rice or farro for a unique texture and flavour profile. Chickpeas are another great option—they add a nutty flavour and extra fibre.


Don’t forget to think about the herbs and spices! A sprinkle of fresh basil or cilantro can brighten up the dish, while a pinch of cumin or smoked paprika can add depth and warmth.


The true beauty of this stuffed bell peppers recipe lies in its flexibility. You can adjust the ingredients based on what you have on hand or what’s in season. Plus, involving your family or friends in the process can make cooking even more fun.


We’d love to hear your creative takes on this recipe! Share your favourite variations and tips in the comments below. Your ideas could inspire others to create their own delicious versions of The Ultimate Quinoa Recipe: Stuffed Bell Peppers with a Twist. Happy cooking and bon appétit!

Posted on

Amazing Tahdig – Crispy Saffron Rice Recipe

Are you ready to discover the magic of crispy saffron rice, otherwise known as Tahdig? This Persian culinary masterpiece is renowned for its flavourful, crispy crust and aromatic saffron-infused rice. Creating the perfect Tahdig might seem challenging, but with Nicol Retailer’s expert tips and quality ingredients, you can achieve restaurant-level results right in your kitchen. Let’s dive into the world of Amazing Tahdig – Crispy Saffron Rice Recipe and elevate your home-cooked meals with this delicious dish.

Tahdig is a celebrated dish in Persian cuisine, cherished for its unique texture and rich flavour. The name “Tahdig” translates to “bottom of the pot,” referring to the golden, crispy layer of rice that forms at the base of the cooking pot. This culinary delight is more than just a side dish; it’s a centerpiece that steals the spotlight at any dining table.

Crafting the ideal Tahdig requires a blend of skill, patience, and top-quality ingredients. High-quality basmati rice and pure saffron are the stars of this dish, providing the essential components for its signature taste and appearance. Nicol Retailer’s selection of premium saffron and basmati rice ensures that you’re starting with the best possible foundation for your culinary creation. This is key for an amazing Tahdig recipe.

Whether you’re new to cooking Persian cuisine or looking to perfect your technique, Nicol Retailer offers the guidance and products you need. Imagine the satisfaction of serving a dish that not only tastes incredible but also looks stunning on the plate. With the right approach and ingredients, you can turn a simple meal into an extraordinary dining experience. So get ready to impress your family and friends with the unforgettable flavours of this amazing crispy saffron rice recipe.

Looking for a step-by-step recipe?

Check out our full recipe for Tahdig with tomato, mint & red onion – easy instructions, and tips for perfect results every time:

Tahdig: Crispy Saffron Rice Recipe

Print Recipe
Looking for a show-stopping rice dish that’s packed with flavour, texture, and colour? This Tahdig (crispy saffron rice) recipe is the ultimate centrepiece for any meal. Golden, aromatic, and satisfyingly crunchy, this traditional Persian dish is a celebration of simple ingredients cooked with care – and it's easier to make than you might think!
Comes with a vibrant, zesty side of cooked tomatoes, fresh mint, and red onion – a match made in food heaven.
Course Main Course
Cuisine Middle East
Diet Vegan, Vegetarian
Keyword Crispy Saffron Rice Recipe, Tahdig
Prep Time 20 minutes
Cook Time 45 minutes
Servings 4 People
Calories 486

Instructions

Prepare the Rice

  • Rinse the rice under cold running water several times until the water runs clear. This helps remove excess starch and ensures the grains stay separate during cooking.

Cook the Rice

  • Bring a large pot of salted water to a boil. Add the rinsed rice and cook for 5–7 minutes, or until the grains are partially cooked but still firm in the centre. Drain and set aside.

Prepare the Tahdig Base

  • In a small bowl, combine the plain yoghurt, 1 tablespoon of the saffron water, 2 tablespoons of the melted butter, and 1 cup of the partially cooked rice. Mix well until the rice is coated.

Assemble the Dish

  • In a non-stick pot or pan, heat the vegetable oil and the remaining melted butter over medium heat. Spread the yoghurt-rice mixture evenly over the bottom of the pan to create the base layer.

Cook the Tahdig

  • Cover the pot with a clean kitchen towel or tea towel to absorb excess moisture, then place the lid tightly over it. Reduce the heat to low and let the rice cook for about 30–40 minutes. The base will develop a golden, crisp crust while the steam cooks the rest of the rice.

Prepare the Tomato Side

  • While the rice steams, heat 1 tbsp olive oil in a small frying pan. Add the chopped tomatoes and cook for 5–7 minutes until softened.
  • Stir in the red onion, mint, salt, and pepper to taste. Remove from heat and set aside.

Serve the Tahdig:

  • To release the Tahdig, carefully run a spatula around the sides of the pan. Place a large plate over the pan and quickly invert it to flip the rice out. You should see a beautiful golden crust.
    Serve hot with the warm tomato-mint-red onion mixture spooned on the side or over the rice.

Notes

Tips

Creating the perfect Tahdig can be a bit tricky for beginners, but with some essential tips, you’ll be on your way to mastering this delightful dish. Start by ensuring your basmati rice is parboiled correctly; it should be partially cooked but still firm. Use a non-stick pot to make flipping the Tahdig onto a serving platter easier and to prevent sticking. Patience is key—allow the rice to cook slowly on low heat to achieve that coveted golden, crispy crust without burning. Use a clean kitchen towel under the pot lid to absorb excess moisture and ensure a crispy texture.
Lastly, resist the urge to check on your Tahdig frequently; lifting the lid too often can disrupt the cooking process. With Nicol Retailer’s top-notch ingredients, your first attempt at Tahdig will be a delicious success.

Nutrition

Calories: 486kcal | Carbohydrates: 80g | Protein: 7g | Fat: 14g | Saturated Fat: 2g | Polyunsaturated Fat: 6g | Monounsaturated Fat: 5g | Trans Fat: 0.1g | Sodium: 5mg | Potassium: 115mg | Fiber: 1g | Sugar: 0.1g | Calcium: 28mg | Iron: 1mg

Impress at Your Next Dinner Party

Tahdig isn’t just delicious – it’s interactive. The moment you flip the pan and reveal that crispy layer is a theatrical moment that never fails to impress. An amazing Tahdig dish can be the highlight of your dinner party.

Plus, with premium ingredients from Nicol Retailer, like high-quality basmati rice and aromatic saffron, your homemade Tahdig will look and taste restaurant-worthy.

Serving suggestion

If you’ve never tried Tahdig, prepare to fall in love. This Persian classic is so much more than a side dish – it’s a culinary masterpiece that transforms humble rice into a golden, crispy delight. Whether you’re planning a dinner party, a family gathering, or a quiet night in, Amazing Tahdig – Crispy Saffron Rice Recipe is guaranteed to elevate your meal and wow your guests.

Tahdig is the ultimate crowd-pleaser, pairing beautifully with a wide range of mains. Serve it alongside:

  • A hearty lentil or bean stew
  • Succulent grilled meats or kebabs
  • Roasted seasonal vegetables
  • Traditional Persian favourites like Ghormeh Sabzi or Fesenjan

Its crispy base and tender saffron-infused rice make it the ideal complement to both bold and subtle flavours. The contrast in textures and the aromatic warmth of saffron create a satisfying dish that holds its own or enhances any main course.
Want to make your Tahdig even more eye-catching? Garnish it like a pro:

  • Sprinkle over slivered almonds or chopped pistachios for a satisfying crunch and a burst of vibrant colour
  • Add a handful of fresh herbs such as parsley, dill, or coriander for a fresh, fragrant finish
  • A squeeze of lemon just before serving can brighten the whole dish

These simple additions don’t just boost the flavour – they also turn your Tahdig into a centrepiece that looks as stunning as it tastes. When following an amazing saffron and rice recipe, such garnishes can elevate the dish visually.

Tahdig is a celebration of texture, flavour, and tradition. Whether you’re preparing a Persian feast or simply looking for something different, this crispy saffron rice dish is guaranteed to bring a touch of elegance and excitement to your table.

Posted on

Elevate Your Palate with Burrata: Roasted Pistachios, Honey & Balsamic Glaze

Burrata, an exquisite gem in the world of cheese, hails from the beautiful landscapes of Italy. Its unique composition—a delicate mozzarella shell encasing a creamy core—makes it a true delight for the senses. Pairing it with roasted pistachios honey and balsamic glaze can elevate the experience even further. As you slice into it, the soft interior oozes out, promising a luxurious culinary experience.

This Italian treasure has gained a well-deserved reputation among food enthusiasts and chefs alike. Its mild, milky flavour pairs seamlessly with a wide variety of ingredients, making it a versatile addition to any dish. Today, we explore a remarkable recipe that marries the lush texture of Burrata with the crunch of roasted pistachios, the natural sweetness of honey, and the tangy depth of balsamic glaze.

Imagine the moment you first encounter Roasted Pistachio Burrata with Honey & Balsamic Glaze. The visual appeal alone is enough to make your mouth water: the golden-green pistachios scattered over the creamy white Burrata, glistening with honey, all elegantly drizzled with dark balsamic glaze. Each element is chosen not just for its flavour but also for its ability to create a balanced, harmonious dish.

The contrast between the smooth Burrata and the crunchy pistachios creates a textural symphony that will make each bite an adventure. The honey adds a floral sweetness, while the balsamic glaze provides a sophisticated tanginess, resulting in a dish that’s complex yet accessible. This combination elevates a simple cheese into something truly special, making it a must-try for anyone looking to impress at their next dinner gathering.

Stay tuned as we guide you through crafting this delightful recipe, ensuring you capture the essence of Italian cuisine right in your own kitchen.

Roasted Pistachio Burrata with Honey & Balsamic Glaze Recipe

Print Recipe
Looking for an easy yet elegant appetiser that will impress your guests? This Roasted Pistachio Burrata is a game-changer! Creamy Burrata di Puglia, crunchy roasted pistachios, sweet honey, and tangy balsamic glaze come together in a flavour-packed dish that’s perfect for any occasion. Serve it with crusty bread, focaccia, or crackers for the ultimate indulgence!
Course Appetizer, brunch, lunch
Cuisine Italian
Diet Vegetarian
Keyword Burrata, Pistachio, Roasted Pistachio Burrata with Honey & Balsamic Glaze recipe
Prep Time 15 minutes
Cook Time 10 minutes
Servings 4 People
Calories 170

Instructions

Prepare the Pistachios:

  • Preheat your oven to 180°C (350°F). Spread the chopped pistachios on a baking tray. Drizzle with 1 tablespoon of olive oil and season with a pinch of salt and pepper. Toss to coat evenly.
  • Place the tray in the oven and roast for about 8-10 minutes, or until the pistachios are golden and fragrant. Keep an eye on them to avoid burning. Once done, set aside to cool.

Assemble the Dish:

  • Place the burrata balls on a serving platter. Carefully tear them open to expose the creamy interior.
  • Drizzle the remaining olive oil over the burrata. Scatter the roasted pistachios generously on top. Drizzle the honey and balsamic glaze over the cheese and pistachios.
  • Garnish with fresh basil or thyme leaves. Season with additional salt and pepper, if desired. Serve immediately with crusty bread on the side.

Nutrition

Calories: 170kcal | Carbohydrates: 13g | Protein: 2g | Fat: 13g | Saturated Fat: 5g | Polyunsaturated Fat: 1g | Monounsaturated Fat: 5g | Sodium: 1mg | Potassium: 6mg | Fiber: 0.02g | Sugar: 10g | Vitamin C: 0.1mg | Calcium: 1mg | Iron: 0.1mg

Why Roasted Pistachios?

Roasted pistachios bring an exceptional depth to this dish, enhancing both flavour and texture in a way that’s hard to match. When you roast pistachios, they develop a rich, nutty aroma and a satisfying crunch that beautifully balances the creamy Burrata. This delightful texture contrast elevates the dish’s overall appeal, making each bite a unique experience.

In addition to their culinary virtues, pistachios are a powerhouse of nutrients. They are rich in protein, healthy fats, and antioxidants, which are beneficial for heart health and can support weight management. Including roasted pistachios in your meals is a delectable way to enjoy these health perks.

Their unique flavour profile also enhances the dish’s complexity. The nutty notes of roasted pistachios pair perfectly with the mild, creamy Burrata, adding an intriguing layer of taste that makes the dish stand out. The process of roasting intensifies their flavour, bringing out subtle, earthy tones that complement the other ingredients beautifully.

Roasted pistachios also add visual appeal to the dish. Their vibrant green and golden hues create a stunning contrast against the creamy white Burrata, making the dish as visually enticing as it is delicious. This not only makes for an Instagram-worthy presentation but also enhances your overall dining experience.

So, next time you’re looking to impress your guests, remember that the humble pistachio can transform your Roasted Pistachio Burrata with Honey & Balsamic Glaze into a culinary masterpiece.

Why You’ll Love This Recipe:

✅ Quick & Easy – Ready in just 10 minutes!
✅ Perfect for Entertaining – A guaranteed crowd-pleaser.
✅ Balanced Flavours – Creamy, crunchy, sweet, and savoury in one bite.
✅ Instagram-Worthy – A beautiful dish that looks as good as it tastes!

The Harmony of Honey and Balsamic Glaze

Honey brings a natural sweetness that beautifully complements the rich creaminess of Burrata. Its floral notes subtly enhance the cheese’s mild flavour, creating a delightful contrast that is neither too sweet nor overpowering. The honey adds a golden hue that glistens against the white Burrata, adding an inviting visual appeal.

Balsamic glaze, on the other hand, introduces a tangy richness that balances the sweetness of the honey and the creaminess of the Burrata. Made by reducing balsamic vinegar, this glaze has a concentrated flavour with a hint of sweetness, offering a deep, slightly acidic note that enriches the overall taste profile of the dish. The dark, glossy drizzle of balsamic glaze not only adds a sophisticated touch but also creates an appealing contrast against the honey and Burrata.

Together, honey and balsamic glaze work in perfect harmony, elevating the dish to a new level of culinary sophistication. The interplay of sweet and tangy, creamy and crunchy, ensures each bite is a well-rounded flavour experience. When combined with the roasted pistachios, these elements create a balanced and cohesive dish that is both visually stunning and tantalising to the taste buds. This thoughtful combination of ingredients ensures your Roasted Pistachio Burrata with Honey & Balsamic Glaze will be a memorable addition to any meal.

Serving Suggestions and Pairings

Roasted Pistachio Burrata with Honey & Balsamic Glaze is not just a feast for the palate but also a versatile addition to any table. To fully enjoy its flavours, consider serving it with a fresh, crusty loaf of sourdough or artisanal bread. The bread’s texture complements the creamy Burrata, allowing you to savour every bit of this delightful dish.

For a refreshing balance, pair it with a salad of rocket, cherry tomatoes, and thinly sliced red onions. Dress the salad lightly with olive oil and a splash of lemon juice to enhance the dish’s vibrant flavours. The peppery notes of the rocket and the sweetness of the tomatoes provide a wonderful contrast to the rich, creamy Burrata..

Whether for a dinner party or a quiet evening at home, these serving suggestions will elevate your Roasted Pistachio Burrata with Honey & Balsamic Glaze to a memorable dining experience.

Conclusion

Roasted Pistachio Burrata with Honey & Balsamic Glaze brings together an exquisite blend of flavours and textures that will captivate your palate. The creamy Burrata, paired with the nutty crunch of roasted pistachios, creates a delightful textural contrast that is both luxurious and satisfying. The addition of honey introduces a natural sweetness, while the balsamic glaze adds a rich, tangy depth, making every bite a harmonious symphony of taste.

This dish is more than just a culinary delight; it is an experience that combines simplicity and elegance in every mouthful. Whether you are hosting a dinner party or enjoying a quiet evening at home, this recipe will undoubtedly impress your guests and make you the star of the kitchen.

Preparing Roasted Pistachio Burrata with Honey & Balsamic Glaze is straightforward, requiring minimal effort for maximum impact. The roasting of the pistachios and the simple assembly of ingredients ensure that even novice cooks can achieve stunning results. Plus, its visual appeal makes it perfect for sharing on social media, creating a dish that is as beautiful as it is delicious.

Incorporating this recipe into your repertoire not only showcases your culinary skills but also brings a touch of Italian sophistication to your dining table. With its balanced flavours and eye-catching presentation, this dish is sure to become a favourite in your household.

So why not give it a try? With the luxurious creaminess of Burrata, the crunchy allure of roasted pistachios, and the delightful blend of honey and balsamic glaze, this recipe promises to be a memorable addition to your culinary adventures.

Posted on

How to Make Crispy Vegetable Tempura at Home

Crispy vegetable tempura offers a delightful way to enjoy a variety of fresh vegetables encased in a light, airy batter. This traditional Japanese dish has won the hearts of food lovers worldwide, thanks to its unique texture and the versatility of ingredients. Making vegetable tempura at home provides an opportunity to explore different vegetables and perfect the technique in your own kitchen.

The origins of tempura date back to the 16th century when Portuguese missionaries introduced the concept of frying food in batter to Japan. Over the centuries, it has evolved into a staple of Japanese cuisine, known for its delicate crunch and the subtle interplay of flavours, especially in crispy vegetable tempura.

The essence of good tempura lies in its simplicity. A minimalistic approach ensures that the natural flavours of the vegetables are highlighted. By using a basic batter of plain flour, cornflour, baking powder, salt, and ice-cold water, you can achieve the quintessential lightness that defines this dish, particularly when making crispy vegetable tempura.

One of the joys of making tempura is the freedom to experiment with a wide range of vegetables. Whether you prefer the sweetness of sweet potatoes or the earthiness of mushrooms, there’s something for everyone. The key is to maintain a consistent size and thickness for even cooking, ensuring each piece is perfectly coated and fried, resulting in the perfect crispy vegetable tempura.

The experience of preparing and enjoying homemade crispy vegetable tempura is both rewarding and educational, offering a glimpse into the artistry of Japanese culinary traditions.

How to Make Crispy Vegetable Tempura at Home:

Crispy Vegetable Tempura with Dipping Sauce

Print Recipe
Crispy, Crunchy, Delicious: Vegetable Tempura like you've never experienced before!
Indulge in the satisfying crunch of perfectly fried vegetables, coated in a light and airy batter. Paired with a delightful dipping sauce that enhances the flavours and leaves you craving for more.
Experience the ultimate satisfaction of biting into a piece of vegetable tempura, with each bite bursting with flavour and texture. Perfect for a quick snack or a tasty appetiser. Treat yourself to a plate of vegetable tempura today and elevate your snacking experience to a whole new level.
Course Appetizer, Side Dish, Snack
Cuisine Asian-inspired
Diet Vegan, Vegetarian
Keyword Crispy Vegetable Tempura with Dipping Sauce
Prep Time 15 minutes
Cook Time 20 minutes
Servings 4 People

Instructions

Preparation

  • Ina large bowl, combine the plain flour, cornflour, and baking powder. Gradually whisk in the sparkling water until you achieve a smooth batter. Be careful not to overmix; a few lumps are fine.
  • Prepare the vegetables by slicing them as directed. Keep the pieces relatively uniform to ensure even cooking.

Cooking the Tempura

  • Heat vegetable oil in a deep pan or wok to around 180°C (350°F). To test, drop a small amount of batter into the oil; it should sizzle and rise to the surface immediately.
  • Dip each vegetable piece into the batter, ensuring they are coated evenly. Carefully lower them into the hot oil, frying in batches to avoid overcrowding.
  • Fry each batch for about 2-3 minutes or until the tempura is crisp and lightly golden. Remove with a slotted spoon and drain on kitchen paper. Season with salt while still hot.

Making the Dipping Sauce

  • In a small bowl, combine soy sauce, rice vinegar, mirin, ginger, spring onion,and sesame oil. Mix well.

Serving

  • Arrange the tempura vegetables on a serving platter. Serve immediately with the dipping sauce on the side.

Suggestions for Serving

Serving crispy vegetable tempura with an eye for detail can elevate the dining experience. Arrange the tempura pieces on a serving platter with a touch of artistry, perhaps using a garnish of fresh herbs like coriander or chives. A few slices of lemon can add a burst of colour and a hint of zest, making the presentation visually appealing.

For a complete meal, consider pairing your tempura with other Japanese favourites. A bowl of steaming noodles or a side of delicate sushi can complement the light, crispy texture of the tempura beautifully. You could also serve it alongside a simple bowl of steamed rice and miso soup for a well-rounded, traditional Japanese meal.

Individual dipping bowls for the sauce can add a touch of elegance to the presentation. Ensure each guest has their own small bowl of the delightful dipping sauce , allowing them to enjoy the tempura at their own pace.

To add variety, include a selection of tempura vegetables on the platter. The contrasting colours and flavours can create an inviting visual feast, showcasing the appeal of crispy vegetable tempura.

Finally, for a more informal setting, serve the tempura as part of a sharing platter, allowing everyone to pick and choose their favourite pieces. This communal style of eating not only makes the meal more interactive but also highlights the versatility and appeal of crispy vegetable tempura.

Typical Mistakes and How to Prevent When Tempura Vegetables

A frequent issue in tempura preparation is ending up with a batter that’s too thick, leading to a heavy coating. Ensuring the batter is slightly thinner than pancake batter can help achieve the desired lightness. Another common mistake is not maintaining the oil temperature. Use a kitchen thermometer to keep it between 170-180°C to ensure the tempura crisps up properly.

Avoid overcrowding the pan, as this can lower the oil temperature and result in soggy tempura. Fry in small batches to maintain consistent heat. Additionally, cutting vegetables into uniform sizes ensures even cooking, preventing overcooked or undercooked pieces.

To keep the batter cold, place the mixing bowl in a larger bowl filled with ice. Cold batter creates a better texture for making crispy vegetable tempura. If the batter starts warming up, refrigerate it for a few minutes. You may also consider using Tempura Batter Mix instead to save time.

Lastly, drain excess oil using a wire rack instead of kitchen roll to prevent sogginess. By paying attention to these details, you can ensure a delightful and authentic crispy vegetable tempura experience.

Posted on

Perfectly Crispy Breaded Avocado Wedges Recipe

Avocados, with their creamy texture and rich flavour, have become a staple in many kitchens around the world. Their versatility allows them to be used in a variety of dishes, from salads and sandwiches to smoothies and desserts. One innovative way to enjoy this beloved fruit is by making breaded avocado wedges. For those looking for a great snack, the Perfectly Crispy Breaded Avocado Wedges Recipe offers a delightful combination of textures, with a crispy outer layer encasing the smooth, buttery avocado inside.

What makes breaded avocado wedges particularly appealing is their ability to be both a delicious treat and a nutritious snack. When you bite into a perfectly breaded wedge, you experience a satisfying crunch followed by the rich, creamy taste of the avocado. This contrast in textures makes it a unique and enjoyable eating experience.

Moreover, breaded avocado wedges can be easily customised to suit your taste preferences. Whether you prefer a hint of spice, a burst of fresh herbs, or a touch of cheese, the recipe can be adapted to meet your needs. This flexibility makes them a great option for entertaining guests or simply enjoying a tasty snack at home.

These wedges are also an excellent way to introduce avocados to those who might be hesitant to try them in their raw form. The familiar breaded coating can make the avocado more approachable and enjoyable for a wider audience. Whether you choose to fry or bake them, breaded avocado wedges are a delightful way to elevate your avocado game and try something new.

Here is the recipe:

Breaded Avocado Wedges Recipe

Print Recipe
Breaded avocado wedges are a delightful treat that brings together the creamy richness of avocados with a crispy outer layer. These wedges are perfect for snacking, adding a unique twist to traditional appetizers. The process involves coating slices of ripe avocado in a seasoned bread crumb mixture, ensuring every bite is full of flavour. Once coated, the wedges are either baked or fried to achieve that satisfying crunch. The contrast between the smooth interior and the crunchy exterior makes breaded avocado wedges a must-try for anyone looking to enjoy a delicious and inventive dish. They can be served with a variety of dips, such as spicy mayo or tangy lime aioli, to enhance their taste further. Whether you're hosting a gathering or just indulging in a treat for yourself, these avocado wedges are sure to impress.
Course brunch, lunch, snacks
Cuisine Vegetarian
Keyword Avocado Wedges Recipe, Breaded Avocado Wedges Recipe
Prep Time 15 minutes
Cook Time 10 minutes
Servings 4 People
Calories 99

Ingredients

Instructions

Prepare the Ingredients

  • Cut each avocado in half, remove the stone, and peel the skin.
  • Slice the avocado halves into wedges.

Set Up the Breading Stations

  • Place the flour in a shallow dish and season with salt and pepper.
  • add the vegan egg in a shallow dish, stir to combined.

Bread the Avocado Wedges

  • Coat each avocado wedge in flour, ensuring it’s fully covered. Shake off any excess
  • Dip the floured avocado wedge into the vegan egg.
  • Finally, press the wedge into the breadcrumb mixture, making sure it is well coated.

Cook the Avocado Wedges

  • Heat a generous amount of vegetable oil in a frying pan over medium heat.
  • Once the oil is hot, add the breaded avocado wedges in batches. Fry them for about 2-3 minutes on each side or until they are golden and crispy.
  • Remove the wedges from the pan and place them on a plate lined with kitchen paper to drain excess oil.

Serve

  • Arrange the avocado wedges on a serving platter.
  • Garnish with fresh coriander or parsley.

Nutrition

Calories: 99kcal | Carbohydrates: 18g | Protein: 3g | Fat: 1g | Saturated Fat: 0.3g | Polyunsaturated Fat: 1g | Monounsaturated Fat: 0.3g | Sodium: 183mg | Potassium: 55mg | Fiber: 1g | Sugar: 2g | Vitamin A: 123IU | Vitamin C: 0.003mg | Calcium: 46mg | Iron: 1mg

Suggestions for Serving

Once your delicious breaded avocado wedges are ready, consider these serving suggestions:

– Pair with a creamy garlic aioli or spicy sriracha mayo for dipping.

– Arrange the wedges on a platter with fresh herbs and a sprinkle of sea salt for an appealing presentation.

– Serve alongside a crisp salad or as part of a tapas spread to impress your guests.

Another delightful way to enjoy your avocado wedges is by incorporating them into a light and refreshing summer meal. You can serve them with a chilled gazpacho or a tangy ceviche for a vibrant and colourful spread. Alternatively, consider placing them inside a wrap with some grilled chicken, fresh veggies, and a drizzle of lime juice for a quick and satisfying lunch option.

For a more substantial meal, pair your wedges with a hearty grain bowl. Think quinoa or brown rice topped with roasted vegetables, a dollop of hummus, and a sprinkle of toasted seeds. The creamy avocado wedges will add a lovely texture and richness to the dish, making it a well-rounded and nutritious choice.

If you’re hosting a gathering, why not create an avocado-themed platter? Alongside your breaded wedges, include some guacamole, sliced avocado with a dash of chilli flakes, and avocado toast bites. This will not only look visually appealing but also cater to various taste preferences.

Finally, for a touch of indulgence, consider serving the wedges with a cheesy dip. A warm, melty cheese sauce or a classic blue cheese dip can add a rich and comforting element to the crispy avocado wedges, making them an irresistible treat for any occasion.

Nutritional Advantages

Avocados are a powerhouse of nutrients, making them an excellent addition to your diet. They contain a wealth of monounsaturated fats, which are known to support heart health by reducing bad cholesterol levels. Additionally, avocados are high in fibre, aiding in digestion and promoting a feeling of fullness, which can be beneficial for weight management.

Rich in vitamins such as Vitamin E and Vitamin C, avocados contribute to healthy skin and a robust immune system. They also provide a good amount of potassium, which helps regulate blood pressure and maintain proper muscle function.

When preparing breaded avocado wedges, there are several ways to retain or even enhance their nutritional benefits. Baking the wedges instead of frying them can reduce the amount of added fat, making for a lighter and healthier snack. Opting for wholemeal breadcrumbs instead of white breadcrumbs can increase the fibre content, adding to the dish’s nutritional profile.

Pairing your avocado wedges with nutrient-rich dips, such as a low-fat yoghurt dip or a homemade salsa, can further boost their health benefits. For those following a vegan diet, using aquafaba as an egg substitute can provide a plant-based alternative without compromising on taste or texture.

Incorporating these methods can help you enjoy your delicious breaded avocado wedges while reaping the numerous health benefits avocados offer.

Variations and Enhancements

Elevate your delicious breaded avocado wedges with these creative twists:

– Mix finely chopped fresh herbs such as parsley or coriander into the breadcrumb mixture for an added burst of freshness.

– Add a sprinkle of smoked paprika, cumin, or chilli powder to the breadcrumbs for an extra layer of flavour.

– For a touch of indulgence, incorporate grated Parmesan cheese into the breadcrumb mixture.

– Try using different types of breadcrumbs, such as panko or wholemeal, to vary the texture and nutritional content.

– For a hint of sweetness, drizzle the cooked wedges with a balsamic glaze or a touch of honey.

These variations will make your avocado wedges uniquely yours and offer exciting new taste experiences each time you make them. Enjoy experimenting with these ideas and delight in the results!