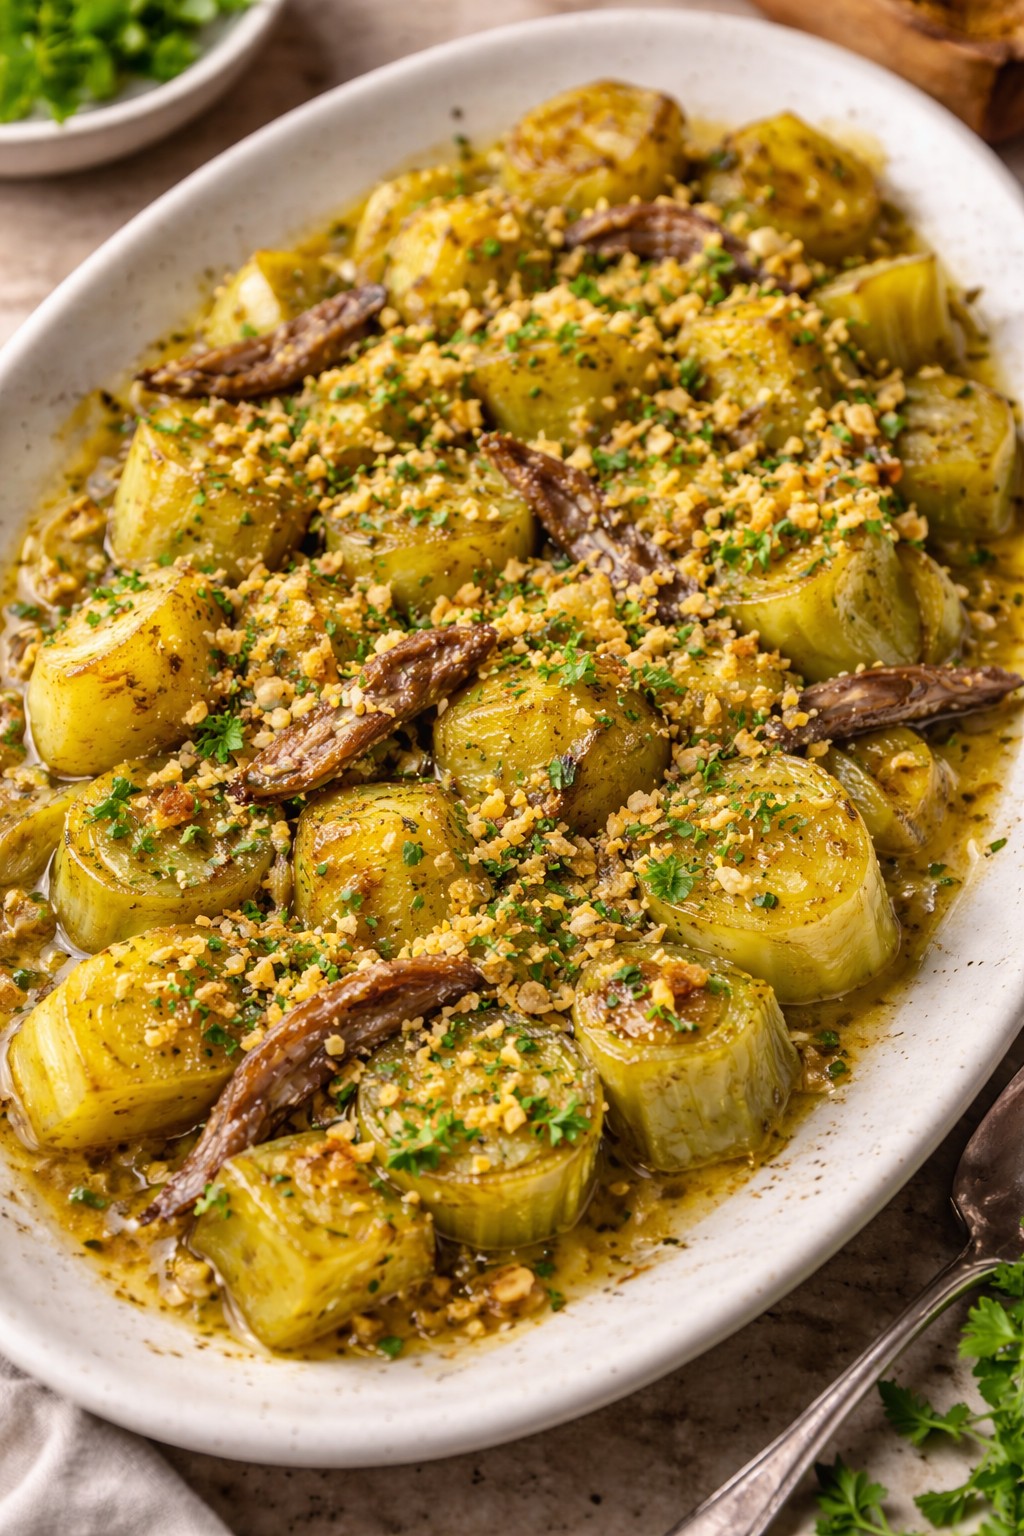
Explore the delicious world of Italian cooking with Nicol’s Easy Italian Recipes. This book is your guide to creating incredible Italian meals at home without fuss. Featuring a variety of recipes from savoury antipasti to decadent desserts, you’ll find something for every occasion. Each recipe is straightforward, ensuring that even novice cooks can enjoy the culinary magic of Italy. Rediscover the joy of home cooking with these beautifully simple Italian dishes.
A luxurious, no-bake dessert bursting with flavour — created by Nicol Retailer Limited.
If you’re searching for a dessert that delivers instant indulgence with minimal effort, you’ve just found your new favourite. This Warm Morello Cherry Compote with Vanilla Mascarpone Cream is the perfect balance of tangy, rich and velvety-smooth. It’s a restaurant-quality treat made effortlessly at home.
Made using Darta Pitted Morello Cherries from Nicol Retailer Limited, this recipe celebrates the bold, natural flavour of real cherries. Each spoonful is a beautiful contrast of flavours: warm, glossy cherry compote melting into cool, creamy mascarpone with hints of vanilla. It’s elegant, comforting and guaranteed to impress.
Whether you’re hosting a dinner party, treating yourself to something special, or looking for a showstopping dessert that’s ready in minutes — this recipe delivers every time. No baking. No fuss. Just pure flavour.
How to Make This Delicious Dessert
Creating this luxurious Morello Cherry & Mascarpone dessert couldn’t be easier — and you don’t need any baking skills to achieve a restaurant-quality result. Using rich, tangy Darta Pitted Morello Cherries from Nicol Retailer Limited, this recipe comes together in just minutes. It blends warm cherry compote with silky vanilla mascarpone for the perfect balance of sweetness, creaminess, and vibrant flavour. Whether you’re preparing a quick treat, entertaining guests, or looking for a showstopping dessert with minimal effort, this step-by-step method will guide you to a stunning result every time:
Warm Morello Cherry Compote Over Vanilla Mascarpone Cream
This irresistible no-bake dessert combines the bold, tangy flavour of Darta Pitted Morello Cherries with the silky richness of vanilla mascarpone cream for a luxurious treat ready in minutes. Warm cherries simmer into a glossy compote that melts beautifully over cool, whipped mascarpone, creating the perfect balance of sweet, tart and creamy. Elegant enough for entertaining yet simple enough for everyday indulgence, this quick 17-minute recipe is ideal for dinner parties, romantic desserts or effortless weeknight treats. Made with high-quality Morello cherries from Nicol Retailer, it delivers authentic flavour, stunning presentation and guaranteed satisfaction in every spoonful.
Course Dessert, Dinner Party Dessert, No-Baked Desset
Cuisine British (with a modern twist), European, Italian
Add cherries, a splash of cherry juice, sugar, vanilla and lemon juice to a small saucepan.
Simmer gently for 5–7 minutes until warm, glossy and slightly thickened.
Set aside (keep warm)
Prepare the Vanilla Mascarpone Cream
In a bowl, whisk mascarpone, double cream, icing sugar and vanilla until soft and creamy.
Chill for 10 minutes for the perfect texture.
Assemble the Dessert
Spoon a generous layer of mascarpone cream into bowls or glasses.
Top with warm Morello cherry compote.
Finish with crushed biscuits, mint, or chocolate shavings.
Notes
For the best flavour, always use high-quality Morello cherries like the Darta Pitted Morello Cherries from Nicol Retailer. Their natural tartness balances perfectly with the rich mascarpone cream.This recipe is no-bake and ready in under 15 minutes, making it ideal for quick desserts, entertaining, or when you need something impressive with minimal effort.To lighten the dessert, you can use reduced-fat mascarpone or single cream, or replace part of the cream with Greek yogurt for extra freshness.Make the mascarpone cream ahead and keep it chilled; warm the cherry compote just before serving for the perfect temperature contrast.Add crunch by topping with crushed biscuits, granola, toasted nuts, or dark chocolate curls for added texture and flavour.This recipe is naturally vegetarian and can be made gluten-free by using gluten-free biscuits or omitting them entirely.Serve in glass dessert cups or bowls to show off the layers — it enhances presentation and looks stunning for dinner parties.Leftover cherry compote can be used on pancakes, porridge, yoghurt bowls, waffles, cheesecakes or ice cream, making it a versatile addition to your kitchen.
This Warm Morello Cherry Compote with Vanilla Mascarpone Cream is incredibly versatile. It is perfect for everything from elegant dinner parties to cosy family nights in. The rich, tangy flavour of the Morello cherries pairs beautifully with the cool, silky mascarpone, allowing you to create a dessert experience that feels indulgent, comforting, and effortlessly sophisticated.
Serve this dessert in glass tumblers, mini ramekins, cocktail glasses or dessert bowls to showcase the vibrant cherry colours and creamy layers. For added texture and flavour, sprinkle the top with crushed shortbread, biscotti crumbs, toasted almonds, granola clusters, or dark chocolate curls. These small touches elevate the presentation and create a restaurant-quality finish.
This morello cherry dessert also pairs wonderfully with:
Fresh mint leaves for a refreshing aroma and burst of colour
A drizzle of dark chocolate for a richer, more decadent twist
Toasted hazelnuts or pistachios for crunch and earthiness
A scoop of vanilla or cherry ice cream for extra indulgence
A dollop of whipped cream for added lightness
Crisp almond tuiles or wafers to add elegance
This dessert shines as a:
Showstopping dinner party finale
Easy make-ahead dessert
Romantic date-night treat
Festive Christmas or Valentine’s Day pudding
Summer evening sweet course
No matter the occasion, this recipe turns simple ingredients into something extraordinary — and every spoonful delivers a perfect balance of tart cherries and luscious vanilla cream.
A Comforting, Gourmet Vegetarian Dish Created by Nicol Retailer Limited: Crispy Maitake Mushroom Risotto. Crispy Maitake Mushroom Risotto | Nicol Retailer Limited offers a delightful culinary experience perfect for a comforting meal.
There’s something undeniably special about a bowl of risotto — the way it soothes, satisfies, and feels like a warm embrace after a long day. And when you elevate that comfort classic with the nutty, earthy tones of maitake mushrooms, you step into gourmet territory. This delights both the palate and the soul. This is precisely what Crispy Maitake Mushroom Risotto | Nicol Retailer Limited has achieved.
This Crispy Maitake Mushroom Risotto with Parmesan & Thyme Butter captures everything we love about home cooking and fine dining in one dish. It is rich, creamy, aromatic, and deeply satisfying. Each spoonful is layered with texture: velvety arborio rice infused with thyme and butter. It’s topped with crispy, golden maitake mushrooms that bring a burst of umami with every bite.
Made with premium Maitake Mushrooms (500g) from Nicol Retailer Limited, this recipe celebrates the beauty of simple, high-quality ingredients. These are turned into something truly exceptional. This is why the Crispy Maitake Mushroom Risotto | Nicol Retailer Limited is unique.
Why You’ll Love This Recipe
This isn’t just another risotto — it’s a sensory experience. The maitake mushrooms (also known as hen-of-the-woods) have a beautifully meaty texture. They crisp up perfectly in butter. Meanwhile, the risotto base remains creamy and comforting. Here’s why Crispy Maitake Mushroom Risotto | Nicol Retailer Limited is irresistible:
Restaurant-quality flavour with ingredients you can easily find at home.
Rich, earthy aroma from the maitake mushrooms and thyme butter.
Naturally vegetarian and gluten-free, with simple swaps for vegan diets.
Ready in under 45 minutes, yet elegant enough for dinner parties.
Each bite tells a story of warmth, flavour, and craft. This is exactly what Nicol Retailer Limited stands for: premium ingredients that make everyday meals feel extraordinary.
Recipe
There’s something irresistibly comforting about the slow rhythm of making risotto. The gentle stirring, the rich aroma of garlic and butter, and that moment when the rice turns perfectly creamy. This Crispy Maitake Mushroom Risotto with Parmesan & Thyme Butter transforms a humble classic into an elegant, restaurant-quality dish. It is bursting with earthy, nutty flavour.
Using premium Maitake Mushrooms (500g) from Nicol Retailer Limited, this recipe celebrates the magic of simple ingredients done right. The maitake — also known as hen of the woods — brings deep umami and a delicate crispiness. This beautifully complements the creamy risotto base. Whether you’re planning a cosy dinner for two or an indulgent weekend meal, this dish promises warmth, comfort, and a touch of gourmet flair in every bite. Here is the recipe for Crispy Maitake Mushroom Risotto | Nicol Retailer Limited:
Crispy Maitake Mushroom Risotto with Parmesan & Thyme Butter
Indulge in the rich, earthy comfort of this Crispy Maitake Mushroom Risotto with Parmesan & Thyme Butter — a luxurious vegetarian dish bursting with flavour and texture. Tender arborio rice is slowly cooked in a creamy, aromatic broth, finished with golden, pan-seared Maitake Mushrooms from Nicol Retailer Limited, and topped with melted butter, fresh thyme, and aged parmesan.Perfect for dinner parties or cosy nights in, this risotto delivers restaurant-quality taste in under 45 minutes. The maitake mushrooms add a deep umami richness that pairs beautifully with the creamy risotto base, making every spoonful pure comfort food. Shop premium maitake mushrooms and gourmet ingredients at Nicol Retailer Limited, your trusted UK supplier of fine food essentials.
Course brunch, Comfort Food, Dinner, Main Course
Cuisine European, Italian, Mediterranean, Modern Vegetarian
Diet Gluten Free, Low Fat, Vegetarian
Keyword creamy mushroom risotto, hen of the woods risotto, maitake mushroom risotto, maitake mushrooms recipe, Nicol Retailer Limited
Tear the mushrooms into large pieces. Heat 1 tbsp olive oil and a little butter in a large pan. Sauté the maitake over medium-high heat until golden and crisp (5–7 mins). Remove and set aside for topping.
Start the Risotto
In the same pan, add another tbsp of olive oil. Sauté onion and garlic until soft and fragrant. Add rice and toast for 1–2 mins until slightly translucent.
Deglaze & Simmer
Pour in the white wine, stirring until absorbed. Add warm vegetable stock, one ladle at a time, stirring gently between each addition. Continue for about 20 minutes, or until the risotto is creamy and the rice is tender but al dente
Add Flavour & Finish
Stir in butter, parmesan, thyme, and half the crispy maitake. Adjust seasoning with salt and pepper.
Serve Beautifully
Spoon the risotto into bowls and top with the remaining crispy mushrooms. Drizzle lightly with truffle oil and finish with extra parmesan and fresh thyme.
Notes
This Crispy Maitake Mushroom Risotto is pure comfort in a bowl — creamy, earthy, and elegant. Each spoonful blends buttery arborio rice with golden, crispy Maitake Mushrooms (500g) from Nicol Retailer Limited, delivering the perfect balance of texture and umami richness.To get the best results, always use hot vegetable stock and stir slowly as the risotto cooks — this releases the rice’s natural starches for that classic creamy finish. Tear the maitake mushrooms instead of slicing them to preserve their meaty, layered texture and create crispy edges when seared.For a lighter version, you can swap the butter for olive oil and use vegan parmesan or nutritional yeast — it’s just as indulgent but completely plant-based. Chef’s Tips:Deglaze with white wine for restaurant-level depth.Finish with fresh thyme or a drizzle of truffle oil to elevate the aroma.Serve immediately — risotto is at its creamiest right off the stove.This dish is a perfect showcase of Mediterranean-inspired vegetarian cooking, made easy with Nicol Retailer Limited’s premium maitake mushrooms. Whether served as a main course or part of a fine-dining dinner menu, it’s guaranteed to impress.
Every spoonful of this Crispy Maitake Mushroom Risotto with Parmesan & Thyme Butter feels like a warm embrace — rich, aromatic, and deeply satisfying. To make the experience even more unforgettable, pair it with flavours and textures that enhance its creamy, earthy character.
For a lighter meal, serve your risotto alongside:
Rocket salad with lemon vinaigrette — its peppery freshness cuts through the richness.
Garlic-roasted asparagus or tenderstem broccoli for colour and crunch.
If you’re hosting, a basket of warm artisan bread drizzled with olive oil makes the perfect finishing touch — ideal for soaking up every last drop of creamy sauce.
Seasonal Twists
One of the joys of risotto is how easily it adapts to the seasons:
In spring, add green peas or asparagus tips for brightness.
In autumn, fold in roasted butternut squash or sage for an earthy depth.
In winter, stir through a touch of truffle oil or porcini powder for luxurious warmth.
Each variation keeps the dish exciting while highlighting the quality of the Maitake Mushrooms — their flavour is the heart of the recipe.
A Dining Experience to Remember
Serve this dish in warm bowls with a drizzle of melted butter, a sprinkle of fresh thyme, and a few extra crisp maitake pieces on top. Light a candle, pour your favourite wine, and let the gentle aroma of thyme and garlic fill the room.
This risotto isn’t just food — it’s a moment of calm, crafted with love and quality ingredients from Nicol Retailer Limited, where gourmet inspiration meets everyday simplicity.
Conclusion
Some dishes comfort you — others completely captivate you. This Crispy Maitake Mushroom Risotto with Parmesan & Thyme Butter is one of those rare recipes that does both. From the first creamy bite to the last crisp piece of golden maitake mushroom, it’s a symphony of texture and flavour — rustic, indulgent, and effortlessly elegant.
What makes this risotto truly special is the quality of the ingredients. Using premium Maitake Mushrooms (500g) from Nicol Retailer Limited, every forkful carries deep umami richness and natural sweetness. This turns an everyday meal into a fine-dining experience. This is the essence of Crispy Maitake Mushroom Risotto | Nicol Retailer Limited.
Whether you’re preparing it for loved ones, serving it as a show-stopping vegetarian main, or simply treating yourself to something extraordinary, this dish proves that comfort food can also be artful and inspiring.
Created with care. Crafted with flavour. Delivered by Nicol Retailer Limited — bringing the world’s finest ingredients to your kitchen.
🛒 Shop This Recipe – Crispy Maitake Mushroom Risotto
Recreate this creamy, crispy Maitake Mushroom Risotto with Parmesan & Thyme Butter using premium ingredients from Nicol Retailer Limited. Each product is carefully selected to bring gourmet flavour and quality to your kitchen.
🍄 Maitake Mushrooms (500g) – The star ingredient, offering deep umami flavour and a crisp, golden texture.
All premium ingredients are available to buy from Nicol Retailer Limited — your trusted UK supplier of gourmet, vegetarian, and Mediterranean cooking essentials.
Few dishes say comfort quite like a slow-braised British Beef Shin Ragù — rich, silky, and bursting with deep, savoury flavour. Using the exceptional Alec Jarrett British Red Tractor Beef Shin Middle Cut, this recipe transforms a humble cut into a restaurant-quality masterpiece.
As the beef gently cooks in red wine, tomatoes, and aromatic herbs, it breaks down into tender shreds. This creates a sauce so luscious you’ll want to savour every bite. Served over buttery Parmesan mash, it’s the perfect balance of rustic warmth and indulgent dining.
This is comfort food, elevated — and proof that with Nicol Retailer Limited’s premium British beef, you can bring chef-level flavour straight to your home kitchen.
Why Alec Jarrett British Red Tractor Beef Shin is the Star Ingredient
The Alec Jarrett British Red Tractor Beef Shin Middle Cut from Nicol Retailer Limited is the hero of this dish. It’s a premium British cut known for its exceptional quality, traceability, and melt-in-the-mouth tenderness. Every reason to choose it makes this recipe shine:
🇬🇧 Certified British Quality: As a Red Tractor Assured product, this beef guarantees traceability, animal welfare, and sustainable farming practices — so you know exactly where your meat comes from.
Rich and Full-Bodied Flavour: Beef shin is cut from the hardworking leg, rich in connective tissue and flavour. When slow-cooked, the collagen melts down, giving the sauce its silky texture and mouthfeel.
Generous and Versatile: The 5 kg pack is ideal for batch cooking, dinner parties, or freezing portions for future meals — delivering incredible value and consistent quality.
Perfect for Braising: The slow cooking process transforms this affordable cut into restaurant-quality tenderness, full of deep, comforting flavour.
You can source this premium ingredient exclusively at Nicol Retailer Limited — the home of professional-grade British meats.
Recipe
This easy-to-follow recipe guides you through every step. From browning the beef and building layers of flavour to preparing the creamy mash that completes the dish. Whether you’re cooking for a Sunday family meal, a special dinner, or simply craving a hearty bowl of comfort, this British Beef Shin Ragù is a timeless classic that delivers every time. Here is the recipe and ingredients:
Braised British Beef Shin Ragù with Creamy Parmesan Mash
Indulge in pure comfort with this Braised British Beef Shin Ragù with Creamy Parmesan Mash, a dish that brings slow-cooked luxury to your dinner table. Using Alec Jarrett British Red Tractor Beef Shin Middle Cut from Nicol Retailer Limited, this recipe delivers melt-in-the-mouth beef simmered in a rich red wine and tomato sauce, served over velvety Parmesan mash.Each bite combines deep, savoury flavours and silky textures — perfect for Sunday roasts, date nights, or elegant family meals. With Red Tractor-certified British beef, this dish guarantees both quality and flavour in every forkful.
Season beef pieces and brown in olive oil over medium heat until golden on all sides. Remove and set aside.
Build the base:
In the same pot, cook onions, carrots, and celery for 5 minutes. Add garlic and tomato purée; cook for 1 minute
Deglaze:
Pour in red wine, scraping up any caramelised bits. Reduce slightly.
Simmer:
Add chopped tomatoes, stock, herbs, and ISFI Cayenne Pepper. Return beef to the pot.
Braise:
Cover and cook gently for 3 hours in the oven at 160 °C (140 °C fan) until beef is tender and falling apart.
Finish:
Shred the beef into the sauce with a fork. Simmer uncovered for 10 minutes to thicken.
Make the mash:
Boil potatoes until soft. Drain, mash with butter, milk, Parmesan, and salt until smooth.
Serve:
Spoon creamy mash onto plates and top generously with beef shin ragù. Garnish with extra Parmesan and herbs.
Notes
Chef’s NotesBest Cut for Braising: The Alec Jarrett British Red Tractor Beef Shin from Nicol Retailer Limited is naturally rich in collagen, giving your ragù a luxurious, velvety sauce when slow-cooked.Cook it Low and Slow: For tender, melt-in-the-mouth beef, cook gently at 160 °C for about 3 hours — patience pays off with this dish.Plan Ahead: Make your ragù a day in advance; the flavours deepen overnight for an even richer taste the next day.Freezer Friendly: Cool completely, portion into containers, and freeze for up to 3 months — ideal for batch cooking or quick weekday meals.Flavour Upgrade: Add a splash of cream or a pinch of ISFI Professional Cayenne Pepper for an indulgent twist.Creative Serving Idea: Spoon leftover ragù over buttery pasta, polenta, or even inside a Yorkshire pudding for a British-Italian fusion treat.Perfect Pairing: A glass of Chianti, Barolo, or Malbec enhances the deep beef flavour and tomato richness beautifully.
This Braised Beef Shin Ragù isn’t just a main course — it’s a centrepiece meal that deserves to be enjoyed slowly. Here are a few pairing and plating ideas to make it even more memorable:
On the Side
Garlic Bread or Ciabatta: Perfect for soaking up every drop of that rich red-wine sauce.
Crispy Roast Vegetables: Try roasted parsnips, carrots, or tenderstem broccoli for a pop of colour and crunch.
Green Salad: A fresh rocket and Parmesan salad cuts through the richness perfectly.
Creamed Spinach: Adds a luxurious, buttery texture alongside the mash.
Occasions to Serve
Sunday Roast Alternative: Serve this instead of traditional roast beef for a modern twist.
Dinner Parties: Impress guests with a dish that looks like it took hours (because it did — and it’s worth it!).
Winter Feasts: Perfect for cold evenings by the fire, paired with a glass of red and good company.
Leftover Magic: Spoon the leftover ragù over pappardelle, layer into lasagne, or use as a jacket potato topping.
Chef’s Tip: Add a splash of balsamic vinegar or a knob of butter right before serving for extra shine and richness.
Conclusion
There’s something truly special about taking simple, honest ingredients and transforming them into a dish that feels both comforting and luxurious. This Braised British Beef Shin Ragù with Creamy Parmesan Mash is proof that with patience, care, and quality ingredients, home cooking can rival any restaurant experience.
The slow-cooked Alec Jarrett British Red Tractor Beef Shin Middle Cut delivers incredible flavour and tenderness. Meanwhile, the buttery Parmesan mash provides the perfect base for soaking up that rich, glossy sauce. It’s a true celebration of British beef — hearty, satisfying, and packed with depth.
Whether you’re cooking for loved ones, preparing a Sunday feast, or just craving a bowl of comfort after a long day, this recipe promises to deliver warmth, flavour, and satisfaction in every bite.
Created by Nicol Retailer Limited — proudly bringing premium British Red Tractor meats and professional-grade ingredients to your kitchen.
Discover more gourmet recipes and chef-quality products at nicolretailer.com .
Grilling seafood brings out an incredible depth of flavour, making it a favourite for many outdoor cooking enthusiasts. When you think of the perfect summer dish, juicy grilled shrimps and scallops often come to mind. For those searching for the ultimate shrimp and scallops recipe, these seafood delights are not only delicious but also quick and easy to prepare, making them perfect for any grilling occasion. The natural sweetness of shrimps and scallops is heightened when grilled, creating a mouth-watering experience that is hard to match.
Whether you’re hosting a garden barbecue or enjoying a quiet dinner, this recipe is sure to impress your guests and leave them wanting more. The secret to achieving those perfect flavours lies in the marinade and grilling techniques that enhance the seafood. A marinade made with olive oil, garlic, parsley and lemon juice, delightful mix of tangy, sweet, and spicy flavours to the shrimps and scallops, which will excite your palate.
Grilling shrimps and scallops not only enhances their flavour but also creates an appealing presentation. The slight char from the grill provides a lovely visual contrast to the tender seafood, ensuring your dish looks as good as it tastes. As you prepare to light the grill, remember that the simplicity of this recipe is what makes it truly special.
The Juicy Grilled Shrimp and Scallops Recipe is a simple and delicious seafood dish perfect for outdoor grilling. It features fresh shrimp and scallops marinated in a flavourful mixture of olive oil, garlic, lemon juice, and herbs. The seafood is then grilled to perfection, resulting in a tender, smoky, and citrusy dish that can be enjoyed on its own or paired with your favourite sides. Perfect for gatherings or a quick dinner, this recipe is both versatile and satisfying.
Course brunch, lunch, Main Course
Cuisine Mediterranean
Keyword Shrimp and Scallops, Shrimp and Scallops recipe, Shrimp and Scallops skewers
Rinse the shrimps and scallops under cold water, then pat them dry with kitchen paper.
In a medium-sized bowl, whisk together the olive oil, lemon juice, minced garlic, parsley, smoked paprika, salt, and pepper.
Marinate the Seafood
Add the shrimps and scallops to the bowl, ensuring they are evenly coated in the marinade. Cover and refrigerate for 15 minutes to allow the flavours to develop
Prepare the Skewers
If using wooden skewers, soak them in water for at least 10 minutes to prevent them from burning.
Once the seafood has marinated, thread the shrimps and scallops alternately onto the skewers.
Grill the Skewers
Preheat your grill or barbecue to medium-high heat.
Place the skewers on the grill and cook for about 2-3 minutes per side, or until the shrimps are pink and the scallops are opaque. Be careful not to overcook as they can become dry.
Serve
Transfer the skewers to a serving plate and garnish with additional chopped parsley if desired.
Serve immediately with lemon wedges on the side for an extra zing of flavour.
Notes
TipsCleaning and preparing the seafood is essential. Rinse the shrimps under cold water and remove the shell and vein for a tidy result. For scallops, ensure they’re free of any attached side muscles. Pat both dry with kitchen paper to remove excess moisture.Making the marinade is straightforward. Whisk until thoroughly combined. Place the prawns and scallops in a resealable plastic bag, pour the marinade over them, seal the bag, and gently shake to coat. Allow them to marinate in the fridge for at least 30 minutes, but no longer than an hour to prevent over-marinating.Keep a close watch on the seafood as it cooks quickly. Shrimps typically take 2-3 minutes per side until they turn pink and opaque. Scallops need about 3-4 minutes per side, forming a lovely golden crust. Avoid overcooking by taking them off the grill as soon as they are done.Once cooked, allow the seafood to rest for a minute or two before serving. This short resting time helps the juices settle, ensuring every bite is moist and full of flavour. Now you’re ready to enjoy your perfectly grilled prawns and scallops, ideal for any occasion.
Grilled shrimps and scallops go wonderfully with a variety of side dishes and drinks, allowing you to tailor your meal to suit any occasion. For a fresh and vibrant side, try serving a mixed leaf salad with cherry tomatoes, cucumber slices, and a light vinaigrette. The crisp texture of the vegetables pairs beautifully with the tender seafood.
Grilled vegetables such as asparagus, courgette, or peppers make excellent accompaniments, adding both colour and flavour to your plate. For a more filling option, consider a serving of quinoa or couscous mixed with herbs and a splash of lemon juice, which provides a pleasant contrast to the juicy shrimps and scallops.
The choice of drink can also enhance your meal. A chilled, crisp white wine like Sauvignon Blanc or Pinot Grigio works wonderfully, complementing the subtle flavours of the seafood without overwhelming them. If you prefer a non-alcoholic option, sparkling water with a hint of lime or a light iced tea can be excellent alternatives.
For an extra touch of indulgence, serve the shrimps and scallops with a creamy garlic aioli or a tangy mango salsa. These sauces add depth to the flavour and enhance the overall presentation of the dish.
To finish, garnish your plate with fresh herbs such as parsley or coriander and a few lemon wedges. The herbs bring a burst of freshness, while the lemon adds a bright, zesty note that works perfectly with the seafood.
By combining these serving ideas, your grilled shrimps and scallops will take centre stage in a truly memorable meal.
Frequently Asked Questions
Over-marinating can make shrimp and scallops mushy, so stick to the recommended 30 minutes to an hour for marinating. Overcooking is another common issue; keep an eye on the grill and use a meat thermometer to ensure precise cooking. Shrimp should reach 120°F, while scallops should hit 130°F.
If you’re unsure about the quality of your seafood, always check for firmness and a fresh, oceanic smell for shrimp, and creamy white, plump appearance for scallops. These indicators will help you choose the best ingredients for your dish. For those who don’t have a grill, an indoor grill pan or broiler can be a good alternative. Just make sure to adjust the cooking times as necessary and keep an eye on the seafood to avoid overcooking.
To store leftovers, place the grilled shrimp and scallops in an airtight container and refrigerate promptly. Consume them within two days for the best taste. They can be reheated gently on the stove or enjoyed cold in a salad for a quick meal.
These tips should help you navigate any potential pitfalls and ensure a delicious outcome every time you prepare this recipe.
If you’re on the hunt for the ultimate comfort food, look no further. This Pappardelle pasta with slow-cooked beef mince ragu is the hearty, flavour-packed dish your dinner table has been waiting for. Rich, tender beef cooked low and slow in a deeply savoury tomato sauce, tangled with ribbons of perfectly al dente pappardelle—it’s a recipe that brings pure joy with every bite.
Whether you’re planning a cosy family meal or a special dinner for two, this recipe ticks all the boxes. And the best part? It’s surprisingly simple to make at home.
What is Pappardelle?
Pappardelle is a wide, flat pasta originating from Tuscany. Its broad ribbons are perfect for catching robust, meaty sauces like ragu. If you’ve only ever tried spaghetti or penne, you’re in for a real treat—pappardelle takes pasta night to the next level especially when paired with beef mince ragu.
Why Slow-Cooked Beef Mince Ragu?
There’s something magical about slow-cooked dishes. The flavours develop depth and richness over time, transforming everyday ingredients into something extraordinary. This beef mince ragu is a humble classic that delivers restaurant-quality results in your own kitchen.
Made with seasoned beef mince, aromatic vegetables, red wine, and crushed tomatoes, this ragu simmers gently until the meat is meltingly tender and infused with layers of Italian-inspired flavour, perfect for Pappardelle Pasta with a classic slow-cooked beef mince ragu recipe.
Why You’ll Love This Recipe
✅ Hearty and satisfying ✅ Packed with rich, meaty flavour ✅ Perfect for meal prep and freezing ✅ A true Italian classic you can make at home ✅ Easily customisable for dietary needs
Step-by-Step Cooking Instructions:
Pappardelle Pasta with Slow-Cooked Beef Mince Ragu
Pappardelle pasta with slow-cooked beef mince ragu is the epitome of hearty, comforting cuisine that warms both the body and soul. This dish showcases wide ribbons of pappardelle, their silky texture perfectly suited to cradle the luscious ragu. As the pasta twirls around your fork, it captures every bit of the richly flavoured sauce, creating a symphony of tastes in each bite.The beef mince ragu is the star of this dish, simmered gently over hours to develop layers of deep, savoury flavour. The beef, tender and succulent, is combined with aromatic onions, garlic, and celery, all softened to release their natural sweetness. Tomatoes, cooked until they reach a deep, velvety consistency, lend a subtle tang that balances the richness of the meat. A hint of red wine and a selection of herbs, such as thyme and bay leaf, bring depth and a gentle earthiness to the sauce.
Course lunch, Main Course
Cuisine Italian
Keyword Pappardelle Pasta with Beef Mince Ragu, Pappardelle Pasta with Slow-Cooked Beef Mince Ragu
Heat the olive oil in a large pan over medium heat. Add the chopped onion, carrot, celery, and garlic. Cook gently for 8-10 minutes until softened, stirring occasionally.
Brown the Beef
Increase the heat slightly, add the beef mince, and cook until browned all over. Use a wooden spoon to break up any clumps as it cooks.
Add Flavour
Stir in the dried oregano and tomato purée. Cook for 1-2 minutes to allow the flavours to combine.
Build the Sauce
Pour in the chopped tomatoes, beef stock, and red wine (if using). Add the bay leaf and season with salt and pepper. Stir well to combine.
Slow Cook
Reduce the heat to low, cover the pan with a lid, and let the ragu simmer gently for 2 hours. Stir occasionally and check to ensure it’s not sticking. Add a splash of water if needed.
Cook the Pasta
About 10 minutes before the ragu is ready, bring a large pot of salted water to the boil. Add the pappardelle and cook according to the packet instructions (usually 8-10 minutes). Drain the pasta, reserving a small cup of pasta water.
Combine
Remove the bay leaf from the ragu. Toss the drained pappardelle into the sauce, adding a little of the reserved pasta water if needed to coat the pasta evenly.
Serve
Divide the pasta and ragu between four bowls. Garnish with fresh rosemary sprigs and a generous sprinkle of grated Parmesan. Serve immediately.
To elevate your Pappardelle Pasta with the rich beef mince ragu, pair it with sides and accompaniments that complement the deep, savoury flavours of the dish. Here are some delicious and easy-to-make serving suggestions to transform your meal into an unforgettable Italian-inspired dining experience.
A bowl of beef mince ragu pasta practically begs for a side of warm, crusty bread. Choose a rustic sourdough loaf or a freshly baked Italian ciabatta to soak up the delicious, slow-cooked ragu sauce. Even better? Serve it with homemade garlic bread made with fresh parsley, crushed garlic, and a generous spread of salted butter. The crispy outside and soft, buttery centre offer a satisfying contrast to the silky pasta.
Lighten the meal with a fresh rocket and Parmesan salad. Toss peppery rocket leaves with shaved Parmesan, extra virgin olive oil, lemon juice, and a pinch of sea salt for a zesty bite that cuts through the richness of the ragu. Alternatively, go for a classic Caprese salad with ripe tomatoes, creamy mozzarella, fresh basil leaves, and a drizzle of balsamic glaze.
These salads not only add vibrant colour to your plate but also balance the hearty pasta with freshness and acidity.
A final flourish of freshly grated Parmesan cheese or Grana Padano takes your pappardelle ragu to the next level. These aged cheeses add umami and a nutty sharpness that enhances the rich ragu sauce. For a dairy-free option, try a vegan hard cheese or nutritional yeast for a cheesy flavour.
You can also drizzle a little truffle oil or chilli oil over the top for a gourmet twist. Finish with a handful of chopped parsley or fresh basil to bring freshness and colour to the dish.
Complete your Italian dinner experience with a traditional dessert. A creamy, coffee-soaked tiramisu, a silky vanilla panna cotta, or a scoop of authentic Italian gelato are all perfect endings to your meal. These sweet treats offer a cool, indulgent contrast to the savoury pasta dish and round off the evening on a high note.
If you’re looking for something quick, try chocolate-dipped biscotti or affogato (vanilla ice cream with a shot of espresso).
The Ultimate Italian Meal Awaits
With the right sides and thoughtful pairings, your Pappardelle Pasta with Slow-Cooked Beef Mince Ragu Recipe can become more than just dinner—it becomes an experience. Whether you’re cooking for family, friends, or a romantic date night, these serving suggestions bring out the very best in your dish.
Looking for more Italian dinner ideas or classic pasta recipes? Don’t forget to explore our blog for culinary inspiration straight from the heart of Italy.
Burrata, an exquisite gem in the world of cheese, hails from the beautiful landscapes of Italy. Its unique composition—a delicate mozzarella shell encasing a creamy core—makes it a true delight for the senses. Pairing it with roasted pistachios honey and balsamic glaze can elevate the experience even further. As you slice into it, the soft interior oozes out, promising a luxurious culinary experience.
This Italian treasure has gained a well-deserved reputation among food enthusiasts and chefs alike. Its mild, milky flavour pairs seamlessly with a wide variety of ingredients, making it a versatile addition to any dish. Today, we explore a remarkable recipe that marries the lush texture of Burrata with the crunch of roasted pistachios, the natural sweetness of honey, and the tangy depth of balsamic glaze.
Imagine the moment you first encounter Roasted Pistachio Burrata with Honey & Balsamic Glaze. The visual appeal alone is enough to make your mouth water: the golden-green pistachios scattered over the creamy white Burrata, glistening with honey, all elegantly drizzled with dark balsamic glaze. Each element is chosen not just for its flavour but also for its ability to create a balanced, harmonious dish.
The contrast between the smooth Burrata and the crunchy pistachios creates a textural symphony that will make each bite an adventure. The honey adds a floral sweetness, while the balsamic glaze provides a sophisticated tanginess, resulting in a dish that’s complex yet accessible. This combination elevates a simple cheese into something truly special, making it a must-try for anyone looking to impress at their next dinner gathering.
Stay tuned as we guide you through crafting this delightful recipe, ensuring you capture the essence of Italian cuisine right in your own kitchen.
Roasted Pistachio Burrata with Honey & Balsamic Glaze Recipe
Looking for an easy yet elegant appetiser that will impress your guests? This Roasted Pistachio Burrata is a game-changer! Creamy Burrata di Puglia, crunchy roasted pistachios, sweet honey, and tangy balsamic glaze come together in a flavour-packed dish that’s perfect for any occasion. Serve it with crusty bread, focaccia, or crackers for the ultimate indulgence!
Preheat your oven to 180°C (350°F). Spread the chopped pistachios on a baking tray. Drizzle with 1 tablespoon of olive oil and season with a pinch of salt and pepper. Toss to coat evenly.
Place the tray in the oven and roast for about 8-10 minutes, or until the pistachios are golden and fragrant. Keep an eye on them to avoid burning. Once done, set aside to cool.
Assemble the Dish:
Place the burrata balls on a serving platter. Carefully tear them open to expose the creamy interior.
Drizzle the remaining olive oil over the burrata. Scatter the roasted pistachios generously on top. Drizzle the honey and balsamic glaze over the cheese and pistachios.
Garnish with fresh basil or thyme leaves. Season with additional salt and pepper, if desired. Serve immediately with crusty bread on the side.
Roasted pistachios bring an exceptional depth to this dish, enhancing both flavour and texture in a way that’s hard to match. When you roast pistachios, they develop a rich, nutty aroma and a satisfying crunch that beautifully balances the creamy Burrata. This delightful texture contrast elevates the dish’s overall appeal, making each bite a unique experience.
In addition to their culinary virtues, pistachios are a powerhouse of nutrients. They are rich in protein, healthy fats, and antioxidants, which are beneficial for heart health and can support weight management. Including roasted pistachios in your meals is a delectable way to enjoy these health perks.
Their unique flavour profile also enhances the dish’s complexity. The nutty notes of roasted pistachios pair perfectly with the mild, creamy Burrata, adding an intriguing layer of taste that makes the dish stand out. The process of roasting intensifies their flavour, bringing out subtle, earthy tones that complement the other ingredients beautifully.
Roasted pistachios also add visual appeal to the dish. Their vibrant green and golden hues create a stunning contrast against the creamy white Burrata, making the dish as visually enticing as it is delicious. This not only makes for an Instagram-worthy presentation but also enhances your overall dining experience.
So, next time you’re looking to impress your guests, remember that the humble pistachio can transform your Roasted Pistachio Burrata with Honey & Balsamic Glaze into a culinary masterpiece.
Why You’ll Love This Recipe:
✅ Quick & Easy – Ready in just 10 minutes! ✅ Perfect for Entertaining – A guaranteed crowd-pleaser. ✅ Balanced Flavours – Creamy, crunchy, sweet, and savoury in one bite. ✅ Instagram-Worthy – A beautiful dish that looks as good as it tastes!
The Harmony of Honey and Balsamic Glaze
Honey brings a natural sweetness that beautifully complements the rich creaminess of Burrata. Its floral notes subtly enhance the cheese’s mild flavour, creating a delightful contrast that is neither too sweet nor overpowering. The honey adds a golden hue that glistens against the white Burrata, adding an inviting visual appeal.
Balsamic glaze, on the other hand, introduces a tangy richness that balances the sweetness of the honey and the creaminess of the Burrata. Made by reducing balsamic vinegar, this glaze has a concentrated flavour with a hint of sweetness, offering a deep, slightly acidic note that enriches the overall taste profile of the dish. The dark, glossy drizzle of balsamic glaze not only adds a sophisticated touch but also creates an appealing contrast against the honey and Burrata.
Together, honey and balsamic glaze work in perfect harmony, elevating the dish to a new level of culinary sophistication. The interplay of sweet and tangy, creamy and crunchy, ensures each bite is a well-rounded flavour experience. When combined with the roasted pistachios, these elements create a balanced and cohesive dish that is both visually stunning and tantalising to the taste buds. This thoughtful combination of ingredients ensures your Roasted Pistachio Burrata with Honey & Balsamic Glaze will be a memorable addition to any meal.
Serving Suggestions and Pairings
Roasted Pistachio Burrata with Honey & Balsamic Glaze is not just a feast for the palate but also a versatile addition to any table. To fully enjoy its flavours, consider serving it with a fresh, crusty loaf of sourdough or artisanal bread. The bread’s texture complements the creamy Burrata, allowing you to savour every bit of this delightful dish.
For a refreshing balance, pair it with a salad of rocket, cherry tomatoes, and thinly sliced red onions. Dress the salad lightly with olive oil and a splash of lemon juice to enhance the dish’s vibrant flavours. The peppery notes of the rocket and the sweetness of the tomatoes provide a wonderful contrast to the rich, creamy Burrata..
Whether for a dinner party or a quiet evening at home, these serving suggestions will elevate your Roasted Pistachio Burrata with Honey & Balsamic Glaze to a memorable dining experience.
Conclusion
Roasted Pistachio Burrata with Honey & Balsamic Glaze brings together an exquisite blend of flavours and textures that will captivate your palate. The creamy Burrata, paired with the nutty crunch of roasted pistachios, creates a delightful textural contrast that is both luxurious and satisfying. The addition of honey introduces a natural sweetness, while the balsamic glaze adds a rich, tangy depth, making every bite a harmonious symphony of taste.
This dish is more than just a culinary delight; it is an experience that combines simplicity and elegance in every mouthful. Whether you are hosting a dinner party or enjoying a quiet evening at home, this recipe will undoubtedly impress your guests and make you the star of the kitchen.
Preparing Roasted Pistachio Burrata with Honey & Balsamic Glaze is straightforward, requiring minimal effort for maximum impact. The roasting of the pistachios and the simple assembly of ingredients ensure that even novice cooks can achieve stunning results. Plus, its visual appeal makes it perfect for sharing on social media, creating a dish that is as beautiful as it is delicious.
Incorporating this recipe into your repertoire not only showcases your culinary skills but also brings a touch of Italian sophistication to your dining table. With its balanced flavours and eye-catching presentation, this dish is sure to become a favourite in your household.
So why not give it a try? With the luxurious creaminess of Burrata, the crunchy allure of roasted pistachios, and the delightful blend of honey and balsamic glaze, this recipe promises to be a memorable addition to your culinary adventures.
Searching for a dish that marries gourmet flair with simplicity? The Delicious Bresaola Salad with Balsamic Glaze Recipe is exactly what you need. This salad features delicate bresaola, an air-dried cured beef from Northern Italy, which adds a touch of sophistication to any meal. The rich balsamic glaze melds beautifully with the fresh ingredients, creating a symphony of flavours that will captivate your taste buds.
What makes this salad truly special is its versatility. It’s perfect whether you’re entertaining guests at a dinner party or simply treating yourself to a nutritious lunch. The combination of bresaola with mixed salad leaves, cherry tomatoes, and shaved Granarolo Grana Padano is not only visually appealing but also a delightful treat for the palate. The addition of toasted pine nuts and fresh basil leaves brings both texture and freshness to the dish, making it a well-rounded and satisfying option, especially with this Bresaola Salad with Balsamic Glaze recipe.
Opting for high-quality ingredients is essential for this recipe. The choice of bresaola can significantly impact the overall flavour, so it’s worth investing in a premium selection. Similarly, a well-crafted balsamic glaze, with a perfect balance of sweetness and acidity, will elevate the taste of the salad, ensuring every bite is a harmonious blend of flavours.
Whether you’re a seasoned cook or a kitchen novice, this Bresaola Salad with Balsamic Glaze recipe is straightforward and quick to prepare, yet it never fails to impress. The elegance of the bresaola combined with the simplicity of the preparation makes it a must-try dish for any food enthusiast. Enjoy the delightful blend of textures and flavours that make this salad a standout choice for any occasion.
Why You’ll Love This Recipe
High in protein & low in fat – Bresaola is a lean, cured beef that’s full of flavor without extra calories.
Quick & easy – This salad takes just 15 minutes to prepare.
Perfect for any occasion – Enjoy as an appetiser, side dish, or light lunch.
Here is the recipe and easy to follow instructions:
If you're looking for a light, flavourful, and protein-packed dish, this Bresaola Salad with Balsamic Glaze is the perfect choice! Made with thinly sliced air-dried beef, fresh rocket leaves, and a drizzle of rich balsamic glaze, this dish is a quick and elegant appetiser or light meal.This recipe is ideal for those searching for healthy salads, Italian appetizers, keto-friendly meals, low-carb recipes, high-protein salads, quick and easy dishes, gourmet salads, balsamic glaze recipes, and gluten-free salads.
Course Appetizer, brunch, lunch, Side Dish
Cuisine Italian
Diet Gluten Free, Kosher, Low Calorie
Keyword Delicious Bresaola Salad with Balsamic Glaze recipe, healthy salads
Start by washing and drying the rocket leaves thoroughly. Place them in a large salad bowl.
Halve the cherry tomatoes and add them to the bowl.
Finely slice the red onion and mix with the rocket and tomatoes
Add Bresaola and Cheese:
Arrange the bresaola slices evenly over the salad.
Scatter the Granarolo Grana Padano shavings across the top.
Add Nuts:
Toast the walnuts in a dry pan over medium heat for a few minutes until lightly golden, stirring frequently. Allow them to cool slightly, then sprinkle over the salad.
Dress the Salad:
Drizzle the olive oil and balsamic glaze evenly over the salad.
Season with salt and freshly ground black pepper to your preference.
Serve
Gently toss the salad to combine all the ingredients. Serve immediately on plates or in bowls.
Notes
The balsamic glaze is the finishing touch. Select a high-quality glaze that balances sweetness with a hint of acidity. This will enhance the overall taste, making every bite a delightful experience.
Serving Suggestions
To elevate your Bresaola Salad with Balsamic Glaze recipe to new heights, consider pairing it with the perfect beverage and side dishes. A well-chosen drink can significantly enhance the dining experience. For a non-alcoholic option, a sparkling water infused with a hint of lemon or lime provides a zesty, palate-cleansing effect.
In terms of side dishes, a warm, crusty baguette is an excellent choice. The bread’s crunchy exterior and soft interior complement the textures within the salad, providing a satisfying crunch alongside the delicate bresaola and fresh vegetables. Roasted vegetables are another fantastic accompaniment. Consider roasting bell peppers, courgettes, and red onions with a drizzle of olive oil and a sprinkle of sea salt. Their caramelised sweetness and tender texture add a delightful contrast to the salad’s fresh and crisp elements.
For an added layer of indulgence, you might want to include a selection of cheeses on the side. While shaved Granarolo Grana Padano already enriches the salad, a small cheese board featuring soft cheeses like brie or camembert and a few robust varieties like aged cheddar or blue cheese can offer an array of complementary flavours. Freshly cracked black pepper and a touch of olive oil on the cheese board can make the experience even more enjoyable.
If you’re aiming for a more substantial meal, a side of herbed couscous or quinoa salad can be a hearty addition. Lightly seasoned with lemon zest, olive oil, and fresh herbs, these grains provide a nutritious and filling complement to the bresaola salad.
Lastly, don’t underestimate the power of presentation. Serve the salad on a large, rustic wooden board or a chic ceramic platter. The visual appeal will make the dish even more inviting, ensuring that your Bresaola Salad with Balsamic Glaze Recipe is not just a meal, but a memorable culinary experience.
Common Mistakes to Avoid
Preparing the perfect Bresaola Salad with Balsamic Glaze requires attention to detail to avoid common pitfalls. One frequent error is using inferior bresaola, which can be overly salty or lack depth of flavour. Investing in high-quality bresaola ensures a rich and satisfying taste.
Overdressing the salad is another mistake to avoid. A heavy hand with the balsamic glaze can overwhelm the delicate balance of ingredients. Aim for a light drizzle to enhance, not overpower, the flavours.
Timing is also crucial. Preparing the salad too far in advance can result in wilted leaves and a less vibrant presentation. Assemble the salad just before serving to maintain its fresh and appealing appearance.
Be mindful of the quantity of pine nuts. While they add a delightful crunch, too many can dominate the texture. A moderate sprinkle ensures the perfect balance.
Garlic knots are a beloved delicacy that offers a delightful blend of flavours, combining the comforting taste of freshly baked bread with the robust aromas of garlic, parsley, and Parmesan cheese. Originating from Italian-American cuisine, these delectable treats have gained popularity worldwide, becoming a favourite for their simple yet irresistible taste. Our Garlic Knots Recipe with Parsley and Parmesan Cheese allows you to recreate this delicious snack in the comfort of your home. Ideal for both casual gatherings and more formal occasions, garlic knots are an excellent addition to any menu.
Their appeal lies not only in their taste but also in their texture. The soft, chewy interior contrasts beautifully with the slightly crisp, golden-brown exterior, making each bite a delightful experience. The inclusion of garlic, parsley, and Parmesan cheese elevates these knots beyond ordinary bread rolls, adding layers of flavour that make them stand out.
Whether you’re an experienced baker or a novice in the kitchen, our Garlic Knots Recipe is straightforward and easy to follow, ensuring you can achieve perfect results every time. Garlic knots are versatile enough to be served as a side dish, appetiser, or even as a snack on their own. Their fragrant aroma and exquisite taste will undoubtedly make them a hit at any event or meal.
So, gather your ingredients and prepare to indulge in the deliciousness of garlic knots. With this Garlic Knots Recipe, you’ll bring a touch of Italian-American culinary magic to your table, delighting your taste buds and impressing your guests.
Freshly Baked Garlic Knots with Parsley and Parmesan Cheese
These Garlic Knots are the perfect combination of buttery, garlicky goodness, topped with fresh parsley and grated parmesan cheese. A delightful treat for any occasion, whether you're hosting a party or simply craving a delicious snack. Imagine the aroma of freshly baked bread filling your kitchen, the taste of warm, soft dough melting in your mouth. These Garlic Knots will have you coming back for more with each savoury bite.
Course Appetizer, party food, Side Dish, snacks
Cuisine Italian
Keyword Baked Garlic Knots with Parsley and Parmesan Cheese, Garlic Knots recipe
In a large mixing bowl, add the white bread flour mix and gradually add the warm water and 2 tablespoons of olive oil. Mix until a dough forms.
Knead the dough on a lightly floured surface for about 10 minutes until it is smooth and elastic.
Place the dough in a lightly oiled bowl, cover with a damp cloth, and leave to rise in a warm place for about 1 hour or until it has doubled in size.
Shape the Knots
Preheat your oven to 200°C (180°C fan) or gas mark 6.
Once the dough has risen, punch it down to release the air. Divide it into 12 equal portions.
Roll each portion into a rope about 20cm long and tie into a loose knot, tucking the ends underneath.
Prepare the Garlic Mixture
Ina small bowl, mix the melted butter with the chopped garlic
Bake the Knots
Place the knots on a baking tray lined with parchment paper.
Brush each knot generously with the garlic butter mixture.
Bake in the preheated oven for 15-20 minutes, or until golden brown
Add the Toppings
Once baked, remove the knots from the oven.
While still warm, brush with the remaining garlic butter, and sprinkle with parsley and parmesan cheese.
Serve
Serve the garlic knots warm as a delightful side or a snack. Enjoy with a dipping sauce of your choice, if desired.
Notes
Tips
For an extra touch, consider adding a light drizzle of olive oil over the knots. This will give them a slight sheen and further enrich their flavour profile. You can also add a pinch of sea salt for an added layer of texture and taste. When using parsley and Parmesan, aim for a balance that allows both ingredients to shine without one overpowering the other. This careful addition will enhance not just the flavour but also the visual appeal, making your garlic knots as attractive as they are delicious. These finishing touches transform your garlic knots from simple bread rolls into a gourmet delight, worthy of any special occasion or casual get-together.
Suggestions for Serving
Garlic knots can be enjoyed in a variety of ways, making them a versatile addition to your dining experience. Pair them with an array of dips and sauces to elevate their flavour. A marinara sauce provides a classic Italian touch, while a creamy garlic aioli offers an additional layer of taste. They also complement soups and salads perfectly, adding a satisfying crunch and depth of flavour to your meal. For a more indulgent option, serve them alongside a rich cheese fondue or a warm spinach and artichoke dip.
For those who enjoy a bit of spice, consider serving garlic knots with a spicy arrabbiata sauce or a tangy barbecue dip. These options provide a delightful contrast to the buttery, garlicky goodness of the knots. If you’re hosting a gathering, garlic knots make an excellent appetiser that guests can easily enjoy while mingling. Arrange them on a platter with a variety of dipping sauces to cater to different tastes and preferences.
Another creative serving suggestion is to use garlic knots as a base for mini sandwiches. Slice them open and fill them with your favourite ingredients, such as mozzarella, basil, and sun-dried tomatoes, for a tasty Italian-inspired snack. They can also be served as a side dish with main courses like pasta, grilled meats, or roasted vegetables, enhancing the overall dining experience with their robust flavours.
For a unique twist, consider incorporating garlic knots into a brunch menu. Serve them with scrambled eggs, smoked salmon, and cream cheese for a delightful morning treat. Their versatility and delicious taste make this Garlic Knots Recipe is a fantastic addition to any meal, whether you’re looking to impress guests or simply enjoy a cosy dinner at home.
Spaghetti and meatballs in tomato sauce is a beloved classic that has charmed households for generations. This dish, with its harmonious blend of tender meatballs and rich tomato sauce, served over a bed of al dente spaghetti, is the epitome of comfort food. Its appeal lies in its simplicity and the way it brings people together around the dinner table. Try this Spaghetti and Meatballs in Tomato Sauce Recipe to enjoy this classic at home.
The origins of spaghetti and meatballs can be traced back to Italian-American cuisine, where immigrants adapted traditional Italian recipes to the ingredients available in America. Over time, it has evolved into a cherished meal, known for its hearty and satisfying nature. This Spaghetti and Meatballs in Tomato Sauce Recipe captures that evolution and brings it to your kitchen.
One of the dish’s defining characteristics is the balance of flavours. The meatballs, often a mix of beef and pork, are seasoned with a blend of herbs and spices that complement the tanginess of the tomato sauce. This combination creates a symphony of tastes that is both robust and comforting. The tomato sauce itself is usually made from fresh tomatoes, simmered with garlic, onions, and herbs, resulting in a sauce that is both rich and aromatic. You can follow the Spaghetti and Meatballs in Tomato Sauce Recipe for detailed steps.
What makes spaghetti and meatballs in tomato sauce truly special is its versatility. It can be dressed up for a dinner party or kept simple for a weeknight family meal. The process of making it can also be a communal activity, with family members gathering to roll meatballs or stir the sauce, adding to the dish’s charm. Thus, using the Spaghetti and Meatballs in Tomato Sauce Recipe can turn cooking into a delightful family experience.
Ultimately, the enduring popularity of spaghetti and meatballs in tomato sauce is a testament to its timeless appeal and the joy it brings to those who prepare and savour it.
Here’s how you can prepare a flawless version of this beloved meal:
Our delectable recipe marries succulent meatballs with a luscious tomato sauce, all atop al dente spaghetti. This delightful and fulfilling meal will undoubtedly leave you yearning for more. Whether you're in search of a substantial dinner or wish to indulge in a comforting dish, our Spaghetti and Meatballs is bound to satisfy your cravings. Each mouthful offers a harmonious blend of tastes that will surely have you reaching for another serving.
Course Main Course
Cuisine Italian
Keyword Spaghetti and Meatballs in Tomato Sauce Recipe, Spaghetti and Meatballs Recipe
In a large bowl, mix together the beef mince, finely chopped onion, crushed garlic, breadcrumbs, egg, parsley, grated Parmesan, salt, and pepper.
Shape the mixture into balls, aiming for a size slightly smaller than a golf ball to ensure they cook evenly.
Heat 2 tablespoons of olive oil in a large frying pan over medium heat. Add the meatballs and cook until browned on all sides. Remove from the pan and set aside.
Make the Tomato Sauce
In the same pan, add 1 tablespoon of olive oil and sauté the finely chopped onion until soft.
Add the crushed garlic and cook for another minute.
Stir in the chopped tomatoes, sugar, dried oregano, salt, tomato purée and pepper. Let it simmer for 20 minutes, stirring occasionally.
Cook the Spaghetti
In the meantime, cook the spaghetti in a large pot of salted boiling water according to the packet instructions until al dente. Drain and set aside.
Combine and Serve
Add the browned meatballs to the tomato sauce and simmer for another 15 minutes until the meatballs are cooked through.
While the sauce and meatballs are simmering, bring a large pot of salted water to aboil. Add the spaghetti and cook according to the package instructions until al dente. Drain and set aside.
Divide the spaghetti among four plates and top with the meatballs and tomato sauce. Serve hot, garnished with basil and grated Parmesan cheese if desired.
Notes
Tips
Using fresh garlic and onions is vital for the sauce, as they offer a robust aromatic base. Olive oil should be extra virgin for the best flavour. Fresh basil and oregano elevate the sauce’s taste, making it aromatic and well-rounded. Red chilli flakes can add a hint of heat, depending on your preference.To balance the acidity of the tomatoes sauce, consider adding a touch of sugar. Season with salt and pepper to taste. Continue to cook the sauce until it thickens slightly, stirring occasionally to prevent it from sticking to the pan.Making the meatballs It’s important to mix meatballs ingredients gently with your hands, avoiding overworking the meat to keep the meatballs light and airy. Shape the mixture into balls, aiming for a size slightly smaller than a golf ball to ensure they cook evenly. To enhance their flavour, heat a bit of olive oil in a frying pan over medium-high heat and sear the meatballs until they develop a golden-brown crust on all sides. This step not only adds a delightful texture but also locks in the juices, keeping the meatballs moist and succulent.
Suggestions for Pairing and Serving
A wonderful complement to spaghetti and meatballs in tomato sauce is a fresh, crisp green salad with a tangy vinaigrette. This helps to balance the richness of the main dish. Garlic bread is another fantastic accompaniment, perfect for soaking up any remaining sauce and adding a satisfying crunch.
For a non-alcoholic option, sparkling water with a slice of lemon offers a refreshing alternative, cutting through the dish’s richness without overpowering it.
Leftovers can be creatively repurposed. Meatballs can be used in a delicious meatball sub, topped with extra sauce and melted cheese. They can also be added to a hearty vegetable soup, providing an additional layer of flavour and protein. Another variation to try is incorporating a dash of balsamic vinegar into the sauce, adding a sweet and tangy dimension to the dish. This Spaghetti and Meatballs in Tomato Sauce Recipe offers so much versatility.
Experimenting with these suggestions can make your meal even more enjoyable. Share your unique takes on this classic dish with Nicol Retailer Limited or fellow cooking enthusiasts, and discover new ways to appreciate this timeless favourite.