Posted on

How to Cook Perfect Vegetable Ratatouille

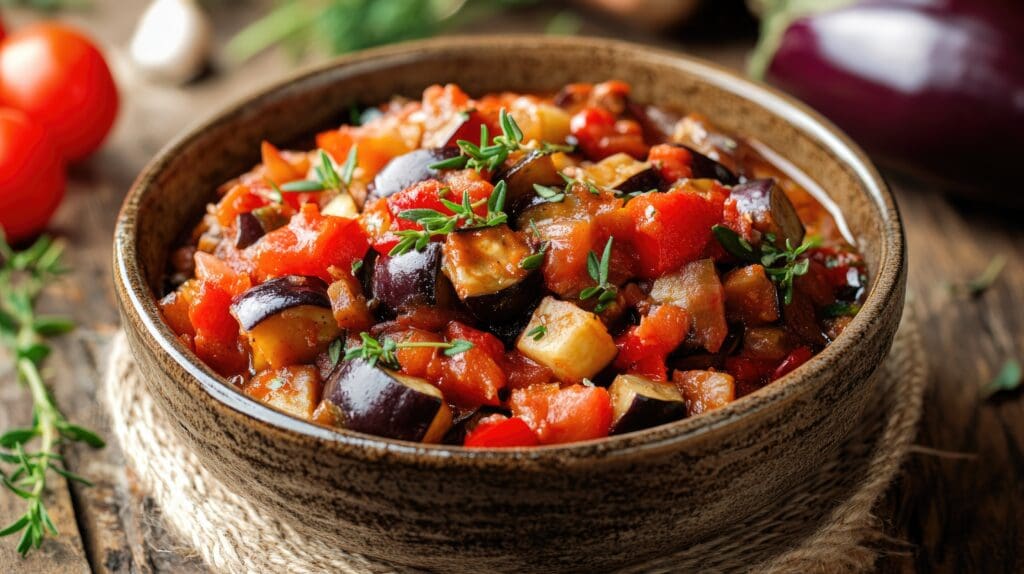
Ratatouille, originating from the sun-soaked region of Provence in France, is a cherished dish that embodies the essence of Mediterranean cooking. This Provençal Vegetable Stew not only delights the palate but also celebrates the abundance of summer vegetables. The perfect vegetable ratatouille is a vibrant and colourful dish that brings together a medley of aubergines, courgettes, tomatoes, and peppers, all cooked to perfection with aromatic herbs and a drizzle of olive oil

What makes ratatouille particularly appealing is its versatility. Whether served hot or at room temperature, it fits seamlessly into various meal settings. It can be the star of the show as a main course or serve as a delightful side dish complementing a range of proteins. For those seeking a vegetarian or vegan option, ratatouille stands out as a hearty and satisfying choice, rich in both flavour and nutrients.

The beauty of ratatouille lies in its simplicity and the quality of its ingredients. Provençal cuisine is known for its emphasis on fresh, local produce, and this dish is no exception. The selection of vegetables, bursting with natural flavours, forms the foundation of a successful ratatouille. When cooked with care, each vegetable retains its integrity, contributing to a harmonious blend of tastes and textures.

Cooking ratatouille is not just about following a recipe; it’s an experience that engages the senses. The process of chopping and preparing the vegetables, the aromatic scent of herbs like basil and thyme filling the kitchen, and the gentle simmering that melds the flavours together all add to the charm of this dish.

Ratatouille also holds a certain rustic charm, reminiscent of countryside cooking where meals are prepared with love and shared with family and friends. It’s a dish that encourages communal dining, inviting everyone to gather around the table and enjoy the simple pleasures of good food and company.

In many ways, ratatouille is a testament to the beauty of uncomplicated cooking. With just a few fresh ingredients and some basic techniques, you can create a dish that is both wholesome and indulgent. Whether you’re new to cooking or a seasoned chef, ratatouille offers a rewarding culinary adventure that highlights the best of what nature has to offer.

Vegetable Ratatouille Recipe

Print Recipe
Enjoy your homemade vegetable ratatouille either as a main course or as a charming side dish. This classic French dish is a medley of fresh vegetables, typically including courgettes, aubergines, and tomatoes, cooked to perfection with fragrant herbs. Its rich flavours and vibrant colours make it a wonderful addition to any meal, offering both a healthy and delicious option for your dining experience. Whether you're serving it at a dinner party or enjoying it as a comforting meal at home, vegetable ratatouille is sure to impress.
Course Main Course
Cuisine France
Diet Vegan, Vegetarian
Keyword Ratatouille Recipe, Vegetable Ratatouille Recipe
Prep Time 15 minutes
Cook Time 45 minutes
Servings 4 People
Calories 190

Instructions

  • Begin by preparing all the vegetables as described in the ingredients list. This will make the cooking process smoother.
  • In a large pan, heat the olive oil over medium heat. Add the finely chopped onion and cook until it becomes translucent, which should take about 5 minutes. Stir in the minced garlic and cook for an additional minute.
  • Add the chopped red and yellow peppers to the pan. Cook them for about 5 minutes until they start to soften.
  • Incorporate the diced aubergine and sliced courgettes into the pan. Stir well and continue to cook for another 5 minutes, allowing them to soften.
  • Add the chopped tomatoes, thyme, and oregano to the pan. Season with salt and pepper to taste. Stir everything together to combine well.
  • Reduce the heat to low and cover the pan with a lid. Let the mixture simmer gently for about 30 minutes, stirring occasionally. The vegetables should become tender and the flavours will blend together beautifully.
  • Once cooked, remove the pan from the heat. Garnish the ratatouille with fresh basil leaves before serving.

Nutrition

Calories: 190kcal | Carbohydrates: 30g | Protein: 5g | Fat: 8g | Saturated Fat: 1g | Polyunsaturated Fat: 1g | Monounsaturated Fat: 5g | Sodium: 593mg | Potassium: 1299mg | Fiber: 11g | Sugar: 18g | Vitamin A: 543IU | Vitamin C: 43mg | Calcium: 153mg | Iron: 5mg

Cooking Techniques

Cooking ratatouille to perfection requires a delicate balance of techniques to ensure each vegetable retains its shape while contributing to the overall harmony of flavours. Once the vegetables have been layered in your chosen dish, the next step is to cook them slowly to meld the flavours without turning the vegetables to mush.

Begin by covering your dish with a lid or aluminium foil. This helps to trap the steam and moisture, allowing the vegetables to cook evenly and retain their natural juices. Place the dish on the hob over low heat, allowing it to simmer gently. Patience is key here, as this slow cooking method can take up to an hour but results in a rich and flavourful stew.

Alternatively, you can opt for baking the ratatouille in the oven. Preheat your oven to a moderate temperature, around 180°C (350°F). Place the covered dish in the oven and let it bake for approximately 45 minutes to an hour. Baking offers a slightly different texture, giving the vegetables a tender yet firm bite. Halfway through, you may want to uncover the dish to allow some of the liquid to evaporate, concentrating the flavours further.

During cooking, it’s important to monitor the ratatouille occasionally. Check to ensure that the vegetables are cooking evenly and give the dish a gentle stir if necessary. This ensures that the flavours are well-distributed throughout the stew.

Another technique to enhance the flavour profile is to finish the dish with a brief rest period. After cooking, allow the ratatouille to sit, covered, for about 15 minutes before serving. This resting time lets the flavours continue to develop and meld together, offering a more cohesive taste experience.

While the traditional method involves slow cooking, you can also use a pressure cooker for a quicker version. However, be mindful that the rapid cooking might slightly alter the texture of the vegetables.

Regardless of the method chosen, the goal remains the same: to create a dish where each vegetable stands out yet harmonises beautifully with the others, offering a taste of Provençal cuisine at its finest.

Serving suggestions

Ratatouille can elevate any meal with its rich, layered flavours and vibrant presentation. For a casual yet satisfying option, serve it with a slice of crusty baguette or a side of fluffy couscous. These simple accompaniments help to soak up the delightful juices of the Provençal Vegetable Stew, making each bite truly delightful.

For those seeking a more elaborate dining experience, consider pairing ratatouille with grilled meats or fish. Its robust flavours complement a variety of proteins, enhancing the overall meal. A beautifully seared piece of chicken or a succulent fillet of fish can transform your ratatouille into a gourmet feast.

Ratatouille also works wonderfully as a topping for pasta or rice. The sauce-like consistency of the dish blends seamlessly with these bases, creating a comforting and wholesome meal. For a lighter option, consider serving it over a bed of quinoa or bulgur wheat, adding an extra layer of texture and nutrition.

Presentation plays a crucial role in making your ratatouille look as appetising as it tastes. Opt for a shallow serving bowl or a large platter to showcase the vibrant colours of the vegetables. Arrange the vegetables artfully, and finish with a drizzle of extra virgin olive oil and a scattering of fresh basil leaves to enhance the dish’s visual appeal.

For a unique twist, try serving ratatouille as a warm starter or appetiser. Spoon it into individual ramekins and top with a sprinkle of cheese before popping them under the grill for a few minutes. The result is a deliciously gooey and flavourful beginning to any meal.

Ratatouille can also be served cold or at room temperature, making it a versatile option for picnics or casual gatherings. Simply spoon it into a serving dish and let your guests enjoy its rich flavours at their leisure. With so many serving possibilities, ratatouille is sure to become a favourite in your culinary repertoire.

Storing Leftovers

Storing leftover ratatouille is straightforward and helps to prolong the enjoyment of this delightful Provençal Vegetable Stew. After cooking, let the ratatouille cool to room temperature before transferring it to an airtight container. This step is crucial for maintaining the freshness and preventing condensation, which can affect the texture of the dish.

When storing in the refrigerator, the ratatouille will remain good for up to five days. If you plan to keep it longer, consider freezing it. Divide the stew into individual portions and place them in freezer-safe containers. Label each container with the date to keep track of its freshness. Frozen ratatouille can be stored for up to three months, making it a convenient option for future meals.

Reheating ratatouille is best done gently to preserve its flavours and textures. If using the hob, place the stew in a saucepan over low to medium heat, stirring occasionally until it is warmed through. This method helps to maintain the integrity of the vegetables while ensuring even heating.

For a quicker option, the microwave can be used. Place the ratatouille in a microwave-safe dish, cover it with a microwave-safe lid or wrap, and heat on low power in short intervals. Stir between each interval to ensure even heating and to prevent any hot spots.

If reheating from frozen, it’s best to thaw the ratatouille in the refrigerator overnight. This gradual thawing process helps to retain the dish’s quality. Once thawed, reheat using your preferred method, either on the hob or in the microwave.

Ratatouille also makes a fantastic meal prep option, allowing you to enjoy a nutritious and flavourful dish throughout the week. With proper storage and gentle reheating, your ratatouille will remain as delightful as when it was freshly made.

Posted on

How to Make Crispy Vegetable Tempura at Home

Crispy vegetable tempura offers a delightful way to enjoy a variety of fresh vegetables encased in a light, airy batter. This traditional Japanese dish has won the hearts of food lovers worldwide, thanks to its unique texture and the versatility of ingredients. Making vegetable tempura at home provides an opportunity to explore different vegetables and perfect the technique in your own kitchen.

The origins of tempura date back to the 16th century when Portuguese missionaries introduced the concept of frying food in batter to Japan. Over the centuries, it has evolved into a staple of Japanese cuisine, known for its delicate crunch and the subtle interplay of flavours, especially in crispy vegetable tempura.

The essence of good tempura lies in its simplicity. A minimalistic approach ensures that the natural flavours of the vegetables are highlighted. By using a basic batter of plain flour, cornflour, baking powder, salt, and ice-cold water, you can achieve the quintessential lightness that defines this dish, particularly when making crispy vegetable tempura.

One of the joys of making tempura is the freedom to experiment with a wide range of vegetables. Whether you prefer the sweetness of sweet potatoes or the earthiness of mushrooms, there’s something for everyone. The key is to maintain a consistent size and thickness for even cooking, ensuring each piece is perfectly coated and fried, resulting in the perfect crispy vegetable tempura.

The experience of preparing and enjoying homemade crispy vegetable tempura is both rewarding and educational, offering a glimpse into the artistry of Japanese culinary traditions.

How to Make Crispy Vegetable Tempura at Home:

Crispy Vegetable Tempura with Dipping Sauce

Print Recipe
Crispy, Crunchy, Delicious: Vegetable Tempura like you've never experienced before!
Indulge in the satisfying crunch of perfectly fried vegetables, coated in a light and airy batter. Paired with a delightful dipping sauce that enhances the flavours and leaves you craving for more.
Experience the ultimate satisfaction of biting into a piece of vegetable tempura, with each bite bursting with flavour and texture. Perfect for a quick snack or a tasty appetiser. Treat yourself to a plate of vegetable tempura today and elevate your snacking experience to a whole new level.
Course Appetizer, Side Dish, Snack
Cuisine Asian-inspired
Diet Vegan, Vegetarian
Keyword Crispy Vegetable Tempura with Dipping Sauce
Prep Time 15 minutes
Cook Time 20 minutes
Servings 4 People

Instructions

Preparation

  • Ina large bowl, combine the plain flour, cornflour, and baking powder. Gradually whisk in the sparkling water until you achieve a smooth batter. Be careful not to overmix; a few lumps are fine.
  • Prepare the vegetables by slicing them as directed. Keep the pieces relatively uniform to ensure even cooking.

Cooking the Tempura

  • Heat vegetable oil in a deep pan or wok to around 180°C (350°F). To test, drop a small amount of batter into the oil; it should sizzle and rise to the surface immediately.
  • Dip each vegetable piece into the batter, ensuring they are coated evenly. Carefully lower them into the hot oil, frying in batches to avoid overcrowding.
  • Fry each batch for about 2-3 minutes or until the tempura is crisp and lightly golden. Remove with a slotted spoon and drain on kitchen paper. Season with salt while still hot.

Making the Dipping Sauce

  • In a small bowl, combine soy sauce, rice vinegar, mirin, ginger, spring onion,and sesame oil. Mix well.

Serving

  • Arrange the tempura vegetables on a serving platter. Serve immediately with the dipping sauce on the side.

Suggestions for Serving

Serving crispy vegetable tempura with an eye for detail can elevate the dining experience. Arrange the tempura pieces on a serving platter with a touch of artistry, perhaps using a garnish of fresh herbs like coriander or chives. A few slices of lemon can add a burst of colour and a hint of zest, making the presentation visually appealing.

For a complete meal, consider pairing your tempura with other Japanese favourites. A bowl of steaming noodles or a side of delicate sushi can complement the light, crispy texture of the tempura beautifully. You could also serve it alongside a simple bowl of steamed rice and miso soup for a well-rounded, traditional Japanese meal.

Individual dipping bowls for the sauce can add a touch of elegance to the presentation. Ensure each guest has their own small bowl of the delightful dipping sauce , allowing them to enjoy the tempura at their own pace.

To add variety, include a selection of tempura vegetables on the platter. The contrasting colours and flavours can create an inviting visual feast, showcasing the appeal of crispy vegetable tempura.

Finally, for a more informal setting, serve the tempura as part of a sharing platter, allowing everyone to pick and choose their favourite pieces. This communal style of eating not only makes the meal more interactive but also highlights the versatility and appeal of crispy vegetable tempura.

Typical Mistakes and How to Prevent When Tempura Vegetables

A frequent issue in tempura preparation is ending up with a batter that’s too thick, leading to a heavy coating. Ensuring the batter is slightly thinner than pancake batter can help achieve the desired lightness. Another common mistake is not maintaining the oil temperature. Use a kitchen thermometer to keep it between 170-180°C to ensure the tempura crisps up properly.

Avoid overcrowding the pan, as this can lower the oil temperature and result in soggy tempura. Fry in small batches to maintain consistent heat. Additionally, cutting vegetables into uniform sizes ensures even cooking, preventing overcooked or undercooked pieces.

To keep the batter cold, place the mixing bowl in a larger bowl filled with ice. Cold batter creates a better texture for making crispy vegetable tempura. If the batter starts warming up, refrigerate it for a few minutes. You may also consider using Tempura Batter Mix instead to save time.

Lastly, drain excess oil using a wire rack instead of kitchen roll to prevent sogginess. By paying attention to these details, you can ensure a delightful and authentic crispy vegetable tempura experience.

Posted on

Baked Sweet Potatoes Recipe with a Tasty Filling

Baked sweet potatoes are a culinary delight, combining simplicity with rich, satisfying flavours. This baked sweet potatoes recipe not only brings essential vitamins and minerals but also their natural sweetness, making them an ideal base for an array of delicious fillings. Baking sweet potatoes enhances their caramelised notes, offering a delectable contrast to savoury ingredients.

One of the most appealing aspects of baked sweet potatoes is their versatility. They can be enjoyed as a main course or as a hearty side dish. Additionally, they are suitable for various dietary preferences, being both gluten-free and vegetarian. Whether you’re catering to a large family dinner or preparing a simple meal for yourself, baked sweet potatoes are a reliable choice that never disappoints.

Today’s recipe combines corn, and black beans to create a flavourful and nutritious filling. Each ingredient brings its own unique texture and taste, resulting in a harmonious blend that complements the sweet, tender flesh of the baked potatoes. The combination of spices such as cumin and smoked paprika adds a delightful depth of flavour, turning a simple meal into something special.

Another advantage of baked sweet potatoes is their ease of preparation. With just a few basic steps, you can create a wholesome and satisfying dish. The process requires minimal effort, yet the results are incredibly rewarding. This makes baked sweet potatoes an excellent option for busy weekdays or relaxed weekends.

So, whether you’re an experienced cook or just starting out, baked sweet potatoes offer an accessible and delightful way to enjoy a nutritious meal. With the right ingredients and a bit of creativity, you can transform this humble root vegetable into a culinary masterpiece. Here is the recipe below:

Baked Sweet Potatoes filled with Corn and Black Beans

Print Recipe
Enjoy your delightful baked sweet potatoes, bursting with flavor and nutrients, filled with a satisfying mix of black beans and corn that will leave your taste buds tingling with joy!
Course brunch, lunch, Main Course
Cuisine Vegan
Keyword Bakes sweet potato recipe
Prep Time 20 minutes
Cook Time 45 minutes
Servings 4 People
Calories 34

Instructions

Preparethe Sweet Potatoes

  • Preheat your oven to200°C (180°C fan-assisted). Wash the sweet potatoes thoroughly and pierce each one several times with a fork. Place them on a baking tray and bake in the preheated oven for about 45 minutes or until they are tender when pierced with a fork.

Prepare the Filling

  • While the sweet potatoes are baking, heat the olive oil in a frying pan over medium heat. Add the sweetcorn, black beans, ground cumin, smoked paprika, salt, and pepper. Stir well and cook for about 5-7 minutes, until the mixture is heated through and the flavours combine nicely. Set aside.

Assemble the Dish

  • Once the sweet potatoes are cooked, remove them from the oven and let them cool slightly. Carefully cut a slit down the centre of each sweet potato and gently push the ends to open them up. Use a fork to fluff the insides a bit.

Fill the Sweet Potatoes

  • Divide the black bean and corn mixture evenly among the four sweet potatoes, spooning it into the centre of each.

Garnish and Serve

  • Once ready, remove the sweet potatoes from the oven. Garnish with fresh coriander, if desired, and serve immediately.

Notes

Having  ingredients on hand will streamline your cooking experience. In addition to the primary ingredients, you might want to have some optional garnishes ready, such as chopped fresh coriander or sour cream. These can add an extra layer of flavour and visual appeal to your final dish.
Ensuring you have everything prepped and measured before you start cooking will make the entire process smoother and more enjoyable. 

Nutrition

Calories: 34kcal | Carbohydrates: 0.5g | Protein: 0.2g | Fat: 4g | Saturated Fat: 1g | Polyunsaturated Fat: 0.4g | Monounsaturated Fat: 3g | Sodium: 1mg | Potassium: 20mg | Fiber: 0.2g | Sugar: 0.1g | Vitamin A: 253IU | Vitamin C: 0.04mg | Calcium: 6mg | Iron: 0.5mg

Suggestions for Serving

Once your Baked Sweet Potatoes are ready, it’s time to assemble and serve them with flair. Carefully slice each sweet potato lengthwise, creating an opening for the filling. Generously spoon the corn, diced sweet potatoes, and black bean mixture into the cavity of each potato. For an added touch, consider garnishing with chopped fresh coriander or a dollop of sour cream. Serve alongside a crisp green salad or avocado slices for a balanced meal. Presentation is key, so take a moment to arrange the sweet potatoes on a platter, ensuring they look as appetising as they taste.

Wrapping up

This recipe for Baked Sweet Potatoes filled with corn, diced sweet potatoes, and black beans is a true testament to how simple ingredients can come together to create a flavourful and wholesome dish. The combination of textures and the balance of sweet and savoury notes make it a standout option for both everyday meals and special occasions. It’s a versatile dish that caters to various dietary preferences and is bound to become a staple in your culinary repertoire.

What makes this recipe even more appealing is its ease of preparation. With a few basic steps and minimal effort, you can create a meal that’s not only delicious but also packed with nutrients. The process is straightforward, making it perfect for both novice cooks and seasoned chefs looking for a reliable go-to recipe.

Serving this dish is a pleasure in itself. The vibrant colours of the sweet potatoes, corn, and black beans make for an inviting presentation that is sure to whet anyone’s appetite. Adding optional garnishes like chopped coriander or a dollop of sour cream can enhance both the visual appeal and the flavour profile, making your dish even more delightful.

This recipe also offers plenty of room for creativity. Feel free to experiment with additional ingredients or spices to suit your taste. Whether you prefer a spicier kick or a hint of citrus, the filling can be adapted to reflect your personal preferences. It’s a great opportunity to get creative in the kitchen and make the dish truly your own.

In summary, these Baked Sweet Potatoes are not just a meal; they are an experience of taste and satisfaction. The ease of preparation combined with the depth of flavour ensures that this dish will be a favourite in your household. I look forward to hearing your feedback and any unique twists you might add. Enjoy your cooking adventure and the delicious results that follow!

Posted on

Savoury Jackfruit Bao Buns: The Perfect Vegan Recipe

If you’re seeking an enticing vegan dish that combines unique textures and bold flavours, look no further than Jackfruit Bao Buns. These fluffy steamed buns, filled with a savoury jackfruit mixture, offer a delightful twist on the traditional bao and are perfect for any occasion. What sets these bao buns apart is the jackfruit filling, which mimics the texture of pulled meat while offering a distinct taste that blends seamlessly with the soft, pillowy dough.

Jackfruit, known for its meat-like consistency, becomes incredibly flavourful when seasoned properly. Adding Fine Sea Salt to the mix ensures the filling has a balanced, rich taste without any additives, enhancing the natural flavours of the ingredients. The combination of soy sauce, hoisin sauce, and a touch of ginger and garlic creates a filling that is both savoury and slightly sweet, making each bite a flavourful experience.

Whether you’re hosting a dinner party or looking for a comforting weeknight meal, these Jackfruit Bao Buns are sure to impress. They offer a versatile option for those adhering to a plant-based diet and can easily be adapted to suit various flavour preferences. With the right ingredients and a bit of patience, you can create a dish that not only looks impressive but tastes fantastic as well.

This recipe is ideal for both seasoned cooks and those new to vegan cooking, providing a straightforward yet rewarding culinary endeavour. So, gather your ingredients and get ready to enjoy a taste sensation that’s sure to become a favourite in your home.

Jackfruit Bao Bun with Savoury Filling Recipe

Print Recipe
Jackfruit Bao Bun with a Savoury Filling is a delightful culinary creation that combines the soft, fluffy texture of the bao bun with the unique taste of jackfruit. This Asian-inspired dish is perfect for those who enjoy exploring new flavours and textures. The bao bun itself is made from a simple dough, steamed to perfection, and has a slight sweetness that complements the savoury filling.
Course Main Course, party food, Snack, vegan food
Cuisine Asian-inspired
Keyword Jackfruit recipe
Prep Time 40 minutes
Cook Time 20 minutes
Servings 4 People

Ingredients

For the Bao Buns:

Instructions

Prepare the Bao Dough

  • In a large bowl, combine the flour, caster sugar, baking powder, and salt. In a separate small bowl, mix the yeast with the warm water and let it sit for about 5 minutes until foamy. Add the yeast mixture and vegetable oil to the dry ingredients. Mix until a dough forms. Knead the dough on a lightly floured surface for about 10 minutes until smooth and elastic. Place the dough in a greased bowl, cover with a damp cloth, and let it rise in a warm place for about 1 hour or until doubled in size

Prepare the Filling

  • Drained the jackfruit. Trim the firm, pointed ends off each triangular piece of jackfruit (you can still use them if you prefer) and gently press each piece so that it separates into individual strands and absorbs more of the cooking sauce. Set aside.
  • Heat the vegetable oil in a pan over medium heat. Add the onion, garlic, and ginger, and sauté until the onion is translucent. Add the shredded jackfruit, soy sauce, hoisin sauce, tamarind sauce and sesame oil. Stir well and cook for about 10 minutes until the jackfruit is tender and well coated. Add the red pepper, cooking for an additional 5 minutes. Season with salt and black pepper. Remove from heat and set aside

Shape and Steam the Bao

  • Once the dough has risen, punch it down and divide it into 8 equal pieces. Roll each piece into a ball and flatten each ball into an oval shape, approximately 10cm long.
  • Lightly brush one side with oil and fold in half to create a bun shape. Prepare a steamer lined with parchment paper. Place the buns inside, ensuring they are not touching.
  • Cover and steam over medium heat for 10-12 minutes until the buns are puffed and cooked through.

Assembling the Bao Buns

  • Once the buns are steamed, carefully open them and fill a bao bun with pulled jackfruit filling, drizzling with extra hoisin sauce if desired. Finish garnishing each filled bao bun with white and black sesame seeds, and chopped fresh coriander leaves.

Notes

Tips for Shaping:

Ensure the filling is well-centred to avoid uneven cooking.
If you find the dough sticking to your hands, lightly flour your hands to make handling easier.
Shaping the bao buns might require a bit of practice, but it’s a fun and rewarding process. Don’t worry if the first few attempts aren’t perfect; the buns will still be delicious. 
Properly sealed buns help in achieving that delightful, fluffy texture without losing any of the savoury filling inside. Enjoy the process and look forward to tasting these delectable bao bu

Suggestions for Serving

For a complete meal, consider pairing your Savoury Jackfruit Bao Buns with refreshing side dishes and thoughtful presentation touches. A fresh cucumber salad, lightly dressed with rice vinegar and sesame oil, adds a crisp and refreshing contrast to the rich filling of the bao buns. Alternatively, a simple mix of pickled vegetables like carrots, radishes, and red onions offers a tangy counterbalance to the savoury jackfruit filling.

For an added burst of flavour, serve the bao buns with a side of dipping sauce. A mixture of soy sauce, rice vinegar, a touch of sesame oil, and a sprinkle of chilli flakes makes for a delicious dip that complements the buns beautifully.

When it comes to presentation, arranging the buns in a bamboo steamer basket adds an authentic and charming touch to your meal. Sprinkling sesame seeds or finely chopped spring onions over the buns before serving can enhance both the visual appeal and the texture.

For those looking to elevate the dining experience further, consider serving the bao buns with a pot of hot green tea. The tea’s subtle bitterness pairs well with the savoury and slightly sweet flavours of the bao buns, providing a well-rounded meal experience.

If you’re hosting guests, these presentation and serving suggestions can turn a simple meal into a memorable culinary event. The attention to detail in pairing and presentation not only enhances the taste but also makes the meal visually appealing, ensuring that your Jackfruit Bao Buns are the highlight of the dining experience. Enjoy this delightful vegan recipe that brings together flavour, texture, and a touch of elegance.

Posted on

Delicious Butternut Squash Soup Recipe

The vibrant orange hue of butternut squash not only brightens up the table but also signifies its rich nutritional value. Packed with vitamins, minerals, and antioxidants, butternut squash is a powerhouse of goodness. When transformed into a soup, it retains its nutritional benefits while offering a delightful taste experience.

The beauty of butternut squash soup lies in its simplicity. A few fresh ingredients come together to create a harmonious blend of flavours that can be enjoyed by all. Whether you’re seeking a quick weekday dinner or an elegant starter for a dinner party, this soup fits the bill.

Its versatility means you can tailor the recipe to suit your preferences, adding spices, herbs, or other ingredients to make it uniquely yours. The process of making this soup is also quite therapeutic – from the roasting of the squash to the blending of the ingredients, every step adds to the anticipation of the final dish.

Here is a step-by-step recipe to create a delightful butternut squash soup from scratch.

Butternut Squash Soup Recipe

Print Recipe
Savour the rich, comforting flavours of butternut squash soup, an ideal dish for the cooler months. This velvety soup is simple to prepare and presents a marvellous combination of sweet and savoury notes that will warm you from within. Not only is this butternut squash soup a delight to cook, but it also provides a soothing treat that is bound to become a beloved staple at the dining table. Whether shared with family or enjoyed in solitude, this soup serves as the perfect companion on any brisk day.
Course brunch, Starter
Cuisine African, American, English, Mediterranean
Keyword Butternut squash at Nicol Retailer, Butternut Squash Recipe, butternut squash soup
Prep Time 20 minutes
Cook Time 40 minutes
Servings 4 People
Calories 77

Instructions

  • Begin by peeling and dicing the butternut squash into small cubes. Ensure all other vegetables are properly prepared as well.
  • Heat the olive oil in a large pot over medium heat. Add the chopped onion and garlic, and sauté for about 5 minutes until the onion becomes translucent.
  • Incorporate the diced carrot and butternut squash into the pot. Stir the mixture well, allowing the vegetables to coat with the oil and onion mixture.
  • Pour in the vegetable stock and add the ground nutmeg. Stir to combine all ingredients. Bring the mixture to a gentle boil, then reduce the heat to low. Cover the pot and let it simmer for about 30 minutes, or until the vegetables are tender.
  • Once the vegetables are cooked through, remove the pot from the heat. Use an immersion blender to puree the soup until smooth. Alternatively, you can carefully transfer the soup in batches to a countertop blender.
  • Season the soup with salt and pepper according to your taste. If desired, stir in a swirl of double cream or coconut milk for added richness.
  • Serve the soup hot, garnished with fresh parsley if you wish. Enjoy your warm, comforting butternut squash soup

Notes

Tips
For the best results, choose a firm, unblemished butternut squash. Quality ingredients make a significant difference, so it’s worth visiting Nicol Retailer online  to ensure you’re getting the freshest produce available.
Additionally, you may want to keep some spices and herbs on hand. Nutmeg and cinnamon can add a warm, sweet note, while fresh thyme or sage can introduce an aromatic complexity. If you enjoy a bit of heat, a pinch of cayenne pepper can also be a nice touch.

Nutrition

Calories: 77kcal | Carbohydrates: 3g | Protein: 0.03g | Fat: 7g | Saturated Fat: 1g | Polyunsaturated Fat: 1g | Monounsaturated Fat: 5g | Sodium: 994mg | Potassium: 2mg | Fiber: 0.1g | Sugar: 2g | Vitamin A: 529IU | Vitamin C: 0.01mg | Calcium: 1mg | Iron: 0.1mg

Tips for Enhancing the Flavour

To boost the taste of your butternut squash soup, play around with various spices and herbs. Nutmeg and cinnamon can bring out the squash’s inherent sweetness, while fresh thyme or sage can introduce aromatic depth.

For an even creamier soup, consider adding a swirl of double cream or coconut milk. If you prefer a bit of crunch, garnish with roasted nuts or seeds just before serving.

Experimenting with different seasoning blends can also yield delightful results. A hint of curry powder can give the soup a twist, while smoked paprika can add a subtle smokiness. For those who enjoy a bit of spice, a pinch of cayenne pepper can provide a gentle kick.

Incorporating acidic elements like a squeeze of lemon juice or a splash of apple cider vinegar can also enhance the overall flavour profile. These additions can balance the soup’s sweetness and add a refreshing contrast.

Another way to enrich the taste is by using flavoured oils. A drizzle of truffle oil or chilli oil can add a gourmet touch to your butternut squash soup, making it feel extra special.

Fresh herbs such as parsley, coriander, or chives can be sprinkled on top for a burst of colour and an extra layer of flavour.

By experimenting with these tips, you can customise your butternut squash soup to suit your taste preferences, creating a dish that’s both unique and delicious.

Suggestions for Serving

Butternut squash soup pairs beautifully with a variety of accompaniments, making it a versatile choice for any meal. One delightful option is to serve it with a crusty loaf of bread, perfect for dipping and soaking up every last drop of the soup’s rich, velvety goodness. A fresh green salad can add a refreshing contrast, offering a crisp texture that balances the soup’s creamy consistency.

For a more filling meal, consider pairing the soup with a hearty sandwich. Options like a classic grilled cheese or a roasted vegetable panini can complement the soup’s flavours and provide a satisfying bite. Additionally, a side of roasted or steamed vegetables can further enhance the nutritional value and variety of your meal.

Garnishing your butternut squash soup can also elevate the dining experience. A sprinkle of freshly chopped herbs such as parsley, coriander, or chives can add a burst of colour and an extra layer of flavour. A drizzle of olive oil or a touch of cream can create an appealing visual effect, while a dash of paprika or a few roasted nuts or seeds can introduce an interesting textural contrast.

If you’re serving the soup for a special occasion or dinner party, consider adding a gourmet touch with flavoured oils like truffle or chilli oil. These small additions can make your butternut squash soup feel extra special and impress your guests.

By exploring different serving options and garnishes, you can transform a simple butternut squash soup into a memorable and satisfying meal.

Posted on

Hasselback Butternut Squash Recipe

Transform your meals with our Hasselback Butternut Squash Recipe. A twist on the traditional roasted butternut squash, this recipe brings both flair and flavour to your dinner table. With carefully scored slices, each piece absorbs more seasoning, delivering a delightful taste in every bite. This versatile dish can be enjoyed as a side for any main course or stand alone as a vegetarian delight. Made from the freshest squash and spiced with herbs and a touch of garlic, it’s sure to impress family and friends. Perfect for autumn gatherings or holiday feasts, add this show-stopping recipe to your kitchen repertoire.

Roasted butternut squash with pecans and pomegranate.

Hasselback Butternut Squash

Print Recipe
Discover a new way to enjoy butternut squash with our Hasselback Butternut Squash Recipe. Perfect for vegetarians and vegans, this delightful dish is both tasty and nutritious. With just a few ingredients, including olive oil, garlic, and your favourite herbs, you'll create a visually appealing side dish that's full of flavour. The recipe's unique cutting technique ensures each piece absorbs all the seasoning, making every bite delicious. Easy to follow and quick to prepare, this recipe will soon become a staple in your kitchen.
Course Main Course, Side Dish
Keyword Butternut Squash, Butternut Squash Recipe, Hasselback Butternut Squash Recipe
Prep Time 30 minutes
Cook Time 1 hour

Ingredients

Instructions

  • Preheat your oven to 200°C (400°F). Peel the butternut squash, cut it in half lengthwise, and scoop out the seeds. Place the halves flat side down on a cutting board.
  • Using a sharp knife, make thin slices across each squash half, cutting about three-quarters of the way through. Be careful not to slice all the way to the bottom.
  • In a small bowl, mix together the olive oil, honey or maple syrup, minced garlic, salt, and pepper.
  • Place the squash halves on a baking tray. Brush them generously with the olive oil mixture, ensuring it seeps into the slices. Cover with foil and bake in the oven for 30 minutes.
  • Remove the foil and bake for an additional 15-20 minutes, or until the squash is tender and slightly caramelised on the edges.
  • Once cooked, transfer the squash to a serving platter. Sprinkle with fresh thyme and the optional pecan & pomegranate seeds.