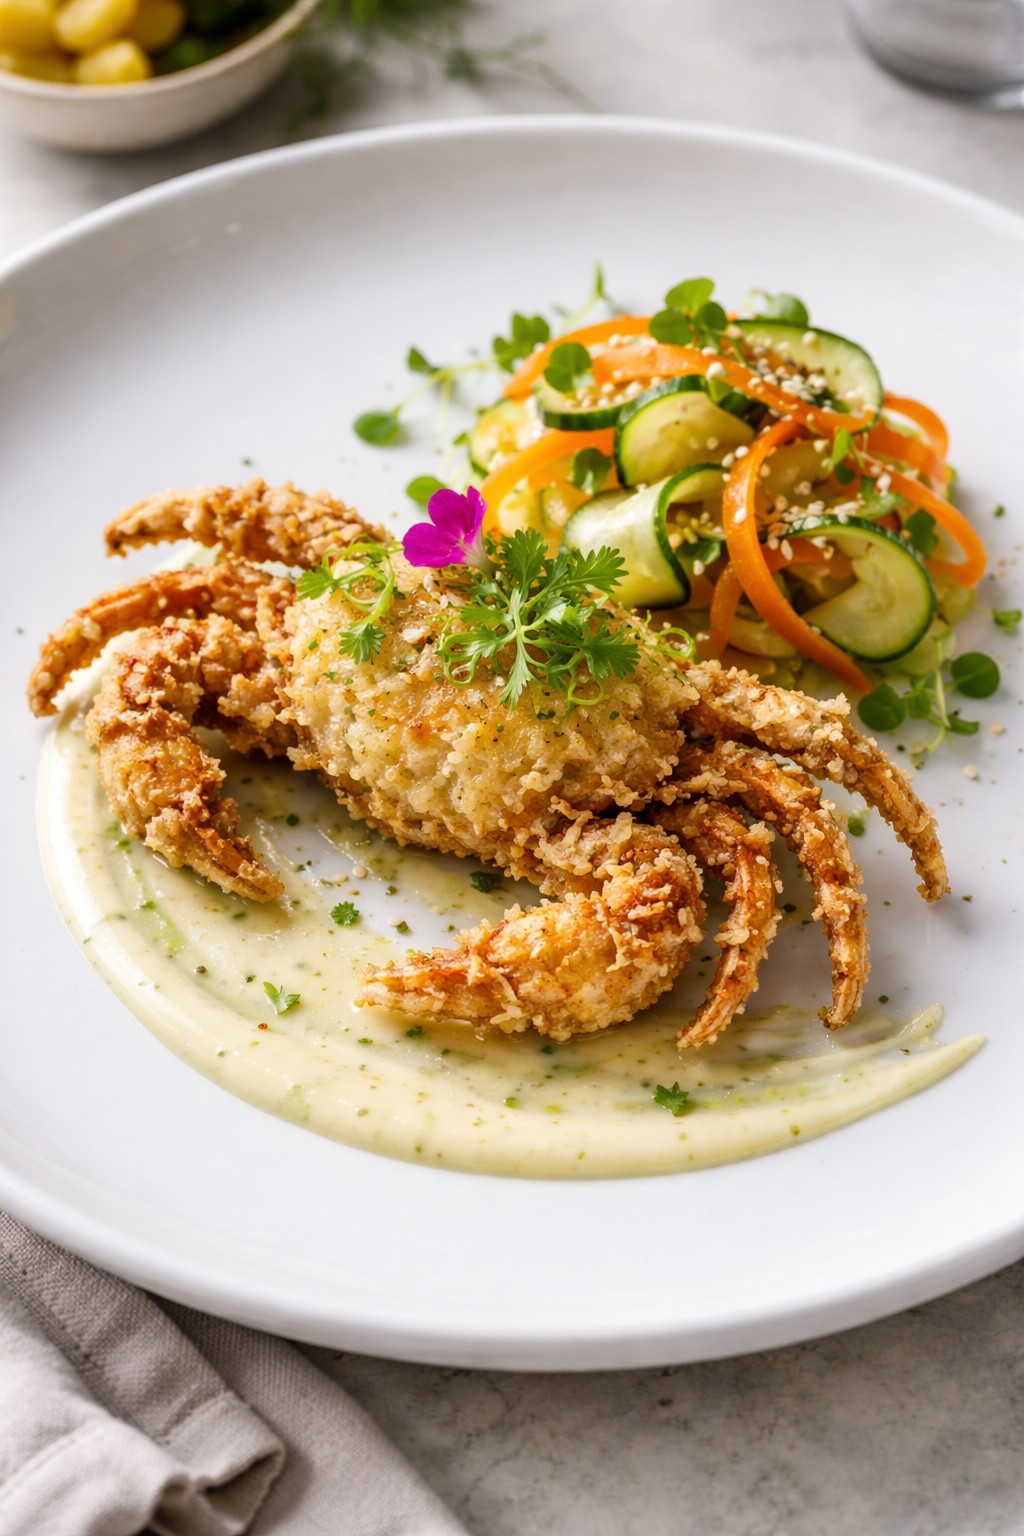
If you’ve ever wanted to recreate a Michelin-style seafood dish in your own kitchen, this crispy soft shell crab tempura is exactly where to start. Here, you’ll find an easy soft shell crab tempura recipe that delivers light, golden, and delicately crisp soft shell crab—one of those rare ingredients that provides both texture and flavour in every bite—no fuss, just pure indulgence. In fact, if you are searching for the perfect soft shell crab tempura recipe, this guide has you covered.
What makes this dish truly special is the contrast. The crunchy tempura coating gives way to sweet, tender crab, while the silky yuzu kosho emulsion adds a citrusy kick with just the right amount of heat. Paired with sharp, refreshing pickled vegetables, every element works together to create a perfectly balanced plate. For anyone who loves seafood, mastering a soft shell crab tempura recipe can elevate your repertoire.
Why Soft Shell Crab Is So Popular
Soft shell crab has become a favourite in modern British and Asian-fusion kitchens—and for good reason. Unlike regular crab, the entire shell is edible, meaning you get a full, satisfying bite without any effort. It cooks quickly, absorbs flavour beautifully, and delivers that irresistible crisp finish when fried.
Whether you’re planning a dinner party, a date-night meal, or simply elevating your home cooking, this dish instantly adds a touch of luxury.
If you’re curious about the health benefits of seafood, including soft shell crab, the NHS provides a helpful overview of fish and shellfish nutrition and why they are an important part of a balanced diet: https://www.nhs.uk/live-well/eat-well/food-types/fish-and-shellfish-nutrition/
Indulge in this Michelin-inspired tempura soft shell crab recipe, featuring a perfectly crisp, golden coating paired with a smooth yuzu kosho emulsion and vibrant pickled vegetables. This elegant dish balances texture and flavour with citrusy freshness, subtle heat, and delicate crunch, making it ideal for gourmet dining at home. Perfect for food lovers seeking a refined seafood experience, this recipe transforms soft shell crab into a restaurant-quality masterpiece.
Course Appetizer, Starter, Tasting Menu Course
Cuisine Asian-inspired, Contemporary Fine Dining, Japanese Fusion, Modern European
Gently heat vinegar, sugar, and salt until dissolved
Pour over cucumber and carrot
Leave to pickle for at least 20 minutes
Tempura Batter (Prep – 5 mins)
In a chilled bowl, whisk egg yolk with ice-cold sparkling water
Lightly fold in flour and cornflour
Keep batter cold and slightly lumpy
Fry the Crab
Heat oil to 180°C
Dip each crab into batter
Fry for 2–3 minutes until light golden and crisp
Drain and lightly season
Yuzu Emulsion
Whisk mayonnaise, yuzu kosho, lemon juice, and olive oil until smooth
Plating
Spread or swipe the emulsion across the plate.
Place crab slightly off-centre
Arrange pickled vegetables neatly
Finish with micro herbs and lime zest
Keep batter very cold → ensures light, airy tempuraOil must stay at 180°C → prevents greasy coatingServe immediately → texture is at its peak
Notes
Discover how to create a restaurant-quality soft shell crab dish at home with this elegant tempura recipe, featuring a light, crispy coating and a vibrant yuzu kosho emulsion. Perfect for seafood lovers, this dish delivers the ultimate balance of crunch, citrus, and umami ideal for dinner parties, special occasions, or gourmet home cooking.Looking for dietary flexibility? This recipe can easily be adapted to suit different needs. For a gluten-free version, simply swap the plain flour for a gluten-free flour blend or rice flour to achieve the same light, crispy texture.For a vegan alternative, replace the soft shell crab with king oyster mushrooms or aubergine slices, prepared using the same tempura technique. Pair with a vegan mayonnaise-based yuzu emulsion for a fully plant-based, flavour-packed dish that still delivers on texture and presentation.Whether you’re cooking for pescatarians, gluten-free diners, or vegan guests, this versatile recipe ensures everyone can enjoy a gourmet, chef-style experience at home.
When preparing seafood at home, knowing how to select the freshest ingredients is key. This guide from BBC Good Food offers practical tips on choosing high-quality fish and shellfish: https://www.bbcgoodfood.com/howto/guide/how-buy-fish
Serving Suggestion (Make It Look Restaurant-Quality)
Presentation is what transforms this crispy soft shell crab from a simple dish into a true restaurant-quality dining experience at home. Moreover, presenting your soft shell crab tempura recipe with care will truly impress guests. With just a few thoughtful touches, you can elevate both the visual appeal and overall enjoyment of the dish.
Start by choosing a neutral or matte plate white, slate, or stoneware works beautifully to highlight the golden crispness of the tempura crab. Use the back of a spoon to create a smooth swipe of yuzu kosho emulsion across the plate. This not only adds a professional finish but also ensures every bite is balanced with flavour.
Place the crispy soft shell crab slightly off-centre or stacked for height, a technique often used in fine dining to create visual interest. The goal is to avoid overcrowding and allow each component to stand out.
Next, carefully arrange the pickled vegetables. Think neat, intentional placement rather than piling—this adds colour contrast and keeps the dish looking clean and refined. The vibrant greens and oranges will pop against the plate, making it instantly more appetising.
Finish with delicate garnishes:
A sprinkle of micro herbs or coriander tips for freshness
A light dusting of lime zest for brightness and aroma
Optional edible flowers for a premium, Instagram-worthy touch
Timing is everything—serve the dish immediately while the crab is hot and crisp to preserve its texture. Soft shell crab is at its absolute best straight from the fryer, with that perfect contrast between crunch and tenderness.
Complete the Experience
To turn this into a full dining experience, consider pairing and plating options:
Serve alongside steamed jasmine rice or seasoned fries for a more filling main course
Add a small side of Asian-style slaw or light salad to enhance freshness
Entertaining Tip
If you’re hosting, serve this as part of a small plates or sharing menu. Plate individually for a fine dining feel, or present on a large serving platter for a more relaxed, social dining experience. Above all, your soft shell crab tempura recipe is sure to impress any guest.
If you’re searching for a quick beef dinner recipe that feels vibrant, fresh and restaurant-quality, these Chimichurri Beef Flatbreads deliver bold flavour in under 30 minutes. Tender British beef stir fry strips are seared until beautifully caramelised and layered onto warm flatbreads. After that, they are finished with bright green chimichurri. Made using premium beef available from Nicol Retailer, this dish combines heritage flavour with modern convenience.
British beef is known for its traceability, high welfare standards and consistent quality. This makes it a reliable choice for flavour-driven recipes, as highlighted by the Agriculture and Horticulture Development Board (AHDB).
The History Behind Chimichurri
Chimichurri originates from Argentina and Uruguay, where it is traditionally served with grilled beef during asado cooking. As widely documented in South American cuisine by BBC Good Food, this is a classic pairing.
The sauce itself is simple yet powerful: parsley, garlic, olive oil and vinegar. Designed to cut through rich, grilled meat, chimichurri provides brightness and balance. Over time, this humble herb sauce has travelled far beyond its roots and become a global favourite in modern kitchens. This recipe honours that tradition while giving it a contemporary twist. In particular, it swaps open-fire grilling for quick-seared British beef stir fry strips and serves it in soft flatbreads for easy sharing.
These Chimichurri Beef Flatbreads with Charred Peppers are a quick and flavour-packed Mediterranean-inspired dish made with tender British beef stir fry strips, fresh herbs, and vibrant roasted peppers. Ready in under 30 minutes, this easy beef flatbread recipe is perfect for weeknight dinners, casual entertaining, or summer gatherings. The fresh chimichurri sauce adds brightness and depth, while warm flatbreads and creamy yoghurt create a satisfying balance of textures and flavours.
Course Dinner, lunch, Main Course
Cuisine British Fusion, Mediterranean
Keyword British beef stir fry strip, chimichurri beef flatbread recipe, easy flatbread meal, high protein beef recipe, Mediterranean beef recipe, Nicol Retailer recipes, quick beef dinner UK,, weeknight beef recipe
Mix with red wine vinegar, olive oil, chilli flakes, and salt. Set aside.
Cook the Peppers
Heat a pan over medium-high heat.
Add sliced peppers and cook until slightly charred and softened (5–6 minutes). Remove and set aside.
Sear the Beef
Season beef strips with smoked paprika, cumin, salt, and pepper.
Heat olive oil in a hot pan and cook beef in batches for 2–3 minutes until browned and juicy.
Assemble
Warm flatbreads.
Spread a spoonful of yoghurt over each, top with beef, charred peppers, and drizzle generously with chimichurri.
Serve with lemon wedges.
Notes
For the most tender result, cook the beef stir fry strips quickly over high heat and avoid overcrowding the pan. Overcooking can cause the beef to become tough. Let the meat rest briefly before assembling the flatbreads to retain its juices.The chimichurri sauce can be made up to 24 hours in advance and stored in the fridge. Allow it to return to room temperature before serving to enhance flavour.Vegan VariationTo make this recipe vegan:Replace the beef with marinated portobello mushrooms, grilled aubergine strips, or plant-based steak-style strips.Use dairy-free yoghurt or a tahini-based sauce instead of natural yoghurt. Ensure flatbreads are dairy-free.The chimichurri sauce is naturally vegan, so no changes are required.Gluten-Free VariationTo make this recipe gluten-free:Use certified gluten-free flatbreads or wraps. Check that all seasonings and condiments are gluten-free. Ensure no cross-contamination during preparation.Alternatively, serve the beef and chimichurri over rice, quinoa, or a fresh salad instead of flatbread.For extra flavour, add a squeeze of fresh lemon just before serving, or crumble over feta (omit for vegan version). If you prefer extra heat, increase the chilli flakes in the chimichurri
These Chimichurri Beef Flatbreads are incredibly versatile and can be styled to suit anything from a relaxed weeknight dinner to an impressive sharing platter for guests.
For a vibrant Mediterranean-style spread, serve alongside a rocket and shaved parmesan salad, drizzled with lemon and olive oil. The peppery leaves and salty cheese complement the richness of the beef beautifully. Add a bowl of marinated olives and warm flatbreads for a complete sharing table.
If you’re looking for something heartier, pair with crispy sweet potato wedges or rosemary roasted baby potatoes. The natural sweetness of the potatoes balances the tangy chimichurri and savoury beef. A side of grilled courgettes or charred aubergine enhances the Mediterranean feel.
For a lighter, summer-ready option, serve the chimichurri beef over a fresh couscous or quinoa salad with cucumber, cherry tomatoes and fresh herbs. You can also swap flatbreads for lettuce wraps for a low-carb alternative that still delivers bold flavour.
Entertaining guests? Present the components separately and allow everyone to build their own flatbread. Add toppings such as:
However you serve it, using high-quality British beef stir fry strips ensures the centrepiece of the dish remains tender, flavourful and satisfying. This turns a simple flatbread into something truly memorable.
Mediterranean-inspired dishes, rich in olive oil, herbs and fresh vegetables, are often associated with balanced eating patterns, as outlined by the NHS guide to the Mediterranean diet.
The Star Ingredient: British Beef Stir Fry Strips
At the heart of this recipe are premium British beef stir fry strips. These are a versatile, quick-cooking cut that delivers exceptional flavour and tenderness. Because the beef is sliced evenly and thinly, it cooks rapidly at high heat. Moreover, this makes it ideal for fast, flavour-forward dishes like flatbreads, stir fries, wraps and noodle bowls.
What makes British beef stand out is its quality and traceability. Carefully sourced and prepared, it offers consistent texture, rich natural flavour, and excellent cooking performance. When seared properly, stir fry strips develop a beautiful caramelised crust while remaining juicy inside — exactly what you want for a bold dish like chimichurri beef.
Unlike tougher cuts that require long cooking times, stir fry strips allow you to achieve restaurant-style results in minutes. This makes them perfect for busy households, weeknight meals, and entertaining without stress.
Using high-quality beef from Nicol Retailer ensures:
Consistent thickness for even cooking
Tender texture without overcooking
Deep, natural beef flavour
Reliable performance in high-heat recipes
When you start with quality ingredients, you don’t need complicated techniques or heavy sauces to create something special. The beef becomes the hero of the plate — enhanced, not masked, by fresh herbs and balanced seasoning.
Final Thoughts
From the traditional Argentine asado to your own kitchen table, chimichurri has travelled through history as a celebration of beef and bold flavour. By pairing it with premium British beef stir fry strips, you create a dish that feels both authentic and contemporary.
Great recipes begin with great ingredients — and with quality beef from Nicol Retailer, you’re already halfway there.
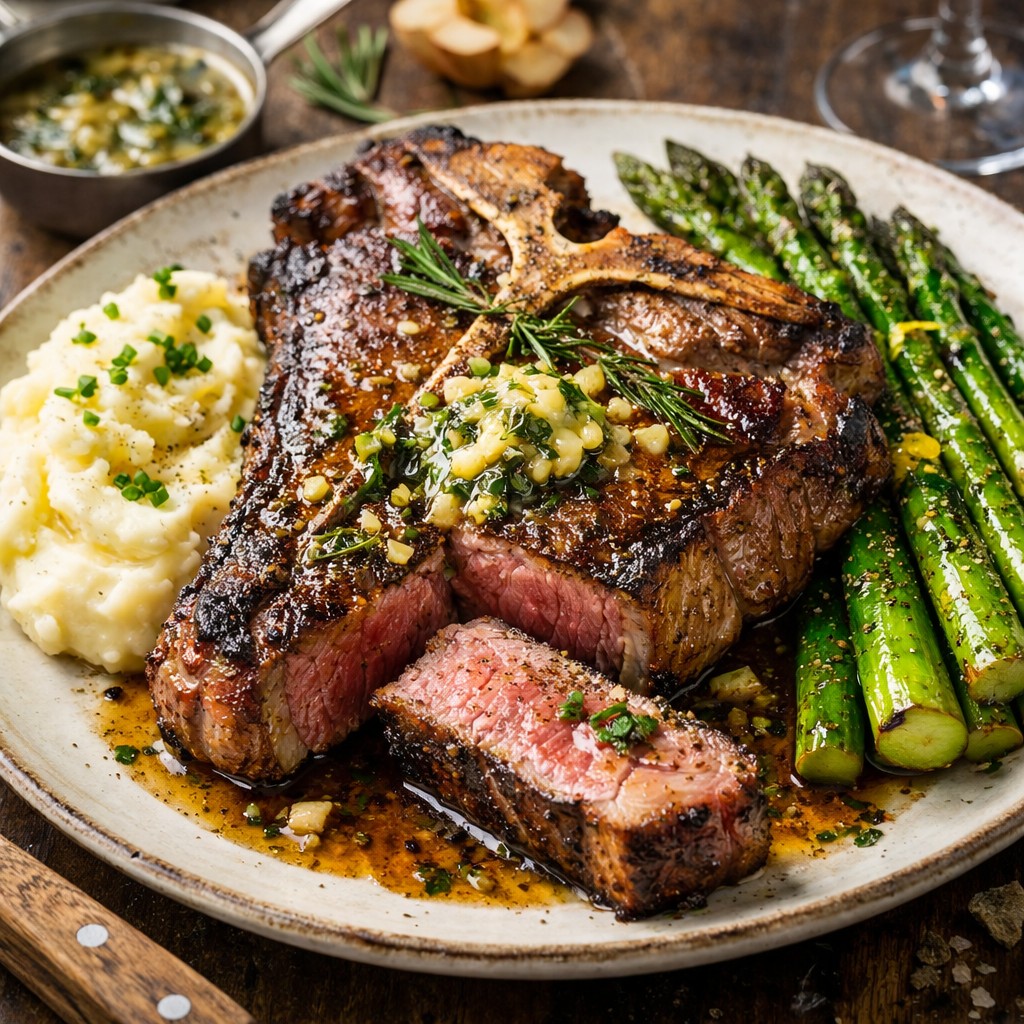
Rich, indulgent, and beautifully simple, this 14-day aged T-bone steak recipe brings steakhouse-quality dining straight to your home kitchen. Using premium aged British beef, the steak is pan-seared to develop a deep caramelised crust. Despite this, it remains juicy and tender inside. It is then finished with aromatic garlic herb butter for maximum flavour. Served with creamy truffle mashed potatoes and charred asparagus, this dish is ideal for special occasions. It also works well for dinner parties or an elevated weekend meal. You can follow the step-by-step instructions below to cook the perfect restaurant-style T-bone steak. Importantly, it is made using high-quality ingredients available from Nicol Retailer.
Pan-Seared Aged T-Bone Steak with Herb Garlic Butter, Truffle Mash & Charred Asparagus
This pan-seared 14-day aged T-bone steak recipe delivers restaurant-quality flavour at home, featuring a perfectly caramelised crust, juicy medium-rare centre, and rich garlic herb butter. Paired with creamy truffle mashed potatoes and charred asparagus, this dish highlights the exceptional quality of Birchstead aged British beef, making it ideal for special occasions, dinner parties, or an indulgent steak night. Premium steak available from Nicol Retailer.
Remove the T-bone steaks from the fridge 40–45 minutes before cooking to allow them to come to room temperature.
Pat dry thoroughly and season generously with sea salt and black pepper on both sides.
Make the Garlic Herb Butter
In a bowl, mix the softened butter with garlic, parsley, rosemary, and lemon zest.
Season lightly with salt and pepper.
Roll into a log using cling film and chill until needed.
Prepare the Truffle Mash
Peel and cut the potatoes into even chunks. Boil in well-salted water for 15–18 minutes until tender.
Drain thoroughly, then mash with butter and warm cream until smooth. Stir in truffle oil gradually, season to taste, and keep warm.
Cook the T-Bone Steaks
Heat a heavy cast-iron pan or grill pan over high heat. Add olive oil. When shimmering, add the steaks and sear for: 5–6 minutes per side for medium-rare
During the final minute, add a slice of garlic herb butter to each steak and baste well. Remove from the pan and rest on a board for 10 minutes.
Char the Asparagus
While the steaks rest, heat a pan or grill. Toss asparagus with olive oil, salt, and pepper. Cook for 3–4 minutes until lightly charred and tender. Finish with a squeeze of lemon.
To Serve
Slice each T-bone against the grain if desired, or serve whole for dramatic presentation. Plate with a generous scoop of truffle mashed potatoes, charred asparagus, and an extra disc of garlic herb butter melting over the steak.
Notes
For the best results, allow the 14-day aged T-bone steaks to come fully to room temperature before cooking and season just before searing to achieve a deep, caramelised crust. Always rest the steak after cooking to lock in juices and maintain tenderness. This recipe is naturally gluten-free, provided the butter and seasonings used are certified gluten-free. For a fully gluten-free variation, serve the steak with charred asparagus or roasted vegetables instead of mashed potatoes, or prepare the mash using gluten-free, additive-free ingredients.Well-done steak tips: If you prefer your T-bone steak well done, sear the steak as usual to develop flavour, then reduce the heat and continue cooking more gently. Finish the steak in a moderate oven (170°C / 150°C fan) for 6–10 minutes, depending on thickness, until fully cooked through. Cover loosely with foil while resting to retain
This recipe works because it is built around the natural quality of 14-day aged British T-bone steak. This allows the beef to shine without unnecessary complexity. Dry ageing intensifies flavour and tenderises the meat. Therefore, the steak requires minimal seasoning and simple cooking techniques to achieve outstanding results.
Using a high-heat pan sear creates a deep, caramelised crust through the Maillard reaction, locking in juices while delivering rich, savoury flavour. Finishing the steak with garlic herb butter adds aromatic depth and enhances the beef’s natural umami without overpowering it. Resting the steak after cooking is a crucial step. It allows the juices to redistribute evenly for a more succulent and tender bite.
The pairing of creamy truffle mashed potatoes works perfectly because the smooth, luxurious texture balances the robust character of the aged steak, while the subtle earthiness of truffle complements the beef rather than competing with it. Charred asparagus adds freshness, colour, and a slight bitterness that cuts through the richness, creating a well-rounded plate.
Star Ingredient
This recipe is designed around the exceptional quality of Birchstead 14-Day Aged Beef T-Bone Steak, available from Nicol Retailer — perfect for premium, restaurant-quality meals at home.
Pairing Suggestions
The bold flavour and tenderness of this 14-day aged T-bone steak call for pairings that both complement and elevate the natural richness of the beef. Dry ageing intensifies umami notes, making this steak particularly well suited to structured, full-bodied accompaniments.
Side Dish Pairings
On the plate, this steak pairs exceptionally well with creamy truffle mashed potatoes, which add luxury and softness to contrast the firm texture of the meat. Charred asparagus, buttered greens, roasted mushrooms, or garlic-roasted root vegetables bring freshness and earthiness, rounding out the dish beautifully. For a lighter meal, a crisp green salad with a sharp vinaigrette helps cut through the richness.
Sauces & Finishing Touches
While the quality of aged British beef means this steak needs little embellishment, classic accompaniments such as peppercorn sauce, red wine jus, or chimichurri can be served on the side for variety. In addition, a final sprinkle of flaky sea salt or a melting knob of garlic herb butter enhances flavour. This approach does not mask the natural taste of the beef.
This versatile pairing approach makes the dish perfect for steak nights, dinner parties, romantic meals, and celebratory occasions. Additionally, it allows the premium quality of the ingredients to shine. For best results, use high-quality aged beef sourced from Nicol Retailer. This ensures a truly restaurant-quality experience at home.
Finally, the recipe is highly adaptable. Whether cooked medium-rare for maximum juiciness or well done using the oven-finish method, the quality of aged British beef ensures consistent results. This balance of technique, flavour contrast, and premium ingredients makes the dish reliable, impressive, and ideal for both special occasions and elevated home cooking.
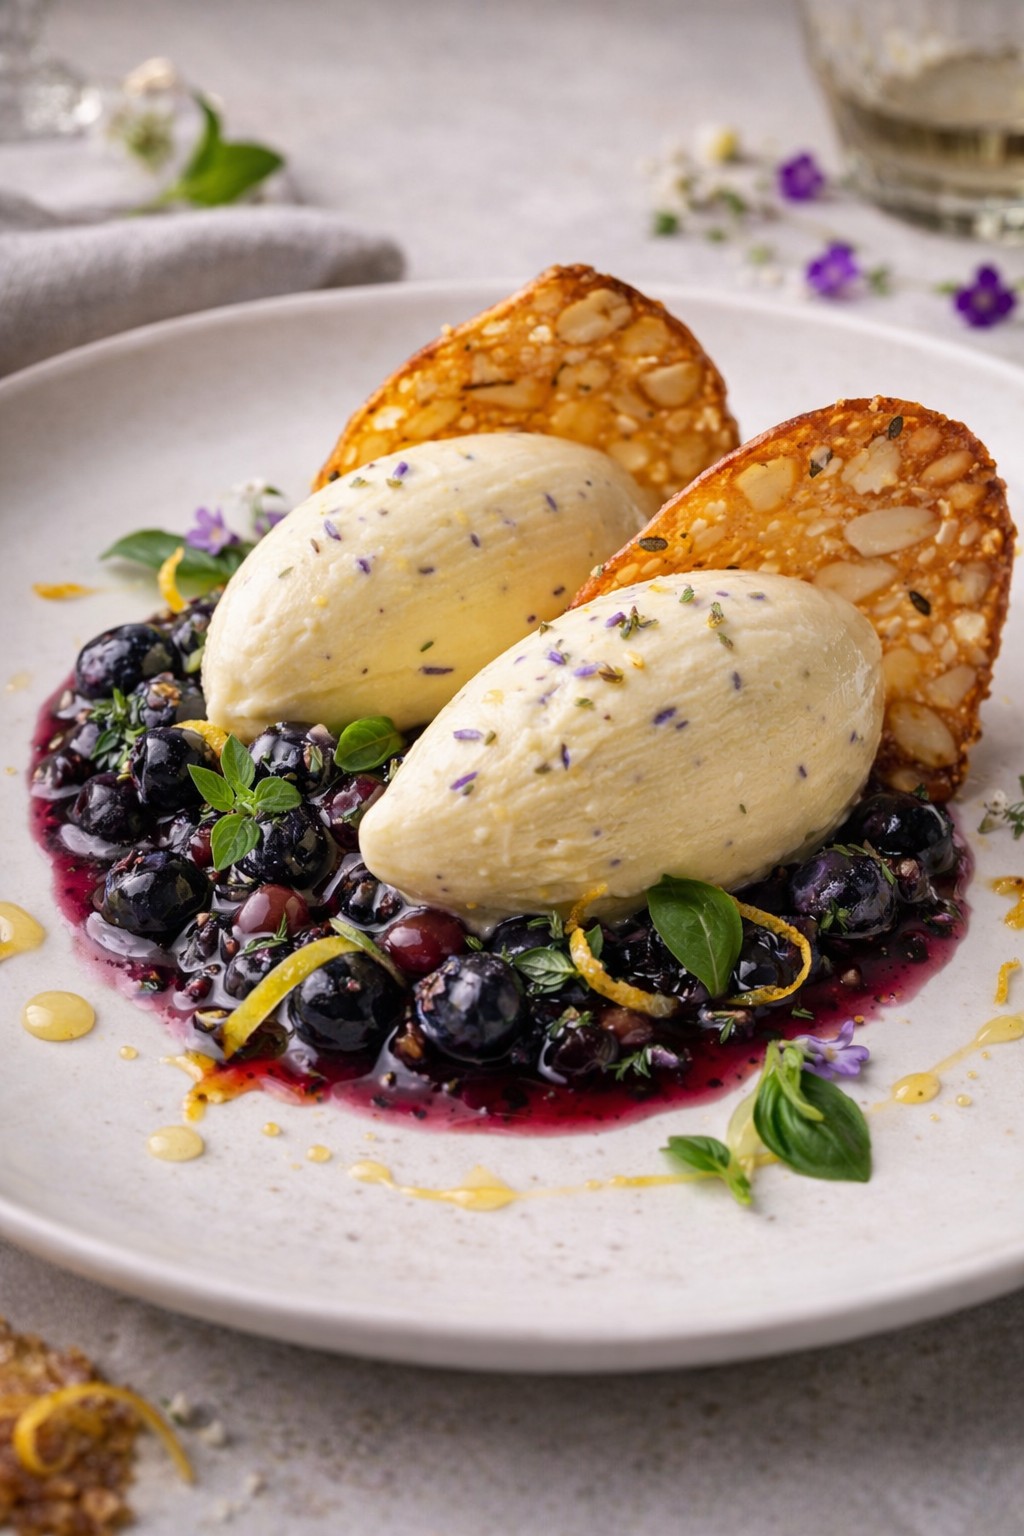
Elegant, refreshing, and beautifully balanced, this lemon and lavender soft ice dessert is a refined example of modern fine-dining. Moreover, it is also made achievable at home. Created using Arla Slower Melt Soft Ice Mix, the soft ice delivers a luxuriously smooth texture. This texture holds its shape longer. Therefore, it is ideal for plated desserts.
Culinary lavender has long been used in desserts for its delicate floral aroma, and should always be used sparingly. This is advised by BBC Good Food.
Follow the step-by-step instructions below to recreate this restaurant-style dessert for dinner parties or special occasions. You can also impress with minimal fuss.
Lemon & Lavender Soft Ice with Blueberry-Basil Compote and Almond Tuile
This elegant fine-dining soft ice dessert combines silky lemon-lavender soft ice with a vibrant blueberry-basil compote and crisp almond tuiles for a refined, restaurant-style finish. Made using Arla Slower Melt Soft Ice Mix, the dessert offers exceptional smoothness and stability, perfect for plated presentation. Balanced with citrus, floral notes, and fresh herbs, it’s an impressive yet achievable dessert ideal for dinner parties and special occasions. Premium ingredients supplied by Nicol Retailer ensure professional results at home.
Course Dessert, Fine Dining Dessert
Cuisine Contemporary British, french, Modern European
Prepare the Arla Slower Melt Soft Ice Mix according to the manufacturer’s instructions.
Strain and stir back into the remaining mix.
Strain and stir back into the remaining mix.
Add honey if using.
Chill thoroughly, then churn in an ice-cream or soft-ice machine until smooth, light, and soft-serve in texture.
Transfer to a piping bag and keep frozen until plating.
Make the Blueberry–Basil Compote
Place blueberries, sugar, and lemon juice in a saucepan.
Simmer gently for 6–8 minutes until the fruit softens and releases juices.
Remove from heat, stir in basil, and allow to cool completely.
Bake the Almond Tuiles
Preheat oven to 180°C (160°C fan).
Mix flour, sugar, ground almonds, salt, and melted butter to form a smooth batter.
Spoon small rounds onto a lined baking tray and spread thin.
Sprinkle with flaked almonds
Bake for 8–10 minutes until golden.
Shape while warm over a rolling pin if desired. Cool until crisp.
Plate the Dessert (Fine-Dining Style)
Spoon a small pool of blueberry–basil compote onto each chilled plate.
Pipe or quenelle the lemon-lavender soft ice alongside.
Add an almond tuile for height and crunch.
Garnish with lemon zest, basil, or edible flowers.
Notes
For best results, prepare the Arla Slower Melt Soft Ice Mix according to the instructions and chill thoroughly before churning to achieve a smooth, stable soft-serve texture. Gently infusing the lemon zest and culinary lavender enhances the flavour while keeping the dessert balanced and refined.For a gluten-free version, simply replace the plain flour in the almond tuiles with a gluten-free flour blend or rice flour, ensuring all other ingredients are certified gluten-free. Chilling serving plates before plating will help the soft ice maintain its shape longer, making this dessert ideal for fine-dining presentation at home or in professional kitchens.
This dessert is made using Arla Slower Melt Soft Ice Mix, available from Nicol Retailer, a trusted supplier of professional-quality ingredients for home cooks and caterers — a high-quality base that delivers exceptional texture and flavour, perfect for elevated desserts like this: https://nicolretailer.com/product/arla-slower-melt-soft-ice-mix-2ltr/
Serving Suggestions
Serve this lemon and lavender soft ice dessert immediately on chilled plates to preserve its smooth, creamy texture and refined presentation. It pairs beautifully with light, citrus-led accompaniments such as fresh berries, shortbread crumbs, or a drizzle of honey for added sweetness. For a fine-dining finish, add crisp almond tuiles or edible flowers to create height and contrast on the plate. This dessert works perfectly as a restaurant-style finale, a sophisticated dinner-party dessert, or an elegant option for special occasions.
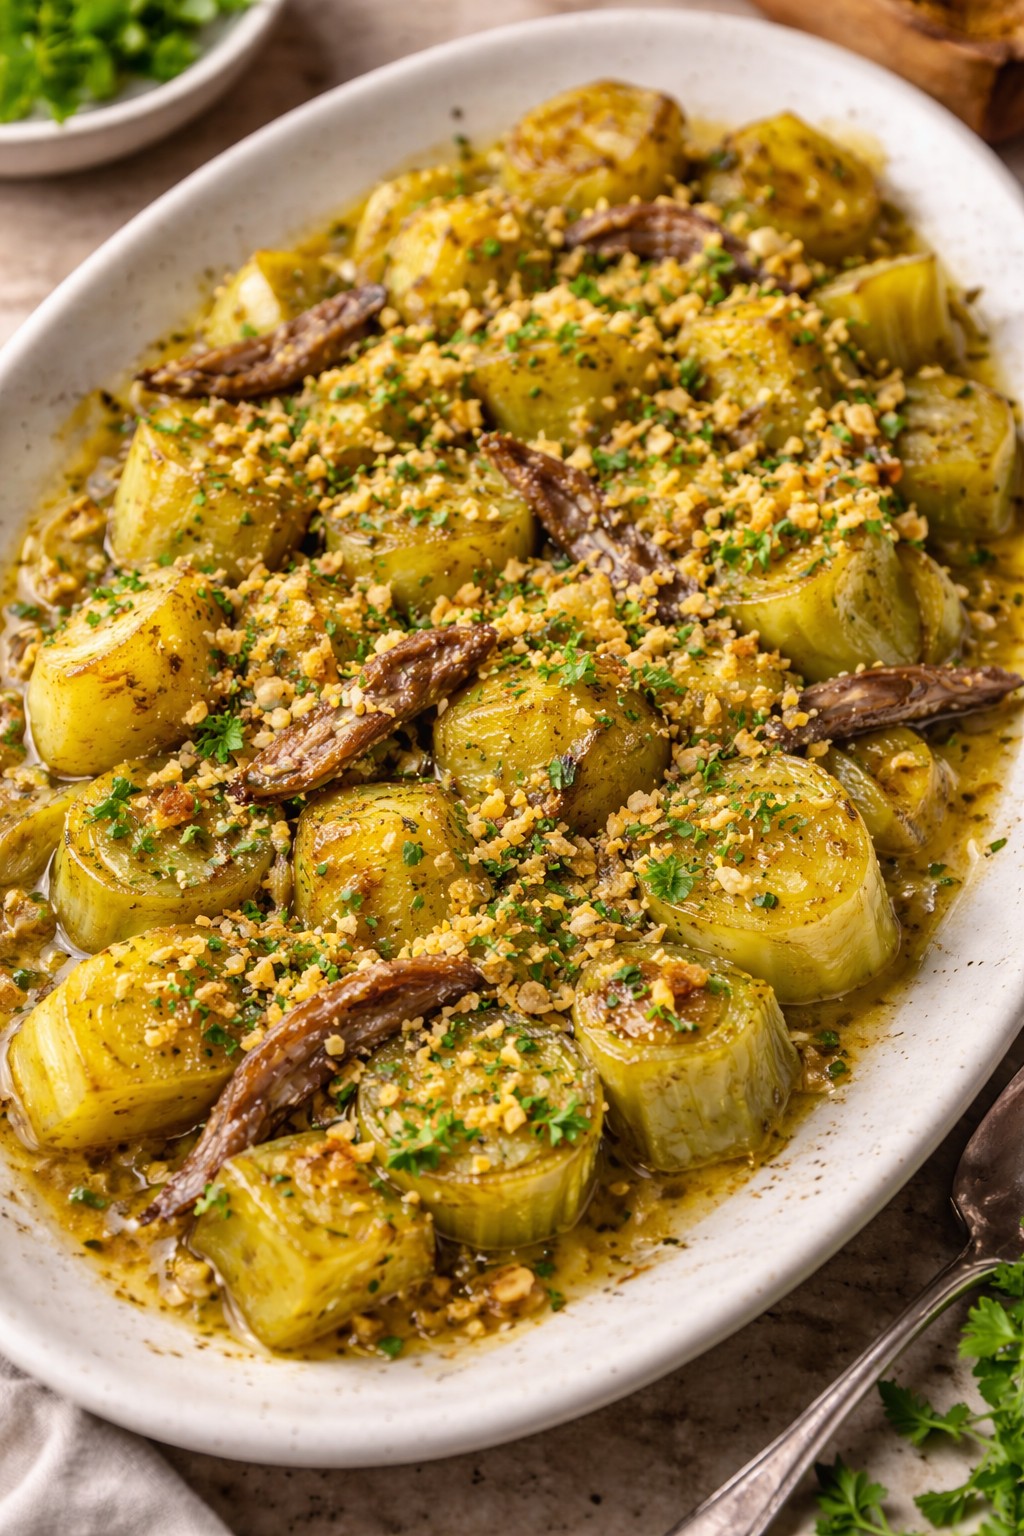
Sometimes the most memorable dishes are the simplest ones — where a handful of quality ingredients come together to create something quietly spectacular. This Warm Anchovy & Buttered Leeks with Lemon Crumbs recipe is exactly that: elegant, comforting, and packed with deep, savoury flavour. This recipe uses premium anchovy fillets in sunflower oil. These are available to buy online from Nicol Retailer and are ideal for adding rich, savoury depth to Mediterranean-style dishes.
Tender leeks are gently cooked until silky and sweet. They are then enriched with anchovy fillets that melt effortlessly into the butter and oil, creating a glossy, umami-rich sauce. Finished with crisp lemon crumbs for contrast and freshness, this dish feels both rustic and refined — perfect as a starter, a light main, or a luxurious side.
History of Anchovies
Anchovies have been used in cooking for centuries, particularly in Mediterranean cuisine. They are prized for their ability to add deep umami flavour. As documented by Encyclopaedia Britannica, this dates back to ancient Roman times. The Romans famously used anchovies to make garum — a fermented fish sauce that was considered a luxury condiment. It was traded across Europe. This early love for anchovies laid the foundation for their enduring role in cuisines from Italy and Spain to France and Greece.
Over time, anchovies became prized not just for their flavour, but for their practicality. Preserved in oil or salt, they travelled well and delivered intense savoury depth to simple dishes. Today, anchovies remain a cornerstone of Mediterranean cooking — quietly enhancing sauces, vegetables, and pastas with their unmistakable umami richness.
In modern kitchens, anchovies are valued less as a “fish” ingredient and more as a natural seasoning. When gently heated, they melt into oils and butters, creating deep flavour without overpowering a dish. This is exactly what makes them perfect for recipes like this warm leek dish.
Using quality anchovies from Nicol Retailer honours this long culinary tradition, bringing an ancient ingredient into contemporary, elegant home cooking.
How to make this Recipe
Elegant yet wonderfully simple, this Warm Anchovy & Buttered Leeks with Lemon Crumbs recipe celebrates the magic of slow cooking and quality ingredients. Follow the steps below to recreate this comforting Mediterranean-inspired recipe at home. It is perfect as a refined starter, light main, or indulgent side:
Warm Anchovy & Buttered Leeks with Lemon Crumbs is a rich yet elegant Mediterranean-inspired dish where anchovy fillets melt into buttery olive oil, coating tender leeks with deep savoury flavour. Finished with golden lemon-garlic breadcrumbs for crunch and freshness, this simple recipe delivers bold umami taste using anchovy fillets in sunflower oil from Nicol Retailer. Perfect as a refined starter, side dish, or light main, it’s quick to prepare and full of comforting flavour.
Course Light Main Course, Side Dish, Starter
Cuisine European, Italian, Mediterranean
Diet Low Calorie
Keyword anchovy fillets in sunflower oil, anchovy leeks recipe, how to cook leeks with anchovies, warm leek dish
Remove from heat, stir in lemon zest and black pepper. Set aside.
Cook the Leeks
In a wide pan, heat butter, olive oil, and anchovy oil over medium heat.
Add garlic and cook gently for 30 seconds.
Add leeks, stir to coat, then cover and cook gently for 15–20 minutes, stirring occasionally, until soft and glossy.
Add the Anchovies
Add anchovy fillets to the pan.
Stir gently until they melt into the leeks, creating a silky sauce.
Season with black pepper (no salt needed).
Finish & Serve
Spoon leeks onto a serving platter or shallow bowls.
Sprinkle generously with lemon crumbs.
Finish with chopped parsley or chives if desired. Serve warm.
Notes
This Warm Anchovy & Buttered Leeks with Lemon Crumbs recipe is designed to maximise flavour using anchovy fillets in sunflower oil, which naturally melt into the cooking fat to create deep umami richness without added salt. The gentle cooking method allows the leeks to become soft, sweet, and glossy, perfectly balancing the savoury anchovies.Gluten-free variation: To make this recipe gluten-free, simply use gluten-free breadcrumbs for the lemon crumb topping or omit the crumbs entirely for a naturally low-carb dish.Vegan variation: For a vegan alternative, replace anchovy fillets with capers, white miso, or finely chopped olives to replicate the savoury depth, and use vegan butter or olive oil instead of dairy butter. This maintains the Mediterranean flavour profile while keeping the dish 100% plant-based.Serve warm as an elegant starter, flavourful side dish, or light main. Using premium ingredients from Nicol Retailer ensures the best texture, aroma, and overall taste.
This dish isn’t just rich in flavour — it’s also packed with nutritional goodness, making it a smart choice for balanced, wholesome meals.
Anchovies
Nutritionally, anchovies are rich in protein and omega-3 fatty acids, supporting heart health, according to Healthline. They are:
High in protein, supporting muscle health
A natural source of omega-3 fatty acids, which help support heart and brain health
Rich in calcium and phosphorus, essential for strong bones
Packed with vitamin B12, supporting energy production and nervous system health
Because anchovies are used melted into the dish, you benefit from their nutrients without needing large quantities.
Leeks
Leeks are a good source of fibre and vitamins, contributing to digestion and overall wellbeing, as highlighted by BBC Good Food, offering:
Dietary fibre, aiding digestion and gut health
Vitamin K, important for bone strength
Vitamin A and antioxidants, supporting immune health
Natural sweetness without added sugars
When slowly cooked, leeks become easier to digest while retaining their nutritional value.
Together, anchovies and leeks create a dish that’s:
Naturally low in carbohydrates
Rich in healthy fats (from olive oil and anchovy oil)
High in flavour without relying on heavy sauces or processed ingredients
It’s a wonderful example of Mediterranean-style eating — simple, seasonal, and nourishing.
Serving & Pairing Suggestions
This Warm Anchovy & Buttered Leeks with Lemon Crumbs dish is wonderfully versatile. It is easy to adapt for different occasions and menus. Its rich, savoury depth pairs beautifully with both simple accompaniments and more refined plates.
Serve it warm, spooned into shallow bowls or arranged neatly on a platter. Allow the glossy anchovy-butter sauce to pool gently around the leeks. A slice of crusty sourdough, focaccia, or toasted ciabatta is essential for soaking up every last drop of the lemon-scented oil.
As a starter, it works beautifully ahead of grilled fish, roast chicken, or a light pasta course. As a side dish, it complements roasted meats, pan-seared white fish, or a vegetarian spread featuring lentils, beans, or polenta. For a simple yet elegant vegetarian main, serve the leeks over creamy mashed potatoes, soft polenta, or butter beans, finished with an extra drizzle of olive or anchovy oil.
For non-alcoholic options, sparkling water with lemon or a light elderflower spritz keeps the palate refreshed.
For an extra flourish, finish the dish at the table with freshly cracked black pepper, a squeeze of lemon juice, or a scattering of chopped herbs. These small touches elevate the dish and reinforce its Mediterranean character.
Shop the Ingredients
Create this dish using anchovy fillets in sunflower oilfrom Nicol Retailer, your trusted source for high-quality ingredients. It’s used by home cooks and professional kitchens alike.
This Warm Anchovy & Buttered Leeks with Lemon Crumbs recipe is a perfect example of how simple ingredients, when carefully chosen, can create truly memorable food. By using high-quality anchovy fillets that melt seamlessly into the dish, you achieve deep, savoury flavour without complexity. For the best results, sourcing premium ingredients is key — which is why home cooks and professional kitchens alike trust Nicol Retailer for reliable quality and exceptional produce. From pantry staples to specialist ingredients, Nicol Retailer makes it easy to cook with confidence, bringing restaurant-quality flavour into everyday meals.
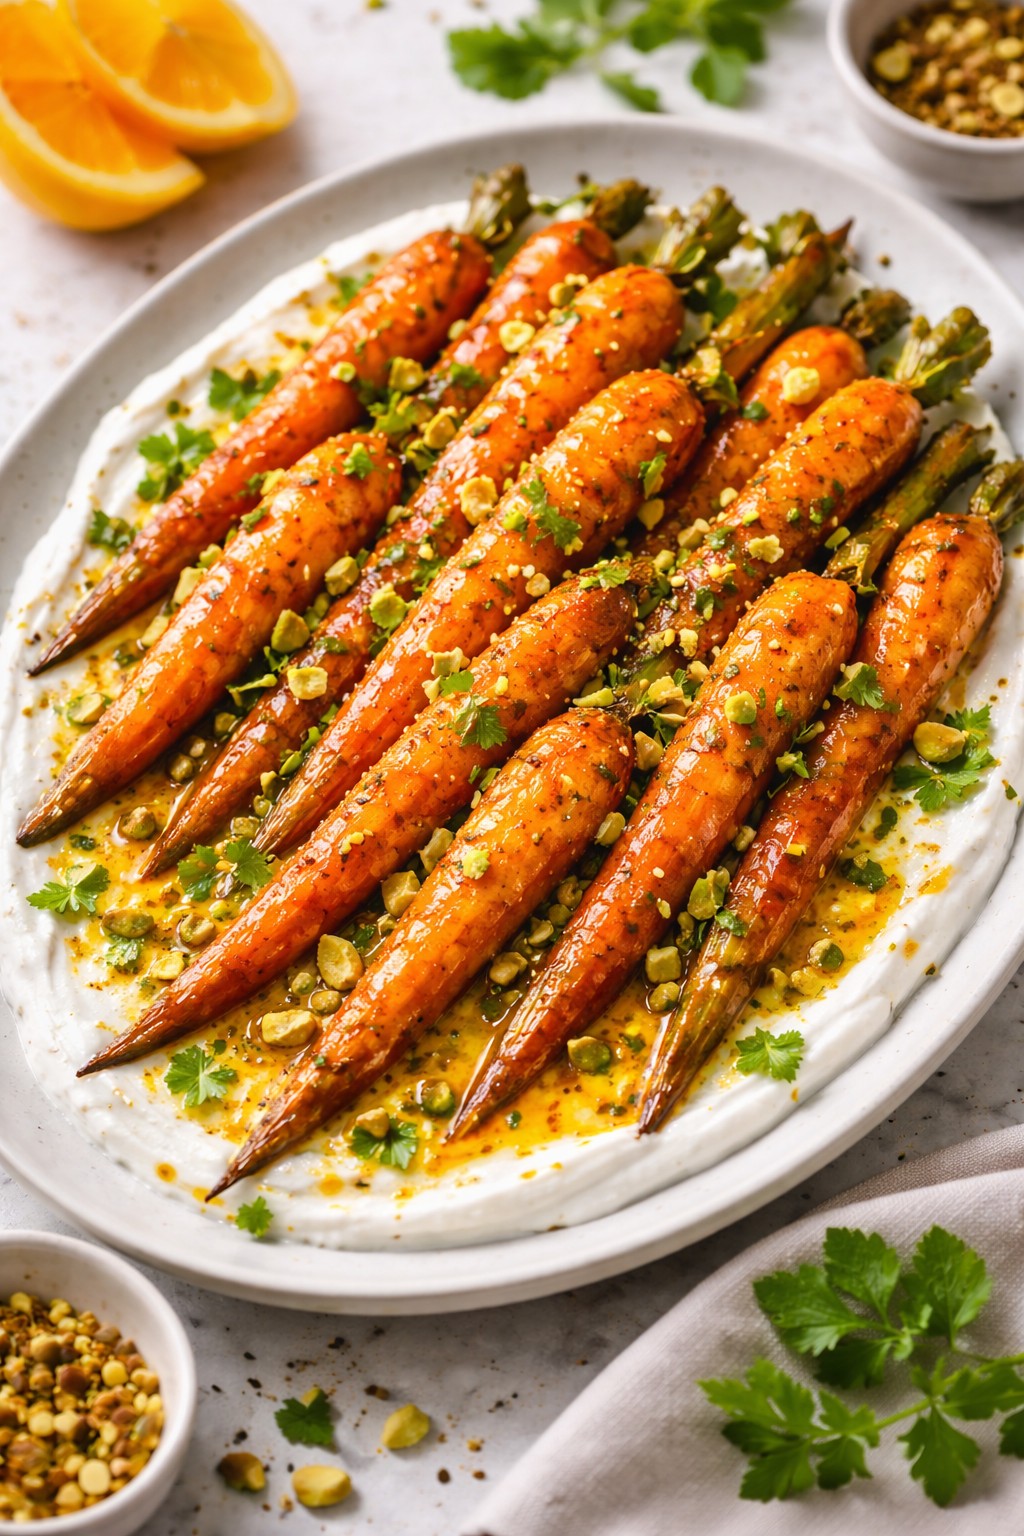
Sometimes the most memorable dishes are built on simple ingredients, treated with care. This saffron-roasted carrot recipe is a perfect example. Humble carrots are transformed into an elegant, flavour-packed dish using delicate saffron, citrus, honey and crunchy roasted nuts.
Ideal as a starter, side dish or vegetarian main, this recipe brings warmth, colour and Mediterranean flair to any table. Whether you’re hosting guests or cooking a comforting meal at home, it impresses.
Why Saffron Works Beautifully with Carrots
Saffron has long been prized in Mediterranean and Middle Eastern cooking for its floral aroma, golden colour and subtle depth of flavour. When paired with naturally sweet carrots, saffron enhances their earthiness without overpowering them.
As the carrots roast, the saffron infuses the dish with warmth and colour. Meanwhile, honey and orange amplify the natural sweetness. The result is a beautifully balanced dish that feels indulgent yet light.
Roasting carrots at a high temperature allows their natural sugars to caramelise, creating a tender interior and lightly crisp edges. This method intensifies flavour while keeping the texture satisfying and vibrant.
The addition of orange zest and juice lifts the dish. It prevents it from becoming overly sweet and adds a fresh citrus note. This perfectly complements the saffron. Discover the nutritional benefits of carrots.
How to Make Saffron-Roasted Carrots with Honey, Orange & Roasted Nuts
This saffron-roasted carrot recipe with honey, orange, yoghurt and roasted nuts is simple to prepare yet delivers rich flavour and elegant presentation. By gently roasting carrots with fragrant saffron strands and citrus then finishing with creamy yoghurt and crunchy nuts, it brings together sweetness, warmth and texture. Follow the ingredients list and step-by-step instructions below to create a versatile Mediterranean-inspired dish. It works beautifully as a starter, side or vegetarian main.
Saffron-Roasted Carrots with Honey, Orange & Yoghurt
Saffron-Roasted Carrots with Honey, Orange & Yoghurt is a vibrant Mediterranean-inspired dish that combines tender roasted carrots with fragrant saffron, citrus brightness and creamy yoghurt. Gently caramelised in the oven, the carrots absorb the delicate floral notes of saffron while honey and orange enhance their natural sweetness. Finished with a cooling yoghurt base and fresh herbs, this elegant yet simple recipe is perfect as a vegetarian main, festive side dish or refined sharing plate. Ideal for home cooks seeking flavourful, wholesome and visually stunning dishes using premium saffron.
Course Mezze, Sharing Plate, Side Dish, Starter, Vegetarian Main
Cuisine Mediterranean, Middle East, Modern European
Place saffron strands in a small bowl with warm water and leave for 5 minutes until fragrant and golden.
Roast the Carrots
Preheat oven to 200°C / 180°C fan / Gas Mark 6.
Place carrots on a roasting tray and toss with olive oil, honey, orange zest and juice.
Add the saffron infusion, season with salt and pepper, and mix well.
Roast for 30–35 minutes, turning once, until tender and caramelised.
Serve
Spoon yoghurt onto a serving platter
Arrange the warm saffron-roasted carrots on top.
Finish with fresh herbs and toasted nuts if using.
Notes
This saffron-roasted carrot recipe is designed to highlight the natural sweetness of carrots while allowing the delicate aroma and golden colour of saffron to shine. Roasting at a high temperature encourages gentle caramelisation without drying the vegetables, while the addition of honey and orange enhances flavour balance. For best results, use whole saffron strands rather than ground saffron and add the yoghurt just before serving to preserve its creamy texture. This dish works beautifully as a starter, side dish or vegetarian main and can be easily adapted for vegan or low-salt diets.
This saffron-roasted carrot dish is incredibly versatile:
Serve as a starter, plated with yoghurt and herbs
Enjoy as a side dish with roasted meats, grilled fish or halloumi
Present as a vegetarian main with flatbreads or grains
Add to sharing platters or mezze spreads
It works beautifully warm or at room temperature, making it perfect for gatherings and make-ahead menus.
A Dish for Modern Diets
This recipe is naturally vegetarian and gluten-free, and can easily be adapted for vegan diets by using plant-based yoghurt and maple syrup instead of honey. It’s also relatively low in sodium and rich in vitamins and antioxidants, making it both nourishing and satisfying.
Ingredient Quality Matters
With a recipe this simple, ingredient quality makes all the difference. By using premium saffron strands and fresh produce sourced from Nicol Retailer Limited, you ensure the best flavour, aroma and visual appeal every time.
Whether you’re cooking for family, guests or customers, this dish delivers consistent results and refined flavour.
Final Thoughts
Saffron-Roasted Carrots with Honey, Orange, Yoghurt & Roasted Nuts is proof that vegetables can be the star of the table. Elegant, comforting and full of Mediterranean character, it’s a recipe you’ll return to again and again.
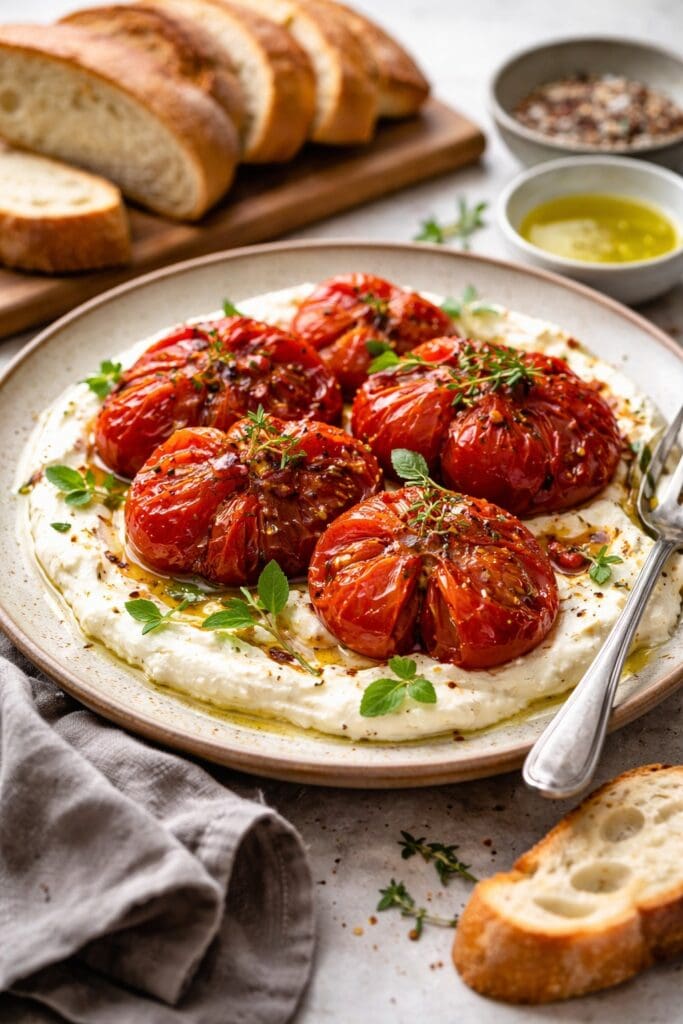
If you’re looking for a simple yet impressive Mediterranean recipe, these slow-roasted Coeur de Bœuf tomatoes with whipped feta are the perfect choice. Rich, sweet and jammy tomatoes are gently roasted with olive oil, garlic and herbs, then paired with creamy whipped feta for a dish that feels indulgent yet effortless.
Ideal as a starter, side dish or sharing plate, this recipe celebrates the natural flavour of premium tomatoes and proves that great food starts with quality ingredients.
Why Coeur de Bœuf Tomatoes Are Perfect for Roasting
Coeur de Bœuf tomatoes, meaning “ox heart” in French, have a long culinary history rooted in Mediterranean and Southern European cuisine. Recognisable by their large, heart-shaped form and deeply ribbed flesh, these tomatoes have been cultivated for generations in France and Italy, where they are prized for both raw and cooked dishes.
Coeur de Bœuf tomatoes, meaning “ox heart” in French, have a long culinary history rooted in Mediterranean and Southern European cuisine. Recognisable by their large, heart-shaped form and deeply ribbed flesh, these tomatoes have been cultivated for generations in France and Italy, where they are prized for both raw and cooked dishes.
Historically, Coeur de Bœuf tomatoes were favoured by farmers and cooks for their dense, meaty interior and low seed content, making them far more versatile than juicier salad tomatoes. Their naturally low acidity and high natural sugars allowed them to be cooked slowly without breaking down into excess liquid—a key reason they became a staple in rustic Mediterranean cooking.
When it comes to roasting, Coeur de Bœuf tomatoes truly excel. Their thick flesh holds its structure during long, slow cooking, allowing moisture to gently evaporate while flavours concentrate. As they roast, the natural sugars caramelise, creating a rich, sweet depth without the need for added sugar or heavy seasoning. Find out why slow roasting tomatoes enhances flavour.
Unlike smaller tomatoes, which can collapse or become watery, Coeur de Bœuf tomatoes develop a jammy, almost confit-like texture when roasted at a low temperature. This makes them ideal for dishes where the tomato itself is the star ingredient, delivering both bold flavour and visual appeal.
Using fresh Coeur de Bœuf tomatoes from Nicol Retailer Limited ensures consistent quality, ripeness and flavour. Carefully selected for their firmness and sweetness, these tomatoes are perfectly suited to slow roasting, whether you’re cooking at home or preparing dishes for professional kitchens, catering or hospitality menus.
Their heritage, structure and flavour profile make Coeur de Bœuf tomatoes one of the finest choices for roasting—transforming a simple ingredient into something deeply satisfying and unmistakably Mediterranean.
Whipped Feta: Creamy, Fresh and Balanced
Whipped feta brings a luxurious yet refreshing element to this dish, providing the perfect contrast to the richness of slow-roasted Coeur de Bœuf tomatoes. Feta cheese has been a cornerstone of Mediterranean cooking for centuries, valued for its distinctive salty tang, crumbly texture and ability to enhance both simple and complex dishes.
By blending feta with Greek yoghurt, olive oil and fresh lemon zest, its sharpness is softened into a smooth, airy cream. This process transforms a traditionally firm cheese into something lighter and more refined, allowing it to complement rather than overpower the roasted tomatoes. The addition of yoghurt adds subtle acidity and silkiness, while lemon zest lifts the flavour, bringing freshness and balance to the plate.
In this recipe, whipped feta acts as both a base and a flavour bridge. Its creamy texture cushions the sweet, caramelised tomatoes, while its savoury depth enhances their natural richness. Served slightly cool against the warmth of the tomatoes, it creates a pleasing contrast in temperature as well as texture.
Whipped feta is also incredibly versatile. It can be prepared ahead of time, making it ideal for entertaining, and easily adjusted to taste—more lemon for brightness, extra yoghurt for lightness, or a drizzle of olive oil for added richness. Its adaptability makes it a popular component in modern Mediterranean and Middle Eastern-inspired cooking.
Slow-roasted Coeur de Bœuf tomatoes are not only rich in flavour but also offer nutritional benefits. Tomatoes are naturally high in antioxidants such as lycopene and are a good source of vitamin C, which supports overall health. Learn more about the nutritional benefits of tomatoes.
How to Make Slow-Roasted Coeur de Bœuf Tomatoes with Whipped Feta
This slow-roasted Coeur de Bœuf tomatoes with whipped feta recipe is simple to prepare yet delivers rich Mediterranean flavour with minimal effort. Using premium Coeur de Bœuf tomatoes, gently roasted with olive oil, garlic and herbs, this dish transforms everyday ingredients into something special. Follow the easy ingredients list and step-by-step instructions below to create a beautifully balanced starter, side dish or sharing plate that’s perfect for entertaining or relaxed dining.
This recipe draws inspiration from traditional Mediterranean cooking, which focuses on fresh, seasonal produce, simple preparation methods and balanced flavours. Using olive oil, ripe tomatoes and fresh herbs reflects the principles of the Mediterranean diet, which emphasises plant-forward ingredients and wholesome, flavour-driven cooking. Learn more about Mediterranean cooking principles and the Mediterranean diet.
Slow-Roasted Coeur de Bœuf Tomatoes with Garlic, Thyme & Whipped Feta
This Slow-Roasted Coeur de Bœuf Tomatoes with Whipped Feta recipe is a simple yet elegant Mediterranean-inspired dish that celebrates the natural sweetness and meaty texture of premium Coeur de Bœuf tomatoes. Gently roasted with garlic, olive oil and fresh herbs, the tomatoes become rich and jammy, perfectly balanced by creamy whipped feta and a drizzle of extra virgin olive oil. Ideal as a starter, side dish or sharing plate, this recipe delivers big flavour with minimal effort and is perfect for entertaining or relaxed dining. Made using Fresh Coeur de Bœuf Tomatoes available from Nicol Retailer Limited, it’s a dish that proves great ingredients speak for themselves.
Course Antipasti, Light Main Course, Sharing Plate, Side Dish, Starter
Cuisine Italian, Mediterranean, Vegetarian
Diet Vegetarian
Keyword Coeur de Bœuf tomato recipe, Mediterranean tomato dish, roasted Coeur de Bœuf tomatoes, vegetarian starter recipe, Whipped feta recipe
Preheat the oven to 160°C / 140°C fan / Gas Mark 3.
Arrange tomato halves cut-side up in a roasting dish.
Drizzle generously with olive oil, add garlic and thyme.
Season with salt, pepper and chilli flakes if using.
Roast slowly for 35–40 minutes until soft, jammy and slightly caramelised.
Make the Whipped Feta
Add feta, yoghurt, olive oil and lemon zest to a blender or food processor.
Blend until smooth and creamy.
Taste and season with black pepper.
Assemble & Serve
Spoon the whipped feta onto a serving plate or shallow bowl.
Top with the warm roasted Coeur de Bœuf tomatoes and garlic.
Finish with fresh herbs and a drizzle of olive oil.
Serve with warm bread for scooping.
Notes
This slow-roasted Coeur de Bœuf tomato recipe is designed to highlight the naturally sweet, meaty texture of premium tomatoes. Roasting at a low temperature allows the tomatoes to soften and caramelise without losing their shape, intensifying flavour while keeping the dish light and balanced. For best results, use ripe Coeur de Bœuf tomatoes and add the whipped feta just before serving to maintain its creamy texture. This recipe works beautifully as a starter, side dish or sharing plate and is easily adaptable for gluten-free or lower-salt diets with simple adjustments.
Slow-roasted Coeur de Bœuf tomatoes are incredibly versatile and can be served in a variety of ways, making them suitable for everyday meals, entertaining and professional menus. Their rich, sweet flavour and soft, jammy texture allow them to pair effortlessly with both simple and more refined accompaniments.
As a starter, serve the tomatoes warm over a generous layer of whipped feta, finished with fresh herbs and a drizzle of olive oil. Add warm crusty bread or focaccia on the side to soak up the roasting juices for an elegant and comforting first course.
For a side dish, these tomatoes work beautifully alongside grilled meats, roasted chicken or pan-seared fish. Their sweetness balances richer proteins, while the whipped feta adds creaminess without heaviness.
When used as part of a sharing platter or grazing board, slow-roasted Coeur de Bœuf tomatoes add colour and depth. Serve them alongside olives, charcuterie, cheeses and roasted vegetables for a Mediterranean-inspired spread that’s perfect for entertaining.
For a light lunch or vegetarian main, pair the tomatoes and whipped feta with a crisp green salad, grains such as couscous or quinoa, or serve them over toasted sourdough. This creates a satisfying yet balanced meal that feels both nourishing and indulgent.
Leftovers can be repurposed easily. Spoon the tomatoes through freshly cooked pasta, layer them into sandwiches or wraps, or serve them with eggs for a simple brunch dish. Their concentrated flavour makes them a valuable addition to multiple meals throughout the week.
Whether served simply or dressed up, slow-roasted Coeur de Bœuf tomatoes bring warmth, colour and Mediterranean character to any table.
Premium Ingredients Available from Nicol Retailer Limited
Whether you’re cooking at home, planning menus for hospitality, or sourcing produce for catering, Nicol Retailer Limited offers reliable quality, freshness and consistency you can trust. Our ingredients are suitable for everyday cooking and professional kitchens alike, helping you create dishes that look impressive, taste exceptional and deliver real value. Browse our range online and source premium fresh produce with confidence from Nicol Retailer Limited.
A Mediterranean Dish Worth Repeating
This slow-roasted Coeur de Bœuf tomatoes with whipped feta recipe is a perfect example of how simple techniques and high-quality ingredients can create outstanding flavour. By gently roasting premium Coeur de Bœuf tomatoes and pairing them with creamy whipped feta, this dish delivers a balanced, Mediterranean-inspired plate that works equally well for everyday meals and special occasions. Whether served as a starter, side dish or sharing plate, it’s a versatile recipe you’ll return to time and again. For the best results, source your ingredients from Nicol Retailer Limited, where quality, freshness and reliability come together to help you cook with confidence.
Made with Birchstead 95% British Beef Burger Pucks & Schär Gluten-Free Mini Brioche Sliders
There’s something deeply satisfying about a slider that tastes like pub-fare but feels handcrafted in your own kitchen. Using top-quality ingredients makes all the difference — that’s why we love the combination of the rich, British beef from Birchstead and the soft gluten-free brioche buns from Schär. The result is a burger slider that’s juicy and flavourful. It is suitable for people avoiding gluten — yet still indulgent, comforting and irresistibly tasty.
This gourmet gluten-free beef sliders recipe is crafted using premium-quality ingredients available exclusively at Nicol Retailer. The Birchstead 95% beef burger pucks offer exceptional flavour and tenderness. Meanwhile, the Schär gluten-free mini brioche buns provide a soft, bakery-style texture perfect for coeliac-friendly cooking. Together, they create a delicious, restaurant-style slider that’s easy to make at home. For more free-from products and premium British meats, explore Nicol Retailer’s full range at https://nicolretailer.com/product-category/butchered-meat/ .
When you pair the 95% beef burger pucks from Birchstead with Schär’s mini brioche sliders, you get a match for pub-style meals, casual dinner parties or cosy at-home feasts. This recipe elevates humble sliders into a rustic dish that looks amazing and tastes even better. Plus, everyone can enjoy it.
Premium Quality Fresh Beef at Nicol Retailer
Discover truly premium-quality, fresh British beef at Nicol Retailer, home to some of the finest cuts and expertly crafted burger pucks available online. Our range includes the exceptional Birchstead British Top Rump Short Rib Cap 95% Beef Burger Pucks, renowned for their rich flavour, tender texture and consistent cooking results. Perfect for home cooks, restaurants and catering businesses, Nicol Retailer provides high-grade, responsibly sourced beef. These products deliver unbeatable taste in every bite. Whether you’re preparing gourmet sliders, family meals or menu-ready dishes, our fresh beef products offer outstanding quality and value — delivered with the reliability and service Nicol Retailer is known for.
How to Make These Delicious Gourmet Sliders
Follow this simple step-by-step guide to recreate the rustic, flavour-packed sliders shown in the recipe:
Create irresistible restaurant-style gourmet beef sliders using Birchstead British 95% beef burger pucks and Schär gluten-free mini brioche sliders. These premium, gluten-free beef sliders feature juicy patties, caramelised onions, and soft brioche buns, perfect for fine dining menus, gastro pubs, catering, and home cooks seeking a luxury bite. Ready in just 30 minutes, this recipe delivers rich flavour, stunning presentation and greater accessibility for gluten-free diners.
Course Gourmet Bar Snack, Main Course, Sharing Platter, Starter
Cuisine Contemporary British, European Fusion, Gourmet Home Cooking, Modern British
Toppings: baby gem lettuce or rocket; slices of gherkin or pickles; tomato slices; mayonnaise, burger sauce, mustard or gluten-free burger sauces of your choice.
Heat the olive oil (and butter if using) in a medium sauté pan over medium-low heat.
Add the thinly sliced onions and a pinch of salt. Stir gently.
Add the thinly sliced onions and a pinch of salt. Stir gently.
Add the brown sugar and balsamic vinegar (if using), stir to combine, and cook a further 5 minutes until onions are soft, sweet and jam-like
Remove from heat and set aside.
Cook the burger pucks
Heat a griddle pan or heavy frying pan over medium-high heat. Lightly oil the surface.
Season each beef puck with a little salt and pepper just before cooking.
Place the pucks on the hot pan. For 57 g patties, cook ~2–3 minutes each side for medium-rare/medium; extend by 1–2 minutes per side for well done (adjust to your preference).
If using cheese, add a slice to each puck about 30 seconds before finishing so it melts nicely.
Once cooked, remove from heat and let rest on a plate.
Prepare the buns
Split the gluten-free mini brioche buns and, if you like, lightly butter/toast them on the hot griddle or a clean pan until just crisp & golden — this adds a nice texture contrast.
Serve & enjoy!
Serve warm, ideally with a side of sweet potato fries, a crisp salad, or even a quick slaw
For a pub-style bite: serve 2 sliders per person with a pint or a soft drink; for a snack platter, include assorted sauces and extra toppings so people build their own.
Notes
For a truly restaurant-quality finish, allow the Birchstead beef patties to reach room temperature before cooking — this ensures even browning and maximum juiciness. Gluten-free buns can soften quickly, so lightly toasting the Schär mini brioche sliders adds structure, enhances flavour, and prevents soaking. Take your time caramelising the onions; slow cooking is what develops their deep, sweet flavour and elevates the entire dish. These sliders are best assembled just before serving so the beef stays hot, the cheese remains melted, and the buns retain their soft texture. Perfect for coeliac-friendly entertaining, party platters, pub-style menus or premium takeaway boxes.
These gourmet gluten-free beef sliders are wonderfully versatile, making them ideal for everything from casual family dinners to laid-back weekend entertaining. To elevate your dish and create a well-rounded meal, here are some delicious serving suggestions that pair beautifully with the juicy Birchstead beef and soft Schär brioche buns.
Classic Pub-Style Sides
For a traditional British pub feel, serve your sliders alongside:
Marinated olives, sun-dried tomatoes, and antipasti
This transforms your dish into a balanced sharing board perfect for game nights, gatherings, or casual celebrations.
Family-Friendly Add-Ons
For a full, comforting dinner, try adding:
Garlic roasted potatoes
Steamed seasonal vegetables
Corn on the cob with herb butter
These sides help round out the meal and make it suitable for all ages.
Premium Star Ingredients — Available at Nicol Retailer
What makes this recipe truly exceptional is the quality of the ingredients — both of which you can conveniently purchase from Nicol Retailer.
The foundation of the dish is the Birchstead British Top Rump Short Rib Cap 95% Beef Burger Pucks. These are made from premium British beef known for its tenderness, rich flavour and superb cooking consistency. These burger pucks offer professional-grade quality, ensuring every slider is juicy, satisfying and packed with natural beef richness.
To complement this, the recipe uses Schär Gluten-Free Mini Brioche Sliders — soft, golden, and buttery in texture. These buns elevate the dish, offering a light sweetness that pairs perfectly with the savoury beef. They also ensure the recipe remains suitable for gluten-free diners. Their bakery-style softness makes them ideal for gourmet sliders, giving you a restaurant-standard result at home.
Nicol Retailer proudly stocks both items, allowing you to source premium beef and high-quality gluten-free brioche buns from one trusted supplier. Whether you’re cooking for family, entertaining guests, or designing a menu for a business, Nicol Retailer ensures you have access to top-tier ingredients that deliver exceptional taste every time.
A Silky, No-Bake Dessert Made with Centaur Pistachio Paste
If you’re looking for a dessert that blends luxury, artistry and effortless elegance, this Pistachio & White Chocolate Mousse Cake deserves a place at the top of your baking list. Made with the incredibly smooth and intensely flavourful Centaur Pistachio Paste (1kg) from Nicol Retailer Limited, this no-bake masterpiece delivers a depth of nutty richness that transforms each bite into a decadent experience.
The velvety pistachio mousse melts on the palate, the buttery biscuit base adds a satisfying crunch, and the white chocolate topping brings a silky sweetness that completes the perfect harmony of flavours. Whether you’re hosting a celebration, preparing a gourmet after-dinner treat, or simply treating yourself to something extraordinary, this dessert promises show-stopping presentation, unforgettable flavour and pure pistachio indulgence.
Crafted to impress but remarkably simple to prepare, this mousse cake showcases the true beauty of premium ingredients — and when those ingredients come from Nicol Retailer Limited, you know you’re working with the best. This is the kind of dessert that turns a special occasion into a memory.
Brief History of Pistachio Paste
Pistachio paste has a long, rich history that stretches back thousands of years. Pistachios themselves are one of the world’s oldest cultivated nuts, enjoyed as early as 7000 BC in Persia (modern-day Iran). Known as “the green gold,” pistachios quickly became prized across the Middle East, Mediterranean and later Europe for their vibrant colour, natural sweetness and luxurious flavour.
Although pistachios were historically eaten whole, roasted or ground into sweets, pistachio paste as we know it today gained popularity in the 19th and early 20th centuries when European pastry chefs began incorporating finely milled pistachios into creams, custards, pralines and patisserie fillings. Italy — especially Sicily — is now renowned for its pistachio paste, using naturally green nuts from Bronte to create deeply flavoured spreads and dessert bases. France also embraced pistachio paste in classic pâtisserie such as Paris-Brest, macarons and ice cream.
Today, pistachio paste is a key ingredient in gourmet desserts worldwide, loved for its smooth texture, distinctive flavour and versatility. Whether used in cakes, mousses, gelato or buttercreams, high-quality paste like Centaur Pistachio Paste delivers a pure, authentic pistachio profile that elevates even the simplest recipes into patisserie-level creations.
How to Make This Delicious Pistachio & White Chocolate Mousse Cake
Creating this luxurious, no-bake dessert is far easier than it looks — and every step helps build the silky texture, rich pistachio flavour and beautiful presentation that make this mousse cake unforgettable. Follow the simple instructions below to prepare each layer to perfection and bring this elegant dessert to life in your own kitchen.
Indulge in this luxurious Pistachio & White Chocolate Mousse Cake, made with rich, nutty Centaur Pistachio Paste from Nicol Retailer Limited. This no-bake dessert combines a buttery biscuit base, creamy pistachio mousse, and a silky white chocolate topping for an irresistible gourmet treat. Perfect for celebrations, dinner parties, or anytime you want a show-stopping pistachio dessert with authentic flavour and a smooth, melt-in-the-mouth texture.
Press mixture firmly into the base of a 20 cm (8-inch) springform cake tin or tart ring.
Chill in fridge while you prepare the filling.
Make the Pistachio Mousse
In a mixing bowl, whisk together the mascarpone (or yogurt), powdered sugar, vanilla extract and Centaur Pistachio Paste until smooth.
In a separate bowl, whip the double cream to soft peaks.
Gently fold the whipped cream into the pistachio-paste mixture until fully combined and light.
Pour Mousse Over Base
Remove the biscuit base from fridge and pour the pistachio mousse over it.
Smooth the top with a spatula.
Chill in fridge for at least 2 hours (preferably overnight) so the mousse sets firmly.
Prepare the White Chocolate Glaze
Gently melt the white chocolate with 50 ml cream in a heatproof bowl over simmering water (double boiler). Stir until smooth and glossy.
Let cool slightly, then pour over the chilled pistachio mousse layer.
Return to fridge and chill for at least 30 minutes to set.
Decorate & Serve
Carefully remove the cake from the tin.
Sprinkle crushed pistachios over the top.
Add white chocolate shavings or curls.
Garnish with a few whole pistachios and fresh mint leaves for colour.
Slice and serve chilled — the contrast between cold creamy mousse and crunchy pistachios is irresistible.
Notes
For the richest flavour, use high-quality Centaur Pistachio Paste from Nicol Retailer Limited — it provides a deep, authentic pistachio taste that elevates the mousse beyond ordinary desserts.Chill the mousse cake for at least 2 hours (or overnight) for the smoothest texture and cleanest slices.Use full-fat mascarpone or Greek yogurt for the creamiest consistency; swapping to yogurt gives a lighter, tangier finish.If the mousse feels too thick, loosen it with a small splash of cream; if too thin, chill for 20 minutes before assembling.For a professional finish, top the cake with crushed pistachios, white chocolate curls, or a drizzle of melted chocolate.This recipe is naturally no-bake, making it perfect for warm weather or quick hosting without using the oven.For gluten-free diners, simply replace the base with gluten-free digestive biscuits.Keep refrigerated until ready to serve — this dessert tastes best chilled and firm.
Why You’ll Love This Pistachio & White Chocolate Mousse Cake
This stunning no-bake dessert stands out for so many irresistible reasons:
Rich, authentic pistachio flavour thanks to premium Centaur Pistachio Paste from Nicol Retailer Limited, giving every bite a deep, natural nuttiness that cheaper alternatives can’t match.
Perfectly balanced sweetness from silky white chocolate, which enhances rather than overwhelms the pistachio mousse.
No baking required, making this cake easy, reliable and ideal for beginners or quick preparation.
Luxurious, melt-in-the-mouth texture created by the smooth pistachio mousse, buttery biscuit base and glossy white chocolate layer.
Visually stunning presentation, with its elegant green hue and patisserie-style finish, guaranteed to impress guests.
Ideal for celebrations, including birthdays, festive gatherings, dinner parties or gifting — this is a dessert that always steals the spotlight.
Versatile and customisable, allowing you to adjust sweetness, decorate creatively and serve with berries, chocolate or fresh herbs.
Made with high-quality ingredients sourced from Nicol Retailer Limited, ensuring premium taste and dependable results every time.
Light yet indulgent, offering a luxurious dessert without feeling overly heavy or dense.
Serving Suggestions
his luxurious Pistachio & White Chocolate Mousse Cake deserves to be served in a way that enhances its elegant layers and rich, nutty flavour. For the best experience, slice the cake while fully chilled to preserve its smooth mousse texture and clean, defined lines. Serve each portion on a chilled dessert plate to maintain its light, creamy consistency.
To complement the deep, buttery flavour of the Centaur Pistachio Paste, pair each slice with fresh seasonal berries—such as raspberries, strawberries or blueberries—for a pop of natural acidity and colour contrast. A drizzle of warm white chocolate or a touch of honey also adds a luxurious finishing note.
For a restaurant-style touch, garnish plates with crushed pistachios, mint leaves, or delicate white chocolate curls. The fresh mint brings brightness, while the added pistachios enhance the cake’s natural nuttiness and provide a satisfying crunch.
Beverage pairings can elevate your dessert even further. This pistachio mousse cake pairs beautifully with espresso, matcha latte, sweet dessert wine, or a light herbal tea. If you prefer something indulgent, try serving with a scoop of vanilla bean ice cream or pistachio gelato for the ultimate pistachio lover’s plate.
Whether you’re entertaining guests, celebrating a special occasion, or enjoying a refined treat at home, these serving suggestions turn every slice into a gourmet dessert experience — making your Pistachio & White Chocolate Mousse Cake truly unforgettable.
Shop Premium Ingredients for This Recipe at Nicol Retailer Limited
Creating a dessert as luxurious as this Pistachio & White Chocolate Mousse Cake begins with using the right ingredients — and you can find everything you need in one place at Nicol Retailer Limited. Whether you’re a home baker, a chef, or simply someone who loves crafting high-quality desserts, Nicol Retailer offers a carefully curated selection of premium products that take your baking to the next level.
Centaur Pistachio Paste – The Star Ingredient
The secret behind this cake’s rich flavour and silky, nutty mousse is the Centaur Pistachio Paste (1kg). Unlike cheaper pastes or artificially flavoured spreads, this premium paste delivers:
Deep, authentic pistachio flavour
Smooth, velvety consistency
Natural colour without additives
Excellent blending for mousses, creams and toppings
This is the key ingredient that transforms a simple no-bake cake into a patisserie-style masterpiece — and it’s exclusively available at Nicol Retailer Limited.
Other High-Quality Essentials You Can Buy at Nicol Retailer
To help you create this stunning dessert effortlessly, Nicol Retailer provides top-quality versions of all the core ingredients you need, including:
Butter & dairy products for a rich mousse and smooth base
Digestive biscuits or alternatives for the perfect crumb base
Double cream, mascarpone, or Greek yogurt for creamy, stable mousse texture
Crushed pistachios for decorative finishing touches
Everything is chosen for its freshness, quality and reliability, giving you confidence that your dessert will turn out beautifully every time.
Why Buy from Nicol Retailer Limited?
Trusted supplier of premium baking ingredients
Excellent value for bulk and speciality items
Perfect for home bakers, cafés, patisseries and catering
Fast delivery and reliable customer service
Carefully selected quality products not always available in supermarkets
When you shop at Nicol Retailer Limited, you’re not just buying ingredients — you’re investing in exceptional flavour, professional results and unforgettable desserts.
When you want to create a meal that people will talk about long after the plates are cleared, nothing compares to the Birchstead 14-Day Aged Bone-In Carvery Beef Forerib. This majestic, five-bone cut is the crown jewel of traditional British roasting — rich in flavour, intensely tender, and visually stunning with its tall, frenched bones and beautiful marbling.
Aged for 14 days to deepen the natural savoury notes of the beef, this cut delivers a melt-in-the-mouth tenderness and a luxurious buttery finish that rivals any high-end steakhouse or Michelin-starred dining room. When roasted properly, it produces thick, juicy slices with a perfect rosy interior, caramelised crust, and an aroma that fills the entire home with anticipation.
Whether you’re hosting a holiday feast, an elegant Sunday roast, or a special celebration, this recipe brings prestige, theatre and unforgettable flavour to the table. And the best part? Every ingredient used in this recipe — including the show-stopping aged forerib — can be purchased directly from Nicol Retailer Limited, your trusted supplier for premium British meats.
Why This 14-Day Aged Forerib Is the Star of Every Table
When it comes to creating a roast that truly commands the spotlight, the Birchstead 14-Day Aged Bone-In Carvery Beef Forerib stands in a class of its own. This cut is celebrated by chefs, home cooks and meat connoisseurs across the UK for its depth of flavour, luxurious tenderness and dramatic visual appeal. Here’s why this spectacular 5-bone joint is guaranteed to elevate any dining occasion:
Exceptional Ageing for Unmatched Depth of Flavour
Ageing beef for 14 days intensifies its natural savouriness, enriches its umami notes and enhances tenderness without compromising juiciness. This slow ageing creates a buttery texture and full-bodied flavour profile that you simply cannot achieve with standard supermarket beef. The result is a roast that tastes richer, smells more aromatic and slices like premium steak.
Stunning Five-Bone Structure for Dramatic Presentation
Nothing makes an entrance quite like a tall, five-bone forerib roast. Frenched bones rise proudly above the perfectly roasted beef, creating a visually striking centrepiece worthy of a Michelin-star restaurant. Whether you bring it to the table whole or carve between the bones for a theatrical reveal, this cut guarantees admiration — and appetite.
Naturally Marbled for Superior Juiciness and Tenderness
The forerib is one of the most flavourful and tender cuts of beef, thanks to its beautiful natural marbling. As the beef roasts, the marbling melts slowly, self-basting the joint from the inside out. This means consistently moist slices, an incredible melt-in-the-mouth texture and that irresistible beefy richness with every bite.
Perfect Balance of Tradition and Gourmet Cooking
This is a cut steeped in British roasting tradition yet sophisticated enough for gourmet dining. The 14-day ageing process elevates a classic forerib into a celebration-worthy dish. Whether it’s a holiday feast, Sunday roast, Christmas centrepiece or luxury family dinner, this beef transforms familiar flavours into something extraordinary.’
How to Make This Delicious Recipe
Creating this 14-Day Aged Bone-In Carvery Beef Forerib Roast is far easier than its grand appearance suggests — and the results are nothing short of spectacular. With its rich marbling, deep 14-day aged flavour and dramatic five-bone structure, this premium joint from Nicol Retailer Limited delivers restaurant-quality results using simple, reliable techniques.
By following the step-by-step guide below, you’ll learn how to season, sear, roast, rest and carve your forerib to perfection, achieving beautifully even cooking, a caramelised crust, and melt-in-the-mouth tenderness every time. Whether you’re preparing this for a Sunday roast, festive celebration or luxury dinner party, this recipe ensures your beef becomes the unforgettable star of the table:
Indulge in the rich, buttery flavour of this 14-Day Aged Bone-In Carvery Beef Forerib, slow-roasted to perfection for a tender, melt-in-the-mouth finish. This impressive 5-bone joint is expertly aged to deepen flavour and enhance juiciness, making it the perfect centrepiece for Sunday roasts, holiday feasts and special celebrations. Cooked with herbs, garlic and a high-heat crust, then served with a glossy homemade gravy, this luxurious roast delivers restaurant-quality results at home. All ingredients, including the premium Birchstead forerib, can be purchased directly from Nicol Retailer Limited for exceptional freshness and value.
Course Dinner, Holiday Centrepiece, Main Course, Special Occasion Dish, Sunday Roast Alternative
Cuisine Modern European, Steakhouse-Style, Traditional Roast Dinner
Remove the forerib from the fridge 1–2 hours before cooking.
Pat dry thoroughly.
Rub with olive oil, salt, pepper, garlic granules, rosemary and thyme.
Preheat the Oven
Set to 220°C (200°C fan / Gas 7). This high heat will help build the gorgeous crust.
Create the Flavour Base
Place onions, carrots, celery, and garlic in a roasting tray.
Position the forerib bone-side down on top.
Roast Hot, Then Low
Roast for 25 minutes at high heat to develop a crust.
Reduce to 160°C (140°C fan / Gas 3).
Continue cooking for approximately:1 hour 45 minutes → medium-rare2 hours → medium(A 5–6 kg joint may vary slightly depending on your oven.)Internal Temperatures:55°C – medium rare60°C – medium
Rest for Perfect Juiciness
Remove from oven, loosely cover with foil and rest for 45–60 minutes. This step ensures tender, juicy slices.
Make the Gravy
Place roasting tray on the hob.
Stir in flour, add red wine to deglaze, then pour in stock.
Reduce until glossy.
Carve & Serve
Slice between the bones for dramatic presentation.
Serve with gravy and your favourite sides.
Notes
For the juiciest and most flavourful results, always allow your 14-Day Aged Bone-In Carvery Beef Forerib to come to room temperature before roasting — this ensures even cooking throughout the thick joint. Start with a high-heat blast to create a rich, caramelised crust, then reduce the temperature for slow, gentle roasting that preserves tenderness and enhances the natural aged flavour.Resting the beef for at least 45 minutes after cooking is essential, as it allows the juices to redistribute for melt-in-the-mouth slices. Using premium Birchstead aged forerib from Nicol Retailer Limited guarantees exceptional quality, deep beefy richness, and a restaurant-worthy roast every time.
A magnificent joint like the Birchstead 14-Day Aged Bone-In Carvery Beef Forerib deserves sides that enhance its rich flavour, balance its natural fattiness, and create a beautiful restaurant-quality presentation. These carefully selected serving suggestions transform your roast into a luxury dining experience, ensuring every plate looks as spectacular as the beef itself.
Crispy Roast Potatoes — The Essential Classic
No British roast is complete without perfectly crisp, fluffy roast potatoes. For best results:
Parboil until edges soften
Shake in the pan to roughen
Roast in beef dripping from Nicol Retailer for unbeatable flavour
The golden crunch pairs beautifully with the buttery tenderness of the aged forerib.
Honey-Glazed Carrots & Parsnips — A Touch of Sweetness
These roasted roots bring a natural sweetness that balances the richness of the beef. Dress with:
Honey
Fresh thyme
Cracked black pepper
A drizzle of olive oil
This side adds colour, shine, and irresistible caramelisation to your plating.
Buttery Greens for Balance & Freshness
To cut through the luxurious fattiness of aged beef, serve vibrant green sides such as:
Tenderstem broccoli
Green beans with garlic butter
Charred asparagus
Savoy cabbage tossed in butter
These add a clean, fresh finish and elevate the plate with vivid colour.
Garlic Butter Mushrooms — Rich and Earthy
Pan-fried mushrooms cooked in butter, garlic and thyme echo the earthy, savoury notes of the aged beef. They also add moisture and depth, making them a Michelin-style addition.
Whole Roasted Garlic Bulbs — Luxury Garnish
Slow-roasted garlic bulbs become soft, sweet and spreadable. Serve whole on the platter or squeeze over beef slices for rich, aromatic flavour.
Fresh Salad for Lightness
A crisp salad brings brightness to balance the richness. Try:
Rocket, parmesan & balsamic glaze
Watercress with lemon dressing
Baby gem Caesar salad
Refreshing, colourful and perfect for lighter palates.
Rich and Glossy Red Wine Gravy
A beautifully reduced gravy is essential for Michelin-level presentation. Use:
Beef drippings from the roasting tray
Red wine
Beef stock from Nicol Retailer
A touch of Worcestershire sauce
Silky, rich and deeply flavoured, it ties the whole meal together.
Michelin-Style Plating Inspiration
For a fine-dining finish, plate like a professional chef:
Fan out the sliced beef for dramatic colour contrast
Add roasted heritage carrots for height
Spoon red wine jus artfully around the plate
Garnish with fresh thyme or rosemary
Present the full five-bone roast at the table for a theatrical reveal
Shop Every Ingredient from Nicol Retailer Limited
Ready to Create This Luxury Roast at Home?
Bring restaurant-quality dining straight to your kitchen with the Birchstead 14-Day Aged Bone-In Carvery Beef Forerib. Order premium British beef, chef-grade ingredients and gourmet essentials directly from Nicol Retailer Limited — your trusted supplier for exceptional flavour and unbeatable value.