Elegant, refreshing, and beautifully balanced, this lemon and lavender soft ice dessert is a refined example of modern fine-dining. Moreover, it is also made achievable at home. Created using Arla Slower Melt Soft Ice Mix, the soft ice delivers a luxuriously smooth texture. This texture holds its shape longer. Therefore, it is ideal for plated desserts.
Culinary lavender has long been used in desserts for its delicate floral aroma, and should always be used sparingly. This is advised by BBC Good Food.
Follow the step-by-step instructions below to recreate this restaurant-style dessert for dinner parties or special occasions. You can also impress with minimal fuss.
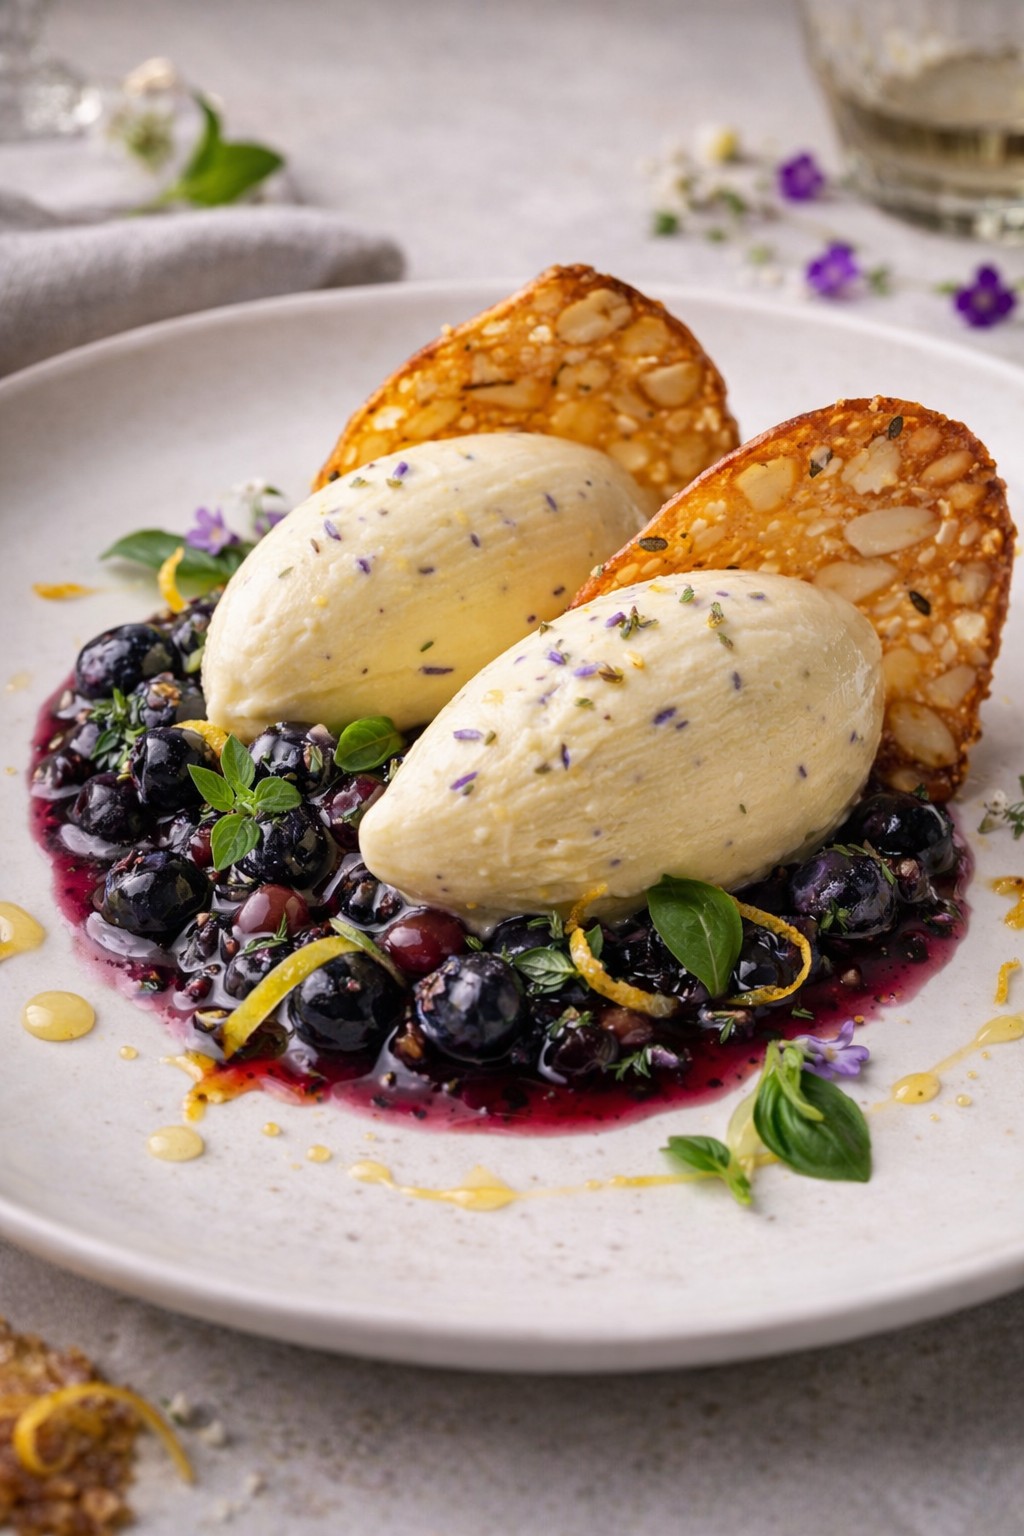
Lemon & Lavender Soft Ice with Blueberry-Basil Compote and Almond Tuile
This elegant fine-dining soft ice dessert combines silky lemon-lavender soft ice with a vibrant blueberry-basil compote and crisp almond tuiles for a refined, restaurant-style finish. Made using Arla Slower Melt Soft Ice Mix, the dessert offers exceptional smoothness and stability, perfect for plated presentation. Balanced with citrus, floral notes, and fresh herbs, it’s an impressive yet achievable dessert ideal for dinner parties and special occasions. Premium ingredients supplied by Nicol Retailer ensure professional results at home.
Course Dessert, Fine Dining Dessert
Cuisine Contemporary British, french, Modern European
Prepare the Arla Slower Melt Soft Ice Mix according to the manufacturer’s instructions.
Strain and stir back into the remaining mix.
Strain and stir back into the remaining mix.
Add honey if using.
Chill thoroughly, then churn in an ice-cream or soft-ice machine until smooth, light, and soft-serve in texture.
Transfer to a piping bag and keep frozen until plating.
Make the Blueberry–Basil Compote
Place blueberries, sugar, and lemon juice in a saucepan.
Simmer gently for 6–8 minutes until the fruit softens and releases juices.
Remove from heat, stir in basil, and allow to cool completely.
Bake the Almond Tuiles
Preheat oven to 180°C (160°C fan).
Mix flour, sugar, ground almonds, salt, and melted butter to form a smooth batter.
Spoon small rounds onto a lined baking tray and spread thin.
Sprinkle with flaked almonds
Bake for 8–10 minutes until golden.
Shape while warm over a rolling pin if desired. Cool until crisp.
Plate the Dessert (Fine-Dining Style)
Spoon a small pool of blueberry–basil compote onto each chilled plate.
Pipe or quenelle the lemon-lavender soft ice alongside.
Add an almond tuile for height and crunch.
Garnish with lemon zest, basil, or edible flowers.
Notes
For best results, prepare the Arla Slower Melt Soft Ice Mix according to the instructions and chill thoroughly before churning to achieve a smooth, stable soft-serve texture. Gently infusing the lemon zest and culinary lavender enhances the flavour while keeping the dessert balanced and refined.For a gluten-free version, simply replace the plain flour in the almond tuiles with a gluten-free flour blend or rice flour, ensuring all other ingredients are certified gluten-free. Chilling serving plates before plating will help the soft ice maintain its shape longer, making this dessert ideal for fine-dining presentation at home or in professional kitchens.
This dessert is made using Arla Slower Melt Soft Ice Mix, available from Nicol Retailer, a trusted supplier of professional-quality ingredients for home cooks and caterers — a high-quality base that delivers exceptional texture and flavour, perfect for elevated desserts like this: https://nicolretailer.com/product/arla-slower-melt-soft-ice-mix-2ltr/
Serving Suggestions
Serve this lemon and lavender soft ice dessert immediately on chilled plates to preserve its smooth, creamy texture and refined presentation. It pairs beautifully with light, citrus-led accompaniments such as fresh berries, shortbread crumbs, or a drizzle of honey for added sweetness. For a fine-dining finish, add crisp almond tuiles or edible flowers to create height and contrast on the plate. This dessert works perfectly as a restaurant-style finale, a sophisticated dinner-party dessert, or an elegant option for special occasions.
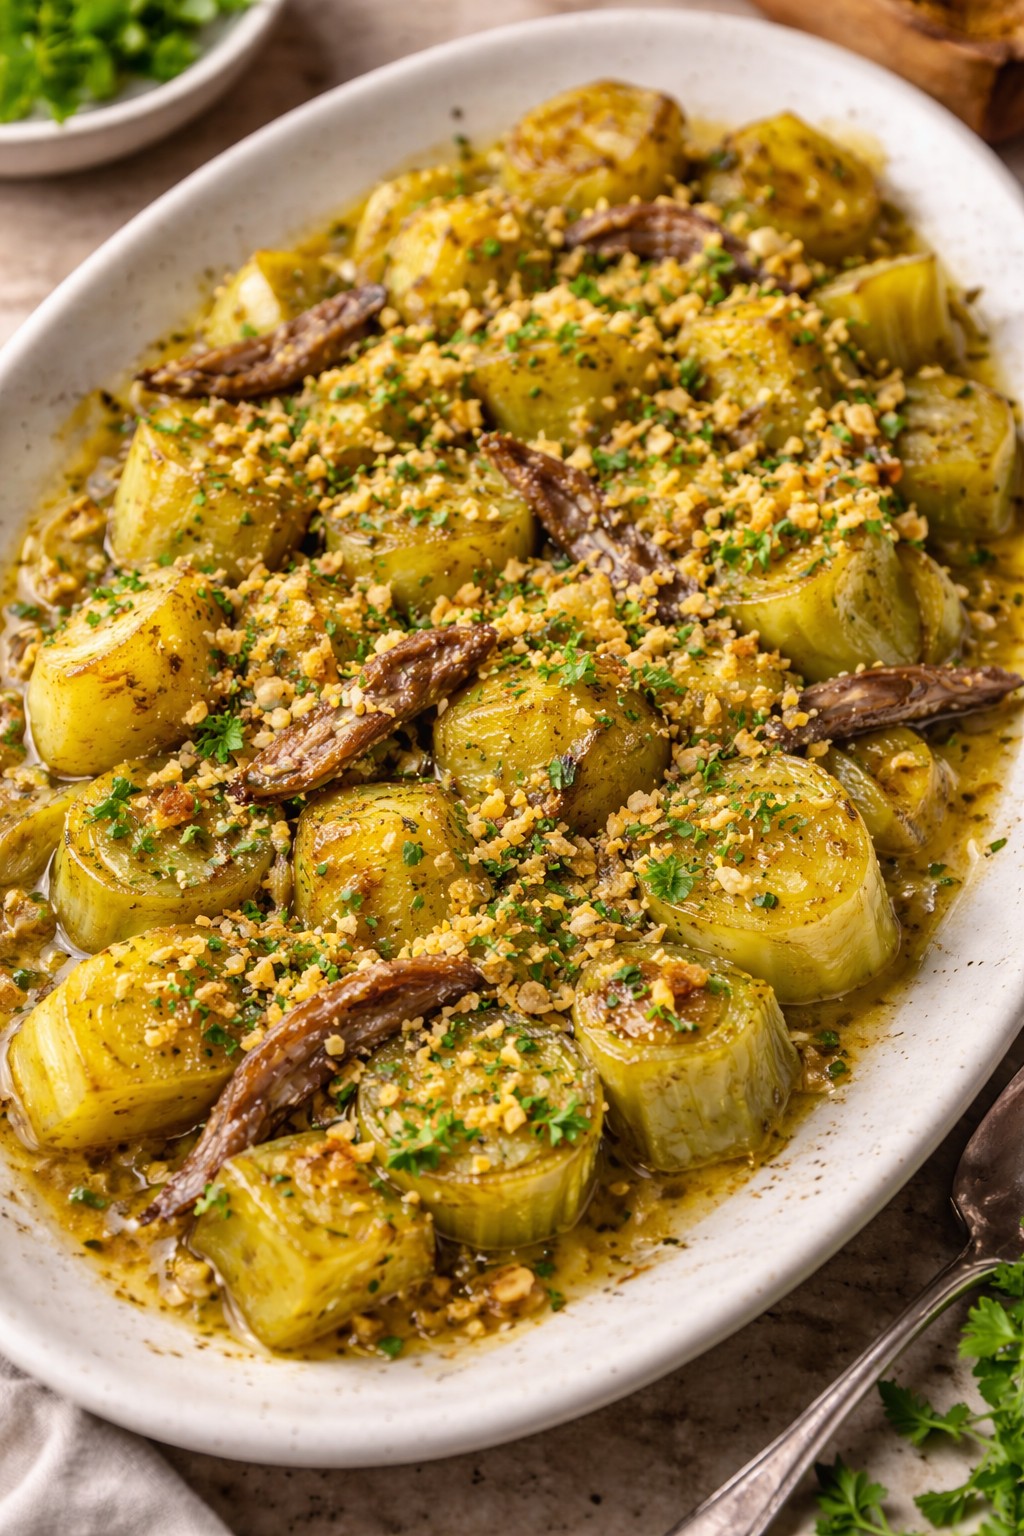
Sometimes the most memorable dishes are the simplest ones — where a handful of quality ingredients come together to create something quietly spectacular. This Warm Anchovy & Buttered Leeks with Lemon Crumbs recipe is exactly that: elegant, comforting, and packed with deep, savoury flavour. This recipe uses premium anchovy fillets in sunflower oil. These are available to buy online from Nicol Retailer and are ideal for adding rich, savoury depth to Mediterranean-style dishes.
Tender leeks are gently cooked until silky and sweet. They are then enriched with anchovy fillets that melt effortlessly into the butter and oil, creating a glossy, umami-rich sauce. Finished with crisp lemon crumbs for contrast and freshness, this dish feels both rustic and refined — perfect as a starter, a light main, or a luxurious side.
History of Anchovies
Anchovies have been used in cooking for centuries, particularly in Mediterranean cuisine. They are prized for their ability to add deep umami flavour. As documented by Encyclopaedia Britannica, this dates back to ancient Roman times. The Romans famously used anchovies to make garum — a fermented fish sauce that was considered a luxury condiment. It was traded across Europe. This early love for anchovies laid the foundation for their enduring role in cuisines from Italy and Spain to France and Greece.
Over time, anchovies became prized not just for their flavour, but for their practicality. Preserved in oil or salt, they travelled well and delivered intense savoury depth to simple dishes. Today, anchovies remain a cornerstone of Mediterranean cooking — quietly enhancing sauces, vegetables, and pastas with their unmistakable umami richness.
In modern kitchens, anchovies are valued less as a “fish” ingredient and more as a natural seasoning. When gently heated, they melt into oils and butters, creating deep flavour without overpowering a dish. This is exactly what makes them perfect for recipes like this warm leek dish.
Using quality anchovies from Nicol Retailer honours this long culinary tradition, bringing an ancient ingredient into contemporary, elegant home cooking.
How to make this Recipe
Elegant yet wonderfully simple, this Warm Anchovy & Buttered Leeks with Lemon Crumbs recipe celebrates the magic of slow cooking and quality ingredients. Follow the steps below to recreate this comforting Mediterranean-inspired recipe at home. It is perfect as a refined starter, light main, or indulgent side:
Warm Anchovy & Buttered Leeks with Lemon Crumbs is a rich yet elegant Mediterranean-inspired dish where anchovy fillets melt into buttery olive oil, coating tender leeks with deep savoury flavour. Finished with golden lemon-garlic breadcrumbs for crunch and freshness, this simple recipe delivers bold umami taste using anchovy fillets in sunflower oil from Nicol Retailer. Perfect as a refined starter, side dish, or light main, it’s quick to prepare and full of comforting flavour.
Course Light Main Course, Side Dish, Starter
Cuisine European, Italian, Mediterranean
Diet Low Calorie
Keyword anchovy fillets in sunflower oil, anchovy leeks recipe, how to cook leeks with anchovies, warm leek dish
Remove from heat, stir in lemon zest and black pepper. Set aside.
Cook the Leeks
In a wide pan, heat butter, olive oil, and anchovy oil over medium heat.
Add garlic and cook gently for 30 seconds.
Add leeks, stir to coat, then cover and cook gently for 15–20 minutes, stirring occasionally, until soft and glossy.
Add the Anchovies
Add anchovy fillets to the pan.
Stir gently until they melt into the leeks, creating a silky sauce.
Season with black pepper (no salt needed).
Finish & Serve
Spoon leeks onto a serving platter or shallow bowls.
Sprinkle generously with lemon crumbs.
Finish with chopped parsley or chives if desired. Serve warm.
Notes
This Warm Anchovy & Buttered Leeks with Lemon Crumbs recipe is designed to maximise flavour using anchovy fillets in sunflower oil, which naturally melt into the cooking fat to create deep umami richness without added salt. The gentle cooking method allows the leeks to become soft, sweet, and glossy, perfectly balancing the savoury anchovies.Gluten-free variation: To make this recipe gluten-free, simply use gluten-free breadcrumbs for the lemon crumb topping or omit the crumbs entirely for a naturally low-carb dish.Vegan variation: For a vegan alternative, replace anchovy fillets with capers, white miso, or finely chopped olives to replicate the savoury depth, and use vegan butter or olive oil instead of dairy butter. This maintains the Mediterranean flavour profile while keeping the dish 100% plant-based.Serve warm as an elegant starter, flavourful side dish, or light main. Using premium ingredients from Nicol Retailer ensures the best texture, aroma, and overall taste.
This dish isn’t just rich in flavour — it’s also packed with nutritional goodness, making it a smart choice for balanced, wholesome meals.
Anchovies
Nutritionally, anchovies are rich in protein and omega-3 fatty acids, supporting heart health, according to Healthline. They are:
High in protein, supporting muscle health
A natural source of omega-3 fatty acids, which help support heart and brain health
Rich in calcium and phosphorus, essential for strong bones
Packed with vitamin B12, supporting energy production and nervous system health
Because anchovies are used melted into the dish, you benefit from their nutrients without needing large quantities.
Leeks
Leeks are a good source of fibre and vitamins, contributing to digestion and overall wellbeing, as highlighted by BBC Good Food, offering:
Dietary fibre, aiding digestion and gut health
Vitamin K, important for bone strength
Vitamin A and antioxidants, supporting immune health
Natural sweetness without added sugars
When slowly cooked, leeks become easier to digest while retaining their nutritional value.
Together, anchovies and leeks create a dish that’s:
Naturally low in carbohydrates
Rich in healthy fats (from olive oil and anchovy oil)
High in flavour without relying on heavy sauces or processed ingredients
It’s a wonderful example of Mediterranean-style eating — simple, seasonal, and nourishing.
Serving & Pairing Suggestions
This Warm Anchovy & Buttered Leeks with Lemon Crumbs dish is wonderfully versatile. It is easy to adapt for different occasions and menus. Its rich, savoury depth pairs beautifully with both simple accompaniments and more refined plates.
Serve it warm, spooned into shallow bowls or arranged neatly on a platter. Allow the glossy anchovy-butter sauce to pool gently around the leeks. A slice of crusty sourdough, focaccia, or toasted ciabatta is essential for soaking up every last drop of the lemon-scented oil.
As a starter, it works beautifully ahead of grilled fish, roast chicken, or a light pasta course. As a side dish, it complements roasted meats, pan-seared white fish, or a vegetarian spread featuring lentils, beans, or polenta. For a simple yet elegant vegetarian main, serve the leeks over creamy mashed potatoes, soft polenta, or butter beans, finished with an extra drizzle of olive or anchovy oil.
For non-alcoholic options, sparkling water with lemon or a light elderflower spritz keeps the palate refreshed.
For an extra flourish, finish the dish at the table with freshly cracked black pepper, a squeeze of lemon juice, or a scattering of chopped herbs. These small touches elevate the dish and reinforce its Mediterranean character.
Shop the Ingredients
Create this dish using anchovy fillets in sunflower oilfrom Nicol Retailer, your trusted source for high-quality ingredients. It’s used by home cooks and professional kitchens alike.
This Warm Anchovy & Buttered Leeks with Lemon Crumbs recipe is a perfect example of how simple ingredients, when carefully chosen, can create truly memorable food. By using high-quality anchovy fillets that melt seamlessly into the dish, you achieve deep, savoury flavour without complexity. For the best results, sourcing premium ingredients is key — which is why home cooks and professional kitchens alike trust Nicol Retailer for reliable quality and exceptional produce. From pantry staples to specialist ingredients, Nicol Retailer makes it easy to cook with confidence, bringing restaurant-quality flavour into everyday meals.
A Restaurant-Style Recipe Packed with Flavour & Nutrition
If you’re looking for a vegetable dish that feels indulgent yet nourishing, this charred cavolo nero with crispy chickpeas delivers on every level. Inspired by Italian restaurant kitchens, this simple but elegant recipe transforms humble ingredients into a dish worthy of centre stage.
Cavolo nero — also known as Tuscan kale — has a deep, earthy flavour and sturdy leaves that stand up beautifully to high heat. When lightly blanched and then charred, it develops smoky edges while remaining tender, making it the perfect base for bold, Mediterranean flavours.
A Brief History of Cavolo Nero
Cavolo nero, meaning “black cabbage” in Italian, originates from Tuscany, where it has been grown and cooked for centuries. Traditionally used in rustic Italian dishes such as ribollita and hearty vegetable soups, cavolo nero has long been valued for both its robust flavour and nutritional strength. Unlike softer leafy greens, its dark, textured leaves were prized for their ability to withstand cold winters and long cooking times. Today, cavolo nero has become a favourite in modern European and British kitchens, celebrated by chefs for its versatility, depth of flavour, and suitability for high-heat cooking such as charring and grilling.
Also known as Tuscan kale, cavolo nero has been used for generations in traditional Italian cooking and is valued for its robust flavour and ability to hold its texture when cooked.
Cavolo nero is rich in vitamins and antioxidants, which support overall health as part of a balanced diet, according to NHS healthy eating guidance.
How to Make Charred Cavolo Nero with Crispy Chickpeas – A Restaurant-Style Italian Recipe
This simple yet elegant recipe brings out the very best of cavolo nero, transforming it into a restaurant-style dish that’s both comforting and refined. By lightly blanching the leaves and then charring them over high heat, the cavolo nero develops a smoky depth while remaining tender. Paired with crispy chickpeas, fresh lemon, and a drizzle of olive oil, this recipe is easy to follow, full of flavour, and perfect for home cooks or professional kitchens alike. Follow the step-by-step instructions below to recreate this vibrant, Italian-inspired dish at home.
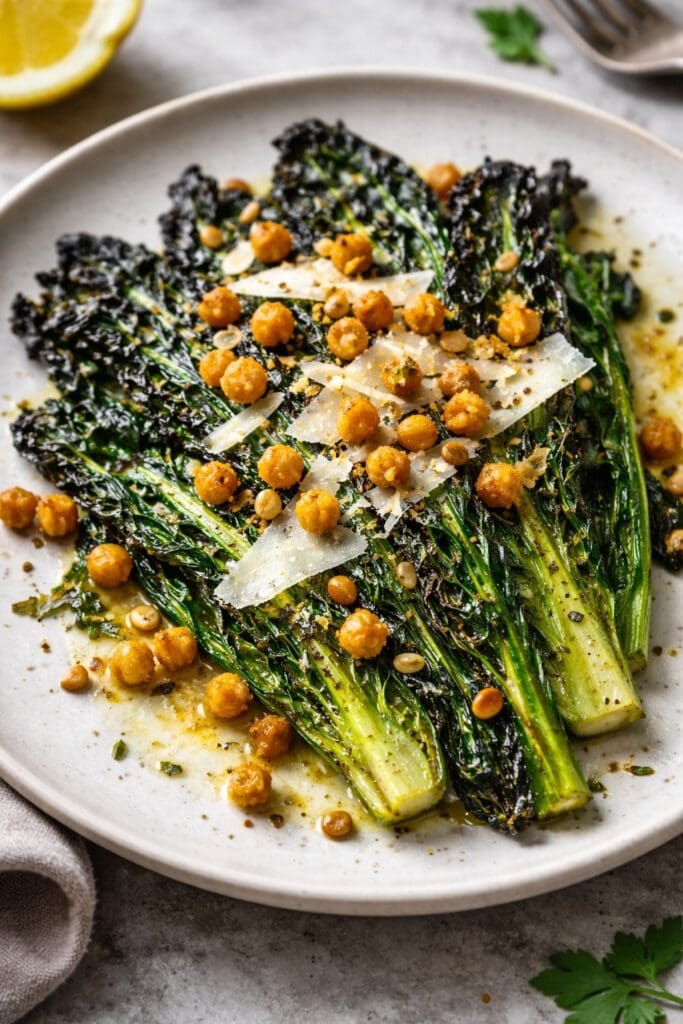
Charred Cavolo Nero with Crispy Chickpeas, Lemon Oil & Parmesan
Charred Cavolo Nero with Crispy Chickpeas, Lemon & Parmesan is a modern, restaurant-style dish that highlights the deep, earthy flavour of fresh cavolo nero. The leaves are lightly blanched, then charred for a smoky finish and paired with golden, crispy chickpeas for texture. Finished with bright lemon, extra virgin olive oil and delicate Parmesan shavings, this elegant recipe is quick to prepare, nutrient-rich, and perfect as a vegetarian starter, side dish, or small plate.
Blanch the cavolo nero in well-salted boiling water for 2 minutes until just tender. Drain and refresh briefly in cold water. Squeeze dry thoroughly.
Char the greens
Heat a heavy pan or grill pan over high heat. Add 1 tablespoon olive oil and lay in the cavolo nero in a single layer. Allow it to char lightly without stirring for 1–2 minutes per side until smoky and crisp at the edges. Season lightly and remove to a warm plate.
Crisp the chickpeas
In the same pan, add 2 tablespoons olive oil. Add chickpeas, season with salt, and cook over medium-high heat until golden and crisp. Add sliced garlic and chilli flakes for the final 30 seconds, tossing gently.
Finish with lemon oil
Remove from heat and stir through lemon zest and lemon juice. Taste and adjust seasoning.
Plate
Arrange the charred cavolo nero neatly on warm plates. Spoon over the crispy chickpeas. Finish with shaved Parmesan, cracked black pepper, and a final drizzle of extra virgin olive oil or garlic oil.
Notes
This charred cavolo nero with crispy chickpeas recipe is a simple yet elegant way to enjoy fresh cavolo nero cabbage. Lightly blanching and charring the leaves brings out their natural sweetness while keeping a tender texture, making this dish ideal as a restaurant-style side dish, vegetarian starter, or small plate.For a vegan cavolo nero recipe, simply omit the Parmesan or replace it with a plant-based hard cheese, nutritional yeast, or toasted breadcrumbs for added umami and crunch. The dish is naturally gluten-free, low in sugar, and rich in fibre, making it suitable for a wide range of diets.This recipe works well for home cooks and food businesses, and pairs beautifully with grilled vegetables, roasted potatoes, pasta, or grain bowls. It’s also a great option for meal prep, plant-forward menus, and Mediterranean-inspired cooking.
This charred cavolo nero with crispy chickpeas is a beautifully flexible dish that transitions effortlessly from casual home cooking to polished restaurant presentation. Its balance of smoky greens, citrus brightness, and crisp texture makes it suitable for a wide range of serving styles and dining occasions.
Starter, Small Plate or Sharing Dish
Serve warm as an elegant starter, neatly plated and finished with shaved Parmesan, lemon zest, and a drizzle of extra virgin olive oil. Add warm sourdough, focaccia, or toasted flatbread on the side to soak up the garlicky lemon oil. For sharing, present on a large platter and finish generously at the table for a rustic yet refined effect.
Elevated Side Dish
This dish pairs exceptionally well with rich and simply cooked proteins. Serve alongside roast chicken, grilled lamb chops, pan-seared salmon, or slow-cooked pork. The slight bitterness of cavolo nero cuts through richness, while the chickpeas add texture and body, creating a well-balanced plate.
Satisfying Vegetarian or Vegan Main
Turn this dish into a filling main course by serving it over warm grains such as farro, pearl barley, quinoa, or lentils. Finish with extra olive oil and toasted nuts or seeds for added depth. For vegan menus, omit the Parmesan or replace it with a plant-based alternative without compromising flavour.
Pasta & Bowl Dishes
Toss the cavolo nero and chickpeas through freshly cooked pasta with olive oil, garlic, and a splash of pasta water for a quick yet refined Italian-style meal. Alternatively, layer it into grain bowls with roasted vegetables, hummus, or tahini dressing for a nourishing lunch or dinner option.
Brunch & Light Meals
Serve as a topping for toasted sourdough, folded into omelettes, or alongside poached eggs for a vibrant brunch dish. The bold flavours work particularly well with eggs and creamy elements.
Beverage Pairings
For non-alcoholic options, serve with sparkling water and citrus or a lightly brewed herbal tea.
Seasonal & Menu Adaptations
In cooler months, enrich the dish with roasted squash or sweet potato. In warmer seasons, lighten it with fresh herbs and additional lemon. Its versatility
Presentation
Presentation plays a key role in elevating this dish from simple greens to a restaurant-quality plate. The deep green tones of the charred cavolo nero contrast beautifully with the golden chickpeas, making it visually striking with minimal effort.
Plating Style
Use a neutral or stoneware plate to allow the natural colours to stand out. Arrange the cavolo nero loosely rather than stacked, letting the charred edges remain visible for a rustic yet refined look. Spoon the crispy chickpeas evenly over the top to add height and texture.
Finishing Touches
Finish the dish with:
Delicate shavings of Parmesan scattered lightly rather than piled
A fine grating of fresh lemon zest for colour and aroma
A light drizzle of extra virgin olive oil just before serving
A twist of freshly cracked black pepper for contrast
Optional garnishes such as toasted pine nuts, breadcrumbs, or a few chilli flakes can be added for extra texture and visual interest.
Shop the Ingredients at Nicol Retailer Limited
All the fresh ingredients used in this charred cavolo nero with crispy chickpeas recipe are available from Nicol Retailer Limited, your trusted source for high-quality fresh produce. From fresh cavolo nero cabbage to lemons, garlic, and other everyday cooking essentials, Nicol Retailer Limited supplies carefully selected ingredients that deliver on freshness, flavour, and consistency. Whether you’re cooking at home or sourcing produce for a food business, shopping with Nicol Retailer Limited means reliable quality, competitive pricing, and produce you can trust. Simply add the ingredients to your basket and recreate this restaurant-style dish with confidence.
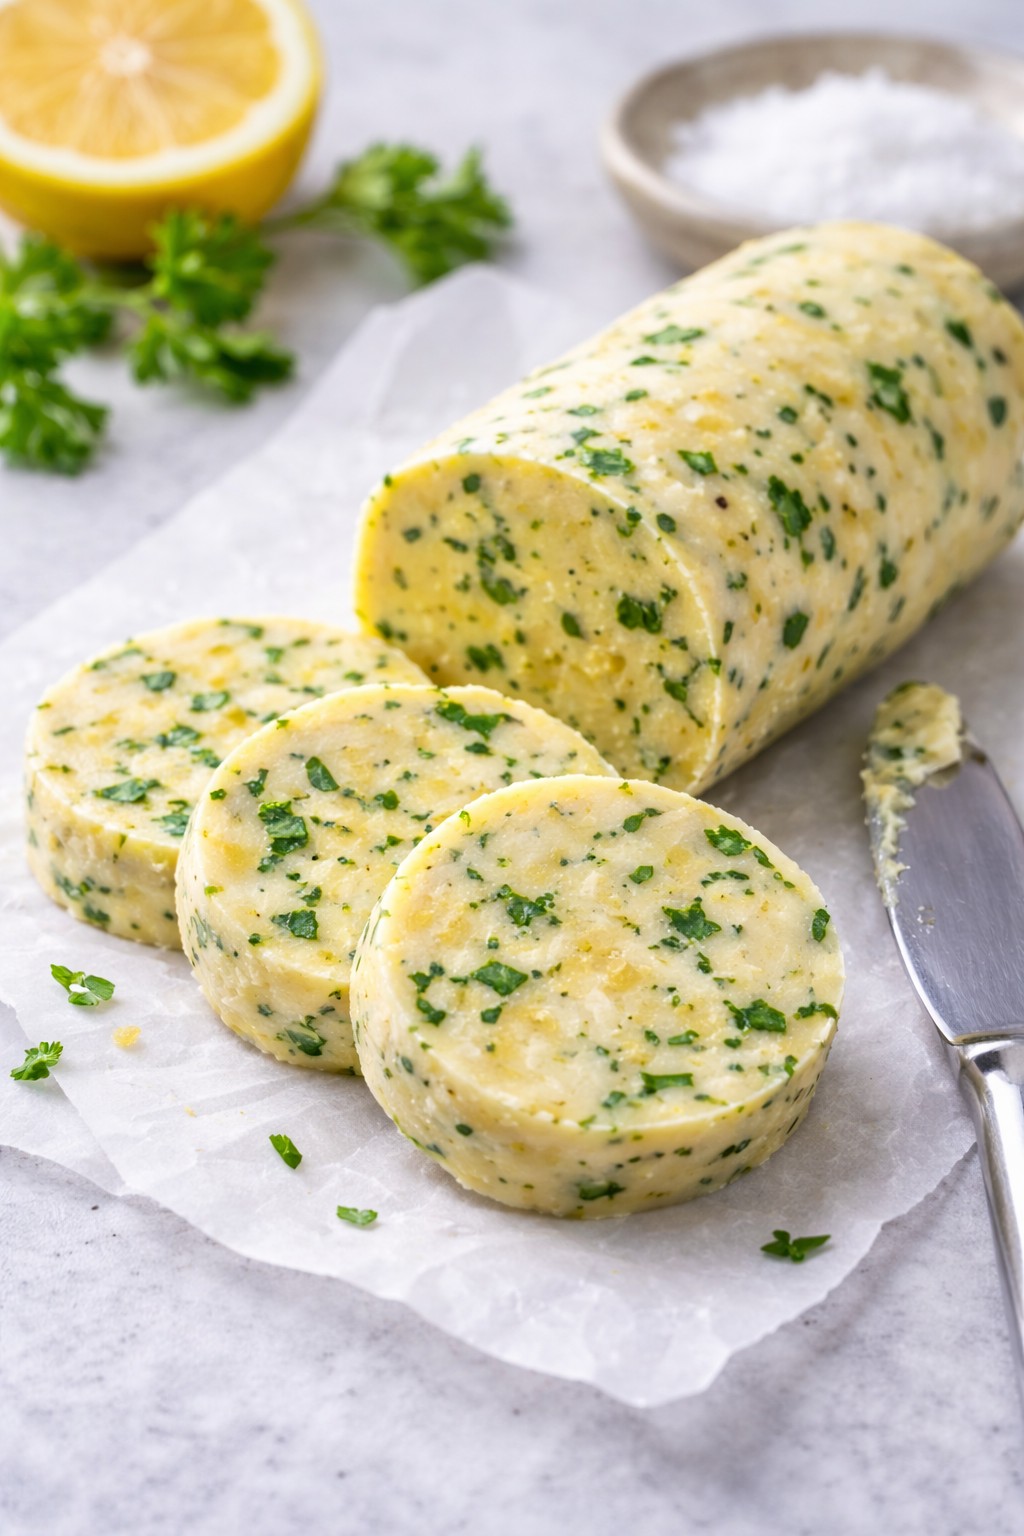
If you love adding bold yet refined flavours to everyday meals, this Yuzu Herb Butter is about to become your new kitchen essential. For those looking for a yuzu herb butter recipe, this creamy, aromatic, and citrus-fresh compound butter transforms ordinary dishes into something truly special.
Created by Nicol Retailer Limited, this recipe celebrates the unique flavour of yuzu – a prized Japanese citrus known for its fragrant blend of lemon, lime, and grapefruit notes. Combined with fresh herbs and a hint of umami, this butter delivers restaurant-quality flavour with minimal effort.
What Is Yuzu and Why It’s Used in Cooking
Yuzu is a highly aromatic citrus fruit originating from East Asia and widely used in Japanese cuisine. While it resembles a small, knobbly lemon, its flavour is far more complex, combining notes of lemon, lime, mandarin, and grapefruit. Rather than being eaten fresh, yuzu is prized for its juice and zest, which add fragrance and brightness to both savoury and sweet dishes.
In Japan, yuzu is commonly used in ponzu sauce, dressings, marinades, soups, desserts, and compound butters. Its sharp acidity cuts through rich ingredients like butter, fish, and meat, while its floral aroma lifts flavours without overpowering them. This makes yuzu especially popular with chefs looking to add depth and refinement to simple recipes.
Because fresh yuzu is rarely available in the UK, high-quality bottled yuzu juice has become the preferred choice for home cooks and professionals alike. Using a reliable, authentic product ensures consistent flavour and avoids bitterness.
If you’d like a deeper understanding of yuzu, its origins, and how it’s traditionally used, this guide from BBC Good Food offers a helpful overview: https://www.bbcgoodfood.com/howto/guide/what-yuzu
What Makes Yuzu So Special?
Yuzu is a cornerstone of Japanese cuisine, valued for its intense aroma rather than sweetness. Unlike lemon, yuzu offers floral depth and complexity, making it perfect for savoury dishes. Using high-quality juice is key, which is why this recipe features Kishida Yuzu Juice, a premium product trusted by chefs and food professionals.
A little yuzu goes a long way, lifting rich ingredients like butter while keeping flavours balanced and fresh. Ingredient usage & culinary context
Why You’ll Love This Yuzu Herb Butter
This isn’t just butter – it’s a flavour enhancer that works across cuisines and diets:
Adds instant depth to grilled fish, prawns, or scallops
Elevates roasted vegetables and plant-based dishes
Melts beautifully over steak, chicken, or tofu
Perfect for finishing rice, noodles, or warm bread
Ideal for entertaining, meal prep, or gifting
It’s also incredibly quick to make, requiring no cooking and just a handful of ingredients.
How to Make Yuzu Herb Butter
This Yuzu Herb Butter recipe is quick to prepare and requires no cooking, making it perfect for both everyday meals and special occasions. Using premium Kishida Yuzu Juice, fresh herbs, and a touch of umami, this simple compound butter delivers bold, citrus-led flavour with minimal effort. Follow the step-by-step instructions below to create a versatile butter that melts beautifully over fish, vegetables, meat, or warm bread.
Make your dishes shine with this easy and flavourful Yuzu Herb Butter recipe. Combining Kishida Yuzu Juice, fresh herbs, and optional miso, this savoury compound butter is perfect for adding a citrusy, umami-rich boost to grilled vegetables, seafood, meats, or crusty bread. Ideal for foodies, home cooks, and fans of Japanese flavours, this butter is a versatile kitchen staple.
Course Appetiser enhancer, Condiment, Side Dish, Topping/Finishing butter
Cuisine Asian-inspired, Japanese-inspired, Modern European (with Japanese twist)
Diet Gluten Free, Low Calorie, Vegetarian
Keyword compound butter with yuzu, Japanese citrus butter, Kishida Yuzu Juice recipe, yuzu butter recipe, yuzu herb butter
In a bowl, combine the softened butter with yuzu juice, herbs, miso (if using), garlic, zest, salt, and pepper. Mix until fully combined and smooth.
Shape and chill:
Scoop the butter onto a piece of baking parchment or clingfilm, roll into a log, and twist the ends. Chill in the fridge for at least 1 hour to firm up, or freeze for longer storage.
Slice & serve:
Slice into discs and serve over grilled salmon, roasted veg, steak, warm bread, or even stirred into steamed rice or soba noodles
Notes
What is Yuzu? Yuzu is a fragrant Japanese citrus fruit known for its sharp, floral aroma — similar to a blend of lemon, lime, and grapefruit. It’s widely used in Japanese cuisine to enhance sauces, dressings, and marinades.Where to buy yuzu juice: We recommend Kishida Yuzu Juice 1.8L — a premium-quality product ideal for cooking, baking, and dressings available at Nicol Retailer Limited.Make-ahead & storage tips: Yuzu herb butter can be made in advance and stored in the fridge for up to 5 days, or frozen for 3 months. Slice from frozen as needed.How to use yuzu butter: This citrus compound butter pairs beautifully with grilled fish, roasted vegetables, steamed rice, noodles, bread, tofu, and steak. It melts easily and adds a gourmet touch to everyday dishes.Customise it: Try swapping parsley for chives or coriander, adding chilli flakes for heat, or including a touch of white miso for a deeper umami flavour.Dietary swaps: Use plant-based butter to make this recipe fully vegan and dairy-free.Why you’ll love it: This recipe is quick, elegant, and brings bold flavour with minimal effort. It’s perfect for entertaining, meal prep, or enhancing weeknight dinners.
One of the best things about this Yuzu Herb Butter is how effortlessly it enhances a wide range of dishes. The fragrant citrus notes of yuzu cut through richness, while the herbs and umami create depth, making it a versatile finishing butter you’ll reach for again and again.
Perfect with Seafood
Yuzu herb butter melts beautifully over grilled salmon, pan-seared scallops, prawns, sea bass, or cod. The citrus freshness brightens the natural sweetness of seafood without overpowering it, making it ideal for both simple weeknight meals and elegant dinner parties.
Elevate Meat Dishes
Add a slice of yuzu butter to rested steak, roast chicken, pork chops, or lamb cutlets. As it melts, it creates a glossy, flavour-packed sauce that enhances savoury depth while keeping the dish light and balanced.
Transform Vegetables
Toss freshly roasted or steamed vegetables such as asparagus, tenderstem broccoli, green beans, carrots, mushrooms, or sweetcorn with yuzu herb butter for instant flavour. It’s an easy way to make plant-based dishes more exciting and satisfying.
Ideal for Vegetarian & Vegan Cooking
This butter is exceptional with tofu, aubergine, courgette, or roasted cauliflower. Simply swap to plant-based butter to keep it vegan while maintaining the bright, Japanese-inspired flavour profile.
Finish Rice, Noodles & Grains
Stir yuzu herb butter into steamed rice, soba noodles, udon, quinoa, or couscous for a fragrant, citrus-led finish. It adds richness without heaviness, making it perfect for Asian-inspired bowls.
Simple but Luxurious with Bread
Serve yuzu herb butter with warm sourdough, crusty baguette, focaccia, or brioche. It’s also delicious melted over corn on the cob or stirred into mashed potatoes for a refined twist.
Entertaining & Meal Prep
Because it can be made ahead and frozen, yuzu herb butter is ideal for entertaining, dinner parties, and batch cooking. Slice as needed and let it melt naturally over hot food for a restaurant-quality finish at home.
Star Ingredient: Premium Yuzu Juice from Nicol Retailer Limited
The hero of this recipe is yuzu juice – a highly prized Japanese citrus ingredient known for its fragrant aroma and vibrant, complex flavour. Unlike lemon, yuzu offers a unique balance of sharpness and floral notes, making it ideal for savoury dishes like this Yuzu Herb Butter.
For best results, we recommend using Kishida Yuzu Juice, available to buy directly from Nicol Retailer Limited. This premium-quality yuzu juice is trusted by chefs and food professionals for its consistency, freshness, and authentic flavour profile.
Using a high-quality yuzu juice ensures:
Bright, clean citrus flavour without bitterness
Consistent results in cooking, baking, dressings, and sauces
A true Japanese-inspired taste that elevates simple recipes
Whether you’re making compound butter, marinades, dressings, or desserts, this yuzu juice delivers
Ingredients Available to Buy from Nicol Retailer Limited
To help you recreate this recipe with confidence, Nicol Retailer Limited stocks key specialist ingredients used in this dish:
Kishida Yuzu Juice – Ideal for savoury recipes, desserts, drinks, and dressings
Japanese pantry staples suitable for home cooks and professionals
High-quality ingredients sourced with flavour and performance in mind
Shopping with Nicol Retailer Limited means you get trusted products, reliable quality, and ingredients chosen specifically for creative cooking.
Yuzu Herb Butter FAQ – How to Use Yuzu Juice in Cooking
What is yuzu juice used for?
Yuzu juice is a highly aromatic Japanese citrus ingredient used to bring brightness and depth to both savoury and sweet dishes. It’s especially popular in sauces, marinades, dressings, desserts, and elegant finishing touches like yuzu herb butter, where it balances richness with fresh citrus notes.
Can yuzu juice replace lemon in recipes?
Yes. Yuzu can be used instead of lemon, but it offers a more refined flavour. While lemon is sharp and direct, yuzu delivers floral, mandarin-like notes with gentle bitterness, creating a more complex and elegant finish.
Is yuzu herb butter vegetarian or vegan?
This yuzu herb butter is vegetarian and naturally gluten-free. To make it vegan, simply use a high-quality plant-based butter — the citrus and herb flavours remain beautifully balanced.
How long does yuzu herb butter keep?
Stored in an airtight container, yuzu herb butter lasts up to 5 days in the fridge. It can also be frozen for up to 3 months. Freezing it in a log allows you to slice off portions as needed.
What does yuzu herb butter taste like?
It’s creamy and silky with a fragrant citrus lift. The butter provides richness, the herbs add freshness, and yuzu brings a bright, floral tang that feels lighter and more aromatic than lemon.
What dishes pair best with yuzu herb butter?
Yuzu herb butter pairs beautifully with grilled fish, prawns, roasted vegetables, tofu, steak, chicken, rice, noodles, and warm bread. Use it as a finishing butter to instantly elevate simple dishes.
Where can I buy yuzu juice in the UK?
You can buy premium Kishida Yuzu Juice from Nicol Retailer Limited. It’s ideal for cooking, baking, dressings, drinks, and Japanese-inspired recipes.
Why add yuzu to compound butter?
Yuzu’s acidity and aroma cut through butter’s richness, creating balance and elegance. It transforms simple butter into a restaurant-quality finishing ingredient with minimal effort.
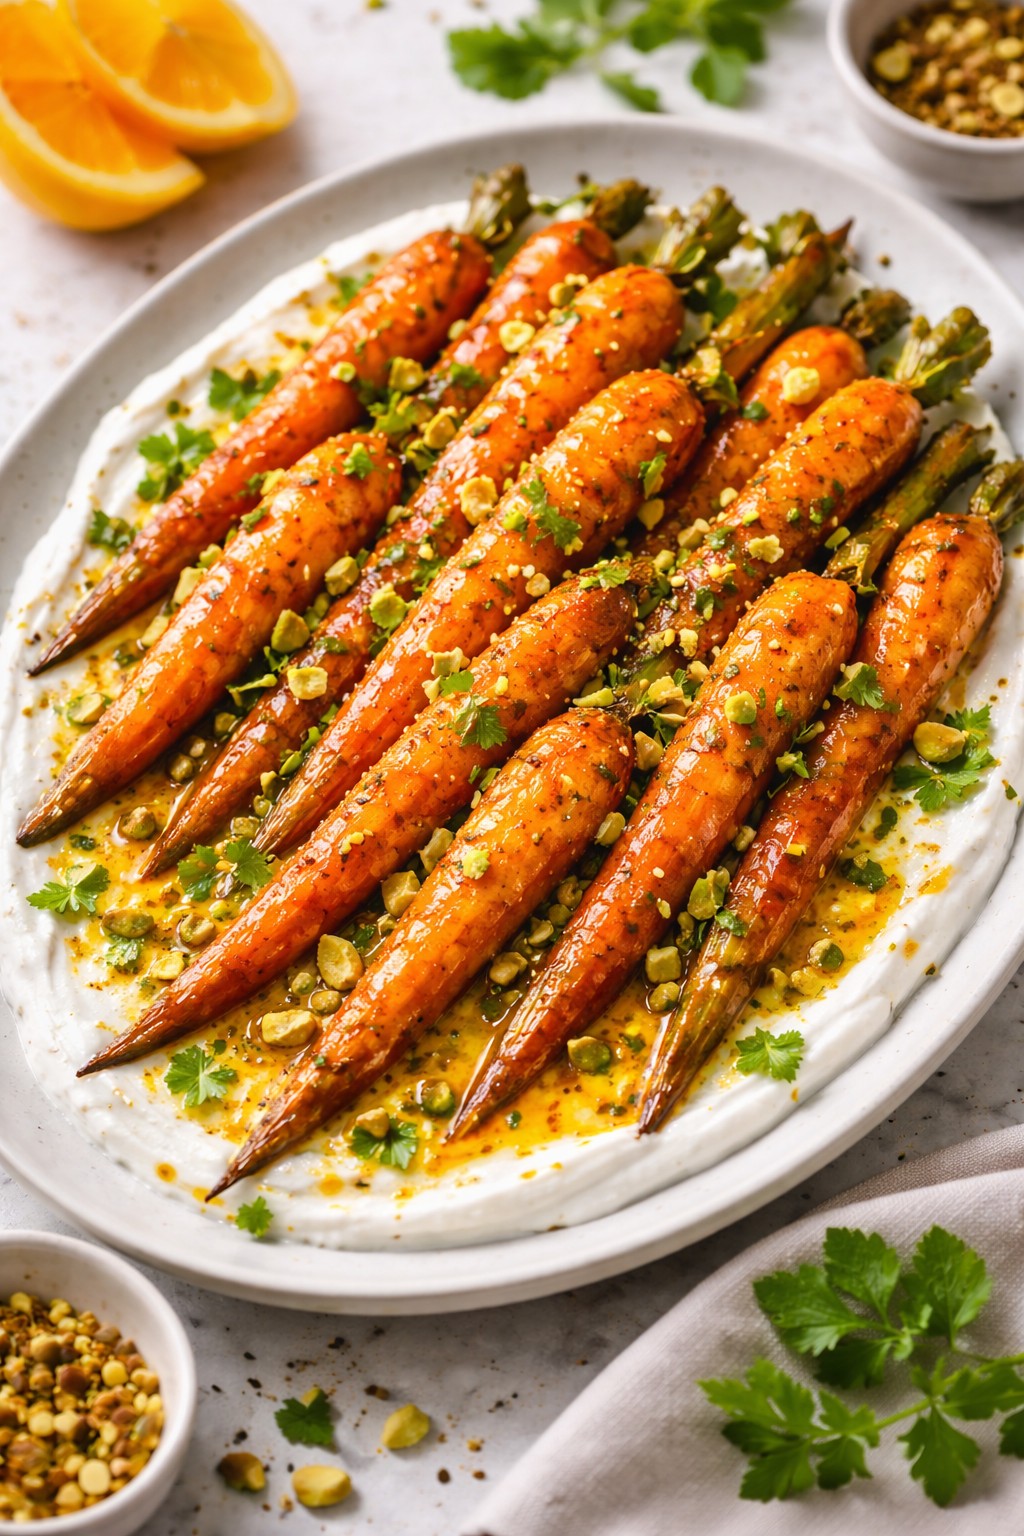
Sometimes the most memorable dishes are built on simple ingredients, treated with care. This saffron-roasted carrot recipe is a perfect example. Humble carrots are transformed into an elegant, flavour-packed dish using delicate saffron, citrus, honey and crunchy roasted nuts.
Ideal as a starter, side dish or vegetarian main, this recipe brings warmth, colour and Mediterranean flair to any table. Whether you’re hosting guests or cooking a comforting meal at home, it impresses.
Why Saffron Works Beautifully with Carrots
Saffron has long been prized in Mediterranean and Middle Eastern cooking for its floral aroma, golden colour and subtle depth of flavour. When paired with naturally sweet carrots, saffron enhances their earthiness without overpowering them.
As the carrots roast, the saffron infuses the dish with warmth and colour. Meanwhile, honey and orange amplify the natural sweetness. The result is a beautifully balanced dish that feels indulgent yet light.
Roasting carrots at a high temperature allows their natural sugars to caramelise, creating a tender interior and lightly crisp edges. This method intensifies flavour while keeping the texture satisfying and vibrant.
The addition of orange zest and juice lifts the dish. It prevents it from becoming overly sweet and adds a fresh citrus note. This perfectly complements the saffron. Discover the nutritional benefits of carrots.
How to Make Saffron-Roasted Carrots with Honey, Orange & Roasted Nuts
This saffron-roasted carrot recipe with honey, orange, yoghurt and roasted nuts is simple to prepare yet delivers rich flavour and elegant presentation. By gently roasting carrots with fragrant saffron strands and citrus then finishing with creamy yoghurt and crunchy nuts, it brings together sweetness, warmth and texture. Follow the ingredients list and step-by-step instructions below to create a versatile Mediterranean-inspired dish. It works beautifully as a starter, side or vegetarian main.
Saffron-Roasted Carrots with Honey, Orange & Yoghurt
Saffron-Roasted Carrots with Honey, Orange & Yoghurt is a vibrant Mediterranean-inspired dish that combines tender roasted carrots with fragrant saffron, citrus brightness and creamy yoghurt. Gently caramelised in the oven, the carrots absorb the delicate floral notes of saffron while honey and orange enhance their natural sweetness. Finished with a cooling yoghurt base and fresh herbs, this elegant yet simple recipe is perfect as a vegetarian main, festive side dish or refined sharing plate. Ideal for home cooks seeking flavourful, wholesome and visually stunning dishes using premium saffron.
Course Mezze, Sharing Plate, Side Dish, Starter, Vegetarian Main
Cuisine Mediterranean, Middle East, Modern European
Place saffron strands in a small bowl with warm water and leave for 5 minutes until fragrant and golden.
Roast the Carrots
Preheat oven to 200°C / 180°C fan / Gas Mark 6.
Place carrots on a roasting tray and toss with olive oil, honey, orange zest and juice.
Add the saffron infusion, season with salt and pepper, and mix well.
Roast for 30–35 minutes, turning once, until tender and caramelised.
Serve
Spoon yoghurt onto a serving platter
Arrange the warm saffron-roasted carrots on top.
Finish with fresh herbs and toasted nuts if using.
Notes
This saffron-roasted carrot recipe is designed to highlight the natural sweetness of carrots while allowing the delicate aroma and golden colour of saffron to shine. Roasting at a high temperature encourages gentle caramelisation without drying the vegetables, while the addition of honey and orange enhances flavour balance. For best results, use whole saffron strands rather than ground saffron and add the yoghurt just before serving to preserve its creamy texture. This dish works beautifully as a starter, side dish or vegetarian main and can be easily adapted for vegan or low-salt diets.
This saffron-roasted carrot dish is incredibly versatile:
Serve as a starter, plated with yoghurt and herbs
Enjoy as a side dish with roasted meats, grilled fish or halloumi
Present as a vegetarian main with flatbreads or grains
Add to sharing platters or mezze spreads
It works beautifully warm or at room temperature, making it perfect for gatherings and make-ahead menus.
A Dish for Modern Diets
This recipe is naturally vegetarian and gluten-free, and can easily be adapted for vegan diets by using plant-based yoghurt and maple syrup instead of honey. It’s also relatively low in sodium and rich in vitamins and antioxidants, making it both nourishing and satisfying.
Ingredient Quality Matters
With a recipe this simple, ingredient quality makes all the difference. By using premium saffron strands and fresh produce sourced from Nicol Retailer Limited, you ensure the best flavour, aroma and visual appeal every time.
Whether you’re cooking for family, guests or customers, this dish delivers consistent results and refined flavour.
Final Thoughts
Saffron-Roasted Carrots with Honey, Orange, Yoghurt & Roasted Nuts is proof that vegetables can be the star of the table. Elegant, comforting and full of Mediterranean character, it’s a recipe you’ll return to again and again.
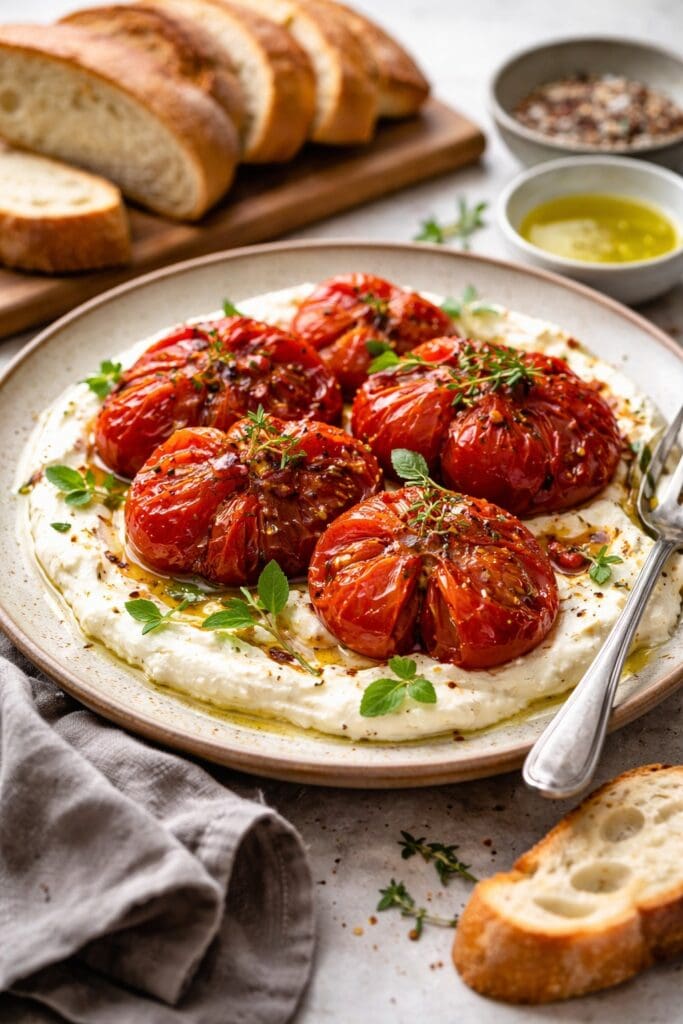
If you’re looking for a simple yet impressive Mediterranean recipe, these slow-roasted Coeur de Bœuf tomatoes with whipped feta are the perfect choice. Rich, sweet and jammy tomatoes are gently roasted with olive oil, garlic and herbs, then paired with creamy whipped feta for a dish that feels indulgent yet effortless.
Ideal as a starter, side dish or sharing plate, this recipe celebrates the natural flavour of premium tomatoes and proves that great food starts with quality ingredients.
Why Coeur de Bœuf Tomatoes Are Perfect for Roasting
Coeur de Bœuf tomatoes, meaning “ox heart” in French, have a long culinary history rooted in Mediterranean and Southern European cuisine. Recognisable by their large, heart-shaped form and deeply ribbed flesh, these tomatoes have been cultivated for generations in France and Italy, where they are prized for both raw and cooked dishes.
Coeur de Bœuf tomatoes, meaning “ox heart” in French, have a long culinary history rooted in Mediterranean and Southern European cuisine. Recognisable by their large, heart-shaped form and deeply ribbed flesh, these tomatoes have been cultivated for generations in France and Italy, where they are prized for both raw and cooked dishes.
Historically, Coeur de Bœuf tomatoes were favoured by farmers and cooks for their dense, meaty interior and low seed content, making them far more versatile than juicier salad tomatoes. Their naturally low acidity and high natural sugars allowed them to be cooked slowly without breaking down into excess liquid—a key reason they became a staple in rustic Mediterranean cooking.
When it comes to roasting, Coeur de Bœuf tomatoes truly excel. Their thick flesh holds its structure during long, slow cooking, allowing moisture to gently evaporate while flavours concentrate. As they roast, the natural sugars caramelise, creating a rich, sweet depth without the need for added sugar or heavy seasoning. Find out why slow roasting tomatoes enhances flavour.
Unlike smaller tomatoes, which can collapse or become watery, Coeur de Bœuf tomatoes develop a jammy, almost confit-like texture when roasted at a low temperature. This makes them ideal for dishes where the tomato itself is the star ingredient, delivering both bold flavour and visual appeal.
Using fresh Coeur de Bœuf tomatoes from Nicol Retailer Limited ensures consistent quality, ripeness and flavour. Carefully selected for their firmness and sweetness, these tomatoes are perfectly suited to slow roasting, whether you’re cooking at home or preparing dishes for professional kitchens, catering or hospitality menus.
Their heritage, structure and flavour profile make Coeur de Bœuf tomatoes one of the finest choices for roasting—transforming a simple ingredient into something deeply satisfying and unmistakably Mediterranean.
Whipped Feta: Creamy, Fresh and Balanced
Whipped feta brings a luxurious yet refreshing element to this dish, providing the perfect contrast to the richness of slow-roasted Coeur de Bœuf tomatoes. Feta cheese has been a cornerstone of Mediterranean cooking for centuries, valued for its distinctive salty tang, crumbly texture and ability to enhance both simple and complex dishes.
By blending feta with Greek yoghurt, olive oil and fresh lemon zest, its sharpness is softened into a smooth, airy cream. This process transforms a traditionally firm cheese into something lighter and more refined, allowing it to complement rather than overpower the roasted tomatoes. The addition of yoghurt adds subtle acidity and silkiness, while lemon zest lifts the flavour, bringing freshness and balance to the plate.
In this recipe, whipped feta acts as both a base and a flavour bridge. Its creamy texture cushions the sweet, caramelised tomatoes, while its savoury depth enhances their natural richness. Served slightly cool against the warmth of the tomatoes, it creates a pleasing contrast in temperature as well as texture.
Whipped feta is also incredibly versatile. It can be prepared ahead of time, making it ideal for entertaining, and easily adjusted to taste—more lemon for brightness, extra yoghurt for lightness, or a drizzle of olive oil for added richness. Its adaptability makes it a popular component in modern Mediterranean and Middle Eastern-inspired cooking.
Slow-roasted Coeur de Bœuf tomatoes are not only rich in flavour but also offer nutritional benefits. Tomatoes are naturally high in antioxidants such as lycopene and are a good source of vitamin C, which supports overall health. Learn more about the nutritional benefits of tomatoes.
How to Make Slow-Roasted Coeur de Bœuf Tomatoes with Whipped Feta
This slow-roasted Coeur de Bœuf tomatoes with whipped feta recipe is simple to prepare yet delivers rich Mediterranean flavour with minimal effort. Using premium Coeur de Bœuf tomatoes, gently roasted with olive oil, garlic and herbs, this dish transforms everyday ingredients into something special. Follow the easy ingredients list and step-by-step instructions below to create a beautifully balanced starter, side dish or sharing plate that’s perfect for entertaining or relaxed dining.
This recipe draws inspiration from traditional Mediterranean cooking, which focuses on fresh, seasonal produce, simple preparation methods and balanced flavours. Using olive oil, ripe tomatoes and fresh herbs reflects the principles of the Mediterranean diet, which emphasises plant-forward ingredients and wholesome, flavour-driven cooking. Learn more about Mediterranean cooking principles and the Mediterranean diet.
Slow-Roasted Coeur de Bœuf Tomatoes with Garlic, Thyme & Whipped Feta
This Slow-Roasted Coeur de Bœuf Tomatoes with Whipped Feta recipe is a simple yet elegant Mediterranean-inspired dish that celebrates the natural sweetness and meaty texture of premium Coeur de Bœuf tomatoes. Gently roasted with garlic, olive oil and fresh herbs, the tomatoes become rich and jammy, perfectly balanced by creamy whipped feta and a drizzle of extra virgin olive oil. Ideal as a starter, side dish or sharing plate, this recipe delivers big flavour with minimal effort and is perfect for entertaining or relaxed dining. Made using Fresh Coeur de Bœuf Tomatoes available from Nicol Retailer Limited, it’s a dish that proves great ingredients speak for themselves.
Course Antipasti, Light Main Course, Sharing Plate, Side Dish, Starter
Cuisine Italian, Mediterranean, Vegetarian
Diet Vegetarian
Keyword Coeur de Bœuf tomato recipe, Mediterranean tomato dish, roasted Coeur de Bœuf tomatoes, vegetarian starter recipe, Whipped feta recipe
Preheat the oven to 160°C / 140°C fan / Gas Mark 3.
Arrange tomato halves cut-side up in a roasting dish.
Drizzle generously with olive oil, add garlic and thyme.
Season with salt, pepper and chilli flakes if using.
Roast slowly for 35–40 minutes until soft, jammy and slightly caramelised.
Make the Whipped Feta
Add feta, yoghurt, olive oil and lemon zest to a blender or food processor.
Blend until smooth and creamy.
Taste and season with black pepper.
Assemble & Serve
Spoon the whipped feta onto a serving plate or shallow bowl.
Top with the warm roasted Coeur de Bœuf tomatoes and garlic.
Finish with fresh herbs and a drizzle of olive oil.
Serve with warm bread for scooping.
Notes
This slow-roasted Coeur de Bœuf tomato recipe is designed to highlight the naturally sweet, meaty texture of premium tomatoes. Roasting at a low temperature allows the tomatoes to soften and caramelise without losing their shape, intensifying flavour while keeping the dish light and balanced. For best results, use ripe Coeur de Bœuf tomatoes and add the whipped feta just before serving to maintain its creamy texture. This recipe works beautifully as a starter, side dish or sharing plate and is easily adaptable for gluten-free or lower-salt diets with simple adjustments.
Slow-roasted Coeur de Bœuf tomatoes are incredibly versatile and can be served in a variety of ways, making them suitable for everyday meals, entertaining and professional menus. Their rich, sweet flavour and soft, jammy texture allow them to pair effortlessly with both simple and more refined accompaniments.
As a starter, serve the tomatoes warm over a generous layer of whipped feta, finished with fresh herbs and a drizzle of olive oil. Add warm crusty bread or focaccia on the side to soak up the roasting juices for an elegant and comforting first course.
For a side dish, these tomatoes work beautifully alongside grilled meats, roasted chicken or pan-seared fish. Their sweetness balances richer proteins, while the whipped feta adds creaminess without heaviness.
When used as part of a sharing platter or grazing board, slow-roasted Coeur de Bœuf tomatoes add colour and depth. Serve them alongside olives, charcuterie, cheeses and roasted vegetables for a Mediterranean-inspired spread that’s perfect for entertaining.
For a light lunch or vegetarian main, pair the tomatoes and whipped feta with a crisp green salad, grains such as couscous or quinoa, or serve them over toasted sourdough. This creates a satisfying yet balanced meal that feels both nourishing and indulgent.
Leftovers can be repurposed easily. Spoon the tomatoes through freshly cooked pasta, layer them into sandwiches or wraps, or serve them with eggs for a simple brunch dish. Their concentrated flavour makes them a valuable addition to multiple meals throughout the week.
Whether served simply or dressed up, slow-roasted Coeur de Bœuf tomatoes bring warmth, colour and Mediterranean character to any table.
Premium Ingredients Available from Nicol Retailer Limited
Whether you’re cooking at home, planning menus for hospitality, or sourcing produce for catering, Nicol Retailer Limited offers reliable quality, freshness and consistency you can trust. Our ingredients are suitable for everyday cooking and professional kitchens alike, helping you create dishes that look impressive, taste exceptional and deliver real value. Browse our range online and source premium fresh produce with confidence from Nicol Retailer Limited.
A Mediterranean Dish Worth Repeating
This slow-roasted Coeur de Bœuf tomatoes with whipped feta recipe is a perfect example of how simple techniques and high-quality ingredients can create outstanding flavour. By gently roasting premium Coeur de Bœuf tomatoes and pairing them with creamy whipped feta, this dish delivers a balanced, Mediterranean-inspired plate that works equally well for everyday meals and special occasions. Whether served as a starter, side dish or sharing plate, it’s a versatile recipe you’ll return to time and again. For the best results, source your ingredients from Nicol Retailer Limited, where quality, freshness and reliability come together to help you cook with confidence.
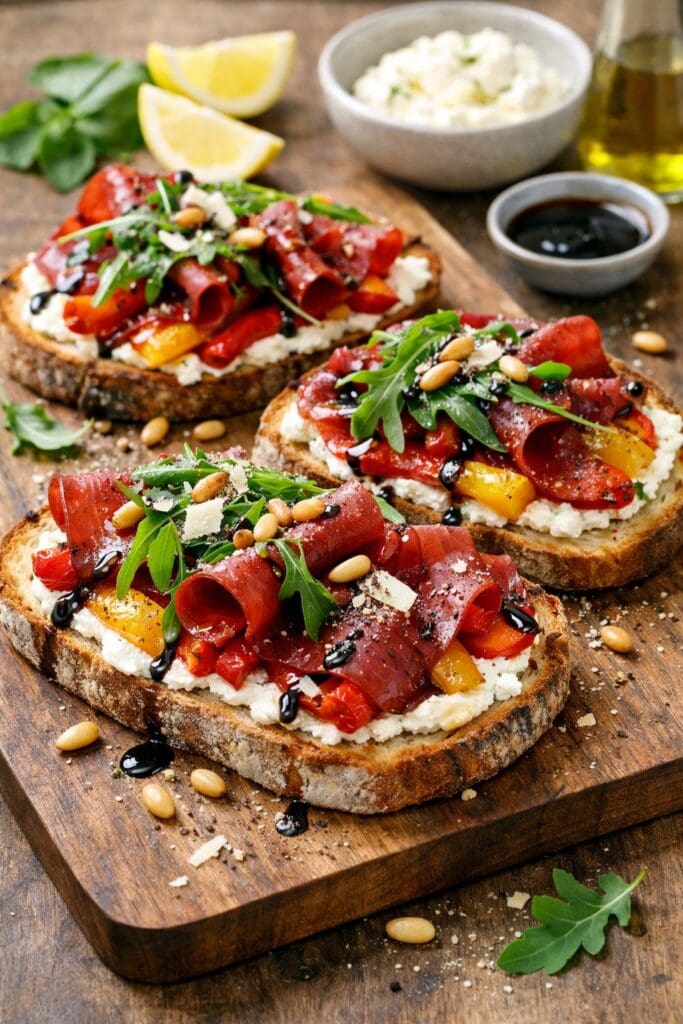
If you’re searching for a recipe that feels luxurious yet effortless, this Italian bresaola tartine with roasted sweet peppers is a perfect choice. Light, colourful and packed with flavour, it combines silky cured beef, naturally sweet roasted peppers, creamy lemon ricotta and peppery rocket. These ingredients are all layered on crisp toasted sourdough.
This is the kind of dish that looks at home on a restaurant menu, yet is simple enough to prepare in your own kitchen. It is ideal as a starter, light lunch, or elegant sharing platter. It proves that when ingredients are high quality, less really is more.
The History of Bresaola
Bresaola is a traditional Italian cured meat with a long and proud heritage rooted in the mountainous regions of Northern Italy. It is particularly found in Valtellina in Lombardy. Unlike many cured meats made from pork, bresaola is produced from lean beef, making it unique within Italian charcuterie.
The origins of bresaola date back several centuries. Preserving meat was essential for survival through long Alpine winters. Local farmers developed a method of air-drying beef using salt, spices and mountain air. This method created a product that was flavourful, long-lasting and easy to store. The cold, dry climate of the Alps played a crucial role in shaping bresaola’s distinctive character. Learn more about the history of bresaola.
Traditional Production Methods
Authentic Italian bresaola is made from carefully selected cuts of beef. Typically, the top round is used. The meat is trimmed of fat, lightly salted, and seasoned with a blend of spices. These spices may include juniper, garlic, cinnamon and black pepper. The meat is then air-dried for several weeks to months, depending on size and tradition.
Unlike heavily smoked or fermented cured meats, bresaola is prized for its clean, delicate flavour, soft texture and deep ruby-red colour. The curing process enhances the natural taste of the beef without overpowering it. This results in a refined and elegant product.
Bresaola della Valtellina PGI
One of the most famous and protected versions is Bresaola della Valtellina IGP (PGI). It received Protected Geographical Indication status from the European Union. This designation recognises the product’s historical importance. It also ensures that authentic bresaola is produced according to strict regional and quality standards.
Today, bresaola remains a symbol of Italian craftsmanship and culinary tradition, enjoyed both in Italy and around the world.
How to Make Italian Bresaola Tartine with Roasted Sweet Peppers
This Italian bresaola tartine recipe is quick to prepare. It showcases the delicate flavour of premium sliced bresaola paired with sweet roasted bell peppers, creamy lemon ricotta and fresh rocket. With minimal cooking and simple assembly, it delivers elegant results without complexity. Follow the step-by-step ingredients and instructions below to create a light starter, refined lunch or impressive sharing dish. These steps highlight the quality of the ingredients:
Bresaola, Roasted Sweet Pepper & Rocket Tartine with Lemon Ricotta
This Italian-inspired bresaola tartine recipe combines premium sliced bresaola with roasted sweet bell peppers, lemon ricotta and fresh rocket on toasted sourdough. Light, flavour-packed and easy to prepare, it’s perfect for a starter, lunch or sharing platter. Made using high-quality Gran Bosca Italian Bresaola and fresh bell peppers available from Nicol Retailer Limited, this recipe delivers a balance of savoury, sweet and citrus notes with a crisp finish. Ideal for entertaining, casual dining and modern European menus.
Preheat your oven to 220°C / 200°C fan / Gas Mark 7.
Cut the sweet peppers into thick strips, remove core and seeds.
Toss in a drizzle of olive oil, a pinch of salt and pepper.
Spread on a baking tray and roast 15–20 minutes, turning once, until tender and slightly charred.
Remove from oven and set aside to cool slightly.
Prepare the Lemon Ricotta:
In a small bowl, combine ricotta with lemon zest, lemon juice and a pinch of black pepper.
Stir well until creamy and bright — season to taste with salt if needed.
Toast the Bread:
Lightly brush each slice of sourdough with olive oil.
Lightly brush each slice of sourdough with olive oil.
Lightly brush each slice of sourdough with olive oil:
Lightly brush each slice of sourdough with olive oil.
Arrange roasted sweet pepper strips evenly on top.
Drape slices of bresaola over the peppers.
Top with a handful of fresh rocket.
Drizzle with a little extra olive oil and, if using, a balsamic glaze for sweet-tangy richness.
Drizzle with a little extra olive oil and, if using, a balsamic glaze for sweet-tangy richness.
Notes
This Italian bresaola tartine recipe is quick to prepare and highlights the natural flavour of premium sliced bresaola paired with sweet roasted bell peppers, creamy lemon ricotta and fresh rocket. Using high-quality Gran Bosca Italian Bresaola ensures a tender texture and balanced savoury taste, while roasting the peppers enhances their natural sweetness. For best results, serve the bresaola at room temperature and add it just before serving to preserve its delicate texture. This recipe is ideal as a starter, light lunch or elegant sharing dish and can be easily adapted for gluten-free or dairy-free diets.
Roasted Sweet Bell Peppers: Colour, Sweetness and Balance
Roasting fresh premium sweet bell peppers transforms them completely. Heat intensifies their natural sweetness, softens their texture and adds subtle caramelised notes. Their vibrant red, yellow and orange tones also bring visual appeal. As a result, the tartine is as striking as it is delicious. Find out how to roast peppers perfectly
The sweetness of the peppers balances the savoury depth of the bresaola, while their softness contrasts beautifully with crisp sourdough and fresh rocket. This harmony of flavours and textures is what makes the recipe so satisfying.
Serving Suggestions
These Italian bresaola tartines with roasted sweet peppers are extremely versatile. They can be served in a variety of ways, making them suitable for casual meals, refined dining and professional catering menus.
For a light lunch or everyday meal, serve the tartines whole with a crisp green salad. Use rocket, watercress or mixed leaves, lightly dressed with lemon juice and extra virgin olive oil. Adding cherry tomatoes or shaved fennel brings freshness and texture. This balances the savoury bresaola and sweet roasted peppers.
As a starter, cut the tartines into smaller portions. Present them on a sharing platter with olives, marinated vegetables or shaved Parmesan. This works beautifully for dinner parties, festive menus and Italian-inspired entertaining. It offers a refined appetiser that feels indulgent without being heavy.
For grazing boards and buffets, slice the tartines into bite-sized pieces and arrange alongside cheeses, charcuterie, crusty bread and dips. Their bold yet balanced flavours make them ideal for parties, celebrations and casual entertaining. Meanwhile, their visual appeal adds colour to any spread.
For a more contemporary or lower-carb option, omit the bread and serve the bresaola, roasted peppers and lemon ricotta layered over fresh rocket leaves. Finish with a drizzle of olive oil and a squeeze of lemon. This variation is perfect for lighter dining or summer menus.
To elevate the dish further, consider finishing with toasted pine nuts, fresh basil, cracked black pepper or a light drizzle of balsamic glaze. These small additions enhance flavour while keeping the focus on the quality of the ingredients.
Star Ingredients
At the heart of this recipe are premium Gran Bosca Italian Bresaolaand fresh premium sweet bell peppers, both available to buy from Nicol Retailer Limited. The bresaola is expertly air-dried to deliver a delicate, savoury flavour with a tender texture, making it ideal for light starters, lunches and Italian-inspired dishes. Paired with naturally sweet, vibrant bell peppers, these high-quality ingredients offer consistent freshness, flavour and reliability. Whether you’re cooking at home or sourcing ingredients for hospitality and catering, Nicol Retailer Limited provides trusted products that elevate simple recipes into something special.
If you’re searching for a flavour-packed smoked mackerel recipe that’s easy, versatile and crowd-pleasing, these smoked mackerel fishcakes deliver on every level. Golden and crisp on the outside, soft and flaky in the centre. They combine rich smoked mackerel with fresh herbs, lemon and a light breadcrumb coating. This is finished with a refreshing dill yoghurt sauce.
This is a recipe designed to work beautifully for home cooks, catering kitchens, cafés and hospitality menus. It offers restaurant-quality results without complicated techniques.
Smoked mackerel is one of the most underrated seafood ingredients. Naturally rich, oily and full of depth, it brings bold flavour to dishes without requiring heavy seasoning. In fishcakes, it provides structure, moisture and a smoky savouriness that pairs exceptionally well with potatoes and fresh herbs.
Using Sykes Seafood Smoked Mackerel Fillets ensures consistency, quality and a clean, well-balanced smoke. The fillets flake easily, making them ideal for shaping fishcakes that hold together well and cook evenly.
Smoked mackerel is also highly nutritious, making this recipe as nourishing as it is delicious:
Naturally high in omega-3 fatty acids
An excellent source of protein
Rich in vitamin D and vitamin B12
Suitable for pescatarian diets
How to Make Smoked Mackerel Fishcakes – Step-by-Step Method
This smoked mackerel fishcake recipe is simple to prepare and delivers bold, smoky flavour with minimal effort. Made using flaked smoked mackerel, creamy potatoes, fresh herbs and lemon, the fishcakes are easy to shape and quick to cook. They are ideal for both home kitchens and professional catering. Follow the step-by-step instructions below to create golden, crispy fishcakes with a soft, flavour-packed centre. Finish them with a fresh dill yoghurt sauce. Perfect for a seafood starter, light main course or lunch dish:
Smoked Mackerel & Lemon Herb Fishcakes with Dill Yoghurt Sauce
Smoked mackerel brings rich, smoky flavour that pairs beautifully with fresh herbs, lemon and creamy potatoes. These fishcakes are crisp on the outside, silky inside, and served with a tangy dill yoghurt sauce.
Place potatoes in a large pan of cold, salted water and bring to the boil.
Cook 12–15 min until tender when pierced with a fork.
Drain and mash roughly — keep a little texture.
Prepare the Fishcake Mix:
Remove skins and bones from the smoked mackerel fillets and flake into large chunks.
In a large bowl combine: mashed potatoes, flaked mackerel, red onion, lemon zest and juice, parsley, dill and spring onion and black pepper
Mix gently — avoid over-working so texture stays light.
Shape & Coat the Fishcakes:
Dust your hands with flour.
Divide mixture into golf-ball sized portions and shape into patties.
Lightly coat each in flour, dip in beaten egg, then press into panko breadcrumbs.
Place on a tray and chill for 10–15 min — this helps them hold their shape when frying.
Fry to Golden Perfection:
Heat 3–4 mm of vegetable oil in a large frying pan over medium heat.
When hot, add the fishcakes (do not overcrowd).
Fry 3–4 min each side until golden and crisp.
Drain on kitchen paper.
Make the Dill Yoghurt Sauce:
In a small bowl combine yoghurt, lemon juice, dill and garlic.
Season with black pepper.
Chill until ready to serve.
To Serve:
Arrange fishcakes on a platter with lemon wedges, a scattering of fresh dill and your dill yoghurt sauce on the side. Pair with a crisp green salad or minted peas for a beautiful lunch or starter.
Notes
These smoked mackerel fishcakes are a quick, flavour-packed seafood dish, perfect for starters, light mains, or lunch menus. Using ready-smoked mackerel fillets keeps preparation simple while delivering rich, smoky flavour and natural omega-3 benefits.For best results, avoid adding extra salt until tasting, as smoked mackerel is naturally seasoned. Chilling the fishcakes before cooking helps them hold their shape and achieve a crisp golden finish when pan-fried.This recipe is pescatarian-friendly, high in protein, and easily adaptable to gluten-free or dairy-free diets with simple substitutions. Ideal for home cooks, catering menus, and festive seafood spreads.
The beauty of this smoked mackerel fishcake recipe lies in its balance. Creamy mashed potatoes soften the intensity of the smoked fish, while lemon zest lifts the flavours and fresh herbs add brightness. A light breadcrumb coating creates a crisp golden exterior without overpowering the filling.
The dill yoghurt sauce plays an essential role, cutting through the richness of the fish with freshness and acidity. It transforms the dish from comforting to refined, making it suitable for everything from casual lunches to elegant starters. This makes the recipe ideal for:
Seafood starters
Light main courses
Lunch menus
Buffets and sharing platters
Serving Suggestions
These smoked mackerel fishcakes are incredibly versatile and adapt effortlessly to a wide range of occasions. They are suitable from simple weekday meals to elegant entertaining and professional catering service.
For a light lunch or everyday supper, serve the fishcakes with a crisp green salad made with rocket, watercress or mixed leaves. Dress the salad lightly with lemon juice and extra virgin olive oil. Adding cherry tomatoes, sliced radishes or cucumber brings freshness and texture. This balances the richness of the smoked mackerel.
As a starter, present smaller fishcakes with a generous spoon of dill yoghurt sauce, a wedge of fresh lemon and a scattering of chopped dill or parsley. This makes an elegant first course for dinner parties, festive menus and seafood-focused events. It offers refined flavour without feeling heavy.
For a more filling main course, pair the fishcakes with buttered new potatoes, crushed baby potatoes or creamy mash. Seasonal vegetables such as tenderstem broccoli, green beans or buttered spinach work particularly well. A simple pickle—such as pickled cucumber, fennel slaw, capers or gherkins—adds acidity and contrast, cutting through the smoky richness of the fish.
These fishcakes are also ideal for buffets, sharing platters and canapé service. Shape the mixture into smaller portions and serve warm with dipping sauces on the side. This makes them perfect for parties, catering events, office lunches and festive spreads. Because they can be prepared ahead of time and cooked to order, they are both practical and visually appealing.
For a more contemporary twist, serve the fishcakes in soft brioche buns or crusty rolls with salad leaves and yoghurt sauce. This makes for a seafood-inspired sandwich. It is ideal for cafés or casual dining menus.
At the heart of this recipe are premium smoked mackerel fillets, sourced for their rich flavour, firm texture and consistent quality. Sykes Seafood Smoked Mackerel Fillets, available from Nicol Retailer Limited, are naturally smoked to deliver a deep, balanced savouriness that works perfectly in fishcakes, salads, pâtés and hot dishes. Ready to use and expertly prepared, these fillets save time without compromising on taste, making them ideal for home cooks, caterers and professional kitchens alike. High in protein and omega-3, smoked mackerel is both nutritious and versatile, making it a reliable choice for everyday cooking and menu development.
A Show-Stopping Festive Dessert by Nicol Retailer Limited
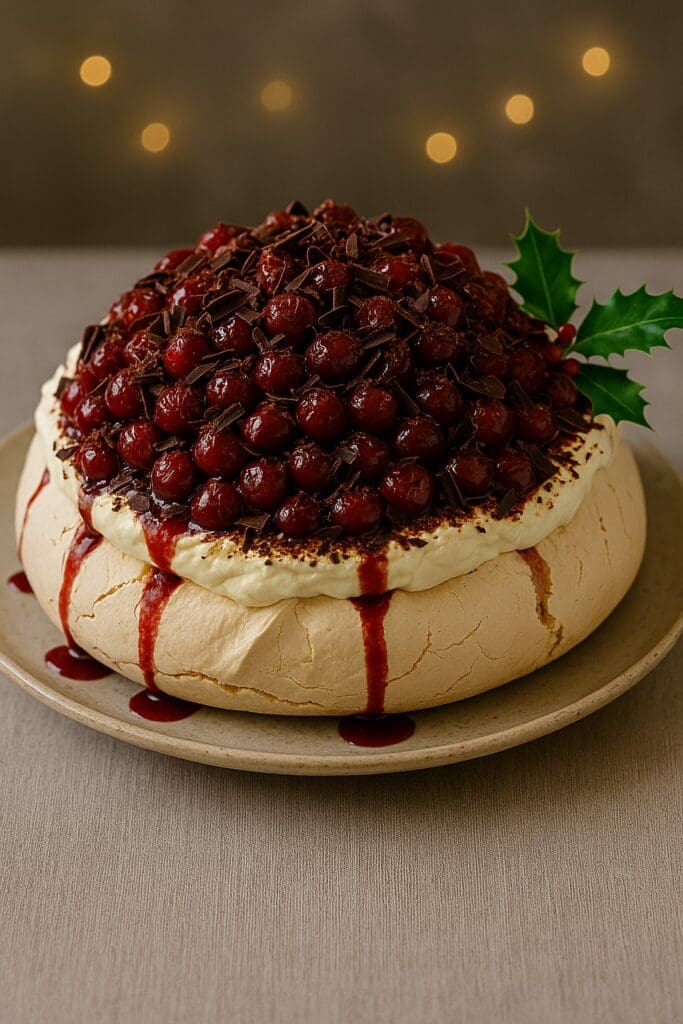
If you’re searching for the ultimate Christmas dessert that looks incredible, tastes luxurious, and delivers a true festive wow-factor, then this Black Forest Christmas Pavlova is the one. With its billowy cloud of meringue, luscious whipped cream, rich dark chocolate shavings and a Christmas is the season of indulgence, celebration and bringing people together through unforgettable food. And when it comes to festive desserts, nothing steals the spotlight quite like this Black Forest Christmas Pavlova topped with Darta Pitted Morello Cherries. With its glossy ruby-red cherries, crisp meringue shell and rich chocolate shavings, this dessert not only tastes extraordinary — it looks like a centrepiece straight from a luxury Christmas magazine.
This recipe has quickly become a top-searched festive dessert thanks to its dazzling presentation, naturally gluten-free base, and the irresistible flavour pairing of chocolate and cherries. Morello cherries, in particular, bring a distinct sweet-tart intensity that cuts beautifully through the sweetness of the pavlova, creating balance, richness and a nostalgic Christmas warmth in every bite.
Crafted and photographed by Nicol Retailer Limited, this recipe is designed to showcase the exceptional quality of Darta Pitted Morello Cherries, a premium ingredient beloved by home bakers and professional chefs alike. Whether you’re hosting Christmas dinner, planning a festive gathering, or creating a show-stopping dessert for the big day, this pavlova offers all the glamour of a traditional Black Forest cake — but with a lighter, cloud-like twist.
The History of Cherries at Christmas
The tradition of using cherries during the Christmas season has deeper historical roots than many realise. Their presence in festive recipes goes back centuries, woven into European winter traditions, religious symbolism and early culinary practices.
Symbol of Prosperity and Celebration
In medieval Europe, cherries were seen as a luxurious ingredient. Fresh cherries were rare in winter, so preserved or dried cherries became a treasured festive treat, symbolising abundance, prosperity and generosity. Using cherries in a Christmas dish was considered a sign of wealth and hospitality — a tradition that continues today with premium Morello cherries.
German and Central European Influence
The Black Forest region of Germany, famous for its cherries and cherry spirits like kirsch, heavily influenced European Christmas baking. From Black Forest gâteau to cherry-filled pastries and winter compotes, cherries became a beloved component of German Weihnachtszeit (Christmas time). Families often preserved sour cherries during summer to enjoy in festive dishes at year-end — a custom still reflected in modern cherry desserts.
The Rise of Victorian Christmas Baking
Victorian Britain cemented many of the Christmas traditions we follow today, including lavish desserts. Cherries were often used in:
decorative puddings
winter tarts
festive trifles
ornamental cakes
Victorians adored rich, colourful additions to their Christmas tables, and cherries — especially preserved Morello cherries — offered the perfect jewel-toned flourish.
Cherries as a Winter Ingredient
Sour cherries, like Morello cherries, preserve exceptionally well. Whether jarred, canned or dried, their intense flavour makes them ideal for winter baking. Long before frozen fruit was available, families relied on preserved cherries to add brightness to dark winter days — and so cherries naturally became tied to seasonal celebrations.
Modern Christmas Revival
Today, cherries are experiencing a renaissance in festive cooking. Their bold colour, refreshing acidity and ability to balance sweet desserts make them a favourite in:
pavlovas
cheesecakes
cocktail garnishes
charcuterie boards
chocolate desserts
The combination of cherries and chocolate — the essence of Black Forest flavours — continues to be one of the world’s most beloved Christmas pairings.
How to Make Christmas Pavlova with Morello Cherries and Chocolate
Get ready to create a truly unforgettable festive showstopper with this Black Forest Christmas Pavlova featuring Darta Pitted Morello Cherries. This beautifully balanced dessert combines a crisp meringue shell, pillowy soft centre, silky whipped cream and luxurious dark chocolate — all crowned with vibrant, glossy Morello cherries supplied by Nicol Retailer Limited. Perfect for Christmas Day, winter gatherings or any celebration where you want a dessert that looks spectacular and tastes even better, this recipe is surprisingly simple to make and delivers outstanding results every time.
Follow the step-by-step instructions below to recreate this stunning pavlova at home and treat your guests to a festive masterpiece they’ll remember long after the last slice is gone:
Winter Black Forest Pavlova with Darta Morello Cherries
This Winter Black Forest Pavlova is a show-stopping Christmas dessert featuring a crisp meringue base layered with soft whipped cream, rich dark chocolate shavings, and a generous topping of Darta Pitted Morello Cherries. With its festive flavour, stunning presentation, and perfect balance of sweetness and tart cherry richness, this pavlova makes an irresistible centrepiece for any Christmas dinner or holiday celebration. Simple to prepare yet visually impressive, it’s the ultimate seasonal dessert for cherry lovers and Black Forest fans alike.
Keyword Black Forest dessert, Christmas dessert ideas, Christmas pavlova recipe, Easy pavlova recipe, Festive pavlova recipe, Gluten-free Christmas dessert, Morello cherry pavlova, Pavlova with cherries, Winter Black Forest Pavlova
Prep Time 25 minutesmins
Cook Time 1 hourhr30 minutesmins
This Winter Black Forest Pavlova is a show-stopping Christmas dessert featuring a crisp meringue base layered with soft whipped cream, rich dark chocolate shavings, and a generous topping of Darta Pitted Morello Cherries. With its festive flavour, stunning presentation, and perfect balance of sweetness and tart cherry richness, this pavlova makes an irresistible centrepiece for any Christmas dinner or holiday celebration. Simple to prepare yet visually impressive, it’s the ultimate seasonal dessert for cherry lovers and Black Forest fans alike. 1 hourhr
Line a baking tray with baking paper; draw a 20cm circle to guide the pavlova shape.
Whisk the egg whites to soft peaks.
Add the caster sugar 1 tablespoon at a time, whisking until glossy and stiff.
Gently fold in the vinegar and cornflour.
Spoon the mixture onto the tray and shape it into a nest with raised sides.
Bake for 1 hour 30 minutes until crisp.
Turn off the oven, leave the door slightly ajar, and let the pavlova cool inside for 1 hour.
Prepare the Cherries & Cream
Whip the double cream with vanilla to soft peaks.
Gently warm the Morello cherries in a saucepan with the cherry syrup (add a splash of liqueur if desired)
Let them cool before topping.
Assemble the Dessert
Place the cooled pavlova on a serving plate.
Spread the whipped cream over the top.
Spoon the cherries over the cream, allowing some syrup to drizzle down the sides.
Finish with dark chocolate shavings and optional orange zest.
Serve immediately for the best texture — crisp shell, marshmallow centre, and juicy cherries.
Notes
This Winter Black Forest Pavlova is a luxurious, festive dessert that brings together all the flavours of a traditional Black Forest gateau—dark chocolate, whipped cream and tangy cherries—reimagined in a light, airy pavlova. The crisp meringue shell with its soft, marshmallow-like centre creates the perfect base for rich cream and vibrant Darta Pitted Morello Cherries, whose deep ruby colour and naturally tart flavour cut beautifully through the sweetness, giving every bite a balanced and indulgent finish.Perfect for Christmas Day, Boxing Day gatherings or festive dinner parties, this pavlova not only tastes incredible but also makes an impressive centrepiece. The dessert can be prepared in stages, making it ideal for busy holiday hosts: bake the meringue ahead of time, whip the cream just before serving and finish with cherries and chocolate shavings to create a restaurant-worthy presentation in minutes.Because it’s naturally gluten-free and adaptable for dairy-free diets, this recipe is suitable for a wide range of guests—making it a reliable choice when entertaining a crowd. The use of premium Darta Morello Cherries elevates the flavour, providing a rich, fruity depth that regular tinned cherries simply can’t achieve. Their vibrant colour also enhances the festive look, making the pavlova as beautiful as it is delicious.Whether you’re looking for a Christmas dessert that’s easy yet elegant, a showstopping centrepiece, or a creative way to showcase high-quality Morello cherries, this Winter Black Forest Pavlova ticks every box. Light, bright, and indulgent, it’s a dessert your guests will remember long after the holidays.
Turn your Black Forest Christmas Pavlova with Darta Morello Cherries into the unforgettable centrepiece of your festive celebration with these indulgent, crowd-pleasing serving suggestions. This pavlova is already strikingly beautiful, but with a few thoughtful touches, it becomes a truly magical dessert moment — the kind guests talk about long after Christmas is over.
For an elegant showstopper effect, present the pavlova on a tall cake stand and allow the cherry syrup to cascade gently down the sides. The deep ruby glow of the Darta Morello Cherries, contrasted with the snowy whipped cream and crisp meringue, creates a dramatic Christmas aesthetic worthy of magazine covers. Just before serving, scatter a handful of dark chocolate shavings and a whisper of orange zest over the top — the aroma alone will have everyone leaning closer.
To elevate each slice, pair it with a scoop of vanilla bean ice cream, clotted cream, or a chilled spoonful of mascarpone. These creamy additions enhance the tartness of the cherries and melt beautifully into the pavlova’s marshmallow centre. For those who enjoy a festive tipple, offer a small glass of kirsch, cherry liqueur, Amaretto, or spiced mulled wine. The warmth and spice complement the rich chocolate notes and fruit beautifully, creating a full sensory experience.
Hosting a larger crowd? Transform this recipe into individual mini pavlovas, allowing each guest to enjoy their own personal dessert masterpiece. They look adorable on a dessert table and allow for customised toppings — think extra chocolate for chocoholics, more cherries for fruit lovers, or even toasted almonds for crunch.
For a truly memorable Christmas moment, serve the pavlova surrounded by glowing fairy lights, festive greenery or seasonal berries. The colours pop under soft lighting, making it perfect for Christmas photos and social sharing — a brilliant touch for your brand’s online presence or for customers who love posting their holiday creations.
Whether enjoyed on Christmas Eve, served proudly after Christmas dinner, or shared on Boxing Day with leftover prosecco, this pavlova brings comfort, elegance and a hint of nostalgic Black Forest charm. With its blend of sweetness, tart fruit, and festive flavours, it promises to be a dessert that guests remember — and request — year after year.
Shop the Star Ingredients at Nicol Retailer Limited
Bring this unforgettable Black Forest Christmas Pavlova to life using the finest, chef-approved ingredients — all conveniently available from Nicol Retailer Limited. We’re proud to supply premium-quality ingredients trusted by home bakers, professional chefs, cafés and catering businesses across the UK.
Darta Pitted Morello Cherries – The Star of the Recipe
No ingredient defines this dessert quite like our Darta Pitted Morello Cherries. Known for their vibrant ruby colour, bold flavour and perfect sweet–tart balance, these cherries instantly elevate any festive recipe. Their rich syrup and natural fruitiness pair beautifully with chocolate, meringue and whipped cream, making them the ultimate centrepiece for Christmas desserts. Our cherries are:
Plump and juicy
Pitted for convenience
Packed in generous 1kg bags
Perfect for pavlovas, Black Forest cakes, cocktails, cheesecakes & festive bakes
These cherries aren’t just an addition — they’re a statement ingredient that makes your dessert look spectacular and taste unforgettable.
Recreate This Festive Showstopper With Nicol Retailer Limited
From the hero ingredient — Darta Pitted Morello Cherries — to the chocolate, sugar, cream and flavourings, everything you need for this Black Forest Christmas Pavlova is available to buy now at Nicol Retailer Limited.
Make this Christmas unforgettable with ingredients that inspire creativity and deliver exceptional results.
For more premium-quality baking ingredients and festive essentials, visit Nicol Retailer Limited’s online store to explore the full range of products, including the exceptional Darta Pitted Morello Cherries: https://nicolretailer.com/
Made with Birchstead 95% British Beef Burger Pucks & Schär Gluten-Free Mini Brioche Sliders
There’s something deeply satisfying about a slider that tastes like pub-fare but feels handcrafted in your own kitchen. Using top-quality ingredients makes all the difference — that’s why we love the combination of the rich, British beef from Birchstead and the soft gluten-free brioche buns from Schär. The result is a burger slider that’s juicy and flavourful. It is suitable for people avoiding gluten — yet still indulgent, comforting and irresistibly tasty.
This gourmet gluten-free beef sliders recipe is crafted using premium-quality ingredients available exclusively at Nicol Retailer. The Birchstead 95% beef burger pucks offer exceptional flavour and tenderness. Meanwhile, the Schär gluten-free mini brioche buns provide a soft, bakery-style texture perfect for coeliac-friendly cooking. Together, they create a delicious, restaurant-style slider that’s easy to make at home. For more free-from products and premium British meats, explore Nicol Retailer’s full range at https://nicolretailer.com/product-category/butchered-meat/ .
When you pair the 95% beef burger pucks from Birchstead with Schär’s mini brioche sliders, you get a match for pub-style meals, casual dinner parties or cosy at-home feasts. This recipe elevates humble sliders into a rustic dish that looks amazing and tastes even better. Plus, everyone can enjoy it.
Premium Quality Fresh Beef at Nicol Retailer
Discover truly premium-quality, fresh British beef at Nicol Retailer, home to some of the finest cuts and expertly crafted burger pucks available online. Our range includes the exceptional Birchstead British Top Rump Short Rib Cap 95% Beef Burger Pucks, renowned for their rich flavour, tender texture and consistent cooking results. Perfect for home cooks, restaurants and catering businesses, Nicol Retailer provides high-grade, responsibly sourced beef. These products deliver unbeatable taste in every bite. Whether you’re preparing gourmet sliders, family meals or menu-ready dishes, our fresh beef products offer outstanding quality and value — delivered with the reliability and service Nicol Retailer is known for.
How to Make These Delicious Gourmet Sliders
Follow this simple step-by-step guide to recreate the rustic, flavour-packed sliders shown in the recipe:
Create irresistible restaurant-style gourmet beef sliders using Birchstead British 95% beef burger pucks and Schär gluten-free mini brioche sliders. These premium, gluten-free beef sliders feature juicy patties, caramelised onions, and soft brioche buns, perfect for fine dining menus, gastro pubs, catering, and home cooks seeking a luxury bite. Ready in just 30 minutes, this recipe delivers rich flavour, stunning presentation and greater accessibility for gluten-free diners.
Course Gourmet Bar Snack, Main Course, Sharing Platter, Starter
Cuisine Contemporary British, European Fusion, Gourmet Home Cooking, Modern British
Toppings: baby gem lettuce or rocket; slices of gherkin or pickles; tomato slices; mayonnaise, burger sauce, mustard or gluten-free burger sauces of your choice.
Heat the olive oil (and butter if using) in a medium sauté pan over medium-low heat.
Add the thinly sliced onions and a pinch of salt. Stir gently.
Add the thinly sliced onions and a pinch of salt. Stir gently.
Add the brown sugar and balsamic vinegar (if using), stir to combine, and cook a further 5 minutes until onions are soft, sweet and jam-like
Remove from heat and set aside.
Cook the burger pucks
Heat a griddle pan or heavy frying pan over medium-high heat. Lightly oil the surface.
Season each beef puck with a little salt and pepper just before cooking.
Place the pucks on the hot pan. For 57 g patties, cook ~2–3 minutes each side for medium-rare/medium; extend by 1–2 minutes per side for well done (adjust to your preference).
If using cheese, add a slice to each puck about 30 seconds before finishing so it melts nicely.
Once cooked, remove from heat and let rest on a plate.
Prepare the buns
Split the gluten-free mini brioche buns and, if you like, lightly butter/toast them on the hot griddle or a clean pan until just crisp & golden — this adds a nice texture contrast.
Serve & enjoy!
Serve warm, ideally with a side of sweet potato fries, a crisp salad, or even a quick slaw
For a pub-style bite: serve 2 sliders per person with a pint or a soft drink; for a snack platter, include assorted sauces and extra toppings so people build their own.
Notes
For a truly restaurant-quality finish, allow the Birchstead beef patties to reach room temperature before cooking — this ensures even browning and maximum juiciness. Gluten-free buns can soften quickly, so lightly toasting the Schär mini brioche sliders adds structure, enhances flavour, and prevents soaking. Take your time caramelising the onions; slow cooking is what develops their deep, sweet flavour and elevates the entire dish. These sliders are best assembled just before serving so the beef stays hot, the cheese remains melted, and the buns retain their soft texture. Perfect for coeliac-friendly entertaining, party platters, pub-style menus or premium takeaway boxes.
These gourmet gluten-free beef sliders are wonderfully versatile, making them ideal for everything from casual family dinners to laid-back weekend entertaining. To elevate your dish and create a well-rounded meal, here are some delicious serving suggestions that pair beautifully with the juicy Birchstead beef and soft Schär brioche buns.
Classic Pub-Style Sides
For a traditional British pub feel, serve your sliders alongside:
Marinated olives, sun-dried tomatoes, and antipasti
This transforms your dish into a balanced sharing board perfect for game nights, gatherings, or casual celebrations.
Family-Friendly Add-Ons
For a full, comforting dinner, try adding:
Garlic roasted potatoes
Steamed seasonal vegetables
Corn on the cob with herb butter
These sides help round out the meal and make it suitable for all ages.
Premium Star Ingredients — Available at Nicol Retailer
What makes this recipe truly exceptional is the quality of the ingredients — both of which you can conveniently purchase from Nicol Retailer.
The foundation of the dish is the Birchstead British Top Rump Short Rib Cap 95% Beef Burger Pucks. These are made from premium British beef known for its tenderness, rich flavour and superb cooking consistency. These burger pucks offer professional-grade quality, ensuring every slider is juicy, satisfying and packed with natural beef richness.
To complement this, the recipe uses Schär Gluten-Free Mini Brioche Sliders — soft, golden, and buttery in texture. These buns elevate the dish, offering a light sweetness that pairs perfectly with the savoury beef. They also ensure the recipe remains suitable for gluten-free diners. Their bakery-style softness makes them ideal for gourmet sliders, giving you a restaurant-standard result at home.
Nicol Retailer proudly stocks both items, allowing you to source premium beef and high-quality gluten-free brioche buns from one trusted supplier. Whether you’re cooking for family, entertaining guests, or designing a menu for a business, Nicol Retailer ensures you have access to top-tier ingredients that deliver exceptional taste every time.