Bring the Magic of Italian Christmas to Your Kitchen
Panettone is one of the most beloved Christmas bakes in the world. Tall, golden, soft as clouds and filled with fruity sweetness, this Italian Christmas bread has been enjoyed for over 500 years. Its delicate texture, gentle citrus aroma and beautiful domed shape make it a centrepiece dessert for festive gatherings, breakfasts and gifting.
This recipe teaches you how to make a luxury homemade Panettone that is light, airy, buttery and far superior to supermarket versions. With step-by-step instructions and simple ingredients, you can enjoy authentic Italian Christmas baking at home.
Whether served on Christmas morning, paired with coffee, shared with guests, or wrapped as a beautiful homemade gift, this Panettone recipe will fill your home with festive aromas and warm holiday cheer.
A Short History of Panettone – The Pride of Milan
Panettone originates from Milan, Italy, where it was first created during the Renaissance. What began as a simple enriched bread has evolved into the iconic tall, dome-shaped Christmas cake known today. Traditionally, Panettone is made with a long fermentation process that creates its signature airy crumb and rich depth of flavour.
Legend has it that Panettone was invented by a Milanese baker named Toni, which is why many Italians still call it “Pane di Toni” — Toni’s Bread. Today, Panettone is shared across Europe during the festive season, symbolising celebration, generosity and the spirit of Christmas.
According to BBC Good Food, Panettone has been a festive staple in Milan for centuries.
How to Make This Panettone
Making this luxury homemade Panettone is easier than you think. You’ll prepare a rich, buttery dough, knead it until smooth, let it rise slowly, then fold in rum-soaked fruit for extra flavour. After shaping and proving in a tall Panettone case, it’s baked until golden and cooled upside-down to keep its iconic tall, fluffy structure. Follow the simple steps and you’ll have a beautifully soft, fragrant Italian Christmas bread straight from your oven.
Create a soft, buttery and beautifully golden homemade Panettone with this authentic Italian Christmas recipe. Made with enriched sweet dough, citrus zest, rum-soaked raisins and mixed peel, this festive bread is light, airy and irresistibly fragrant. Perfect for gifting, Christmas morning breakfast or serving with coffee, this easy step-by-step Panettone guide delivers bakery-quality results at home.
Course brunch, Dessert, Snack
Cuisine Italian, Traditional Christmas
Diet Vegetarian
Keyword bakery style panettone, Christmas panettone,, holiday baking ideas, homemade panettone, Italian Christmas bread, Italian panettone, panettone recipe, panettone with raisins, sweet bread recipe, traditional panettone
Use room-temperature ingredients for best dough development; cold eggs or milk will slow the rise of this enriched bread.Be patient with rising time—Panettone needs a long, slow prove to achieve its signature tall, airy, cloud-soft texture.High-quality dried fruit makes a big difference. Soak raisins and peel in rum or orange juice to keep them plump and fragrant.The dough will be sticky—this is normal for enriched breads. Avoid adding extra flour; rely on a dough hook to knead properly.Use a Panettone case or tall tin to support the dough as it rises upward instead of spreading outward.Hang the Panettone upside-down after baking to prevent collapse and keep the crumb light and tall—this step is essential for authentic results.Flavour variations: Add chocolate chips, pistachios, amarena cherries, or swap citrus peel for candied fruit.Storage: Wrap tightly in cellophane or foil to keep it soft for 5–7 days.Serving tip: Panettone tastes best slightly warm or lightly toasted and served with butter, mascarpone or a festive cream.
Serve Warm with Butter, Mascarpone or Clotted Cream
Panettone is at its most indulgent when enjoyed slightly warm. Spread each slice with soft salted butter for a rich, comforting finish, or elevate it further with a dollop of silky mascarpone or classic clotted cream. The creamy texture melts into the warm, airy crumb, creating a beautifully luxurious Christmas treat.
Enjoy with Espresso or Hot Chocolate on Christmas Morning
A slice of freshly baked Panettone makes the perfect Christmas morning breakfast. Pair it with a strong Italian espresso for an authentic Milanese experience, or serve with a mug of creamy hot chocolate for a cosy, family-friendly moment. The gentle sweetness of the bread pairs wonderfully with warm festive drinks.
Toast Slices Lightly and Drizzle with Honey
For a quick and irresistible twist, toast thick slices of Panettone until lightly caramelised. Once golden, drizzle with honey or maple syrup for a glossy, fragrant finish. This simple serving idea enhances the citrus notes and adds a gentle crispness while keeping the centre soft and fluffy.
Use Leftovers for Panettone French Toast
Turn leftover Panettone into the ultimate luxury breakfast with Panettone French Toast. Dip slices into a mixture of eggs, cream, sugar and cinnamon, then pan-fry until golden. Serve with berries, syrup or whipped cream. It’s one of the most delicious ways to repurpose leftover festive bread and guaranteed to impress guests.
Wrap in Cellophane and Gift to Friends and Family
Homemade Panettone makes a stunning edible Christmas gift. Wrap the entire loaf in festive cellophane, tie with ribbon and add a gift tag for a thoughtful, artisan-style present. Panettone keeps beautifully when wrapped well, making it ideal for gifting to neighbours, colleagues or loved ones.
Shop Premium Baking Ingredients at Nicol Retailer Limited
Make your Panettone even better with high-quality ingredients available at: Nicol Retailer Limited – Premium Ingredients for Home & Professional Bakers.
The Ultimate Festive Treat That Defines British Christmas
Few foods capture the magic of Christmas quite like the humble mince pie. But when made properly — buttery, golden, generously filled and beautifully spiced — they become something truly unforgettable. This recipe combines soft, melt-in-the-mouth shortcrust pastry with the rich, warming flavour of Chef’s Selections Mincemeat (3kg) from Nicol Retailer Limited. It creates bakery-quality mince pies perfect for gifting, serving, or enjoying fresh from the oven.
Whether you’re celebrating National Mince Pie Day on December 13th or preparing for festive gatherings, this recipe brings together tradition, luxury, and irresistible Christmas flavour in every bite.
The History of Mince Pies — A British Christmas Icon
Mince pies have been part of British festive traditions for over 600 years. Originally made with minced meat, dried fruits and warming spices brought back from the Middle East during the Crusades, they evolved throughout the centuries into the sweet, fruit-rich pies we know today.
By Victorian times, mince pies had become a symbol of generosity and celebration — served warm at festive gatherings and gifted as a gesture of love and good fortune. Today, over 200 million mince pies are eaten in the UK every year. This makes them one of the nation’s most cherished seasonal bakes.
National Mince Pie Day — A Celebration of Festive Baking
National Mince Pie Day, celebrated in the UK every year on 12 December, is a joyful tribute to one of Britain’s most beloved festive treats. It marks the start of the Christmas baking season. Homes fill with the warm aroma of citrus, cinnamon and spiced fruit. It’s the perfect moment to bake a fresh batch of mince pies, share them with loved ones and enjoy the tradition that has been part of British Christmas for centuries. Using Chef’s Selections Mincemeat (3kg) from Nicol Retailer Limited makes this celebration even more delicious. It gives every pie a rich, authentic festive flavour.
How to Make These Delicious Christmas Mince Pies
Making these traditional Christmas mince pies is wonderfully simple and incredibly rewarding. With just a few basic ingredients and the rich, flavour-packed Chef’s Selections Mincemeat (3kg) from Nicol Retailer Limited, you can create bakery-quality mince pies right at home. The process begins with preparing a buttery shortcrust pastry and filling each case generously with spiced mincemeat. Then, bake them to golden perfection. Whether you’re an experienced baker or making mince pies for the first time, this step-by-step guide will help you achieve beautifully festive, perfectly flavoured pies every single time.
Luxury Christmas Mince Pies Using Chef’s Selections Mincemeat
Celebrate the festive season with these beautifully golden, buttery Christmas mince pies made using Chef’s Selections Mincemeat (3kg) from Nicol Retailer Limited. Filled with rich vine fruits, warming spices, citrus zest and optional brandy, these homemade mince pies deliver authentic holiday flavour with a bakery-quality finish. With a crisp shortcrust pastry and perfectly spiced filling, they’re ideal for National Mince Pie Day, Christmas gatherings, gifting, or cosy winter treats. Easy to prepare and irresistibly delicious, this recipe captures the true taste of Christmas in every bite.
Rub flour, salt and cold butter together until breadcrumb-like.
Stir in the caster sugar.
Add the egg and bring together into a dough.
If dry, add 1 tablespoon cold water.
Wrap in clingfilm and refrigerate for 30 minutes.
Prepare the Filling
In a bowl, mix the Chef’s Selections Mincemeat with brandy and/or orange zest for extra festive depth (optional but incredible).
Assemble the Mince Pies
Preheat oven to 200°C (180°C Fan).
Grease a muffin or tart tray.
Roll out pastry to 3mm thickness.
Cut rounds to fit your tray for the bases.
Spoon 1–2 tsp mincemeat into each pastry case.
Top with pastry lids, stars, or festive shapes.
Seal edges gently and brush tops with beaten egg.
Sprinkle with demerara sugar.
Bake
Bake for 18–22 minutes until golden brown and bubbling slightly.
Serve
Cool for 10 minutes, dust with icing sugar, and serve warm with clotted cream, brandy butter or custard.
Notes
For the best flavour, use high-quality Chef’s Selections Mincemeat (3kg) from Nicol Retailer Limited — its rich fruit content and warming spices create a deeper, more authentic Christmas taste than supermarket jars.Chill the pastry for at least 30 minutes before rolling. This helps prevent shrinking and gives the mince pies a delicate, buttery crumb.Do not overfill the mince pies; the filling expands as it bakes. A heaped teaspoon per case is usually perfect.Pastry thickness matters — roll your pastry to about 3mm for the ideal balance of crispness and tenderness.Add orange zest or a splash of brandy to the filling for an extra festive boost.Use festive pastry cut-outs (stars, trees, or hearts) instead of full lids for a lighter, bakery-style pie.Brush with beaten egg for a shiny golden finish, and top with demerara sugar for sparkle and crunch.Storage: Mince pies keep for 3–4 days in an airtight container or can be frozen for up to 2 months.Serving suggestion: Warm slightly and serve with clotted cream, brandy butter, or vanilla custard for a traditional Christmas treat.
These luxuriously spiced Christmas mince pies shine even brighter when paired with the right festive accompaniments. Here are delicious serving ideas that elevate the flavour, texture and presentation — perfect for holiday gatherings, Christmas Eve treats, or National Mince Pie Day celebrations.
Classic Brandy Sauce
Nothing says traditional British Christmas dessert like warm brandy sauce poured generously over a hot mince pie. Smooth, silky and gently boozy, it balances the sweetness of the mincemeat and adds a festive warmth to every bite.
Brandy Butter
Creamy, rich and sweet, brandy butter melts beautifully over warm mince pies. Made with butter, icing sugar and a splash of brandy, it creates an indulgent finish worthy of a Christmas dessert table.
Vanilla Custard
A thick, velvety custard brings comforting warmth and creaminess. Try adding a pinch of nutmeg or cinnamon for a festive twist.
Luxury Vanilla Ice Cream
The contrast of cold, silky ice cream against a hot, freshly baked mince pie is irresistible — ideal for those who prefer a lighter, refreshing finish.
Spiced Whipped Cream
Lightly whipped cream flavoured with cinnamon, nutmeg and a hint of orange zest pairs beautifully with the fruity mincemeat.
Festive Presentation Ideas
Dust pies with icing sugar “snow”
Arrange on a wooden board with holly, cinnamon sticks and dried orange slices
Pack into gift boxes for neighbours or friends
Serve warm on a tiered stand for a Christmas afternoon tea
Shop the Star Ingredient
All you need for these delicious festive mince pies — including the premium Chef’s Selections Mincemeat (3kg) — is available at: Nicol Retailer Limited – https://nicolretailer.com/product/chefs-selections-mincemeat-3kg/
When you want to create a meal that people will talk about long after the plates are cleared, nothing compares to the Birchstead 14-Day Aged Bone-In Carvery Beef Forerib. This majestic, five-bone cut is the crown jewel of traditional British roasting — rich in flavour, intensely tender, and visually stunning with its tall, frenched bones and beautiful marbling.
Aged for 14 days to deepen the natural savoury notes of the beef, this cut delivers a melt-in-the-mouth tenderness and a luxurious buttery finish that rivals any high-end steakhouse or Michelin-starred dining room. When roasted properly, it produces thick, juicy slices with a perfect rosy interior, caramelised crust, and an aroma that fills the entire home with anticipation.
Whether you’re hosting a holiday feast, an elegant Sunday roast, or a special celebration, this recipe brings prestige, theatre and unforgettable flavour to the table. And the best part? Every ingredient used in this recipe — including the show-stopping aged forerib — can be purchased directly from Nicol Retailer Limited, your trusted supplier for premium British meats.
Why This 14-Day Aged Forerib Is the Star of Every Table
When it comes to creating a roast that truly commands the spotlight, the Birchstead 14-Day Aged Bone-In Carvery Beef Forerib stands in a class of its own. This cut is celebrated by chefs, home cooks and meat connoisseurs across the UK for its depth of flavour, luxurious tenderness and dramatic visual appeal. Here’s why this spectacular 5-bone joint is guaranteed to elevate any dining occasion:
Exceptional Ageing for Unmatched Depth of Flavour
Ageing beef for 14 days intensifies its natural savouriness, enriches its umami notes and enhances tenderness without compromising juiciness. This slow ageing creates a buttery texture and full-bodied flavour profile that you simply cannot achieve with standard supermarket beef. The result is a roast that tastes richer, smells more aromatic and slices like premium steak.
Stunning Five-Bone Structure for Dramatic Presentation
Nothing makes an entrance quite like a tall, five-bone forerib roast. Frenched bones rise proudly above the perfectly roasted beef, creating a visually striking centrepiece worthy of a Michelin-star restaurant. Whether you bring it to the table whole or carve between the bones for a theatrical reveal, this cut guarantees admiration — and appetite.
Naturally Marbled for Superior Juiciness and Tenderness
The forerib is one of the most flavourful and tender cuts of beef, thanks to its beautiful natural marbling. As the beef roasts, the marbling melts slowly, self-basting the joint from the inside out. This means consistently moist slices, an incredible melt-in-the-mouth texture and that irresistible beefy richness with every bite.
Perfect Balance of Tradition and Gourmet Cooking
This is a cut steeped in British roasting tradition yet sophisticated enough for gourmet dining. The 14-day ageing process elevates a classic forerib into a celebration-worthy dish. Whether it’s a holiday feast, Sunday roast, Christmas centrepiece or luxury family dinner, this beef transforms familiar flavours into something extraordinary.’
How to Make This Delicious Recipe
Creating this 14-Day Aged Bone-In Carvery Beef Forerib Roast is far easier than its grand appearance suggests — and the results are nothing short of spectacular. With its rich marbling, deep 14-day aged flavour and dramatic five-bone structure, this premium joint from Nicol Retailer Limited delivers restaurant-quality results using simple, reliable techniques.
By following the step-by-step guide below, you’ll learn how to season, sear, roast, rest and carve your forerib to perfection, achieving beautifully even cooking, a caramelised crust, and melt-in-the-mouth tenderness every time. Whether you’re preparing this for a Sunday roast, festive celebration or luxury dinner party, this recipe ensures your beef becomes the unforgettable star of the table:
Indulge in the rich, buttery flavour of this 14-Day Aged Bone-In Carvery Beef Forerib, slow-roasted to perfection for a tender, melt-in-the-mouth finish. This impressive 5-bone joint is expertly aged to deepen flavour and enhance juiciness, making it the perfect centrepiece for Sunday roasts, holiday feasts and special celebrations. Cooked with herbs, garlic and a high-heat crust, then served with a glossy homemade gravy, this luxurious roast delivers restaurant-quality results at home. All ingredients, including the premium Birchstead forerib, can be purchased directly from Nicol Retailer Limited for exceptional freshness and value.
Course Dinner, Holiday Centrepiece, Main Course, Special Occasion Dish, Sunday Roast Alternative
Cuisine Modern European, Steakhouse-Style, Traditional Roast Dinner
Remove the forerib from the fridge 1–2 hours before cooking.
Pat dry thoroughly.
Rub with olive oil, salt, pepper, garlic granules, rosemary and thyme.
Preheat the Oven
Set to 220°C (200°C fan / Gas 7). This high heat will help build the gorgeous crust.
Create the Flavour Base
Place onions, carrots, celery, and garlic in a roasting tray.
Position the forerib bone-side down on top.
Roast Hot, Then Low
Roast for 25 minutes at high heat to develop a crust.
Reduce to 160°C (140°C fan / Gas 3).
Continue cooking for approximately:1 hour 45 minutes → medium-rare2 hours → medium(A 5–6 kg joint may vary slightly depending on your oven.)Internal Temperatures:55°C – medium rare60°C – medium
Rest for Perfect Juiciness
Remove from oven, loosely cover with foil and rest for 45–60 minutes. This step ensures tender, juicy slices.
Make the Gravy
Place roasting tray on the hob.
Stir in flour, add red wine to deglaze, then pour in stock.
Reduce until glossy.
Carve & Serve
Slice between the bones for dramatic presentation.
Serve with gravy and your favourite sides.
Notes
For the juiciest and most flavourful results, always allow your 14-Day Aged Bone-In Carvery Beef Forerib to come to room temperature before roasting — this ensures even cooking throughout the thick joint. Start with a high-heat blast to create a rich, caramelised crust, then reduce the temperature for slow, gentle roasting that preserves tenderness and enhances the natural aged flavour.Resting the beef for at least 45 minutes after cooking is essential, as it allows the juices to redistribute for melt-in-the-mouth slices. Using premium Birchstead aged forerib from Nicol Retailer Limited guarantees exceptional quality, deep beefy richness, and a restaurant-worthy roast every time.
A magnificent joint like the Birchstead 14-Day Aged Bone-In Carvery Beef Forerib deserves sides that enhance its rich flavour, balance its natural fattiness, and create a beautiful restaurant-quality presentation. These carefully selected serving suggestions transform your roast into a luxury dining experience, ensuring every plate looks as spectacular as the beef itself.
Crispy Roast Potatoes — The Essential Classic
No British roast is complete without perfectly crisp, fluffy roast potatoes. For best results:
Parboil until edges soften
Shake in the pan to roughen
Roast in beef dripping from Nicol Retailer for unbeatable flavour
The golden crunch pairs beautifully with the buttery tenderness of the aged forerib.
Honey-Glazed Carrots & Parsnips — A Touch of Sweetness
These roasted roots bring a natural sweetness that balances the richness of the beef. Dress with:
Honey
Fresh thyme
Cracked black pepper
A drizzle of olive oil
This side adds colour, shine, and irresistible caramelisation to your plating.
Buttery Greens for Balance & Freshness
To cut through the luxurious fattiness of aged beef, serve vibrant green sides such as:
Tenderstem broccoli
Green beans with garlic butter
Charred asparagus
Savoy cabbage tossed in butter
These add a clean, fresh finish and elevate the plate with vivid colour.
Garlic Butter Mushrooms — Rich and Earthy
Pan-fried mushrooms cooked in butter, garlic and thyme echo the earthy, savoury notes of the aged beef. They also add moisture and depth, making them a Michelin-style addition.
Whole Roasted Garlic Bulbs — Luxury Garnish
Slow-roasted garlic bulbs become soft, sweet and spreadable. Serve whole on the platter or squeeze over beef slices for rich, aromatic flavour.
Fresh Salad for Lightness
A crisp salad brings brightness to balance the richness. Try:
Rocket, parmesan & balsamic glaze
Watercress with lemon dressing
Baby gem Caesar salad
Refreshing, colourful and perfect for lighter palates.
Rich and Glossy Red Wine Gravy
A beautifully reduced gravy is essential for Michelin-level presentation. Use:
Beef drippings from the roasting tray
Red wine
Beef stock from Nicol Retailer
A touch of Worcestershire sauce
Silky, rich and deeply flavoured, it ties the whole meal together.
Michelin-Style Plating Inspiration
For a fine-dining finish, plate like a professional chef:
Fan out the sliced beef for dramatic colour contrast
Add roasted heritage carrots for height
Spoon red wine jus artfully around the plate
Garnish with fresh thyme or rosemary
Present the full five-bone roast at the table for a theatrical reveal
Shop Every Ingredient from Nicol Retailer Limited
Ready to Create This Luxury Roast at Home?
Bring restaurant-quality dining straight to your kitchen with the Birchstead 14-Day Aged Bone-In Carvery Beef Forerib. Order premium British beef, chef-grade ingredients and gourmet essentials directly from Nicol Retailer Limited — your trusted supplier for exceptional flavour and unbeatable value.
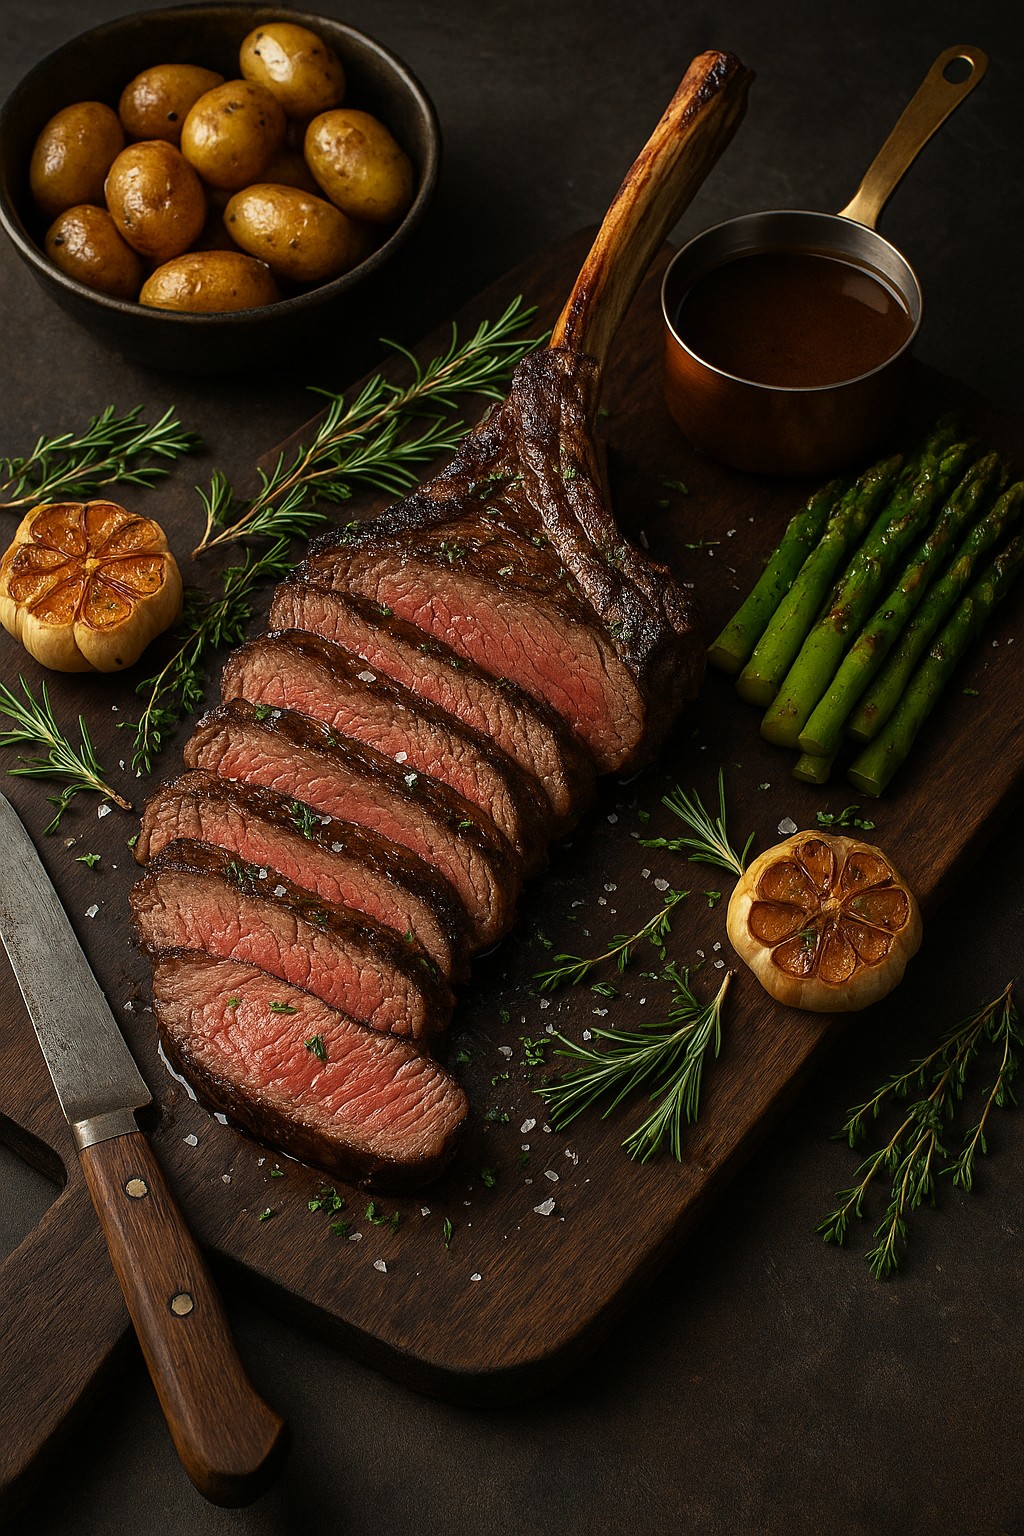
A Showstopper Meal That Everyone Will Remember – Introducing our 14-Day Aged Tomahawk Steak Recipe, an unforgettable culinary experience that will leave your guests talking for weeks.
If you’re searching for a recipe that turns a meal into a moment, look no further than the Birchstead 14-Day Aged Beef Tomahawk Steak. This dramatic bone-in rib steak is the crown jewel of luxury dining — deeply marbled, beautifully matured, and visually striking. With its long rib bone and impressive size, the tomahawk steak is a centrepiece that instantly elevates any dinner table.
Aged for 14 days to intensify flavour and tenderness, this premium cut cooks beautifully with minimal effort. With the right heat, the right technique, and the right ingredients — all of which you can buy directly from Nicol Retailer Limited — you can achieve a steakhouse-quality result at home, without the expensive restaurant bill.
Whether you’re cooking for a birthday celebration, a weekend feast, or a special occasion with family and friends, this recipe guarantees a rich, buttery, melt-in-the-mouth experience that will leave everyone wanting more.
Why You’ll Love This 14-Day Aged Tomahawk Steak
If you’ve ever wanted to recreate a luxury steakhouse experience at home, this Birchstead 14-Day Aged Tomahawk Steak gives you everything you need: premium flavour, dramatic presentation, and a melt-in-the-mouth tenderness only found in properly aged beef. This is more than just a steak — it’s a centrepiece that transforms an ordinary meal into an unforgettable moment. Here’s why this recipe stands out among all steak dishes and why it’s quickly becoming a favourite for home chefs and food lovers across the UK:
Aged for Deep, Rich, Unmatched Flavour
This steak is aged for 14 days, intensifying its natural beefiness and creating a depth of flavour that cheaper, non-aged cuts simply can’t match. The ageing process enhances tenderness and produces that signature buttery, savoury richness people associate with high-end restaurants
Incredible Marbling for Juicy, Tender Results
The Birchstead tomahawk steak is beautifully marbled, meaning each bite is incredibly juicy and tender. As the fat melts during cooking, it bastes the meat from within, giving you a luxurious texture and flavour every single time.
Dramatic Bone-In Steakhouse Presentation
The long rib bone gives this steak its iconic “tomahawk” look — making it the perfect showstopper for celebrations, date nights, dinner parties and special occasions. When carved and presented on a platter, it looks like something straight out of a Michelin-star kitchen.
Surprisingly Easy to Cook at Home
Though impressive in size, this tomahawk steak is simple and forgiving to cook. With a hot sear, oven finish and a short rest, your steak will be perfectly pink, tender and juicy. Whether you’re experienced or new to steak cookery, you’ll achieve restaurant-quality results.
Better Value Than Eating Out
Enjoying a tomahawk steak in a fine-dining restaurant can cost a small fortune — but by buying premium ingredients directly from Nicol Retailer Limited, you enjoy the same quality at a far better price. You get a gourmet experience without the luxury price tag.
Premium Quality From Trusted British Suppliers
The Birchstead tomahawk steak is sourced with care and quality in mind — and when purchased from Nicol Retailer Limited, you have the peace of mind of knowing you’re buying high-grade, expertly handled British produce.
Perfect for Any Special Occasion
Birthdays, Father’s Day, Valentine’s Day, Christmas, anniversaries, Sunday feasts — this steak elevates all of them. It’s a dish made for special moments, celebrations and gatherings where great food brings people together.
Fully Customisable with Flavours & Sides
Serve it with garlic butter, chimichurri, red wine jus, charred vegetables, triple-cooked chips — the possibilities are endless. This steak’s versatility makes it fit any style, whether rustic, gourmet or modern fine dining.
How to Make the Ultimate Tomahawk Steak (Step-by-Step Guide)
Cooking a 14-Day Aged Tomahawk Steak might look impressive and intimidating, but with the right method and a few chef-approved techniques, it’s surprisingly simple to achieve a restaurant-quality result at home. This bone-in rib steak is thick, flavour-packed, and perfect for high-heat searing followed by gentle roasting in the oven. Whether you want a perfectly pink medium-rare centre or a more well-done finish, this guide walks you through every step clearly. Using premium British beef from Nicol Retailer Limited, you’ll learn how to sear, baste, roast, rest, and carve your tomahawk like a professional chef — ensuring juicy, tender, flavourful results every time.
14-Day Aged Beef Tomahawk Steak – The Ultimate Luxury Feast
Elevate your next meal with this Birchstead 14-Day Aged Beef Tomahawk Steak — a premium cut known for exceptional flavour, tenderness, and dramatic presentation. With rich marbling, full beef flavour, and a bone-in design worthy of a high-end steakhouse, this tomahawk transforms any dinner into a luxury dining experience. Follow our step-by-step guide to create a mouth-watering masterpiece at home using ingredients available directly from Nicol Retailer Limited.
Course Celebration Dish, Dinner, Gourmet Weekend Meal, Main Course, Special Occasion Dish
Cuisine English, Gourmet Home Cooking, Modern European, Steakhouse
Remove the tomahawk from the fridge 45–60 minutes before cooking. Pat dry and season heavily with salt & pepper.
Sear for a Crust
Heat olive oil in a cast-iron pan.
Sear the steak for 3–4 minutes per side, including the bone edge.
Add butter, garlic, and herbs, then baste the steak for 1 minute.
Oven Roast
Transfer the pan to a 200°C (180°C fan) oven. Cook for:18–22 minutes → medium rare22–25 minutes → medium
Rest the Steak
Rest under foil for 10–15 minutes so juices redistribute.
Carve & Serve
Slice thickly against the grain and arrange on a warm platter for dramatic presentation.
Red Wine Jus (Serves 4)
Sauté the shallot and garlic in the same pan.
Add red wine and reduce by half.
Add beef stock + thyme and simmer to glossy thickness
Strain and serve with the sliced steak.
Notes
For best results, allow your Birchstead 14-Day Aged Beef Tomahawk Steak to reach room temperature before cooking — this ensures even heat distribution and maximum tenderness. Always sear the tomahawk over high heat to create a rich, caramelised crust, then finish in the oven for perfect doneness.Resting the steak for 10–15 minutes is essential, as it keeps the meat juicy and enhances flavour. For deeper richness, baste generously with butter, garlic, and herbs, and serve with a simple red wine jus to elevate this premium cut into a restaurant-quality experience. All ingredients can be purchased directly from Nicol Retailer Limited, making it easy to recreate a luxury steakhouse feast at home.
A 14-Day Aged Tomahawk Steak deserves sides that complement its rich flavour, buttery tenderness, and steakhouse-style presentation. The right accompaniments elevate your beef to a luxury dining experience — turning a simple meal into a gourmet feast. These serving suggestions are designed to balance flavour, add colour, and create a visually stunning plate that will make your guests feel like they’re dining in a premium British steakhouse.
Creamy Mashed Potatoes or Truffle Mash
A perfectly smooth mashed potato is a classic steak pairing — but for a true restaurant-level upgrade, mix in truffle butter, white truffle oil, or roasted garlic. The creamy texture pairs beautifully with the tender beef, while truffle adds irresistible depth and luxury.
Triple-Cooked Chips or Crispy Roast Potatoes
If you’re looking for crunch, triple-cooked chips or golden roasted potatoes are the ultimate choice. Their crisp exterior contrasts beautifully with the juicy steak, making every bite more satisfying.
Charred Greens for Freshness & Balance
Add colour and freshness with vegetables that stand up to the richness of the beef. Try:
Charred asparagus
Tenderstem broccoli
Sautéed green beans
Grilled courgettes
Lightly season with sea salt, olive oil, and lemon zest for a bright, clean finish that balances the dish.
Garlic Butter Mushrooms or Creamy Spinach
For extra richness, serve your tomahawk with buttery mushrooms or silky creamed spinach. Garlic mushrooms enhance the beef’s umami flavours. Creamed spinach brings comforting creaminess while keeping the meal balanced.
Roasted Garlic Bulbs for Sweetness & Aroma
Slow-roasted garlic bulbs add a fragrant, caramelised sweetness that pairs perfectly with aged beef. Simply squeeze the softened cloves alongside each slice of steak — divine!
A Crisp Side Salad
To lighten the meal, serve a fresh salad with vibrant textures:
It helps cut through richness and refresh the palate.
Red Wine Jus — A Must-Have Finishing Touch
A glossy, reduced red wine jus poured over the carved tomahawk intensifies flavour, adds moisture, and gives the dish a professional finish. This sauce ties every component together and elevates your plate from delicious to extraordinary.
Special Occasion Serving Style
For birthdays, Father’s Day, Christmas, or celebrations:
Serve the tomahawk on a wooden carving board
Present the bone whole, then slice thickly for dramatic effect
Add roasted rosemary sprigs for aroma
Pour the jus tableside for a luxury dining moment
Shop All Ingredients from Nicol Retailer Limited
Create this show-stopping 14-Day Aged Tomahawk Steak with confidence by sourcing all your ingredients directly from Nicol Retailer Limited. From the premium Birchstead 14-Day Aged Beef Tomahawk Steak to fresh herbs, aromatics, and gourmet essentials, Nicol Retailer provides everything you need to bring restaurant-quality cooking into your home. With trusted British sourcing, exceptional product quality, and competitive pricing, Nicol Retailer makes it easy to shop for luxury ingredients in one place — without the inflated costs of high-end supermarkets or steakhouses. Visit NicolRetailer.com to explore the full range and elevate every meal with chef-grade results.
When it comes to creating a memorable meal that leaves everyone in awe, few dishes can match the elegance and indulgence of a Beef Wellington. This Supreme Beef Wellington with Red Wine Jus is the ultimate showstopper for any festive occasion, holiday dinner, or special celebration.
Wrapped in Jus-Rol Puff Pastry, this dish features a tender, succulent premium beef fillet paired with earthy mushroom duxelles and savoury prosciutto. The perfect golden, flaky crust completes it. Finished with a luxurious red wine jus, this dish isn’t just about taste—it’s an experience that will wow your guests. It makes any meal unforgettable.
With this step-by-step guide, you’ll learn how to elevate your cooking with Jus-Rol Puff Pastry Block (1.5kg). This is a versatile, premium-quality pastry that delivers the perfect flaky texture every time. Whether you’re cooking for a festive family gathering or a Michelin-style dinner at home, this Beef Wellington is the epitome of fine dining made easy.
Why You’ll Love This Supreme Beef Wellington
This Supreme Beef Wellington is more than just a dish; it’s a culinary experience that combines rich, tender beef fillet, earthy mushrooms, and buttery Jus-Rol Puff Pastry. It is all enveloped in golden perfection. Whether you’re preparing for a Christmas feast, a special celebration, or a luxurious dinner party, this dish is guaranteed to impress. The beauty of this recipe lies not only in its flavour but also in how simple, premium ingredients come together. This creates a show-stopping centrepiece. Here’s why this Beef Wellington is an absolute must-try.
How to Make Supreme Beef Wellington with Red Wine Jus
Creating the perfect Supreme Beef Wellington requires precision. However, with the right ingredients and techniques, it becomes a showstopper that will leave everyone at the table impressed. This recipe combines the tenderness of premium beef fillet, the rich, savoury flavour of mushroom duxelles, and the crispiness of Jus-Rol Puff Pastry. Together, they create a luxurious dish worthy of any special occasion.
Follow this step-by-step guide to achieve the perfect Wellington, with a glossy red wine jus that adds the perfect finishing touch. Whether you’re making this for Christmas, a birthday, or just a celebration at home, you’ll feel like a Michelin-star chef in no time.
Experience pure gourmet indulgence with this Supreme Beef Wellington with Red Wine Jus — a Michelin-style showstopper featuring premium beef fillet wrapped in wild mushroom duxelles, savoury prosciutto, and buttery, flaky Jus-Rol Puff Pastry. Slow-seared for rich flavour and baked to golden perfection, this luxurious centrepiece is paired with a glossy homemade red wine jus and beautifully presented with seasonal vegetables for the ultimate festive, celebratory or special-occasion meal. Perfect for Christmas dinners, romantic evenings, or dinner-party entertaining, this Beef Wellington delivers restaurant-quality elegance straight from your home kitchen.
Course Christmas Centrepiece, Christmas Dinner, Festive Main, Gourmet Weekend Meal, Main Course, Special Occasion Dish
Cuisine Balkan / Southeast European Cuisine, Contemporary British, English, Festive Cuisine, Fine Dining, Modern European
Season the fillet generously. Heat olive oil in a heavy pan until smoking hot.
Sear on all sides (2–3 minutes), including the ends, until beautifully browned.
Sear on all sides (2–3 minutes), including the ends, until beautifully browned.
Make the Duxelles
In the same pan, add butter, mushrooms, shallot, garlic and thyme. Cook until all liquid evaporates and the mixture becomes a thick paste. Season lightly and let cool completely.
Wrap the Beef
Lay out cling film. Arrange prosciutto slices into a tight rectangle.
Spread the mushroom duxelles evenly over the prosciutto.
Place the chilled beef in the centre and roll tightly using the cling film.
Chill for 20 minutes to firm.
Encase in Puff Pastry
Roll out Jus-Rol Puff Pastry into a large rectangle.
Place the wrapped fillet onto the pastry.
Fold pastry over the beef, trim excess, and seal edges well.
Score the pastry lightly for decoration and brush generously with egg wash.
Chill again for 10–15 minutes.
Bake
Preheat oven to 200°C (180°C fan).
Bake the Wellington for 35–40 minutes for medium rare.
Remove from oven and rest for 10 minutes before slicing.
Red Wine Jus
Sauté shallot and garlic in butter until softened.
Pour in red wine and reduce by half.
Add beef stock, thyme, and Worcestershire sauce.
Simmer until glossy and lightly thickened.
Strain and season to perfection.
Notes
Pro Tips for the Perfect Beef WellingtonChill for clean layers Always chill the beef after searing and after wrapping in prosciutto and pastry. This helps the Wellington hold its shape and creates those clean, restaurant-style slices. Keep the duxelles dry Cook the mushroom mixture until all moisture evaporates. A dry duxelles prevents soggy pastry and gives the Wellington its signature rich, earthy flavour. Use high-quality puff pastry For the most luxurious, flaky crust, use Jus-Rol Puff Pastry Block. Roll it evenly and score lightly for a beautiful golden finish. Don’t skip the resting time Let the Wellington rest 10 minutes after baking. This keeps the meat juicy and prevents the pastry from collapsing when sliced. Brush with egg wash twice Two thin layers of egg wash create a glossy, deeply golden crust worthy of a Michelin-style presentation. Use a thermometer for precision For perfect doneness:
52–54°C – rare
55–57°C – medium-rare (ideal)
58–60°C – medium
Reduce the red wine jus well Take your time reducing the jus until it coats the back of a spoon. A glossy, concentrated jus elevates the whole dish. Serve with colour and contrast Pair with roasted carrots, charred greens, or buttered potatoes to create a beautiful, festive, Instagram-worthy plate.
The Supreme Beef Wellington is the ultimate centerpiece, and it deserves sides that complement its rich, decadent flavour. Whether you’re serving it for a holiday feast, a romantic dinner, or a gourmet celebration, these sides will elevate your dish to new heights. Here are some of the best ways to serve and enjoy your Beef Wellington:
Creamy Mashed Potatoes or Truffle Mash
A rich, buttery mashed potato is the perfect partner to Beef Wellington. The smooth texture complements the crispy pastry and tender beef beautifully. For an extra luxurious touch, swap the regular butter for truffle butter or drizzle with truffle oil to bring an earthy richness to the plate.
Buttered Seasonal Greens
A simple side of buttered green beans, tenderstem broccoli, or steamed asparagus adds a fresh contrast to the richness of the Wellington. The light, crisp flavours of these vegetables balance the heavy, savoury notes of the beef and puff pastry.
Roasted Root Vegetables
Roast a medley of carrots, parsnips, and for a naturally sweet and hearty side. Seasoned with herbs like rosemary and a drizzle of olive oil, these vegetables add both colour and depth to the dish, providing a perfect counterpoint to the richness of the Wellington.
Red Wine Jus
The red wine jus isn’t just a sauce — it’s the finishing touch that ties everything together. Rich, velvety, and slightly tangy, the jus adds depth to every bite of beef. For a more indulgent experience, drizzle the jus over the mashed potatoes and vegetables as well.
Garlic Mushrooms or Creamed Spinach
For an even more luxurious feel, garlic mushrooms or creamed spinach make excellent accompaniments. The earthiness of the mushrooms and the creamy texture of the spinach elevate the dish while adding extra layers of flavour.
Crusty Bread or Yorkshire Puddings
If you want a truly British experience, serve your Beef Wellington with freshly baked Yorkshire puddings. They are light, airy, and perfect for soaking up the red wine jus. Alternatively, serve with crusty bread for an authentic, rustic touch.
Wine Pairing Recommendations
To complement the richness of the Wellington, choose a full-bodied red wine, such as Cabernet Sauvignon, Syrah, or Bordeaux. The wine’s tannins and acidity will cut through the richness of the pastry and meat, balancing the dish perfectly. Alternatively, a glass of Chablis or Chardonnay also pairs beautifully, offering a crisp contrast to the rich flavours of the beef.
Holiday Serving Ideas
For Christmas or New Year’s Eve, serve your Beef Wellington with elegant sides like roasted Brussels sprouts, cranberry sauce, and brandy-infused gravy for a festive twist. The sweetness of the cranberries and the richness of the gravy elevate the flavours, making it the ideal holiday dish that will impress all your guests.
Pro Tip for Leftovers
Leftovers from your Beef Wellington can be used to create gourmet sandwiches. Serve them on fresh artisan bread with a dollop of horseradish cream or mustard. The flaky pastry and tender beef stay delicious the next day. This offers a whole new way to enjoy this amazing dish!
By pairing your Supreme Beef Wellington with these elegant sides and wine pairings, you’ll create an unforgettable meal that is guaranteed to impress. Whether you’re hosting a gourmet dinner party, a holiday celebration, or a casual Sunday roast, these complementary dishes ensure your Wellington is the star of the show.
Where to Buy – Premium Ingredients from Nicol Retailer Limited
Every ingredient used in this Supreme Beef Wellington with Red Wine Jus can be purchased directly from Nicol Retailer Limited. They are your trusted supplier for chef-quality ingredients, premium British produce, and professional-grade essentials. From the rich, golden Jus-Rol Puff Pastry Block (1.5kg) to high-quality beef fillet cuts, fresh herbs, and gourmet pantry staples, Nicol Retailer offers everything you need. You can recreate this luxury dish at home.
As one of the UK’s leading online retailers for home cooks, chefs, and food enthusiasts, Nicol Retailer Limited is committed to exceptional quality, competitive pricing, and fast delivery—helping you shop with confidence and cook with excellence. By sourcing your ingredients from Nicol Retailer, you’re choosing superior freshness and flavour while supporting a trusted British brand that prioritises reliability and value.
A luxurious, no-bake dessert bursting with flavour — created by Nicol Retailer Limited.
If you’re searching for a dessert that delivers instant indulgence with minimal effort, you’ve just found your new favourite. This Warm Morello Cherry Compote with Vanilla Mascarpone Cream is the perfect balance of tangy, rich and velvety-smooth. It’s a restaurant-quality treat made effortlessly at home.
Made using Darta Pitted Morello Cherries from Nicol Retailer Limited, this recipe celebrates the bold, natural flavour of real cherries. Each spoonful is a beautiful contrast of flavours: warm, glossy cherry compote melting into cool, creamy mascarpone with hints of vanilla. It’s elegant, comforting and guaranteed to impress.
Whether you’re hosting a dinner party, treating yourself to something special, or looking for a showstopping dessert that’s ready in minutes — this recipe delivers every time. No baking. No fuss. Just pure flavour.
How to Make This Delicious Dessert
Creating this luxurious Morello Cherry & Mascarpone dessert couldn’t be easier — and you don’t need any baking skills to achieve a restaurant-quality result. Using rich, tangy Darta Pitted Morello Cherries from Nicol Retailer Limited, this recipe comes together in just minutes. It blends warm cherry compote with silky vanilla mascarpone for the perfect balance of sweetness, creaminess, and vibrant flavour. Whether you’re preparing a quick treat, entertaining guests, or looking for a showstopping dessert with minimal effort, this step-by-step method will guide you to a stunning result every time:
Warm Morello Cherry Compote Over Vanilla Mascarpone Cream
This irresistible no-bake dessert combines the bold, tangy flavour of Darta Pitted Morello Cherries with the silky richness of vanilla mascarpone cream for a luxurious treat ready in minutes. Warm cherries simmer into a glossy compote that melts beautifully over cool, whipped mascarpone, creating the perfect balance of sweet, tart and creamy. Elegant enough for entertaining yet simple enough for everyday indulgence, this quick 17-minute recipe is ideal for dinner parties, romantic desserts or effortless weeknight treats. Made with high-quality Morello cherries from Nicol Retailer, it delivers authentic flavour, stunning presentation and guaranteed satisfaction in every spoonful.
Course Dessert, Dinner Party Dessert, No-Baked Desset
Cuisine British (with a modern twist), European, Italian
Add cherries, a splash of cherry juice, sugar, vanilla and lemon juice to a small saucepan.
Simmer gently for 5–7 minutes until warm, glossy and slightly thickened.
Set aside (keep warm)
Prepare the Vanilla Mascarpone Cream
In a bowl, whisk mascarpone, double cream, icing sugar and vanilla until soft and creamy.
Chill for 10 minutes for the perfect texture.
Assemble the Dessert
Spoon a generous layer of mascarpone cream into bowls or glasses.
Top with warm Morello cherry compote.
Finish with crushed biscuits, mint, or chocolate shavings.
Notes
For the best flavour, always use high-quality Morello cherries like the Darta Pitted Morello Cherries from Nicol Retailer. Their natural tartness balances perfectly with the rich mascarpone cream.This recipe is no-bake and ready in under 15 minutes, making it ideal for quick desserts, entertaining, or when you need something impressive with minimal effort.To lighten the dessert, you can use reduced-fat mascarpone or single cream, or replace part of the cream with Greek yogurt for extra freshness.Make the mascarpone cream ahead and keep it chilled; warm the cherry compote just before serving for the perfect temperature contrast.Add crunch by topping with crushed biscuits, granola, toasted nuts, or dark chocolate curls for added texture and flavour.This recipe is naturally vegetarian and can be made gluten-free by using gluten-free biscuits or omitting them entirely.Serve in glass dessert cups or bowls to show off the layers — it enhances presentation and looks stunning for dinner parties.Leftover cherry compote can be used on pancakes, porridge, yoghurt bowls, waffles, cheesecakes or ice cream, making it a versatile addition to your kitchen.
This Warm Morello Cherry Compote with Vanilla Mascarpone Cream is incredibly versatile. It is perfect for everything from elegant dinner parties to cosy family nights in. The rich, tangy flavour of the Morello cherries pairs beautifully with the cool, silky mascarpone, allowing you to create a dessert experience that feels indulgent, comforting, and effortlessly sophisticated.
Serve this dessert in glass tumblers, mini ramekins, cocktail glasses or dessert bowls to showcase the vibrant cherry colours and creamy layers. For added texture and flavour, sprinkle the top with crushed shortbread, biscotti crumbs, toasted almonds, granola clusters, or dark chocolate curls. These small touches elevate the presentation and create a restaurant-quality finish.
This morello cherry dessert also pairs wonderfully with:
Fresh mint leaves for a refreshing aroma and burst of colour
A drizzle of dark chocolate for a richer, more decadent twist
Toasted hazelnuts or pistachios for crunch and earthiness
A scoop of vanilla or cherry ice cream for extra indulgence
A dollop of whipped cream for added lightness
Crisp almond tuiles or wafers to add elegance
This dessert shines as a:
Showstopping dinner party finale
Easy make-ahead dessert
Romantic date-night treat
Festive Christmas or Valentine’s Day pudding
Summer evening sweet course
No matter the occasion, this recipe turns simple ingredients into something extraordinary — and every spoonful delivers a perfect balance of tart cherries and luscious vanilla cream.
A Taste of Southern Italy, Crafted for Pure Indulgence
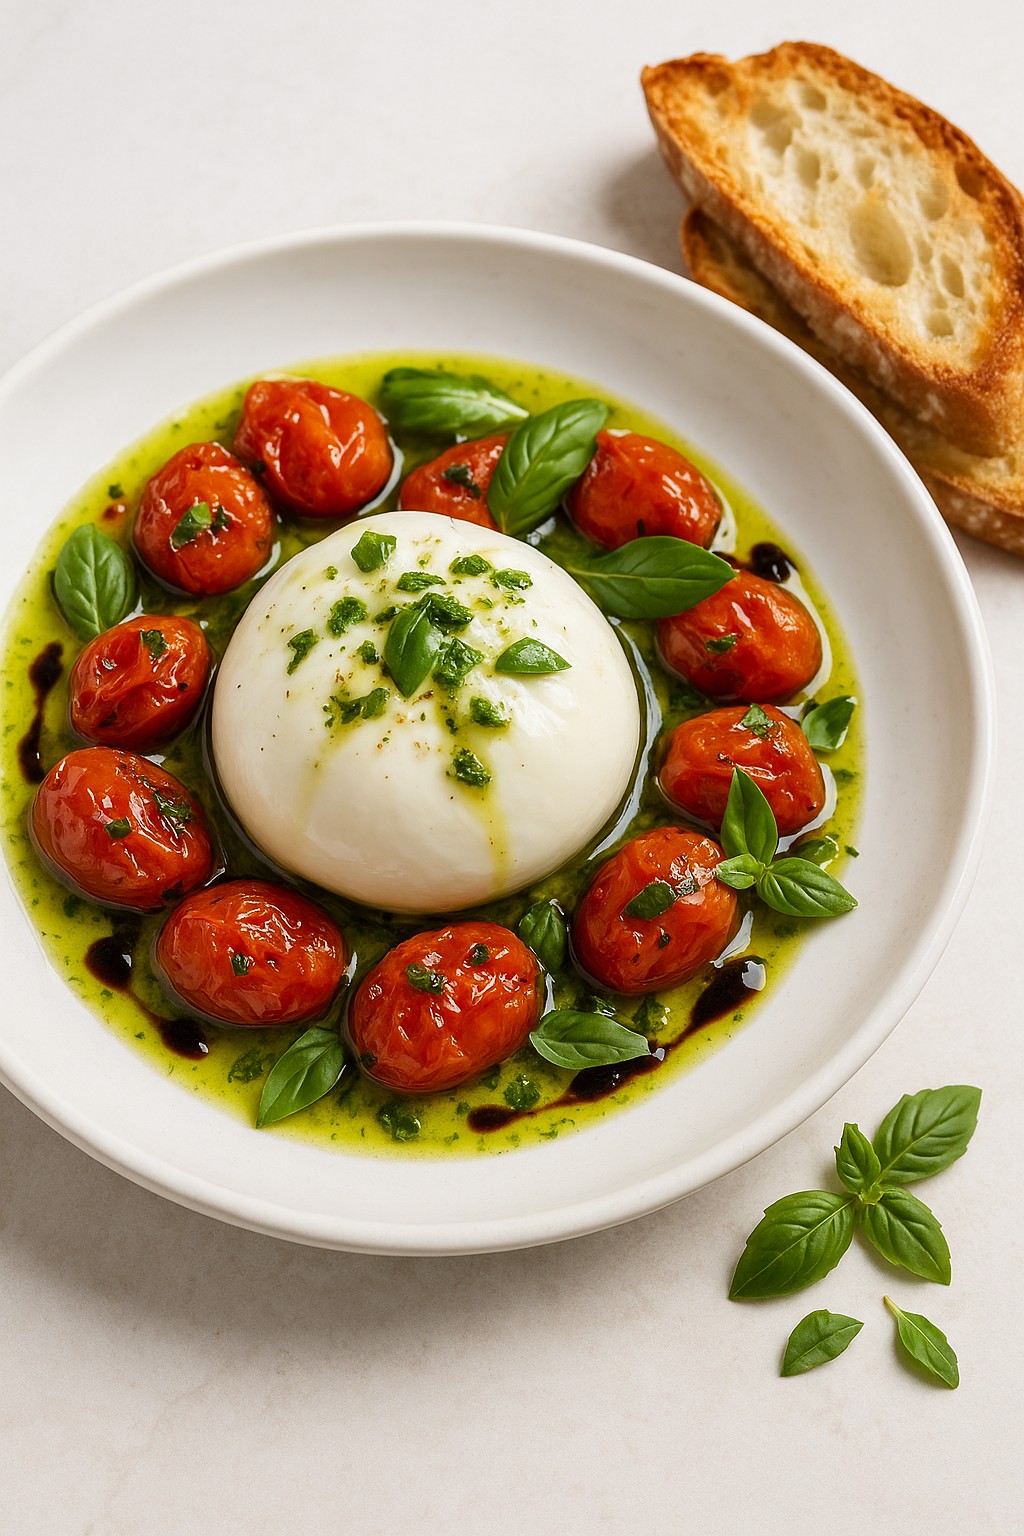
Few dishes capture the heart of Italian cuisine as effortlessly as Burrata di Puglia. Silky on the outside, rich and creamy on the inside, this luxurious cheese transforms even the simplest ingredients into something extraordinary. Our recipe — roasted cherry tomatoes, fresh basil oil and balsamic glaze — celebrates everything people love about this iconic Italian treasure.
Burrata comes from Puglia, a sun-soaked region in Southern Italy famous for its olives, tomatoes and artisanal cheeses. Created in the early 1900s by local cheesemakers, burrata was originally a clever way to use up leftover mozzarella curds known as stracciatella. These creamy ribbons were wrapped in a delicate mozzarella shell, creating the signature “burst of cream” we adore today.
Traditionally stored in fresh asphodel leaves to maintain its moisture, burrata was once a rare, regional delicacy. Over the years, its unique texture and indulgent flavour made it a global sensation. Today, it is loved by chefs, home cooks, and food lovers everywhere.
Why Burrata Is So Popular
Burrata has become nothing short of a global food obsession — and for good reason. It combines everything people love about Italian cuisine: simplicity, indulgence, freshness and pure comfort. But its popularity goes much deeper than just flavour.
The Ultimate Creamy Indulgence
At the heart of burrata is stracciatella — soft ribbons of fresh curd mixed with cream. When you slice open the mozzarella shell and the creamy centre spills out, it creates a sensory moment that diners never forget. It feels luxurious, yet completely natural. This makes it stand out from every other cheese.
A Chef’s Secret for Instant Elegance
Restaurants around the world adore burrata because it adds a “wow factor” with almost no effort. Place it on a plate with seasonal vegetables, drizzle a little oil, and that’s it — you’ve created a dish that looks (and tastes) like fine dining. Home cooks quickly fell in love for the same reason. Burrata transforms simple meals into something extraordinary.
Taste of Authentic Italian Craftsmanship
Food lovers appreciate burrata because it represents true artisanal tradition. Handmade in Puglia using time-honoured cheesemaking techniques, burrata feels like a small piece of Italy on your plate. That cultural authenticity — combined with its luxurious texture — gives it huge global appeal.
Light, Fresh and Comforting
Unlike many cheeses, burrata is indulgent yet refreshing. The mixture of cream and curd creates a lightness that feels clean rather than heavy. It satisfies cravings without overpowering, making it ideal for modern, health-conscious eaters who still want to enjoy rich, flavourful food.
Discover the Magic of Burrata di Puglia – A Creamy Taste of Italy at Its Finest
If you’re searching for a recipe that combines effortless elegance with unforgettable flavour, this Burrata di Puglia with Roasted Tomatoes & Basil Oil is the perfect place to begin. Loved for its silky exterior and irresistibly creamy centre, burrata has become one of the world’s most celebrated cheeses — and for good reason. In this dish, the warmth of blistered cherry tomatoes meets the cool luxury of fresh burrata. This creates a restaurant-quality experience you can enjoy at home in minutes. Whether you’re planning a dinner party, elevating a family meal, or simply treating yourself, this recipe delivers pure indulgence with every bite. Made using authentic Burrata di Puglia from Nicol Retailer Limited, it’s the perfect way to bring the flavours of Southern Italy straight to your table.
A beautifully simple yet luxurious Italian dish, this Burrata di Puglia with roasted tomatoes and basil oil delivers creamy indulgence, vibrant flavour and restaurant-quality elegance in every bite — the perfect way to elevate any meal effortlessly.
Course Antipasti, lunch, Sharing Plate, Side Dish, Starter
Cuisine Italian
Diet Vegetarian
Keyword Authentic Italian cheese recipe, Best burrata to buy UK, Burrata di Puglia recipe, Burrata with roasted tomatoes, Creamy burrata dish, Easy Italian appetiser, Fresh burrata recipe UK, Italian burrata starter, Mediterranean recipe ideas, Nicol Retailer burrata, Vegetarian Italian recipes
Drizzle with olive oil, crushed garlic, salt and pepper.
Roast for 12–15 minutes, until soft, blistered and aromatic.
Make the Basil Oil
Finely chop a generous handful of basil.
Mix with 2 tbsp olive oil and a small pinch of salt.
Set aside for flavours to infuse.
Plate the Burrata
Use a large serving platter or divide across four plates.
Place one burrata ball on each half of the platter.
Arrange the warm roasted tomatoes evenly around the burrata.
Drizzle & Garnish
Pour the basil oil over the burrata.
Add a swirl of balsamic glaze.
Tear fresh basil leaves over the top.
Serve Immediately
Enjoy with toasted sourdough or ciabatta for dipping.
Notes
For the best flavour and texture, use authentic Burrata di Puglia, as its rich, creamy centre pairs perfectly with warm roasted tomatoes and fresh basil. Serve immediately after plating to enjoy the full silkiness of the burrata. This recipe works beautifully as a starter, light lunch or sharing dish, and can be made gluten-free by serving with GF bread. Fresh, high-quality ingredients make all the difference — especially real Italian burrata, available to buy at Nicol Retailer.
To enjoy this dish at its absolute best, serve your Burrata di Puglia with Roasted Tomatoes & Basil Oil the moment it’s plated — timing is everything. The gentle warmth of the roasted tomatoes softens the burrata just enough. This creates that ultra-creamy centre everyone falls in love with.
Place the burrata proudly in the centre of the plate and let the tomatoes pool around it, allowing the basil oil and balsamic glaze to mingle into a glossy, flavour-packed sauce. Serve with thick slices of toasted sourdough, ciabatta or focaccia, perfect for scooping up every silky, indulgent mouthful.
For a more complete Mediterranean experience, pair the dish with:
This recipe also shines as a show-stopping starter for dinner parties, an elegant shared antipasti dish, or a fresh summer lunch when you want something light yet luxurious. Add a sprinkle of flaky sea salt, a crack of black pepper and a final swirl of extra virgin olive oil just before serving. This adds a gourmet finish.
Whether enjoyed as a centrepiece or part of a larger spread, this burrata dish brings the pure flavours of Italy straight to your table — simple, fresh and undeniably beautiful.
Shop the Fresh Ingredients for This Recipe at Nicol Retailer
Creating this luxurious Italian dish is easy when you start with the finest ingredients — and every key element you need is available to buy at Nicol Retailer. From authentic Burrata di Puglia to vibrant Mediterranean vegetables and premium pantry essentials, we make it simple to cook restaurant-quality meals at home.
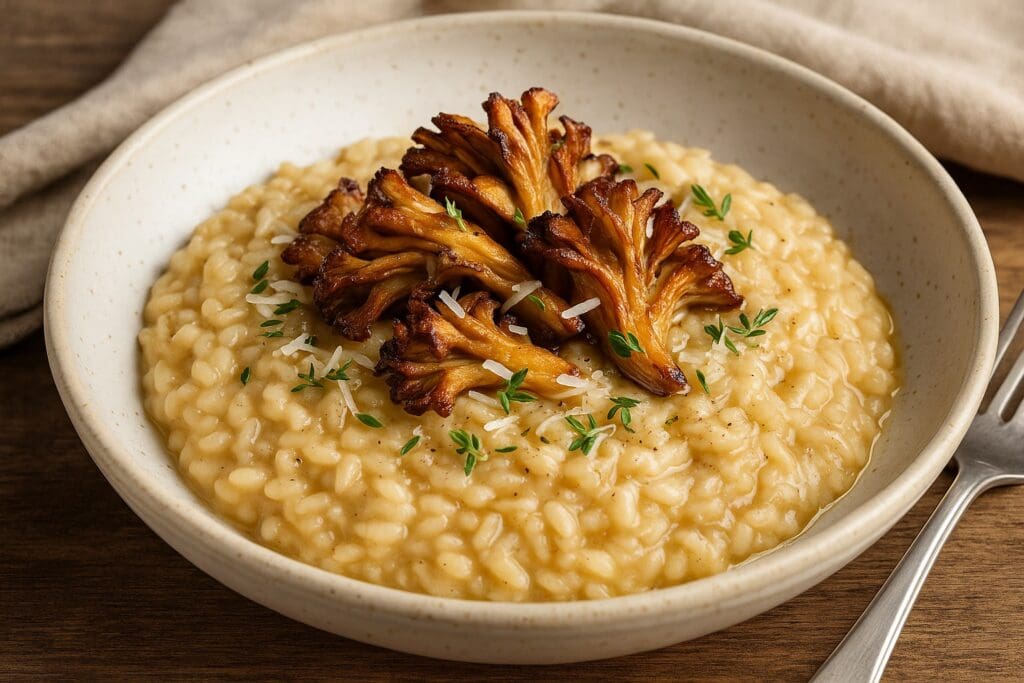
A Comforting, Gourmet Vegetarian Dish Created by Nicol Retailer Limited: Crispy Maitake Mushroom Risotto. Crispy Maitake Mushroom Risotto | Nicol Retailer Limited offers a delightful culinary experience perfect for a comforting meal.
There’s something undeniably special about a bowl of risotto — the way it soothes, satisfies, and feels like a warm embrace after a long day. And when you elevate that comfort classic with the nutty, earthy tones of maitake mushrooms, you step into gourmet territory. This delights both the palate and the soul. This is precisely what Crispy Maitake Mushroom Risotto | Nicol Retailer Limited has achieved.
This Crispy Maitake Mushroom Risotto with Parmesan & Thyme Butter captures everything we love about home cooking and fine dining in one dish. It is rich, creamy, aromatic, and deeply satisfying. Each spoonful is layered with texture: velvety arborio rice infused with thyme and butter. It’s topped with crispy, golden maitake mushrooms that bring a burst of umami with every bite.
Made with premium Maitake Mushrooms (500g) from Nicol Retailer Limited, this recipe celebrates the beauty of simple, high-quality ingredients. These are turned into something truly exceptional. This is why the Crispy Maitake Mushroom Risotto | Nicol Retailer Limited is unique.
Why You’ll Love This Recipe
This isn’t just another risotto — it’s a sensory experience. The maitake mushrooms (also known as hen-of-the-woods) have a beautifully meaty texture. They crisp up perfectly in butter. Meanwhile, the risotto base remains creamy and comforting. Here’s why Crispy Maitake Mushroom Risotto | Nicol Retailer Limited is irresistible:
Restaurant-quality flavour with ingredients you can easily find at home.
Rich, earthy aroma from the maitake mushrooms and thyme butter.
Naturally vegetarian and gluten-free, with simple swaps for vegan diets.
Ready in under 45 minutes, yet elegant enough for dinner parties.
Each bite tells a story of warmth, flavour, and craft. This is exactly what Nicol Retailer Limited stands for: premium ingredients that make everyday meals feel extraordinary.
Recipe
There’s something irresistibly comforting about the slow rhythm of making risotto. The gentle stirring, the rich aroma of garlic and butter, and that moment when the rice turns perfectly creamy. This Crispy Maitake Mushroom Risotto with Parmesan & Thyme Butter transforms a humble classic into an elegant, restaurant-quality dish. It is bursting with earthy, nutty flavour.
Using premium Maitake Mushrooms (500g) from Nicol Retailer Limited, this recipe celebrates the magic of simple ingredients done right. The maitake — also known as hen of the woods — brings deep umami and a delicate crispiness. This beautifully complements the creamy risotto base. Whether you’re planning a cosy dinner for two or an indulgent weekend meal, this dish promises warmth, comfort, and a touch of gourmet flair in every bite. Here is the recipe for Crispy Maitake Mushroom Risotto | Nicol Retailer Limited:
Crispy Maitake Mushroom Risotto with Parmesan & Thyme Butter
Indulge in the rich, earthy comfort of this Crispy Maitake Mushroom Risotto with Parmesan & Thyme Butter — a luxurious vegetarian dish bursting with flavour and texture. Tender arborio rice is slowly cooked in a creamy, aromatic broth, finished with golden, pan-seared Maitake Mushrooms from Nicol Retailer Limited, and topped with melted butter, fresh thyme, and aged parmesan.Perfect for dinner parties or cosy nights in, this risotto delivers restaurant-quality taste in under 45 minutes. The maitake mushrooms add a deep umami richness that pairs beautifully with the creamy risotto base, making every spoonful pure comfort food. Shop premium maitake mushrooms and gourmet ingredients at Nicol Retailer Limited, your trusted UK supplier of fine food essentials.
Course brunch, Comfort Food, Dinner, Main Course
Cuisine European, Italian, Mediterranean, Modern Vegetarian
Diet Gluten Free, Low Fat, Vegetarian
Keyword creamy mushroom risotto, hen of the woods risotto, maitake mushroom risotto, maitake mushrooms recipe, Nicol Retailer Limited
Tear the mushrooms into large pieces. Heat 1 tbsp olive oil and a little butter in a large pan. Sauté the maitake over medium-high heat until golden and crisp (5–7 mins). Remove and set aside for topping.
Start the Risotto
In the same pan, add another tbsp of olive oil. Sauté onion and garlic until soft and fragrant. Add rice and toast for 1–2 mins until slightly translucent.
Deglaze & Simmer
Pour in the white wine, stirring until absorbed. Add warm vegetable stock, one ladle at a time, stirring gently between each addition. Continue for about 20 minutes, or until the risotto is creamy and the rice is tender but al dente
Add Flavour & Finish
Stir in butter, parmesan, thyme, and half the crispy maitake. Adjust seasoning with salt and pepper.
Serve Beautifully
Spoon the risotto into bowls and top with the remaining crispy mushrooms. Drizzle lightly with truffle oil and finish with extra parmesan and fresh thyme.
Notes
This Crispy Maitake Mushroom Risotto is pure comfort in a bowl — creamy, earthy, and elegant. Each spoonful blends buttery arborio rice with golden, crispy Maitake Mushrooms (500g) from Nicol Retailer Limited, delivering the perfect balance of texture and umami richness.To get the best results, always use hot vegetable stock and stir slowly as the risotto cooks — this releases the rice’s natural starches for that classic creamy finish. Tear the maitake mushrooms instead of slicing them to preserve their meaty, layered texture and create crispy edges when seared.For a lighter version, you can swap the butter for olive oil and use vegan parmesan or nutritional yeast — it’s just as indulgent but completely plant-based. Chef’s Tips:Deglaze with white wine for restaurant-level depth.Finish with fresh thyme or a drizzle of truffle oil to elevate the aroma.Serve immediately — risotto is at its creamiest right off the stove.This dish is a perfect showcase of Mediterranean-inspired vegetarian cooking, made easy with Nicol Retailer Limited’s premium maitake mushrooms. Whether served as a main course or part of a fine-dining dinner menu, it’s guaranteed to impress.
Every spoonful of this Crispy Maitake Mushroom Risotto with Parmesan & Thyme Butter feels like a warm embrace — rich, aromatic, and deeply satisfying. To make the experience even more unforgettable, pair it with flavours and textures that enhance its creamy, earthy character.
For a lighter meal, serve your risotto alongside:
Rocket salad with lemon vinaigrette — its peppery freshness cuts through the richness.
Garlic-roasted asparagus or tenderstem broccoli for colour and crunch.
If you’re hosting, a basket of warm artisan bread drizzled with olive oil makes the perfect finishing touch — ideal for soaking up every last drop of creamy sauce.
Seasonal Twists
One of the joys of risotto is how easily it adapts to the seasons:
In spring, add green peas or asparagus tips for brightness.
In autumn, fold in roasted butternut squash or sage for an earthy depth.
In winter, stir through a touch of truffle oil or porcini powder for luxurious warmth.
Each variation keeps the dish exciting while highlighting the quality of the Maitake Mushrooms — their flavour is the heart of the recipe.
A Dining Experience to Remember
Serve this dish in warm bowls with a drizzle of melted butter, a sprinkle of fresh thyme, and a few extra crisp maitake pieces on top. Light a candle, pour your favourite wine, and let the gentle aroma of thyme and garlic fill the room.
This risotto isn’t just food — it’s a moment of calm, crafted with love and quality ingredients from Nicol Retailer Limited, where gourmet inspiration meets everyday simplicity.
Conclusion
Some dishes comfort you — others completely captivate you. This Crispy Maitake Mushroom Risotto with Parmesan & Thyme Butter is one of those rare recipes that does both. From the first creamy bite to the last crisp piece of golden maitake mushroom, it’s a symphony of texture and flavour — rustic, indulgent, and effortlessly elegant.
What makes this risotto truly special is the quality of the ingredients. Using premium Maitake Mushrooms (500g) from Nicol Retailer Limited, every forkful carries deep umami richness and natural sweetness. This turns an everyday meal into a fine-dining experience. This is the essence of Crispy Maitake Mushroom Risotto | Nicol Retailer Limited.
Whether you’re preparing it for loved ones, serving it as a show-stopping vegetarian main, or simply treating yourself to something extraordinary, this dish proves that comfort food can also be artful and inspiring.
Created with care. Crafted with flavour. Delivered by Nicol Retailer Limited — bringing the world’s finest ingredients to your kitchen.
🛒 Shop This Recipe – Crispy Maitake Mushroom Risotto
Recreate this creamy, crispy Maitake Mushroom Risotto with Parmesan & Thyme Butter using premium ingredients from Nicol Retailer Limited. Each product is carefully selected to bring gourmet flavour and quality to your kitchen.
🍄 Maitake Mushrooms (500g) – The star ingredient, offering deep umami flavour and a crisp, golden texture.
All premium ingredients are available to buy from Nicol Retailer Limited — your trusted UK supplier of gourmet, vegetarian, and Mediterranean cooking essentials.
A rustic, Mediterranean seafood masterpiece — Smoky Spanish Octopus with Chorizo, by Nicol Retailer Limited
There are meals that warm the soul — and then there’s this Smoky Spanish Octopus with Chorizo, Chickpeas & Paprika Oil. It’s rich, rustic, and alive with the warmth of Mediterranean sunshine — a dish that captures the passion of Spanish coastal cooking in every bite.
Tender Dockside Cooked Octopus Tentacles, smoky chorizo, and creamy chickpeas come together in a vibrant stew that glows with paprika oil and bursts of cherry tomato sweetness. The result? A comforting yet elegant seafood dish that feels equally at home in a family kitchen or a fine dining setting.
Made with premium seafood from Nicol Retailer Limited, this recipe is about celebrating freshness, quality, and the beauty of simple ingredients done right. Each mouthful delivers a perfect harmony — the smoky spice of chorizo, the tender bite of octopus, and the subtle earthiness of chickpeas wrapped in a warm, velvety sauce.
If you love Mediterranean cuisine, this is a show-stopping dish you’ll make again and again — comforting, colourful, and undeniably delicious.
This Smoky Spanish Octopus with Chorizo, Chickpeas & Paprika Oil is more than just a seafood recipe — it’s a celebration of Mediterranean flavour, quality ingredients, and authentic Spanish cooking. Inspired by traditional Spanish coastal cuisine, the dish combines the smoky depth of paprika and chorizo with the tender, meaty texture of Dockside Cooked Octopus Tentacles from Nicol Retailer Limited, your trusted UK supplier of premium seafood and gourmet ingredients.
Cooking with octopus may sound daunting, but with pre-cooked tentacles, it’s simpler than you think. For those new to working with seafood, BBC Good Food’s expert guide on how to cook octopus offers helpful techniques to achieve restaurant-quality results at home.
Beyond its incredible taste, octopus is also a powerhouse of nutrition. It’s naturally rich in protein and omega-3 fatty acids, both of which support heart and brain health. According to Healthline, it’s one of the healthiest lean proteins you can include in your diet — making this dish both indulgent and nourishing.
Whether served as part of a tapas night or a show-stopping main course, this recipe embodies everything we love about Mediterranean cooking: simple ingredients, bold flavours, and meals made to share.
Why You’ll Love This Recipe
If you adore food that tells a story — smoky, soulful, and bursting with flavour — then this Smoky Spanish Octopus with Chorizo, Chickpeas & Paprika Oil is going to win your heart. It brings the warmth of a Spanish coastal kitchen right to your table, blending rustic simplicity with restaurant-quality elegance. Here’s why this dish deserves a permanent place in your recipe collection:
Incredible Texture — Tender Meets Crispy
Thanks to Dockside Cooked Octopus Tentacles from Nicol Retailer Limited, you skip the tricky boiling stage and get perfectly cooked octopus every time — soft, meaty, and tender inside, with gorgeous golden edges when seared. It’s proof that quality seafood makes all the difference.
Deep, Smoky Spanish Flavour
Every bite sings with the essence of Spain — smoked paprika, spicy chorizo, and rich olive oil combining to create a silky, aromatic sauce that coats the chickpeas and octopus. It’s a dish that feels both bold and comforting, with layers of heat, smoke, and sweetness in perfect harmony.
Beautifully Balanced Ingredients
The earthiness of chickpeas, the freshness of cherry tomatoes, and the tang of sherry vinegar balance the richness of the chorizo and paprika oil. Each spoonful offers contrast — savoury, sweet, smoky, and bright — for a restaurant-worthy depth of flavour that’s easy to achieve at home.
Quick, Simple, and Fuss-Free
This impressive dish takes under 30 minutes from pan to plate, thanks to pre-cooked octopus. With minimal prep and everyday pantry staples, it’s perfect for both busy weeknights and relaxed weekend feasts. You’ll look like a pro without spending hours in the kitchen.
Wholesome and Nourishing
Beyond its irresistible taste, this recipe is high in protein, low in carbs, and naturally rich in omega-3 fatty acids — supporting heart health and energy. It’s a dish that feels indulgent yet wholesome, celebrating the best of the Mediterranean diet.
A Taste of Spain, Crafted in the UK
With every forkful, you’ll taste the spirit of the Spanish coast — reimagined through the quality and craftsmanship of Nicol Retailer Limited, your trusted UK supplier of premium seafood and gourmet ingredients. This isn’t just a meal; it’s an experience — an invitation to savour the sunshine, spice, and sophistication of Spain from your own kitchen.
Simple to make, spectacular to eat — this Spanish octopus recipe proves that great cooking begins with the finest ingredients.
Receipe
Get ready to bring a taste of the Mediterranean coast straight to your kitchen with this Smoky Spanish Octopus with Chorizo, Chickpeas & Paprika Oil — a dish that feels like pure sunshine in a pan.
Picture tender octopus tentacles, perfectly cooked and lightly caramelised, tossed with slices of smoky Spanish chorizo, creamy chickpeas, and sweet cherry tomatoes, all glistening in a deep red paprika oil. The aroma alone will transport you to a seaside taverna in Spain — warm, inviting, and impossible to resist.
Using premium Dockside Cooked Octopus Tentacles from Nicol Retailer Limited, this recipe delivers the kind of restaurant-quality flavour you can create effortlessly at home. It’s bold yet balanced, rich yet refreshing — the perfect harmony of smoky, savoury, and tangy Mediterranean magic.
Now, let’s dive into this irresistible seafood masterpiece — simple to prepare, stunning to serve, and guaranteed to impress:
Smoky Spanish Octopus with Chorizo, Chickpeas & Paprika Oil
Experience the bold, rustic flavours of Spain with this Smoky Spanish Octopus with Chorizo, Chickpeas & Paprika Oil — a dish that captures the essence of Mediterranean cooking in every bite. Tender, pre-cooked Dockside Octopus Tentacles are tossed with smoky Spanish chorizo, creamy chickpeas, and vibrant cherry tomatoes, then finished with a drizzle of rich paprika oil and fresh parsley.It’s hearty, colourful, and irresistibly aromatic — the perfect centrepiece for a tapas night, dinner party, or midweek indulgence. Using premium-quality octopus from Nicol Retailer Limited, this recipe combines convenience and fine-dining flavour, ready in under 30 minutes.Rich in protein and omega-3, it’s as nourishing as it is delicious — a true showcase of Mediterranean warmth, bold spices, and coastal freshness.
Warm olive oil in a small pan over low heat. Add smoked paprika and a pinch of salt. Stir, then remove from heat. Set aside to infuse while you cook the octopus.
Cook the Base
Heat 1 tbsp olive oil in a large skillet or cast-iron pan. Add chorizo slices and fry for 3–4 minutes until they release their smoky red oil. Add onion and garlic, sautéing until soft and fragrant.
Add the Flavour
Sprinkle in smoked paprika and chilli flakes. Stir in cherry tomatoes and chickpeas. Cook for 2 minutes, then pour in stock and vinegar. Simmer for 5 minutes to reduce slightly.
Add the Octopus
Stir in the Dockside Cooked Octopus Tentacles and toss gently to coat in the sauce. Cook for 3–4 minutes until the octopus is heated through and the sauce thickens slightly.
Finish & Serve
Spoon the mixture into shallow bowls, drizzle with paprika oil, and sprinkle with fresh parsley. Serve immediately with crusty bread or roasted new potatoes.
Notes
Premium Ingredients Matter: The key to this recipe’s rich, smoky depth lies in using high-quality seafood. The Dockside Cooked Octopus Tentacles from Nicol Retailer Limited are pre-cooked to perfection — tender, meaty, and ready to absorb every drop of smoky paprika and chorizo oil.Texture Tip: Always pat the octopus dry before adding it to the pan — this ensures crisp edges and a beautiful golden sear without losing tenderness.Balancing Flavours: Add the sherry vinegar right at the end for a bright, tangy lift that balances the smoky oil and hearty chickpeas.Make It Your Own: For a pescatarian version, replace chorizo with roasted red peppers or smoked paprika chickpeas. Add grilled prawns for an indulgent seafood twist.Serving Idea: Serve with rustic bread, roasted potatoes, or a simple rocket salad.
When it comes to this Smoky Spanish Octopus with Chorizo, Chickpeas & Paprika Oil, every bite feels like a journey through Spain’s sun-drenched coastlines — rustic, vibrant, and bursting with flavour. Whether you’re setting the table for a family supper, a romantic evening, or a Spanish-style tapas night with friends, this dish steals the spotlight effortlessly.
A Tapas Feast to Remember
Transform your table into a lively Spanish tapas experience by serving this octopus dish alongside a few Mediterranean favourites. Pair it with patatas bravas, grilled padron peppers, or manchego cheese and olives for that authentic Spanish flair. The smoky chorizo and paprika oil tie beautifully with other small plates, creating a warm, communal dining experience full of colour and laughter.
Tip: Serve it straight from the cast-iron pan to the table — the sizzling aroma and rustic presentation will captivate your guests before the first bite.
Side Dishes That Complete the Experience
To turn this into a show-stopping main course, serve with:
Crusty artisan bread to soak up that rich paprika oil.
Chargrilled vegetables like courgettes, peppers, and aubergine for smoky depth.
Or a simple rocket and lemon salad to balance the richness with bright, fresh acidity.
These sides don’t just fill the plate — they amplify the flavours and texture, creating the perfect Mediterranean harmony.
How to Serve It Beautifully
Presentation matters — and this dish deserves to look as good as it tastes. Serve your octopus in shallow ceramic bowls or a rustic skillet, drizzle with paprika oil, and finish with a handful of fresh parsley or microgreens. Add a lemon wedge on the side for that final touch of brightness.
The glistening red oil, golden chickpeas, and charred octopus create a naturally stunning contrast — ideal for food photography or social media sharing.
Seasonal Twist Ideas
Summer: Serve it warm with fresh salad greens.
Winter: Pair with roasted root vegetables and crusty bread for a hearty, comforting meal.
Spring: Add peas or asparagus for a pop of freshness.
The recipe’s versatility means you can enjoy it all year round — a dish that brings Mediterranean warmth to even the chilliest UK evening.
The Perfect Meal to Share
At its heart, this recipe celebrates togetherness and flavour — just like all great Spanish cooking. The combination of smoky chorizo, tender Dockside Cooked Octopus Tentacles, and creamy chickpeas makes it ideal for sharing at the centre of the table.
Serve it family-style with a few bottles of wine, laughter, and good conversation. After all, the best meals are the ones enjoyed together — and this one has the power to turn any dinner into a celebration.
Conclusion
Every once in a while, a dish comes along that reminds us why we love to cook — and this Smoky Spanish Octopus with Chorizo, Chickpeas & Paprika Oil is exactly that kind of recipe. It’s rustic yet refined, simple yet luxurious — the perfect blend of Spanish passion and Mediterranean warmth brought to life with premium Dockside Cooked Octopus Tentacles from Nicol Retailer Limited. Each bite is a celebration of flavour — smoky, spicy, and subtly sweet — with the tender octopus soaking up every drop of paprika oil and chorizo richness. It’s the kind of meal that doesn’t just fill you up, but fills the room with laughter, warmth, and a sense of connection.
Whether you serve it for a special dinner, a festive gathering, or a tapas night with friends, this dish has one goal: to make every table feel like a seaside evening in Spain. 🇪🇸
So go ahead — gather your ingredients, pour a glass of wine, and let this recipe transport you. Because great food isn’t just about what’s on the plate — it’s about the moments shared around it.
🛒 Shop This Recipe
Recreate this delicious Smoky Spanish Octopus with Chorizo, Chickpeas & Paprika Oil at home using premium ingredients from
Nicol Retailer Limited.
Soft, Steamy, and Full of Flavour — Discover the irresistible delight of Hoisin Mushroom Bao Buns, a Vegan Street Food Sensation by Nicol Retailer Limited
The Street-Food Classic That’s Stealing the Show
If there’s one dish guaranteed to make your taste buds dance, it’s this: Hoisin Mushroom & Pickled Veg Bao Buns — soft, fluffy clouds of perfection filled with sticky, savoury-sweet mushrooms. They also include crunchy pickled vegetables and fresh herbs.
These aren’t just any buns — they’re made with premium Bao Hirata Buns from Nicol Retailer Limited. This is the secret ingredient behind their irresistible texture.
Pillowy on the outside and perfectly chewy inside, they create the ultimate bite — one that’s sweet, tangy, and satisfyingly umami all at once.
Why Everyone Loves This Recipe
Whether you’re vegan, flexitarian, or just a foodie with good taste, this recipe ticks every box. It’s quick, healthy, and packed with bold Asian street-food flavours that feel indulgent but don’t weigh you down. Here’s what makes it a winner:
100% plant-based and dairy-free
Made with authentic Hirata buns for that signature fluffiness
15-minute prep — perfect for midweek meals or party platters
Customisable with tofu, jackfruit, or crispy tempeh
These bao buns aren’t just food — they’re an experience. Every bite feels like something straight out of a modern Asian restaurant, but easier and faster to make at home.
The Star Ingredient: Bao Hirata Buns
The hero of this dish is undoubtedly the Bao Hirata Bun (1 × 30 × 50 g) — soft, versatile, and restaurant-quality. At Nicol Retailer Limited, these buns are sourced for chefs and food lovers who appreciate true authenticity. Whether you’re filling them with mushrooms, or teriyaki tofu, they transform simple ingredients into unforgettable meals.
There’s something truly irresistible about soft, fluffy bao buns filled with sticky, flavour-packed goodness. These Hoisin Mushroom & Pickled Veg Bao Buns are no exception. Each bite delivers the perfect balance of sweet and savoury. They feature glossy mushrooms, crisp pickled vegetables, and aromatic herbs wrapped in a warm, pillowy Bao Hirata Bun.
This recipe brings together everything you love about Asian street food — vibrant, fresh, and full of texture — but made simple for your home kitchen. Whether you’re planning a weekend lunch, a dinner party appetiser, or a vegan twist on comfort food, these bao buns are sure to impress.
Now, let’s make this mouth-watering restaurant-style dish come to life — step by step:
Indulge in these soft, pillowy Bao Hirata Buns filled with sticky hoisin-glazed mushrooms, crisp pickled vegetables, and fresh herbs. A vegan-friendly, Asian street food classic — bursting with sweet, savoury, and tangy flavours. Made with premium Bao Hirata Buns from Nicol Retailer Limited for a restaurant-quality experience at home.
Course Appetizer, Main Course, Starter, Street Food
Fresh coriander leaves and toasted sesame seeds for garnish
Instructions
Quick-pickle the veg
In a bowl, combine carrot, cucumber, salt, sugar and 2 tbsp rice vinegar. Toss well and set aside for 15 minutes to soften and absorb flavour.
Cook the mushrooms
Heat vegetable oil in a large pan over medium-high heat. Add the sliced mushrooms and cook until they release their moisture and begin to brown (about 5–6 minutes).
Add garlic, ginger, hoisin sauce, soy sauce, maple syrup and 1 tsp rice vinegar. Stir until the mushrooms are glossy and coated in a sticky, savoury-sweet glaze.
Steam the buns
Steam the Bao Hirata Buns for 2–3 minutes until soft and fluffy (per pack instructions).
Assemble the bao
Open each bun gently and fill with a spoonful of hoisin mushrooms, then top with pickled carrot and cucumber. Garnish with coriander and sesame seeds for a burst of freshness and crunch.
Serve immediately
Serve warm with extra hoisin sauce or chilli oil on the side for dipping.
Notes
These Hoisin Mushroom & Pickled Veg Bao Buns are a celebration of texture and flavour — a perfect balance of sweet, savoury, and tangy wrapped in the softest Bao Hirata Buns from Nicol Retailer Limited.Chef’s Tip: Use a mix of mushrooms such as shiitake, oyster, and chestnut for a deeper, meatier flavour. Don’t rush the cooking process — allow the mushrooms to caramelise slightly before adding the sauce for that glossy, sticky finish.Flavour Boost: Add a dash of rice wine or mirin while cooking for extra depth, or drizzle a little sesame oil just before serving for a nutty aroma.Make Ahead: The pickled vegetables can be prepared up to 2 days in advance — they taste even better once the flavours develop. Simply store in an airtight container in the fridge.Customise It: These bao buns are endlessly versatile. Try swapping the mushrooms for tofu, tempeh, or even shredded jackfruit for a unique twist.Serving Suggestion: Serve immediately after assembling while the buns are still warm and pillowy. Pair with a small bowl of dipping hoisin sauce or sriracha mayo for a restaurant-style touch.With every bite, you’ll enjoy the fusion of authentic Asian street-food flavours and plant-based goodness — all made effortless with Bao Hirata Buns from Nicol Retailer Limited.
These Hoisin Mushroom & Pickled Veg Bao Buns aren’t just a meal — they’re an experience. Each soft, pillowy bun is packed with flavour, freshness, and texture, making it the perfect centrepiece for any occasion. Whether you’re hosting friends, craving something light yet satisfying, or looking to recreate an authentic Asian street-food night at home, these bao buns will steal the spotlight.
Street-Food Feast at Home
Turn your kitchen into a bustling street market! Serve these bao buns alongside crispy vegetable spring rolls, edamame with sea salt, and steamed dumplings for the ultimate Asian street-food platter. Add a dipping trio — hoisin, sriracha mayo, and soy-ginger dressing — for flavour variety that keeps everyone coming back for more.
Light Lunch or Weekend Brunch
Pair your bao buns with a side of sesame cucumber salad or Asian-style slaw. For a weekend treat, serve them with bubble tea or homemade iced matcha lattes — refreshing, Instagram-worthy, and a total crowd-pleaser.
Date Night or Dinner Party
Planning a dinner that feels restaurant-worthy but effortless? Plate up your bao buns on a bamboo steamer or slate board, drizzle a little extra hoisin sauce on top, and sprinkle toasted sesame seeds.
Comfort Food Combo
For something heartier, serve your bao buns with sticky jasmine rice or miso soup on the side. The warm, savoury broth complements the sweet hoisin glaze beautifully, while the rice helps soak up all that irresistible sauce.
Dipping Sauces that Make It Unforgettable
Amp up the experience with easy homemade dips — creamy sriracha mayo, tangy soy-lime sauce, or a punchy peanut dressing. These sauces not only boost flavour but also make your bao buns perfect for sharing platters or party appetisers.
Pro Tip:
For a show-stopping presentation, serve the bao buns warm in bamboo baskets lined with parchment paper. Garnish with fresh coriander, red chilli slices, and a light drizzle of sesame oil. It’s a small detail that makes a big impact — both on taste and presentation.
No matter how you serve them, these Hoisin Mushroom Bao Buns promise to be the star of any table. They are simple to make, irresistibly delicious, and bursting with vibrant street-food flair
Create your own bao feast at home with authentic Bao Hirata Buns, available from Nicol Retailer Limited — delivering quality and taste across the UK.
Shop the Ingredients
Recreate this delicious street-food experience at home with authentic Bao Hirata Buns (2 × 30 × 50 g) — available exclusively from Nicol Retailer Limited. Browse the full shop here for restaurant-quality products, sauces, and gourmet essentials delivered across the UK.
Final Thoughts
From the first bite, these Hoisin Mushroom Bao Buns prove that flavour and simplicity can coexist beautifully. They’re quick, healthy, and utterly addictive — the kind of dish that keeps people talking (and sharing). Make them once, and you’ll be hooked. Made possible with Bao Hirata Buns from Nicol Retailer Limited — where quality meets creativity.
🛒 Shop This Recipe
Bring this delicious Hoisin Mushroom & Pickled Veg Bao Bun recipe to life
with authentic ingredients from
Nicol Retailer Limited —
your trusted UK source for restaurant-quality food and gourmet essentials.