Experience the rich and varied flavours of Asian cuisine with Nicol Retailer’s collection of mouth-watering recipes. Designed for both beginners and seasoned cooks, our recipes are easy to follow and result in delicious, authentic dishes. This collection ensures you can bring the best of Asian cuisine into your kitchen. Each recipe is carefully crafted to ensure an exquisite taste experience. Transform your meals with Nicol Retailer’s simple yet scrumptious recipes, perfect for any occasion.
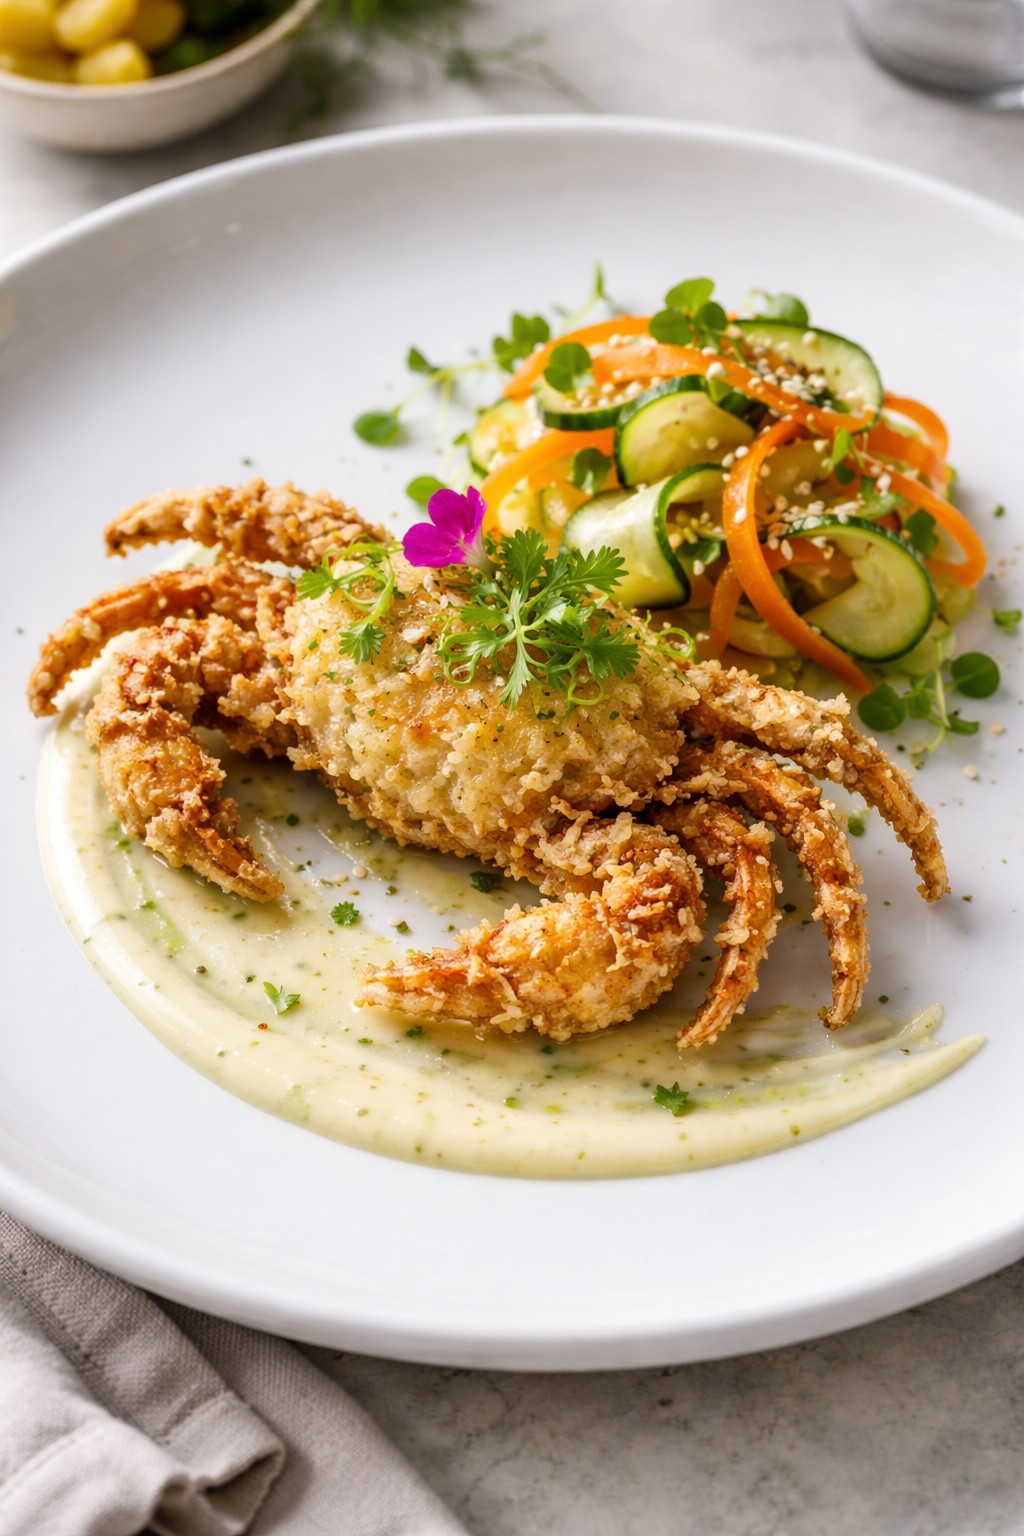
If you’ve ever wanted to recreate a Michelin-style seafood dish in your own kitchen, this crispy soft shell crab tempura is exactly where to start. Here, you’ll find an easy soft shell crab tempura recipe that delivers light, golden, and delicately crisp soft shell crab—one of those rare ingredients that provides both texture and flavour in every bite—no fuss, just pure indulgence. In fact, if you are searching for the perfect soft shell crab tempura recipe, this guide has you covered.
What makes this dish truly special is the contrast. The crunchy tempura coating gives way to sweet, tender crab, while the silky yuzu kosho emulsion adds a citrusy kick with just the right amount of heat. Paired with sharp, refreshing pickled vegetables, every element works together to create a perfectly balanced plate. For anyone who loves seafood, mastering a soft shell crab tempura recipe can elevate your repertoire.
Why Soft Shell Crab Is So Popular
Soft shell crab has become a favourite in modern British and Asian-fusion kitchens—and for good reason. Unlike regular crab, the entire shell is edible, meaning you get a full, satisfying bite without any effort. It cooks quickly, absorbs flavour beautifully, and delivers that irresistible crisp finish when fried.
Whether you’re planning a dinner party, a date-night meal, or simply elevating your home cooking, this dish instantly adds a touch of luxury.
If you’re curious about the health benefits of seafood, including soft shell crab, the NHS provides a helpful overview of fish and shellfish nutrition and why they are an important part of a balanced diet: https://www.nhs.uk/live-well/eat-well/food-types/fish-and-shellfish-nutrition/
Indulge in this Michelin-inspired tempura soft shell crab recipe, featuring a perfectly crisp, golden coating paired with a smooth yuzu kosho emulsion and vibrant pickled vegetables. This elegant dish balances texture and flavour with citrusy freshness, subtle heat, and delicate crunch, making it ideal for gourmet dining at home. Perfect for food lovers seeking a refined seafood experience, this recipe transforms soft shell crab into a restaurant-quality masterpiece.
Course Appetizer, Starter, Tasting Menu Course
Cuisine Asian-inspired, Contemporary Fine Dining, Japanese Fusion, Modern European
Gently heat vinegar, sugar, and salt until dissolved
Pour over cucumber and carrot
Leave to pickle for at least 20 minutes
Tempura Batter (Prep – 5 mins)
In a chilled bowl, whisk egg yolk with ice-cold sparkling water
Lightly fold in flour and cornflour
Keep batter cold and slightly lumpy
Fry the Crab
Heat oil to 180°C
Dip each crab into batter
Fry for 2–3 minutes until light golden and crisp
Drain and lightly season
Yuzu Emulsion
Whisk mayonnaise, yuzu kosho, lemon juice, and olive oil until smooth
Plating
Spread or swipe the emulsion across the plate.
Place crab slightly off-centre
Arrange pickled vegetables neatly
Finish with micro herbs and lime zest
Keep batter very cold → ensures light, airy tempuraOil must stay at 180°C → prevents greasy coatingServe immediately → texture is at its peak
Notes
Discover how to create a restaurant-quality soft shell crab dish at home with this elegant tempura recipe, featuring a light, crispy coating and a vibrant yuzu kosho emulsion. Perfect for seafood lovers, this dish delivers the ultimate balance of crunch, citrus, and umami ideal for dinner parties, special occasions, or gourmet home cooking.Looking for dietary flexibility? This recipe can easily be adapted to suit different needs. For a gluten-free version, simply swap the plain flour for a gluten-free flour blend or rice flour to achieve the same light, crispy texture.For a vegan alternative, replace the soft shell crab with king oyster mushrooms or aubergine slices, prepared using the same tempura technique. Pair with a vegan mayonnaise-based yuzu emulsion for a fully plant-based, flavour-packed dish that still delivers on texture and presentation.Whether you’re cooking for pescatarians, gluten-free diners, or vegan guests, this versatile recipe ensures everyone can enjoy a gourmet, chef-style experience at home.
When preparing seafood at home, knowing how to select the freshest ingredients is key. This guide from BBC Good Food offers practical tips on choosing high-quality fish and shellfish: https://www.bbcgoodfood.com/howto/guide/how-buy-fish
Serving Suggestion (Make It Look Restaurant-Quality)
Presentation is what transforms this crispy soft shell crab from a simple dish into a true restaurant-quality dining experience at home. Moreover, presenting your soft shell crab tempura recipe with care will truly impress guests. With just a few thoughtful touches, you can elevate both the visual appeal and overall enjoyment of the dish.
Start by choosing a neutral or matte plate white, slate, or stoneware works beautifully to highlight the golden crispness of the tempura crab. Use the back of a spoon to create a smooth swipe of yuzu kosho emulsion across the plate. This not only adds a professional finish but also ensures every bite is balanced with flavour.
Place the crispy soft shell crab slightly off-centre or stacked for height, a technique often used in fine dining to create visual interest. The goal is to avoid overcrowding and allow each component to stand out.
Next, carefully arrange the pickled vegetables. Think neat, intentional placement rather than piling—this adds colour contrast and keeps the dish looking clean and refined. The vibrant greens and oranges will pop against the plate, making it instantly more appetising.
Finish with delicate garnishes:
A sprinkle of micro herbs or coriander tips for freshness
A light dusting of lime zest for brightness and aroma
Optional edible flowers for a premium, Instagram-worthy touch
Timing is everything—serve the dish immediately while the crab is hot and crisp to preserve its texture. Soft shell crab is at its absolute best straight from the fryer, with that perfect contrast between crunch and tenderness.
Complete the Experience
To turn this into a full dining experience, consider pairing and plating options:
Serve alongside steamed jasmine rice or seasoned fries for a more filling main course
Add a small side of Asian-style slaw or light salad to enhance freshness
Entertaining Tip
If you’re hosting, serve this as part of a small plates or sharing menu. Plate individually for a fine dining feel, or present on a large serving platter for a more relaxed, social dining experience. Above all, your soft shell crab tempura recipe is sure to impress any guest.
If you’re searching for a quick beef dinner recipe that feels vibrant, fresh and restaurant-quality, these Chimichurri Beef Flatbreads deliver bold flavour in under 30 minutes. Tender British beef stir fry strips are seared until beautifully caramelised and layered onto warm flatbreads. After that, they are finished with bright green chimichurri. Made using premium beef available from Nicol Retailer, this dish combines heritage flavour with modern convenience.
British beef is known for its traceability, high welfare standards and consistent quality. This makes it a reliable choice for flavour-driven recipes, as highlighted by the Agriculture and Horticulture Development Board (AHDB).
The History Behind Chimichurri
Chimichurri originates from Argentina and Uruguay, where it is traditionally served with grilled beef during asado cooking. As widely documented in South American cuisine by BBC Good Food, this is a classic pairing.
The sauce itself is simple yet powerful: parsley, garlic, olive oil and vinegar. Designed to cut through rich, grilled meat, chimichurri provides brightness and balance. Over time, this humble herb sauce has travelled far beyond its roots and become a global favourite in modern kitchens. This recipe honours that tradition while giving it a contemporary twist. In particular, it swaps open-fire grilling for quick-seared British beef stir fry strips and serves it in soft flatbreads for easy sharing.
These Chimichurri Beef Flatbreads with Charred Peppers are a quick and flavour-packed Mediterranean-inspired dish made with tender British beef stir fry strips, fresh herbs, and vibrant roasted peppers. Ready in under 30 minutes, this easy beef flatbread recipe is perfect for weeknight dinners, casual entertaining, or summer gatherings. The fresh chimichurri sauce adds brightness and depth, while warm flatbreads and creamy yoghurt create a satisfying balance of textures and flavours.
Course Dinner, lunch, Main Course
Cuisine British Fusion, Mediterranean
Keyword British beef stir fry strip, chimichurri beef flatbread recipe, easy flatbread meal, high protein beef recipe, Mediterranean beef recipe, Nicol Retailer recipes, quick beef dinner UK,, weeknight beef recipe
Mix with red wine vinegar, olive oil, chilli flakes, and salt. Set aside.
Cook the Peppers
Heat a pan over medium-high heat.
Add sliced peppers and cook until slightly charred and softened (5–6 minutes). Remove and set aside.
Sear the Beef
Season beef strips with smoked paprika, cumin, salt, and pepper.
Heat olive oil in a hot pan and cook beef in batches for 2–3 minutes until browned and juicy.
Assemble
Warm flatbreads.
Spread a spoonful of yoghurt over each, top with beef, charred peppers, and drizzle generously with chimichurri.
Serve with lemon wedges.
Notes
For the most tender result, cook the beef stir fry strips quickly over high heat and avoid overcrowding the pan. Overcooking can cause the beef to become tough. Let the meat rest briefly before assembling the flatbreads to retain its juices.The chimichurri sauce can be made up to 24 hours in advance and stored in the fridge. Allow it to return to room temperature before serving to enhance flavour.Vegan VariationTo make this recipe vegan:Replace the beef with marinated portobello mushrooms, grilled aubergine strips, or plant-based steak-style strips.Use dairy-free yoghurt or a tahini-based sauce instead of natural yoghurt. Ensure flatbreads are dairy-free.The chimichurri sauce is naturally vegan, so no changes are required.Gluten-Free VariationTo make this recipe gluten-free:Use certified gluten-free flatbreads or wraps. Check that all seasonings and condiments are gluten-free. Ensure no cross-contamination during preparation.Alternatively, serve the beef and chimichurri over rice, quinoa, or a fresh salad instead of flatbread.For extra flavour, add a squeeze of fresh lemon just before serving, or crumble over feta (omit for vegan version). If you prefer extra heat, increase the chilli flakes in the chimichurri
These Chimichurri Beef Flatbreads are incredibly versatile and can be styled to suit anything from a relaxed weeknight dinner to an impressive sharing platter for guests.
For a vibrant Mediterranean-style spread, serve alongside a rocket and shaved parmesan salad, drizzled with lemon and olive oil. The peppery leaves and salty cheese complement the richness of the beef beautifully. Add a bowl of marinated olives and warm flatbreads for a complete sharing table.
If you’re looking for something heartier, pair with crispy sweet potato wedges or rosemary roasted baby potatoes. The natural sweetness of the potatoes balances the tangy chimichurri and savoury beef. A side of grilled courgettes or charred aubergine enhances the Mediterranean feel.
For a lighter, summer-ready option, serve the chimichurri beef over a fresh couscous or quinoa salad with cucumber, cherry tomatoes and fresh herbs. You can also swap flatbreads for lettuce wraps for a low-carb alternative that still delivers bold flavour.
Entertaining guests? Present the components separately and allow everyone to build their own flatbread. Add toppings such as:
However you serve it, using high-quality British beef stir fry strips ensures the centrepiece of the dish remains tender, flavourful and satisfying. This turns a simple flatbread into something truly memorable.
Mediterranean-inspired dishes, rich in olive oil, herbs and fresh vegetables, are often associated with balanced eating patterns, as outlined by the NHS guide to the Mediterranean diet.
The Star Ingredient: British Beef Stir Fry Strips
At the heart of this recipe are premium British beef stir fry strips. These are a versatile, quick-cooking cut that delivers exceptional flavour and tenderness. Because the beef is sliced evenly and thinly, it cooks rapidly at high heat. Moreover, this makes it ideal for fast, flavour-forward dishes like flatbreads, stir fries, wraps and noodle bowls.
What makes British beef stand out is its quality and traceability. Carefully sourced and prepared, it offers consistent texture, rich natural flavour, and excellent cooking performance. When seared properly, stir fry strips develop a beautiful caramelised crust while remaining juicy inside — exactly what you want for a bold dish like chimichurri beef.
Unlike tougher cuts that require long cooking times, stir fry strips allow you to achieve restaurant-style results in minutes. This makes them perfect for busy households, weeknight meals, and entertaining without stress.
Using high-quality beef from Nicol Retailer ensures:
Consistent thickness for even cooking
Tender texture without overcooking
Deep, natural beef flavour
Reliable performance in high-heat recipes
When you start with quality ingredients, you don’t need complicated techniques or heavy sauces to create something special. The beef becomes the hero of the plate — enhanced, not masked, by fresh herbs and balanced seasoning.
Final Thoughts
From the traditional Argentine asado to your own kitchen table, chimichurri has travelled through history as a celebration of beef and bold flavour. By pairing it with premium British beef stir fry strips, you create a dish that feels both authentic and contemporary.
Great recipes begin with great ingredients — and with quality beef from Nicol Retailer, you’re already halfway there.
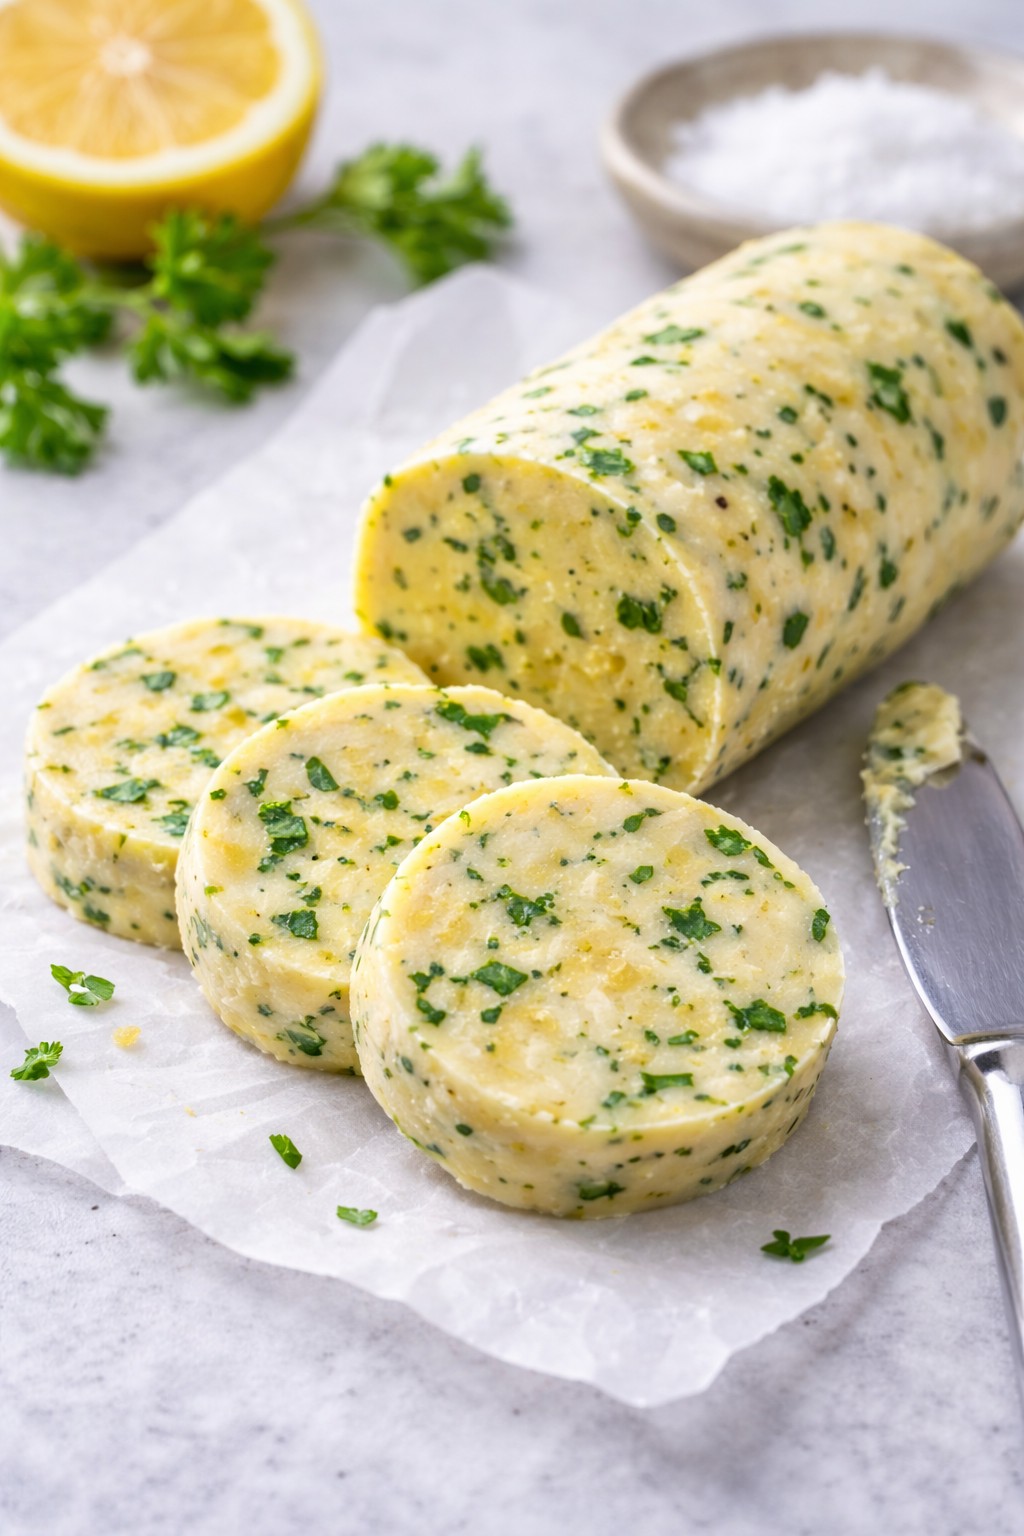
If you love adding bold yet refined flavours to everyday meals, this Yuzu Herb Butter is about to become your new kitchen essential. For those looking for a yuzu herb butter recipe, this creamy, aromatic, and citrus-fresh compound butter transforms ordinary dishes into something truly special.
Created by Nicol Retailer Limited, this recipe celebrates the unique flavour of yuzu – a prized Japanese citrus known for its fragrant blend of lemon, lime, and grapefruit notes. Combined with fresh herbs and a hint of umami, this butter delivers restaurant-quality flavour with minimal effort.
What Is Yuzu and Why It’s Used in Cooking
Yuzu is a highly aromatic citrus fruit originating from East Asia and widely used in Japanese cuisine. While it resembles a small, knobbly lemon, its flavour is far more complex, combining notes of lemon, lime, mandarin, and grapefruit. Rather than being eaten fresh, yuzu is prized for its juice and zest, which add fragrance and brightness to both savoury and sweet dishes.
In Japan, yuzu is commonly used in ponzu sauce, dressings, marinades, soups, desserts, and compound butters. Its sharp acidity cuts through rich ingredients like butter, fish, and meat, while its floral aroma lifts flavours without overpowering them. This makes yuzu especially popular with chefs looking to add depth and refinement to simple recipes.
Because fresh yuzu is rarely available in the UK, high-quality bottled yuzu juice has become the preferred choice for home cooks and professionals alike. Using a reliable, authentic product ensures consistent flavour and avoids bitterness.
If you’d like a deeper understanding of yuzu, its origins, and how it’s traditionally used, this guide from BBC Good Food offers a helpful overview: https://www.bbcgoodfood.com/howto/guide/what-yuzu
What Makes Yuzu So Special?
Yuzu is a cornerstone of Japanese cuisine, valued for its intense aroma rather than sweetness. Unlike lemon, yuzu offers floral depth and complexity, making it perfect for savoury dishes. Using high-quality juice is key, which is why this recipe features Kishida Yuzu Juice, a premium product trusted by chefs and food professionals.
A little yuzu goes a long way, lifting rich ingredients like butter while keeping flavours balanced and fresh. Ingredient usage & culinary context
Why You’ll Love This Yuzu Herb Butter
This isn’t just butter – it’s a flavour enhancer that works across cuisines and diets:
Adds instant depth to grilled fish, prawns, or scallops
Elevates roasted vegetables and plant-based dishes
Melts beautifully over steak, chicken, or tofu
Perfect for finishing rice, noodles, or warm bread
Ideal for entertaining, meal prep, or gifting
It’s also incredibly quick to make, requiring no cooking and just a handful of ingredients.
How to Make Yuzu Herb Butter
This Yuzu Herb Butter recipe is quick to prepare and requires no cooking, making it perfect for both everyday meals and special occasions. Using premium Kishida Yuzu Juice, fresh herbs, and a touch of umami, this simple compound butter delivers bold, citrus-led flavour with minimal effort. Follow the step-by-step instructions below to create a versatile butter that melts beautifully over fish, vegetables, meat, or warm bread.
Make your dishes shine with this easy and flavourful Yuzu Herb Butter recipe. Combining Kishida Yuzu Juice, fresh herbs, and optional miso, this savoury compound butter is perfect for adding a citrusy, umami-rich boost to grilled vegetables, seafood, meats, or crusty bread. Ideal for foodies, home cooks, and fans of Japanese flavours, this butter is a versatile kitchen staple.
Course Appetiser enhancer, Condiment, Side Dish, Topping/Finishing butter
Cuisine Asian-inspired, Japanese-inspired, Modern European (with Japanese twist)
Diet Gluten Free, Low Calorie, Vegetarian
Keyword compound butter with yuzu, Japanese citrus butter, Kishida Yuzu Juice recipe, yuzu butter recipe, yuzu herb butter
In a bowl, combine the softened butter with yuzu juice, herbs, miso (if using), garlic, zest, salt, and pepper. Mix until fully combined and smooth.
Shape and chill:
Scoop the butter onto a piece of baking parchment or clingfilm, roll into a log, and twist the ends. Chill in the fridge for at least 1 hour to firm up, or freeze for longer storage.
Slice & serve:
Slice into discs and serve over grilled salmon, roasted veg, steak, warm bread, or even stirred into steamed rice or soba noodles
Notes
What is Yuzu? Yuzu is a fragrant Japanese citrus fruit known for its sharp, floral aroma — similar to a blend of lemon, lime, and grapefruit. It’s widely used in Japanese cuisine to enhance sauces, dressings, and marinades.Where to buy yuzu juice: We recommend Kishida Yuzu Juice 1.8L — a premium-quality product ideal for cooking, baking, and dressings available at Nicol Retailer Limited.Make-ahead & storage tips: Yuzu herb butter can be made in advance and stored in the fridge for up to 5 days, or frozen for 3 months. Slice from frozen as needed.How to use yuzu butter: This citrus compound butter pairs beautifully with grilled fish, roasted vegetables, steamed rice, noodles, bread, tofu, and steak. It melts easily and adds a gourmet touch to everyday dishes.Customise it: Try swapping parsley for chives or coriander, adding chilli flakes for heat, or including a touch of white miso for a deeper umami flavour.Dietary swaps: Use plant-based butter to make this recipe fully vegan and dairy-free.Why you’ll love it: This recipe is quick, elegant, and brings bold flavour with minimal effort. It’s perfect for entertaining, meal prep, or enhancing weeknight dinners.
One of the best things about this Yuzu Herb Butter is how effortlessly it enhances a wide range of dishes. The fragrant citrus notes of yuzu cut through richness, while the herbs and umami create depth, making it a versatile finishing butter you’ll reach for again and again.
Perfect with Seafood
Yuzu herb butter melts beautifully over grilled salmon, pan-seared scallops, prawns, sea bass, or cod. The citrus freshness brightens the natural sweetness of seafood without overpowering it, making it ideal for both simple weeknight meals and elegant dinner parties.
Elevate Meat Dishes
Add a slice of yuzu butter to rested steak, roast chicken, pork chops, or lamb cutlets. As it melts, it creates a glossy, flavour-packed sauce that enhances savoury depth while keeping the dish light and balanced.
Transform Vegetables
Toss freshly roasted or steamed vegetables such as asparagus, tenderstem broccoli, green beans, carrots, mushrooms, or sweetcorn with yuzu herb butter for instant flavour. It’s an easy way to make plant-based dishes more exciting and satisfying.
Ideal for Vegetarian & Vegan Cooking
This butter is exceptional with tofu, aubergine, courgette, or roasted cauliflower. Simply swap to plant-based butter to keep it vegan while maintaining the bright, Japanese-inspired flavour profile.
Finish Rice, Noodles & Grains
Stir yuzu herb butter into steamed rice, soba noodles, udon, quinoa, or couscous for a fragrant, citrus-led finish. It adds richness without heaviness, making it perfect for Asian-inspired bowls.
Simple but Luxurious with Bread
Serve yuzu herb butter with warm sourdough, crusty baguette, focaccia, or brioche. It’s also delicious melted over corn on the cob or stirred into mashed potatoes for a refined twist.
Entertaining & Meal Prep
Because it can be made ahead and frozen, yuzu herb butter is ideal for entertaining, dinner parties, and batch cooking. Slice as needed and let it melt naturally over hot food for a restaurant-quality finish at home.
Star Ingredient: Premium Yuzu Juice from Nicol Retailer Limited
The hero of this recipe is yuzu juice – a highly prized Japanese citrus ingredient known for its fragrant aroma and vibrant, complex flavour. Unlike lemon, yuzu offers a unique balance of sharpness and floral notes, making it ideal for savoury dishes like this Yuzu Herb Butter.
For best results, we recommend using Kishida Yuzu Juice, available to buy directly from Nicol Retailer Limited. This premium-quality yuzu juice is trusted by chefs and food professionals for its consistency, freshness, and authentic flavour profile.
Using a high-quality yuzu juice ensures:
Bright, clean citrus flavour without bitterness
Consistent results in cooking, baking, dressings, and sauces
A true Japanese-inspired taste that elevates simple recipes
Whether you’re making compound butter, marinades, dressings, or desserts, this yuzu juice delivers
Ingredients Available to Buy from Nicol Retailer Limited
To help you recreate this recipe with confidence, Nicol Retailer Limited stocks key specialist ingredients used in this dish:
Kishida Yuzu Juice – Ideal for savoury recipes, desserts, drinks, and dressings
Japanese pantry staples suitable for home cooks and professionals
High-quality ingredients sourced with flavour and performance in mind
Shopping with Nicol Retailer Limited means you get trusted products, reliable quality, and ingredients chosen specifically for creative cooking.
Yuzu Herb Butter FAQ – How to Use Yuzu Juice in Cooking
What is yuzu juice used for?
Yuzu juice is a highly aromatic Japanese citrus ingredient used to bring brightness and depth to both savoury and sweet dishes. It’s especially popular in sauces, marinades, dressings, desserts, and elegant finishing touches like yuzu herb butter, where it balances richness with fresh citrus notes.
Can yuzu juice replace lemon in recipes?
Yes. Yuzu can be used instead of lemon, but it offers a more refined flavour. While lemon is sharp and direct, yuzu delivers floral, mandarin-like notes with gentle bitterness, creating a more complex and elegant finish.
Is yuzu herb butter vegetarian or vegan?
This yuzu herb butter is vegetarian and naturally gluten-free. To make it vegan, simply use a high-quality plant-based butter — the citrus and herb flavours remain beautifully balanced.
How long does yuzu herb butter keep?
Stored in an airtight container, yuzu herb butter lasts up to 5 days in the fridge. It can also be frozen for up to 3 months. Freezing it in a log allows you to slice off portions as needed.
What does yuzu herb butter taste like?
It’s creamy and silky with a fragrant citrus lift. The butter provides richness, the herbs add freshness, and yuzu brings a bright, floral tang that feels lighter and more aromatic than lemon.
What dishes pair best with yuzu herb butter?
Yuzu herb butter pairs beautifully with grilled fish, prawns, roasted vegetables, tofu, steak, chicken, rice, noodles, and warm bread. Use it as a finishing butter to instantly elevate simple dishes.
Where can I buy yuzu juice in the UK?
You can buy premium Kishida Yuzu Juice from Nicol Retailer Limited. It’s ideal for cooking, baking, dressings, drinks, and Japanese-inspired recipes.
Why add yuzu to compound butter?
Yuzu’s acidity and aroma cut through butter’s richness, creating balance and elegance. It transforms simple butter into a restaurant-quality finishing ingredient with minimal effort.
Soft, Steamy, and Full of Flavour — Discover the irresistible delight of Hoisin Mushroom Bao Buns, a Vegan Street Food Sensation by Nicol Retailer Limited
The Street-Food Classic That’s Stealing the Show
If there’s one dish guaranteed to make your taste buds dance, it’s this: Hoisin Mushroom & Pickled Veg Bao Buns — soft, fluffy clouds of perfection filled with sticky, savoury-sweet mushrooms. They also include crunchy pickled vegetables and fresh herbs.
These aren’t just any buns — they’re made with premium Bao Hirata Buns from Nicol Retailer Limited. This is the secret ingredient behind their irresistible texture.
Pillowy on the outside and perfectly chewy inside, they create the ultimate bite — one that’s sweet, tangy, and satisfyingly umami all at once.
Why Everyone Loves This Recipe
Whether you’re vegan, flexitarian, or just a foodie with good taste, this recipe ticks every box. It’s quick, healthy, and packed with bold Asian street-food flavours that feel indulgent but don’t weigh you down. Here’s what makes it a winner:
100% plant-based and dairy-free
Made with authentic Hirata buns for that signature fluffiness
15-minute prep — perfect for midweek meals or party platters
Customisable with tofu, jackfruit, or crispy tempeh
These bao buns aren’t just food — they’re an experience. Every bite feels like something straight out of a modern Asian restaurant, but easier and faster to make at home.
The Star Ingredient: Bao Hirata Buns
The hero of this dish is undoubtedly the Bao Hirata Bun (1 × 30 × 50 g) — soft, versatile, and restaurant-quality. At Nicol Retailer Limited, these buns are sourced for chefs and food lovers who appreciate true authenticity. Whether you’re filling them with mushrooms, or teriyaki tofu, they transform simple ingredients into unforgettable meals.
There’s something truly irresistible about soft, fluffy bao buns filled with sticky, flavour-packed goodness. These Hoisin Mushroom & Pickled Veg Bao Buns are no exception. Each bite delivers the perfect balance of sweet and savoury. They feature glossy mushrooms, crisp pickled vegetables, and aromatic herbs wrapped in a warm, pillowy Bao Hirata Bun.
This recipe brings together everything you love about Asian street food — vibrant, fresh, and full of texture — but made simple for your home kitchen. Whether you’re planning a weekend lunch, a dinner party appetiser, or a vegan twist on comfort food, these bao buns are sure to impress.
Now, let’s make this mouth-watering restaurant-style dish come to life — step by step:
Indulge in these soft, pillowy Bao Hirata Buns filled with sticky hoisin-glazed mushrooms, crisp pickled vegetables, and fresh herbs. A vegan-friendly, Asian street food classic — bursting with sweet, savoury, and tangy flavours. Made with premium Bao Hirata Buns from Nicol Retailer Limited for a restaurant-quality experience at home.
Course Appetizer, Main Course, Starter, Street Food
Fresh coriander leaves and toasted sesame seeds for garnish
Instructions
Quick-pickle the veg
In a bowl, combine carrot, cucumber, salt, sugar and 2 tbsp rice vinegar. Toss well and set aside for 15 minutes to soften and absorb flavour.
Cook the mushrooms
Heat vegetable oil in a large pan over medium-high heat. Add the sliced mushrooms and cook until they release their moisture and begin to brown (about 5–6 minutes).
Add garlic, ginger, hoisin sauce, soy sauce, maple syrup and 1 tsp rice vinegar. Stir until the mushrooms are glossy and coated in a sticky, savoury-sweet glaze.
Steam the buns
Steam the Bao Hirata Buns for 2–3 minutes until soft and fluffy (per pack instructions).
Assemble the bao
Open each bun gently and fill with a spoonful of hoisin mushrooms, then top with pickled carrot and cucumber. Garnish with coriander and sesame seeds for a burst of freshness and crunch.
Serve immediately
Serve warm with extra hoisin sauce or chilli oil on the side for dipping.
Notes
These Hoisin Mushroom & Pickled Veg Bao Buns are a celebration of texture and flavour — a perfect balance of sweet, savoury, and tangy wrapped in the softest Bao Hirata Buns from Nicol Retailer Limited.Chef’s Tip: Use a mix of mushrooms such as shiitake, oyster, and chestnut for a deeper, meatier flavour. Don’t rush the cooking process — allow the mushrooms to caramelise slightly before adding the sauce for that glossy, sticky finish.Flavour Boost: Add a dash of rice wine or mirin while cooking for extra depth, or drizzle a little sesame oil just before serving for a nutty aroma.Make Ahead: The pickled vegetables can be prepared up to 2 days in advance — they taste even better once the flavours develop. Simply store in an airtight container in the fridge.Customise It: These bao buns are endlessly versatile. Try swapping the mushrooms for tofu, tempeh, or even shredded jackfruit for a unique twist.Serving Suggestion: Serve immediately after assembling while the buns are still warm and pillowy. Pair with a small bowl of dipping hoisin sauce or sriracha mayo for a restaurant-style touch.With every bite, you’ll enjoy the fusion of authentic Asian street-food flavours and plant-based goodness — all made effortless with Bao Hirata Buns from Nicol Retailer Limited.
These Hoisin Mushroom & Pickled Veg Bao Buns aren’t just a meal — they’re an experience. Each soft, pillowy bun is packed with flavour, freshness, and texture, making it the perfect centrepiece for any occasion. Whether you’re hosting friends, craving something light yet satisfying, or looking to recreate an authentic Asian street-food night at home, these bao buns will steal the spotlight.
Street-Food Feast at Home
Turn your kitchen into a bustling street market! Serve these bao buns alongside crispy vegetable spring rolls, edamame with sea salt, and steamed dumplings for the ultimate Asian street-food platter. Add a dipping trio — hoisin, sriracha mayo, and soy-ginger dressing — for flavour variety that keeps everyone coming back for more.
Light Lunch or Weekend Brunch
Pair your bao buns with a side of sesame cucumber salad or Asian-style slaw. For a weekend treat, serve them with bubble tea or homemade iced matcha lattes — refreshing, Instagram-worthy, and a total crowd-pleaser.
Date Night or Dinner Party
Planning a dinner that feels restaurant-worthy but effortless? Plate up your bao buns on a bamboo steamer or slate board, drizzle a little extra hoisin sauce on top, and sprinkle toasted sesame seeds.
Comfort Food Combo
For something heartier, serve your bao buns with sticky jasmine rice or miso soup on the side. The warm, savoury broth complements the sweet hoisin glaze beautifully, while the rice helps soak up all that irresistible sauce.
Dipping Sauces that Make It Unforgettable
Amp up the experience with easy homemade dips — creamy sriracha mayo, tangy soy-lime sauce, or a punchy peanut dressing. These sauces not only boost flavour but also make your bao buns perfect for sharing platters or party appetisers.
Pro Tip:
For a show-stopping presentation, serve the bao buns warm in bamboo baskets lined with parchment paper. Garnish with fresh coriander, red chilli slices, and a light drizzle of sesame oil. It’s a small detail that makes a big impact — both on taste and presentation.
No matter how you serve them, these Hoisin Mushroom Bao Buns promise to be the star of any table. They are simple to make, irresistibly delicious, and bursting with vibrant street-food flair
Create your own bao feast at home with authentic Bao Hirata Buns, available from Nicol Retailer Limited — delivering quality and taste across the UK.
Shop the Ingredients
Recreate this delicious street-food experience at home with authentic Bao Hirata Buns (2 × 30 × 50 g) — available exclusively from Nicol Retailer Limited. Browse the full shop here for restaurant-quality products, sauces, and gourmet essentials delivered across the UK.
Final Thoughts
From the first bite, these Hoisin Mushroom Bao Buns prove that flavour and simplicity can coexist beautifully. They’re quick, healthy, and utterly addictive — the kind of dish that keeps people talking (and sharing). Make them once, and you’ll be hooked. Made possible with Bao Hirata Buns from Nicol Retailer Limited — where quality meets creativity.
🛒 Shop This Recipe
Bring this delicious Hoisin Mushroom & Pickled Veg Bao Bun recipe to life
with authentic ingredients from
Nicol Retailer Limited —
your trusted UK source for restaurant-quality food and gourmet essentials.
A golden, flavour-packed vegan recipe for Crispy Garlic-Chilli Satonoyuki Tofu by Nicol Retailer Limited
If you think tofu is bland, prepare to have your mind changed forever. This Crispy Garlic-Chilli Satonoyuki Tofu with Sticky Soy Glaze is bold, aromatic, and packed with that irresistible sweet–spicy kick we all crave.
Using the delicate yet firm texture of Satonoyuki Firm Silken Tofu — available to buy from Nicol Retailer Limited — this recipe delivers the perfect balance of crisp edges, soft interiors, and a glossy, sticky glaze that clings beautifully to every bite.
It’s quick enough for a weekday dinner, delicious enough for a dinner party, and completely plant-based. Whether you’re vegan, vegetarian, or just love a flavour explosion, this dish will become a new favourite in your kitchen.
About Satonoyuki Firm Silken Tofu
Satonoyuki is Japan’s leading tofu brand, loved for its delicate flavour, silky texture, and reliability in both Asian and Western cooking.
Unlike traditional tofu, Satonoyuki Firm Silken Tofu keeps its shape beautifully — meaning you can fry, grill, or bake it without crumbling. It absorbs sauces and marinades effortlessly, making it the perfect canvas for this sticky soy glaze.
Available in convenient 300 g packs, it’s ideal for both home cooks and restaurants. You can order Satonoyuki Firm Silken Tofu (12 × 300 g) directly from Nicol Retailer Limited — your trusted supplier of authentic British and international ingredients, delivered across the UK.
Recipe
Get ready to fall in love with tofu all over again! This Crispy Garlic-Chilli Satonoyuki Tofu with Sticky Soy Glaze is a flavour-packed masterpiece that transforms everyday ingredients into something truly extraordinary. Made using premium Satonoyuki Firm Silken Tofu — available from Nicol Retailer Limited — this recipe delivers the ultimate balance of crunchy, golden texture on the outside and silky softness within.
Infused with the bold flavours of garlic, ginger, soy, and chilli, this vegan-friendly dish is as comforting as it is impressive. Whether you’re cooking for family, entertaining friends, or simply craving something special, this recipe guarantees to satisfy every bite.
Scroll down for the full recipe, step-by-step instructions, and serving tips to make this irresistible tofu dish at home.
Crispy Garlic-Chilli Satonoyuki Tofu with Sticky Soy Glaze
Crispy Garlic-Chilli Satonoyuki Tofu with Sticky Soy Glaze — a flavour-packed vegan dish made with Satonoyuki Firm Silken Tofu, pan-fried until golden and coated in a sweet-spicy soy glaze. Each bite delivers a perfect balance of crisp texture, silky interior, and bold umami flavour. Finished with sesame seeds, spring onions, and a squeeze of lime, this tofu bowl is delicious served over jasmine rice or noodles. Ideal for a quick weeknight dinner or an impressive plant-based meal.Made using premium Satonoyuki Firm Silken Tofu (available from Nicol Retailer Limited) — firm enough to hold its shape yet smooth enough to melt in your mouth.
Carefully drain and press your Satonoyuki tofu to remove excess moisture (about 10 min). Cut into 1-inch cubes, then toss lightly in cornflour, salt, and pepper for a delicate crisp coating.
Fry Until Golden
In a non-stick pan, heat oil over medium heat. Fry tofu cubes on all sides until crisp and golden — around 6–8 minutes. Remove and drain on kitchen paper.
Make the Glaze
In the same pan, reduce heat to low and add garlic and ginger. Sauté until fragrant (30 sec). Stir in soy sauce, rice vinegar, maple syrup, sriracha, and sesame oil. Simmer gently until thickened and glossy — about 2–3 minutes.
Glaze & Toss
Return the crispy tofu to the pan and toss to coat evenly in the sticky glaze. The tofu will soak up the flavour beautifully while staying crisp outside and tender inside.
Serve & Garnish
Spoon over jasmine rice or noodles, sprinkle with sesame seeds and spring onions, and finish with a squeeze of lime juice.
Notes
Satonoyuki Firm Silken Tofu is the perfect base for this recipe — firm enough to hold its shape while delivering that soft, melt-in-the-mouth interior. Its versatility makes it ideal for frying, baking, or glazing.For extra crispiness, press the tofu for 10 minutes before cooking and toss it in cornflour. This creates that irresistible golden crust.The sticky soy glaze balances savoury umami with a touch of heat and sweetness — perfect over jasmine rice or noodles. Double the sauce for meal-prep bowls or stir-fry dishes.Swap soy sauce for tamari to make this dish 100% gluten-free.This tofu pairs beautifully with roasted vegetables, edamame, or steamed bok choy for a colourful, nutrient-rich plate.Great for vegan, vegetarian, and dairy-free diets, this recipe is high in plant protein and packed with bold flavour.Serve hot with lime wedges and sesame seeds for a restaurant-style finish.Created using Satonoyuki Firm Silken Tofu (available from Nicol Retailer Limited) — your go-to UK supplier for premium Asian and vegan ingredients.
This Crispy Garlic-Chilli Satonoyuki Tofu is one of those rare dishes that’s as versatile as it is delicious. Whether you want to keep it light or turn it into a hearty main course, this tofu works beautifully with a variety of sides, textures, and flavours. Here are some irresistible ways to serve and pair it:
Classic Rice Bowl
Serve your crispy tofu over a generous bed of steamed jasmine or sticky rice to soak up every drop of the sticky soy glaze. Add a side of stir-fried vegetables — like broccoli, bok choy, or sugar snap peas — for balance and colour. This simple bowl highlights the savoury umami glaze while keeping the meal wholesome and satisfying.
Noodle Heaven
For a slurp-worthy twist, toss your glazed tofu into rice noodles, udon, or soba. Drizzle over a little extra sauce and top with chopped peanuts, coriander, and lime juice for a Southeast Asian-inspired vibe. Perfect for those who love a heartier, restaurant-style vegan noodle bowl.
Buddha Bowl Bliss
Turn this dish into a vibrant, nutrient-packed Buddha bowl by layering crispy tofu with quinoa, roasted sweet potatoes, fresh avocado, cucumber ribbons, and pickled red cabbage. Finish with a sprinkle of sesame seeds and a spoonful of leftover glaze as dressing. Ideal for meal prep or a balanced, colourful plant-based lunch.
Wrap It Up
Take your tofu on the go by wrapping it in a warm tortilla or rice paper roll. Add shredded carrots, lettuce, and a drizzle of spicy mayo or vegan hoisin for a delicious fusion snack. A fun, family-friendly twist that’s easy to pack for lunch or picnics.
Japanese-Inspired Dinner Set
Create an elegant dinner experience by pairing your tofu with miso soup, steamed edamame, and pickled ginger. Add a side of sushi rice and finish with a cup of green tea for a balanced, authentic Japanese meal. A simple yet sophisticated way to showcase Satonoyuki’s authentic Japanese origins.
Fresh & Light Option
If you’re after something refreshing, serve your crispy tofu on top of a crunchy Asian slaw made from shredded cabbage, carrots, and spring onions. Toss the slaw in a light sesame dressing and enjoy the perfect mix of hot, cold, crunchy, and soft textures. A refreshing option for summer days or lighter lunches.
Family-Style Feast
Double the recipe and serve it as a centrepiece alongside other dishes like fried rice, vegetable tempura, or vegan dumplings. The glossy, sticky tofu makes a stunning main dish that looks (and tastes) like something straight from your favourite restaurant.
Why It Works Year-Round
This tofu dish isn’t just for one season — it’s a recipe that fits any occasion. In winter, serve it warm with rice or noodles for cosy comfort. In summer, enjoy it chilled in a salad or as a protein-packed picnic wrap. For entertaining, it’s impressive, vibrant, and easy to prepare in advance.
Tip:
All the ingredients, including the Satonoyuki Firm Silken Tofu (12×300g), are available to buy from Nicol Retailer Limited — your trusted source for premium British and Asian ingredients with nationwide UK delivery.
This Crispy Garlic-Chilli Satonoyuki Tofu is proof that plant-based food can be indulgent, flavourful, and satisfying. It’s a recipe that celebrates texture and taste — golden on the outside, soft within, and glazed to perfection.
Proudly created by Nicol Retailer Limited, this dish brings authentic Japanese tofu to your UK kitchen. Every bite is bold, aromatic, and deeply comforting — the kind of meal that keeps everyone coming back for seconds.
When it comes to fresh, vibrant cooking, few ingredients are as underrated and versatile as Mooli (also known as Daikon Radish). One delightful way to enjoy this ingredient is by making a Fresh Mooli & Carrot Salad with Lemon Dressing. This crisp, white root vegetable is a staple in Asian and Middle Eastern kitchens. It is loved for its delicate peppery flavour, refreshing crunch, and impressive nutritional benefits.
At Nicol Retailer, our Fresh Mooli (2kg pack) is carefully sourced for maximum freshness, flavour, and quality. Whether you’re a home cook or catering for family gatherings, this humble root transforms everyday meals into something truly special. For instance, a mooli carrot salad with lemon dressing.
Why Choose Fresh Mooli?
Light & Refreshing: Adds natural crunch to salads, slaws, and side dishes. It perfectly blends in a salad with fresh carrot and lemon dressing.
Nutrient-Rich: High in vitamin C, fibre, and antioxidants.
Versatile: Delicious raw, pickled, stir-fried, or added to soups and curries.
Diet-Friendly: Vegan, gluten-free, low in calories – perfect for healthy eating.
When paired with colourful vegetables like carrots, spring onions, and fresh coriander, mooli shines as the star ingredient. It makes this crisp, tangy, and utterly addictive salad.
Here s the step by steps of how to make this delicious recipe, a fresh mooli and carrot salad dressed with lemon.
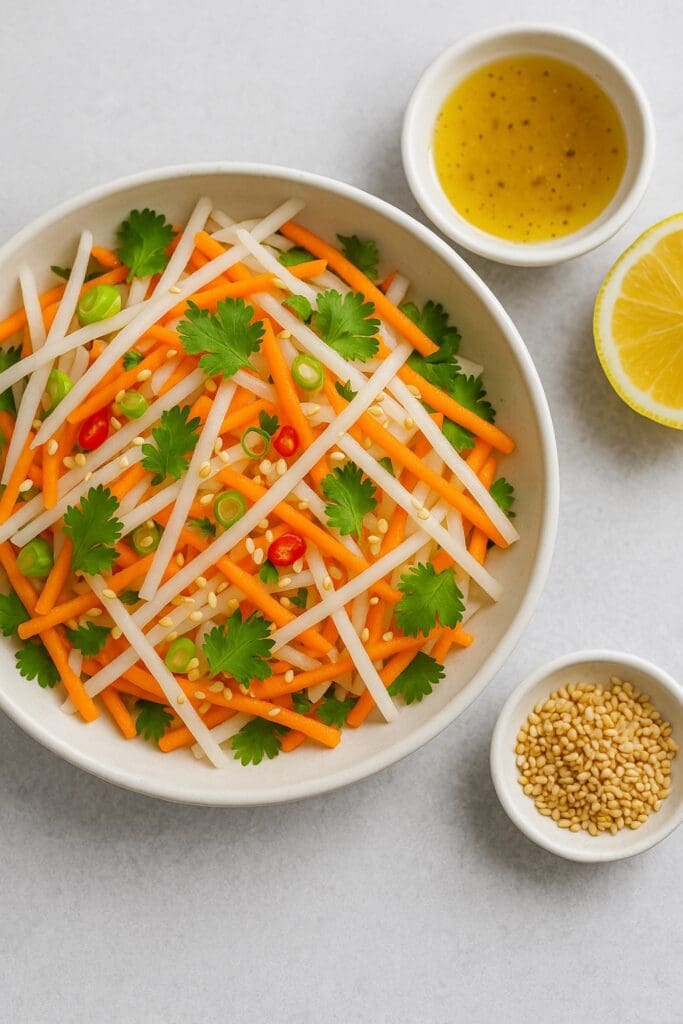
Refreshing Mooli & Carrot Salad with Lemon Dressing
Fresh Mooli & Carrot Salad with Lemon DressingCrisp, light, and packed with flavour, this Fresh Mooli (Daikon Radish) and Carrot Salad is the perfect healthy side dish. Made with julienned mooli, crunchy carrots, spring onions, fresh coriander, and a zesty sesame-lemon dressing, it’s a refreshing no-cook recipe ready in just 10 minutes. Ideal for summer barbecues, Asian-inspired meals, or a light lunch, this vibrant salad balances sweet, tangy, and nutty flavours beautifully. Garnished with toasted sesame seeds, it pairs wonderfully with grilled fish, sushi, or spicy noodles.
Peel and julienne (or grate) the Fresh Mooli and carrots.
Place in a mixing bowl with sliced spring onions, chilli and coriander.
Make the Dressing
In a small bowl, whisk together lemon juice, vinegar, sesame oil, honey (or agave), salt and pepper.
Combine
Pour the dressing over the salad and toss well to coat.
Finish & Serve:
Sprinkle with toasted sesame seeds for extra crunch.
Serve chilled as a light side dish or refreshing starter.
Notes
For the best texture, serve this salad immediately after tossing with the dressing. If preparing ahead, keep the vegetables and dressing separate, then combine just before serving to maintain crunch and freshness.TipsAdd crunch: Toss in roasted peanuts, cashews, or crispy fried shallots for extra texture.Spice it up: A dash of chilli flakes or a drizzle of sriracha can give it a fiery kick.Make it creamy: Add a spoonful of Greek yoghurt or tahini to the dressing for a richer flavour.Swap veggies: Replace carrots with cucumber, beetroot, or thinly sliced red cabbage for colour and variety.Protein boost: Top with grilled tofu, edamame, or shredded chicken for a light main course.Citrus twist: Swap lemon with lime or yuzu juice for a sharper, tangy profile.
This salad isn’t just a side – it’s a versatile dish that elevates any meal. Especially when featuring fresh ingredients like mooli and carrot, combined with a lemony zest.
With Grilled Fish or Chicken: The citrusy dressing cuts through smoky flavours, making it a refreshing side to seafood or lean meats.
Alongside Sushi or Asian Dishes: Its crisp crunch balances soy, ginger, and wasabi notes perfectly.
At Summer BBQs: A cooling, light option to serve alongside rich burgers, skewers, and grilled veggies.
Paired with Spicy Curries: The fresh mooli offers a cooling contrast to bold Indian or Thai curries.
As a Light Lunch: Add extra protein (tofu, prawns, or chickpeas) and enjoy as a satisfying meal on its own.
Drinks Pairing: Complements citrusy mocktails, or sparkling water with lime.
Bring Freshness to Your Table
Ready to try this recipe? Stock up on Fresh Mooli (2kg) direct from Nicol Retailer. With its crisp texture and delicate flavour, it’s the secret ingredient your kitchen has been missing. Order now and create this refreshing salad at home – healthy, vibrant, and full of flavour with the freshness of mooli and carrots under a lemony finish.
Looking for a healthy Japanese soup recipe that’s quick, light, and bursting with umami? This Japanese Chicken & Vegetable Clear Soup with Ninben Shiro Dashi is made using the authentic Ninben Shiro Dashi 500 g – a concentrated Japanese soup base that transforms simple ingredients into a restaurant-quality dish in under 30 minutes.
Whether you need a light starter, a comforting soup course, or a nourishing weeknight dinner, this recipe with Ninben Shiro Dashi is a winner. It includes delicious elements like chicken, vegetables, and the famous Ninben Shiro Dashi for a clear soup packed with flavour.
What is Ninben Shiro Dashi?
Shiro dashi is a light-coloured Japanese soup base made from dashi stock (kombu and bonito), soy sauce, and mirin. Unlike darker broths, it doesn’t overpower or darken your dishes – making it ideal for clear soups, simmered vegetables, and noodle recipes like Japanese Chicken & Vegetable Clear Soup with Ninben Shiro Dashi.
Ninben, a heritage Japanese brand with over 300 years of expertise, is famous for producing shiro dashi with a clean, balanced umami flavour. Just a splash of Ninben Shiro Dashi 500 g saves hours of stock-making.
The History of Japanese Clear Soup – and Why Ninben Shiro Dashi Matters
Clear soups, known as osuimono, have been part of Japanese dining for over a thousand years. Originating in the Heian period (794–1185), they were created to highlight the natural taste of seasonal ingredients rather than overwhelm them. Traditionally served in kaiseki (multi-course banquets) and formal tea ceremonies, osuimono embodies the Japanese principle of simplicity and elegance.
At the heart of every clear soup is dashi – the light yet flavour-rich stock made from kombu (kelp) and katsuobushi (bonito flakes). This combination forms the backbone of Japanese cuisine, celebrated for its clean umami depth. Chefs would carefully prepare dashi daily, then use it to create soups with proteins like chicken and vegetables, often turning them into a Japanese Chicken & Vegetable Clear Soup with Ninben Shiro Dashi.
Ninben’s Place in This Tradition
Founded in 1699 in Tokyo, Ninben is one of Japan’s oldest and most respected producers of dashi. For over 300 years, the brand has perfected the art of balancing umami, sweetness, and clarity in its soup bases.
Today, Ninben Shiro Dashi 500g brings this centuries-old culinary heritage into your home. By using shiro dashi, you’re not just saving time — you’re carrying forward a tradition that has shaped Japanese cuisine for generations. With just a splash of Ninben Shiro Dashi, you can recreate the same refined Japanese Chicken & Vegetable Clear Soup with Ninben Shiro Dashi once served to emperors and tea masters — now made accessible for modern kitchens worldwide.
Bring Centuries of Flavour Into Your Kitchen
For over 300 years, Japanese chefs and home cooks have relied on dashi to create soups that are light, elegant, and deeply satisfying. With Ninben Shiro Dashi 500g, you can enjoy that same tradition without the hours of preparation. This versatile soup base lets you:
Make authentic Japanese clear soups in minutes
Create noodle broths full of umami depth
Simmer vegetables, tofu, or fish with ease
Add a touch of Japanese flavour to everyday dishes
Ready to taste the difference? Shop Ninben Shiro Dashi at Nicol Retailer and bring a piece of Japanese food heritage to your table today.
Japanese Chicken & Vegetable Clear Soup with Ninben Shiro Dashi
If you’re looking for a light yet deeply flavourful soup that’s both comforting and elegant, then this Japanese Chicken & Vegetable Clear Soup (Sumashi-jiru) is for you. Using Ninben Shiro Dashi 500 g, you can create an authentic, restaurant-quality dish in minutes — no need to make stock from scratch. This recipe is perfect for busy weeknights, a warming starter, or when you want a wholesome dish that showcases the delicate balance of Japanese flavours.
Course Starter
Cuisine Japanese
Diet Low Fat
Keyword Authentic Japanese soup base, Buy Shiro Dashi UK, Chicken and vegetable soup Japanese, Japanese broth with vegetables, Ninben Shiro Dashi, Shiro dashi recipe
Prep Time 10 minutesmins
Cook Time 15 minutesmins
Servings 4People
Calories 120
Ingredients
300gchicken breast (skinless, boneless), thinly sliced
In a medium saucepan, bring 1 litre of water to a gentle simmer. Stir in the Ninben Shiro Dashi and taste — it should be delicate and balanced. Adjust with a little extra water if needed.
Cook the vegetables
Add the carrot, daikon, and shiitake mushrooms. Simmer gently for 5–7 minutes until just tender.
Add the chicken
Slide in the chicken slices and simmer for 3–4 minutes, or until fully cooked. Keep the heat gentle to maintain a clear broth.
Finish with greens
Stir through the spinach or mizuna until just wilted.
Serve
Ladle into bowls, top with spring onions, and garnish with yuzu peel or lemon zest for freshness. Enjoy steaming hot.
Notes
This Japanese Chicken & Vegetable Clear Soup is a light, healthy delight that really lets Ninben Shiro Dashi 500 g shine as the star ingredient. You can conveniently purchase this dashi on Nicol Retailer. Because shiro dashi is a concentrated soup base—combining dashi stock (kombu & bonito), mirin, and soy sauce—it instantly adds deep umami without muddying the clarity of the broth. Just one well-balanced bottle can transform simple ingredients into a restaurant-style Japanese soup in minutes.💡 Pro tip: Always check the dilution guideline on your shiro dashi bottle. Some brands are saltier or stronger than others. Start with a moderate amount (e.g. 50 ml per litre) then adjust by tasting—add a little extra water if it’s too intense, or a splash more concentrate if it feels weak.
This Japanese Chicken & Vegetable Clear Soup with Ninben Shiro Dashi is light, versatile, and pairs beautifully with a variety of Japanese and fusion dishes. Here are some ways to enjoy it:
With Rice -Serve alongside steamed Japanese short-grain rice for a traditional meal. Pair with onigiri (rice balls) filled with salmon, tuna, or pickled plum for a light lunch.
With Noodles – Add udon noodles for a heartier, comforting bowl. Try somen noodles in summer for a refreshing, chilled version. Use soba noodles for a buckwheat twist that’s rich in fibre.
Vegetarian & Vegan Options – Replace chicken with silken or firm tofu for a protein-rich, meat-free soup. Increase the amount of mushrooms (shiitake, enoki, or shimeji) for a deeper umami flavour. Add wakame seaweed for extra nutrients and a traditional Japanese touch.
Seafood Twist – Swap the chicken for king prawns, scallops, or white fish fillets. Simmer gently until the seafood is just cooked for a delicate, light broth.
As Part of a Japanese Meal, pair with gyoza (Japanese dumplings) as a starter and follow with a rice or noodle dish like the Japanese Chicken & Vegetable Clear Soup with Ninben Shiro Dashi. Serve alongside a teriyaki chicken donburi for a balanced dinner. Include as part of a multi-course Japanese-inspired meal with miso soup, sashimi, and tempura.
Are you looking for a dish that’s both refreshing and invigorating? Look no further than our spicy papaya salad recipe! This dish is packed with vibrant colours and flavours, thanks to the unique combination of ripe papaya and spicy chilli peppers. Picture the natural sweetness of papaya paired with the crisp texture of fresh vegetables like carrots, bell peppers, and bean sprouts, all tied together with a tangy lime dressing. It’s the kind of salad that excites your taste buds and keeps you wanting more.
Perfect for any occasion, this spicy papaya salad is not only a treat for the eyes but also a healthy choice loaded with vitamins and antioxidants. Whether you’re preparing a family meal or hosting friends for a casual get-together, this salad is sure to be a hit. Additionally, it’s incredibly simple to make, requiring very little preparation.
The ingredients are straightforward and fresh, making it a wholesome option that’s ideal for anyone aiming to include more vegetables in their diet. Papaya, renowned for its high vitamin C content, pairs wonderfully with the beta-carotene found in carrots and the fibre provided by bean sprouts. The inclusion of coriander and chilli peppers not only adds a flavourful kick but also brings an extra nutritional benefit.
So, why wait? Get ready to enjoy the bold and delightful combination of sweet, spicy, and tangy tastes with our spicy papaya salad recipe. Whether you’re confident in the kitchen or just starting out, this recipe is a fantastic way to bring something exciting to your table.
To craft this delightful spicy papaya salad, here is the step by step:
Are you looking for a dish that's both refreshing and invigorating? Look no further than our spicy papaya salad recipe! This dish is full of vibrant colours and flavours, thanks to the wonderful combination of ripe papaya and spicy chilli peppers. Picture the sweetness of papaya paired with the crunch of fresh vegetables such as carrots, peppers, and bean sprouts, all tied together with a tangy lime dressing. It’s the sort of salad that brings joy to your taste buds and leaves you wanting more.
Course Appetizer, lunch, Side Dish
Cuisine Thai
Diet Vegetarian
Keyword Fresh papaya salad, How to make papaya salad at home, Papaya salad recipe, Spicy papaya salad, Thai papaya salad, Thai-inspired salad for summer
1red chilli pepper, finely chopped (or less, to taste)
Instructions
Prepare the vegetables
Using a sharp knife or a julienne peeler, slice the green papaya and carrots into thin strips. Place them into a large mixing bowl.
Add the sliced red and yellow bell peppers, bean sprouts, and half of the chopped coriander to the bowl.
Make the dressing
In a small bowl, combine the lime juice, fish sauce, brown sugar, minced garlic, sesame oil, and finely chopped chilli pepper. Mix thoroughly until the sugar has dissolved.
Assemble the salad
Pour the dressing over the vegetable mixture and toss well to ensure everything is evenly coated.
Garnish and serve
Transfer the salad to a serving dish. Garnish with the remaining coriander, sliced chilli pepper, and roasted peanuts, if using.
Serving your spicy papaya salad with style can make all the difference. Begin by arranging the salad on a large, colourful platter to showcase its striking colours. The vibrant orange of the papaya and carrots, the red of the bell pepper, and the fresh green of the coriander create a visual treat that’s hard to resist.
To make your meal more special, think about serving the salad alongside grilled chicken or prawns. The smoky flavours from the grill work wonderfully with the tangy, spicy taste of the salad. If you prefer a vegetarian option, slices of tofu or tempeh are excellent protein-packed additions. These not only make the dish more nourishing but also more satisfying.
For an elegant touch, decorate the salad with extra coriander leaves and a handful of roasted peanuts. This simple addition improves both the taste and the presentation, making it ideal for hosting guests. A squeeze of fresh lime juice just before serving adds a refreshing sharpness that ties the flavours together perfectly.
Whether you’re hosting a dinner party or enjoying a meal with your family, these serving ideas will help you present a dish that looks as good as it tastes. Savour every bite of this delightful salad!
Nutritional Benefits
This spicy papaya salad isn’t just tasty; it’s full of nutrients that can enhance your health. The key ingredient, papaya, is high in vitamin C and antioxidants, which help to strengthen your immune system and combat free radicals. Carrots bring in plenty of beta-carotene, supporting healthy vision and skin. At the same time, the fresh bean sprouts provide fibre and protein, aiding digestion and keeping you feeling satisfied. Coriander, often an underappreciated herb, delivers anti-inflammatory properties and is packed with essential vitamins like A and K.
Adding red chilli peppers to the mix not only gives the salad its spicy flavour but also introduces capsaicin, a compound known to support metabolism and heart health. The lime juice in the dressing is a great source of vitamin C, while fish sauce supplies vital amino acids and minerals. Don’t overlook the roasted peanuts, which add a delightful crunch along with healthy fats and protein.
By preparing this salad with fresh ingredients, you’re choosing a meal that supports overall well-being. Each bite brings together flavours that are not only enjoyable but also beneficial to your body. So, dig into this colourful, nourishing dish and savour the advantages it offers!
Frequently Asked Questions
Can I make this spicy papaya salad ahead of time?
Certainly! You can prepare the individual ingredients beforehand. However, for the best texture and flavour, it’s advisable to mix them together and add the dressing just before serving. This helps the salad stay fresh and crisp.
What can I use as a substitute if I can’t find green papaya?
If green papaya is unavailable, you can use thinly sliced green mango or cucumber as an alternative. Both options offer a similar crisp texture and refreshing flavour.
How should I store leftovers?
Store any leftover salad in an airtight container and place it in the fridge. Although it will remain good for up to two days, this salad is best enjoyed fresh to maintain its vibrant flavours and crispness.
My salad turned out too spicy. How can I fix it?
If your salad is too spicy, you can reduce the heat by adding extra lime juice or a little sugar. This will help balance the flavours and make it less spicy.
Okonomiyaki, often hailed as Japan’s answer to the savoury pancake, is a dish that captures the essence of comfort food with a unique twist. Hailing from Osaka and Hiroshima, this delightful dish is a staple in Japanese households and street food markets alike. But what exactly makes this Japanese savoury pancake so special? Mastering the delicious Okonomiyaki recipe lies in its harmonious blend of textures and flavours, all combined to create a truly satisfying meal.
The term “Okonomiyaki” translates to “grill as you like,” and this flexibility is what sets it apart. Whether you’re a seafood lover, a meat enthusiast, or a vegetarian, this dish can be tailored to suit your palate. Imagine a hearty pancake filled with finely chopped cabbage, eggs, and grated yam, all brought together with a smooth, flavourful batter. It’s then cooked to golden perfection and topped with a rich, freshly made Okonomiyaki sauce, mayonnaise, and a sprinkle of bonito flakes.
This Delicious Okonomiyaki Recipe will guide you through the process of creating this culinary masterpiece in your own kitchen. With easy-to-follow steps and a focus on fresh, quality ingredients, you’ll be well on your way to mastering this iconic dish. From the foundational batter to the final touches, every aspect of this recipe is designed to bring out the best in each ingredient, resulting in a pancake that’s both light and flavourful.
So, if you’re looking to explore the rich world of Japanese cuisine, starting with Okonomiyaki is an excellent choice. Dive into this Delicious Okonomiyaki Recipe and experience the joy of crafting a dish that is both traditional and adaptable, making it a perfect addition to your culinary repertoire. Here is the recipe and step by step instruction:
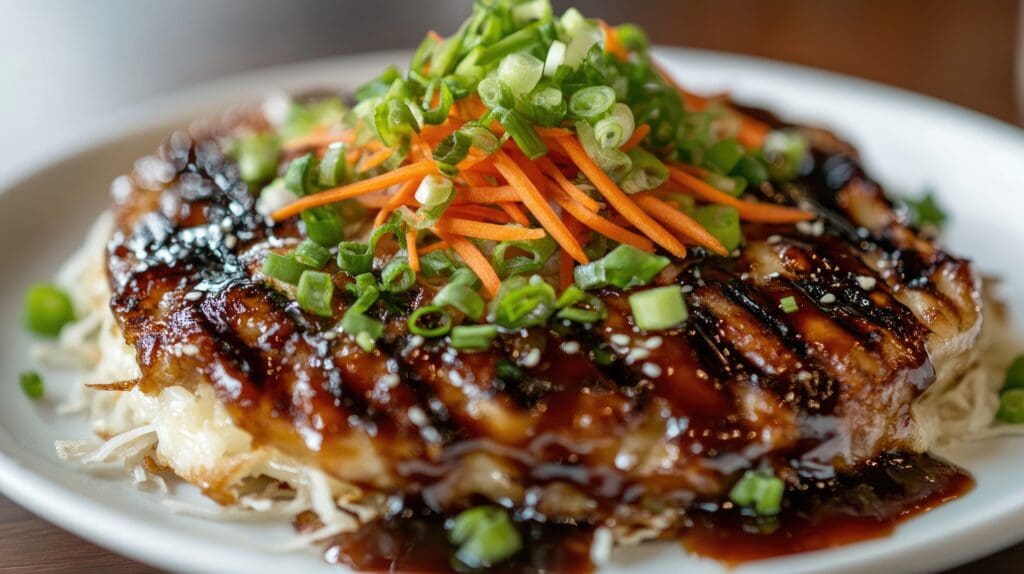
Delicious Okonomiyaki Recipe with Freshly made Okonomiyaki Sauce
The Delicious Okonomiyaki Recipe provides an easy-to-follow guide for making this traditional Japanese savoury pancake. The dish combines flour, eggs, cabbage, and other ingredients, such as pork or seafood, to create a flavourful meal. The batter is mixed with the fillings, then cooked on a hot griddle until both sides are golden brown. It is typically garnished with okonomiyaki sauce, mayonnaise, seaweed flakes, and bonito flakes. This recipe is known for its versatility, allowing for personal preferences in terms of ingredients and toppings, making it a delightful option for any occasion.
Course Breakfast, Snack
Cuisine Asian-inspired
Keyword Delicious Okonomiyaki Recipe for Four, Japanese pancake, Japanese savoury pancake, Okonomiyaki Recipe
In a medium-sized bowl, combine the tomato ketchup, Worcestershire sauce, and soy sauce. Stir well until they are fully blended.
Add the honey or sugar to the mixture, stirring until it dissolves completely. If you prefer a slightly sweeter sauce, you can adjust the amount to taste.
Pour in the oyster sauce and mix thoroughly. This will give the sauce a richer depth of flavour.
If you're using Dijon mustard, add it now and stir until it's evenly distributed. This step is optional but adds a hint of tanginess to the sauce.
Taste the sauce and adjust any of the ingredients to your liking. You can add more soy sauce for saltiness, more ketchup for sweetness, or more Worcestershire sauce for tang.
Once you're satisfied with the taste, transfer the sauce toa small serving bowl or jar.
Making the Okonomiyaki
Start by sifting plain flour into a large mixing bowl, ensuring a smooth and lump-free base. Gradually add water, whisking continuously to blend it seamlessly with the flour. Once you achieve a smooth mixture, crack in the eggs and beat until well combined.
Add the eggs and mix well.
Fold in the cabbage, one of the sliced spring onions, and the carrots until well combined.
Cook the Okonomiyaki
Heat a non-stick frying pan or griddle over medium heat and add a little oil.
Pour a quarter of the batter onto the pan, shaping it into a round pancake about 2cm thick.
Place a few slices of pork belly or bacon on top of the pancake.
Cook for about 4-5 minutes on one side until golden brown, then flip and cook the other side for another 4-5 minutes.
Cook for about 4-5 minutes on one side until golden brown, then flip and cook the other side for another 4-5 minutes.
Add the Toppings
Once cooked, transfer the okonomiyaki to a serving plate.
Brush the top with okonomiyaki sauce and drizzle with mayonnaise.
Garnish with the remaining spring onion and pickled ginger if using.
Serve
Serve hot and enjoy this delightful Japanese pancake with friends or family.
Notes
Tips
Batter – The key to an ideal batter consistency lies in its thickness. It should be thick enough to hold its shape on a spoon but still fluid enough to pour easily. If it’s too thick, add a bit more dashi; if it’s too runny, incorporate a little more flour.A helpful tip is to let the batter rest for about 15 minutes. This resting period allows the flour to fully absorb the liquid, creating a cohesive mixture that enhances the pancake’s texture. During this time, the flavours meld together, making each bite incredibly delicious.Follow these steps meticulously, and you’ll have a batter that’s ready to transform into a mouth-watering Japanese savoury pancake.Pancake – To avoid common pitfalls, ensure the pan isn’t overcrowded, which can make flipping difficult and lead to uneven cooking. Maintain a medium heat to prevent burning the outside while leaving the inside undercooked. If you find the edges are browning too quickly, reduce the heat slightly and extend the cooking time.As the pancake cooks, you’ll notice the delightful aroma of the cabbage and dashi mingling, creating an irresistible scent that will have everyone eagerly waiting to tuck in.
Presentation is key when serving Okonomiyaki. A drizzle of mayonnaise and a generous helping of freshly made Okonomiyaki sauce atop your pancake not only adds flavour but also visual appeal. For an authentic touch, sprinkle bonito flakes and a handful of chopped spring onions. Pair your creation with traditional Japanese side dishes such as edamame or miso soup. As for drinks, a chilled glass of green tea complements the dish wonderfully, offering a refreshing contrast to the rich flavours.
To further enhance your dining experience, serve your Okonomiyaki on a hot plate to keep it warm throughout the meal. The heat intensifies the flavours, making each bite more enjoyable. Garnishing with pickled ginger or a squeeze of lemon can add a refreshing zing, balancing the savoury notes of the dish.
For those who enjoy a bit of spice, a sprinkle of shichimi togarashi (Japanese seven-spice blend) can add a delightful kick. Additionally, serving with a side of steamed rice can help to round out the meal, providing a satisfying and filling experience. Embrace the artistry of plating and let your creativity shine as you present this delicious Japanese savoury pancake to your delighted guests.
Customising Your Okonomiyaki
One of the best things about the Delicious Okonomiyaki Recipe is how easily it can be customised to fit your preferences. Whether you lean towards seafood, meat, or vegetarian options, there’s room for everyone at the Okonomiyaki table. Popular additions include succulent prawns, tender slices of pork belly, or even gooey cheese for an extra burst of indulgence.
If you have dietary restrictions, the recipe can be adapted without losing its charm. Swap regular flour for a gluten-free alternative or omit the eggs to make it vegan-friendly. The key is to experiment and find combinations that excite your taste buds.
Seasonal vegetables can also be a great addition. Think of thinly sliced mushrooms, sweet corn, or bell peppers to add a vibrant touch to your Japanese savoury pancake. For a spicy kick, consider incorporating finely chopped chillies or a dash of chilli powder into the batter.
The joy of this Delicious Okonomiyaki Recipe lies in its flexibility. Whether you’re hosting a dinner party or cooking a weeknight meal, customising your Okonomiyaki ensures that it will always be a delightful and personalised culinary experience.
Crispy vegetable tempura offers a delightful way to enjoy a variety of fresh vegetables encased in a light, airy batter. This traditional Japanese dish has won the hearts of food lovers worldwide, thanks to its unique texture and the versatility of ingredients. Making vegetable tempura at home provides an opportunity to explore different vegetables and perfect the technique in your own kitchen.
The origins of tempura date back to the 16th century when Portuguese missionaries introduced the concept of frying food in batter to Japan. Over the centuries, it has evolved into a staple of Japanese cuisine, known for its delicate crunch and the subtle interplay of flavours, especially in crispy vegetable tempura.
The essence of good tempura lies in its simplicity. A minimalistic approach ensures that the natural flavours of the vegetables are highlighted. By using a basic batter of plain flour, cornflour, baking powder, salt, and ice-cold water, you can achieve the quintessential lightness that defines this dish, particularly when making crispy vegetable tempura.
One of the joys of making tempura is the freedom to experiment with a wide range of vegetables. Whether you prefer the sweetness of sweet potatoes or the earthiness of mushrooms, there’s something for everyone. The key is to maintain a consistent size and thickness for even cooking, ensuring each piece is perfectly coated and fried, resulting in the perfect crispy vegetable tempura.
The experience of preparing and enjoying homemade crispy vegetable tempura is both rewarding and educational, offering a glimpse into the artistry of Japanese culinary traditions.
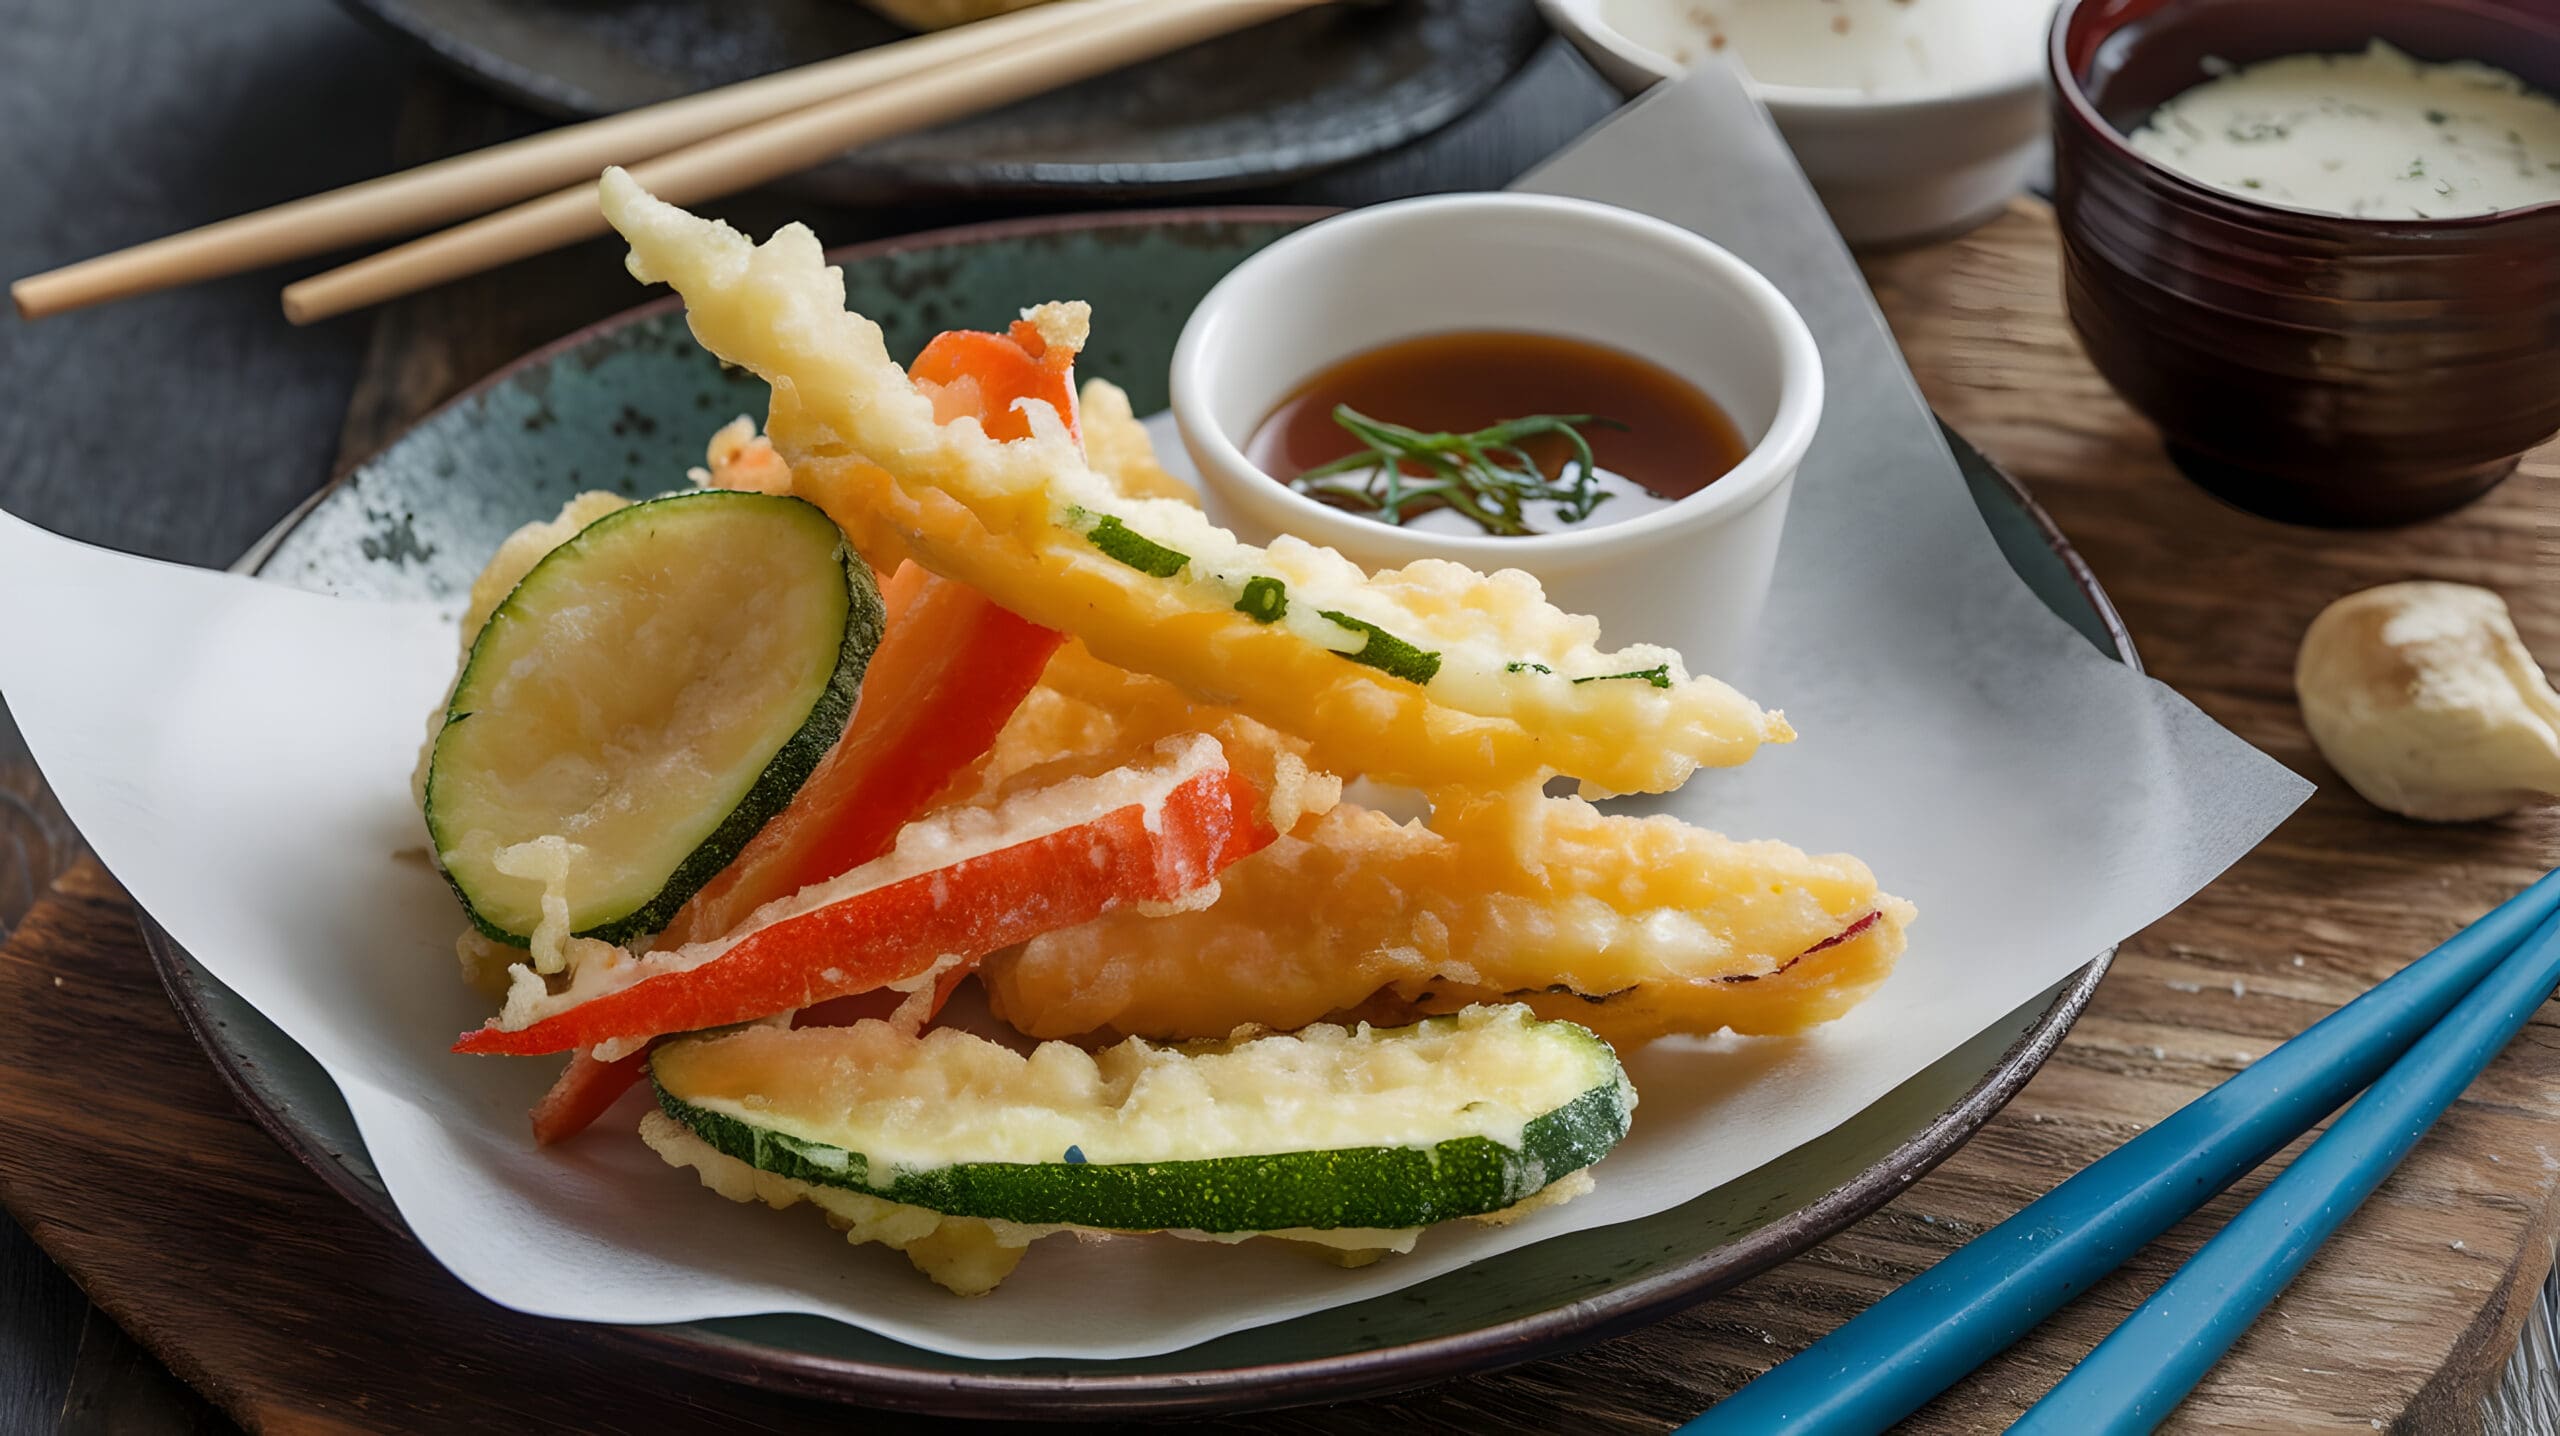
Crispy, Crunchy, Delicious: Vegetable Tempura like you've never experienced before!Indulge in the satisfying crunch of perfectly fried vegetables, coated in a light and airy batter. Paired with a delightful dipping sauce that enhances the flavours and leaves you craving for more.Experience the ultimate satisfaction of biting into a piece of vegetable tempura, with each bite bursting with flavour and texture. Perfect for a quick snack or a tasty appetiser. Treat yourself to a plate of vegetable tempura today and elevate your snacking experience to a whole new level.
Course Appetizer, Side Dish, Snack
Cuisine Asian-inspired
Diet Vegan, Vegetarian
Keyword Crispy Vegetable Tempura with Dipping Sauce
Ina large bowl, combine the plain flour, cornflour, and baking powder. Gradually whisk in the sparkling water until you achieve a smooth batter. Be careful not to overmix; a few lumps are fine.
Prepare the vegetables by slicing them as directed. Keep the pieces relatively uniform to ensure even cooking.
Cooking the Tempura
Heat vegetable oil in a deep pan or wok to around 180°C (350°F). To test, drop a small amount of batter into the oil; it should sizzle and rise to the surface immediately.
Dip each vegetable piece into the batter, ensuring they are coated evenly. Carefully lower them into the hot oil, frying in batches to avoid overcrowding.
Fry each batch for about 2-3 minutes or until the tempura is crisp and lightly golden. Remove with a slotted spoon and drain on kitchen paper. Season with salt while still hot.
Making the Dipping Sauce
In a small bowl, combine soy sauce, rice vinegar, mirin, ginger, spring onion,and sesame oil. Mix well.
Serving
Arrange the tempura vegetables on a serving platter. Serve immediately with the dipping sauce on the side.
Suggestions for Serving
Serving crispy vegetable tempura with an eye for detail can elevate the dining experience. Arrange the tempura pieces on a serving platter with a touch of artistry, perhaps using a garnish of fresh herbs like coriander or chives. A few slices of lemon can add a burst of colour and a hint of zest, making the presentation visually appealing.
For a complete meal, consider pairing your tempura with other Japanese favourites. A bowl of steaming noodles or a side of delicate sushi can complement the light, crispy texture of the tempura beautifully. You could also serve it alongside a simple bowl of steamed rice and miso soup for a well-rounded, traditional Japanese meal.
Individual dipping bowls for the sauce can add a touch of elegance to the presentation. Ensure each guest has their own small bowl of the delightful dipping sauce , allowing them to enjoy the tempura at their own pace.
To add variety, include a selection of tempura vegetables on the platter. The contrasting colours and flavours can create an inviting visual feast, showcasing the appeal of crispy vegetable tempura.
Finally, for a more informal setting, serve the tempura as part of a sharing platter, allowing everyone to pick and choose their favourite pieces. This communal style of eating not only makes the meal more interactive but also highlights the versatility and appeal of crispy vegetable tempura.
Typical Mistakes and How to Prevent When Tempura Vegetables
A frequent issue in tempura preparation is ending up with a batter that’s too thick, leading to a heavy coating. Ensuring the batter is slightly thinner than pancake batter can help achieve the desired lightness. Another common mistake is not maintaining the oil temperature. Use a kitchen thermometer to keep it between 170-180°C to ensure the tempura crisps up properly.
Avoid overcrowding the pan, as this can lower the oil temperature and result in soggy tempura. Fry in small batches to maintain consistent heat. Additionally, cutting vegetables into uniform sizes ensures even cooking, preventing overcooked or undercooked pieces.
To keep the batter cold, place the mixing bowl in a larger bowl filled with ice. Cold batter creates a better texture for making crispy vegetable tempura. If the batter starts warming up, refrigerate it for a few minutes. You may also consider using Tempura Batter Mix instead to save time.
Lastly, drain excess oil using a wire rack instead of kitchen roll to prevent sogginess. By paying attention to these details, you can ensure a delightful and authentic crispy vegetable tempura experience.