Explore the art of French cooking with Nicol Retailer’s Gourmet French Cuisine Recipes. This recipes are designed for both seasoned chefs and kitchen novices, featuring a range of traditional French recipes that are easy to follow. Prepare mouth-watering dishes like quiche Lorraine, beef bourguignon, and madeleines with simple, clear instructions and commonly available ingredients. Elevate your daily meals and enjoy the refined taste of France in every bite. This book is a must-have for anyone passionate about cooking and eager to master the techniques of French cuisine.
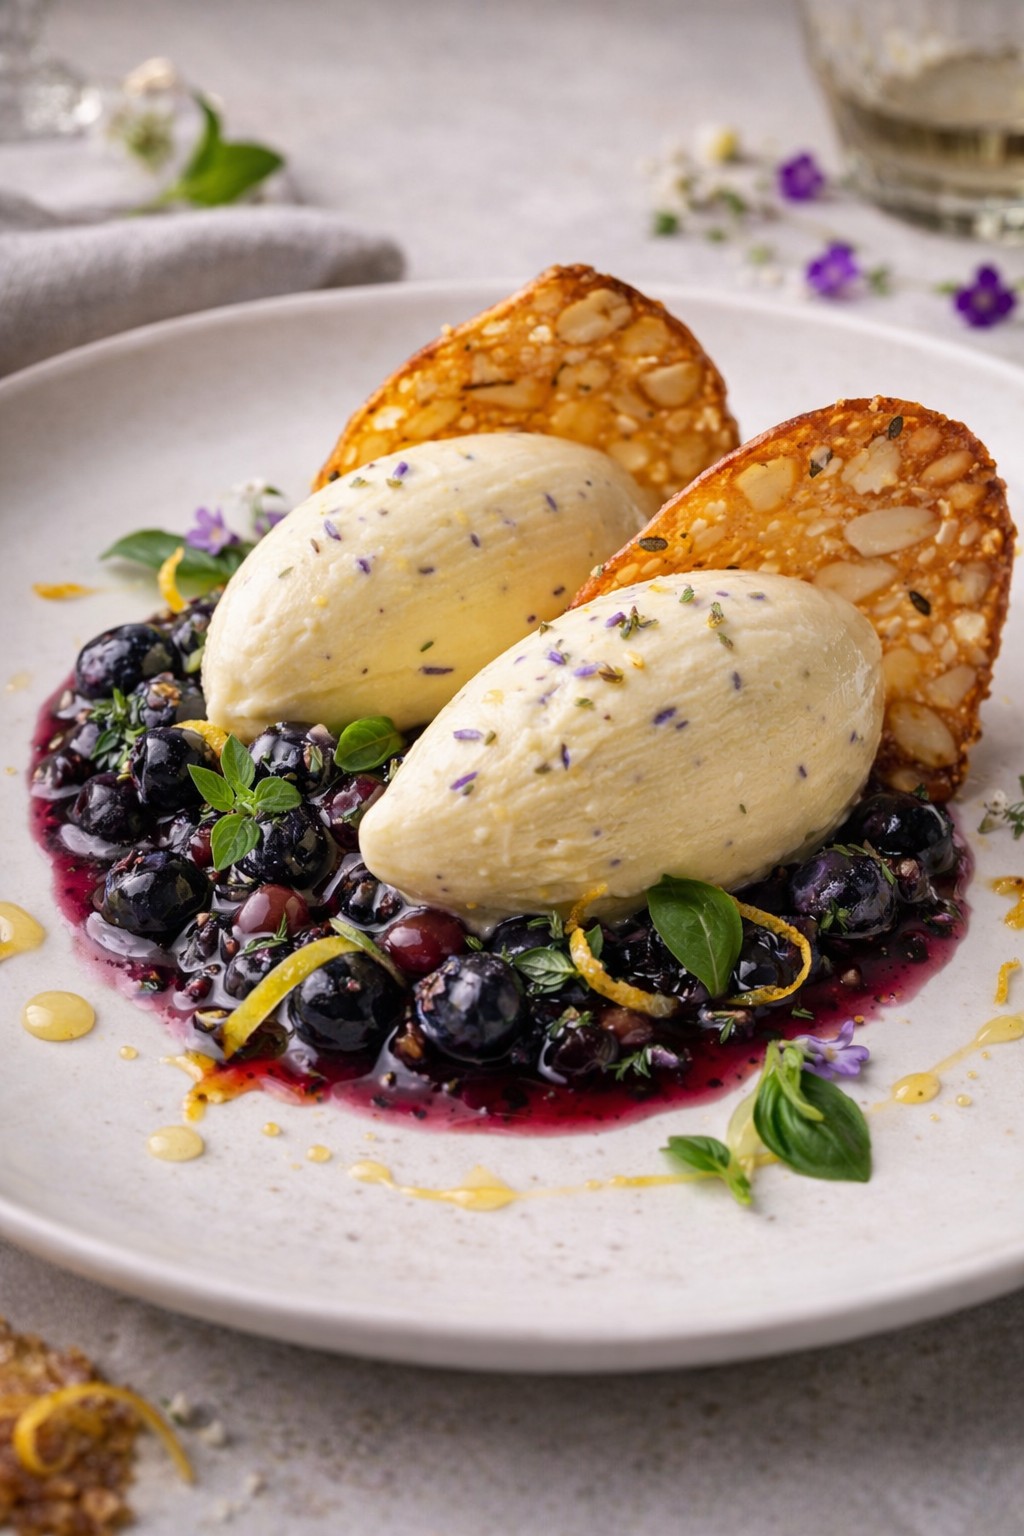
Elegant, refreshing, and beautifully balanced, this lemon and lavender soft ice dessert is a refined example of modern fine-dining. Moreover, it is also made achievable at home. Created using Arla Slower Melt Soft Ice Mix, the soft ice delivers a luxuriously smooth texture. This texture holds its shape longer. Therefore, it is ideal for plated desserts.
Culinary lavender has long been used in desserts for its delicate floral aroma, and should always be used sparingly. This is advised by BBC Good Food.
Follow the step-by-step instructions below to recreate this restaurant-style dessert for dinner parties or special occasions. You can also impress with minimal fuss.
Lemon & Lavender Soft Ice with Blueberry-Basil Compote and Almond Tuile
This elegant fine-dining soft ice dessert combines silky lemon-lavender soft ice with a vibrant blueberry-basil compote and crisp almond tuiles for a refined, restaurant-style finish. Made using Arla Slower Melt Soft Ice Mix, the dessert offers exceptional smoothness and stability, perfect for plated presentation. Balanced with citrus, floral notes, and fresh herbs, it’s an impressive yet achievable dessert ideal for dinner parties and special occasions. Premium ingredients supplied by Nicol Retailer ensure professional results at home.
Course Dessert, Fine Dining Dessert
Cuisine Contemporary British, french, Modern European
Prepare the Arla Slower Melt Soft Ice Mix according to the manufacturer’s instructions.
Strain and stir back into the remaining mix.
Strain and stir back into the remaining mix.
Add honey if using.
Chill thoroughly, then churn in an ice-cream or soft-ice machine until smooth, light, and soft-serve in texture.
Transfer to a piping bag and keep frozen until plating.
Make the Blueberry–Basil Compote
Place blueberries, sugar, and lemon juice in a saucepan.
Simmer gently for 6–8 minutes until the fruit softens and releases juices.
Remove from heat, stir in basil, and allow to cool completely.
Bake the Almond Tuiles
Preheat oven to 180°C (160°C fan).
Mix flour, sugar, ground almonds, salt, and melted butter to form a smooth batter.
Spoon small rounds onto a lined baking tray and spread thin.
Sprinkle with flaked almonds
Bake for 8–10 minutes until golden.
Shape while warm over a rolling pin if desired. Cool until crisp.
Plate the Dessert (Fine-Dining Style)
Spoon a small pool of blueberry–basil compote onto each chilled plate.
Pipe or quenelle the lemon-lavender soft ice alongside.
Add an almond tuile for height and crunch.
Garnish with lemon zest, basil, or edible flowers.
Notes
For best results, prepare the Arla Slower Melt Soft Ice Mix according to the instructions and chill thoroughly before churning to achieve a smooth, stable soft-serve texture. Gently infusing the lemon zest and culinary lavender enhances the flavour while keeping the dessert balanced and refined.For a gluten-free version, simply replace the plain flour in the almond tuiles with a gluten-free flour blend or rice flour, ensuring all other ingredients are certified gluten-free. Chilling serving plates before plating will help the soft ice maintain its shape longer, making this dessert ideal for fine-dining presentation at home or in professional kitchens.
This dessert is made using Arla Slower Melt Soft Ice Mix, available from Nicol Retailer, a trusted supplier of professional-quality ingredients for home cooks and caterers — a high-quality base that delivers exceptional texture and flavour, perfect for elevated desserts like this: https://nicolretailer.com/product/arla-slower-melt-soft-ice-mix-2ltr/
Serving Suggestions
Serve this lemon and lavender soft ice dessert immediately on chilled plates to preserve its smooth, creamy texture and refined presentation. It pairs beautifully with light, citrus-led accompaniments such as fresh berries, shortbread crumbs, or a drizzle of honey for added sweetness. For a fine-dining finish, add crisp almond tuiles or edible flowers to create height and contrast on the plate. This dessert works perfectly as a restaurant-style finale, a sophisticated dinner-party dessert, or an elegant option for special occasions.
Made with Birchstead 95% British Beef Burger Pucks & Schär Gluten-Free Mini Brioche Sliders
There’s something deeply satisfying about a slider that tastes like pub-fare but feels handcrafted in your own kitchen. Using top-quality ingredients makes all the difference — that’s why we love the combination of the rich, British beef from Birchstead and the soft gluten-free brioche buns from Schär. The result is a burger slider that’s juicy and flavourful. It is suitable for people avoiding gluten — yet still indulgent, comforting and irresistibly tasty.
This gourmet gluten-free beef sliders recipe is crafted using premium-quality ingredients available exclusively at Nicol Retailer. The Birchstead 95% beef burger pucks offer exceptional flavour and tenderness. Meanwhile, the Schär gluten-free mini brioche buns provide a soft, bakery-style texture perfect for coeliac-friendly cooking. Together, they create a delicious, restaurant-style slider that’s easy to make at home. For more free-from products and premium British meats, explore Nicol Retailer’s full range at https://nicolretailer.com/product-category/butchered-meat/ .
When you pair the 95% beef burger pucks from Birchstead with Schär’s mini brioche sliders, you get a match for pub-style meals, casual dinner parties or cosy at-home feasts. This recipe elevates humble sliders into a rustic dish that looks amazing and tastes even better. Plus, everyone can enjoy it.
Premium Quality Fresh Beef at Nicol Retailer
Discover truly premium-quality, fresh British beef at Nicol Retailer, home to some of the finest cuts and expertly crafted burger pucks available online. Our range includes the exceptional Birchstead British Top Rump Short Rib Cap 95% Beef Burger Pucks, renowned for their rich flavour, tender texture and consistent cooking results. Perfect for home cooks, restaurants and catering businesses, Nicol Retailer provides high-grade, responsibly sourced beef. These products deliver unbeatable taste in every bite. Whether you’re preparing gourmet sliders, family meals or menu-ready dishes, our fresh beef products offer outstanding quality and value — delivered with the reliability and service Nicol Retailer is known for.
How to Make These Delicious Gourmet Sliders
Follow this simple step-by-step guide to recreate the rustic, flavour-packed sliders shown in the recipe:
Create irresistible restaurant-style gourmet beef sliders using Birchstead British 95% beef burger pucks and Schär gluten-free mini brioche sliders. These premium, gluten-free beef sliders feature juicy patties, caramelised onions, and soft brioche buns, perfect for fine dining menus, gastro pubs, catering, and home cooks seeking a luxury bite. Ready in just 30 minutes, this recipe delivers rich flavour, stunning presentation and greater accessibility for gluten-free diners.
Course Gourmet Bar Snack, Main Course, Sharing Platter, Starter
Cuisine Contemporary British, European Fusion, Gourmet Home Cooking, Modern British
Toppings: baby gem lettuce or rocket; slices of gherkin or pickles; tomato slices; mayonnaise, burger sauce, mustard or gluten-free burger sauces of your choice.
Heat the olive oil (and butter if using) in a medium sauté pan over medium-low heat.
Add the thinly sliced onions and a pinch of salt. Stir gently.
Add the thinly sliced onions and a pinch of salt. Stir gently.
Add the brown sugar and balsamic vinegar (if using), stir to combine, and cook a further 5 minutes until onions are soft, sweet and jam-like
Remove from heat and set aside.
Cook the burger pucks
Heat a griddle pan or heavy frying pan over medium-high heat. Lightly oil the surface.
Season each beef puck with a little salt and pepper just before cooking.
Place the pucks on the hot pan. For 57 g patties, cook ~2–3 minutes each side for medium-rare/medium; extend by 1–2 minutes per side for well done (adjust to your preference).
If using cheese, add a slice to each puck about 30 seconds before finishing so it melts nicely.
Once cooked, remove from heat and let rest on a plate.
Prepare the buns
Split the gluten-free mini brioche buns and, if you like, lightly butter/toast them on the hot griddle or a clean pan until just crisp & golden — this adds a nice texture contrast.
Serve & enjoy!
Serve warm, ideally with a side of sweet potato fries, a crisp salad, or even a quick slaw
For a pub-style bite: serve 2 sliders per person with a pint or a soft drink; for a snack platter, include assorted sauces and extra toppings so people build their own.
Notes
For a truly restaurant-quality finish, allow the Birchstead beef patties to reach room temperature before cooking — this ensures even browning and maximum juiciness. Gluten-free buns can soften quickly, so lightly toasting the Schär mini brioche sliders adds structure, enhances flavour, and prevents soaking. Take your time caramelising the onions; slow cooking is what develops their deep, sweet flavour and elevates the entire dish. These sliders are best assembled just before serving so the beef stays hot, the cheese remains melted, and the buns retain their soft texture. Perfect for coeliac-friendly entertaining, party platters, pub-style menus or premium takeaway boxes.
These gourmet gluten-free beef sliders are wonderfully versatile, making them ideal for everything from casual family dinners to laid-back weekend entertaining. To elevate your dish and create a well-rounded meal, here are some delicious serving suggestions that pair beautifully with the juicy Birchstead beef and soft Schär brioche buns.
Classic Pub-Style Sides
For a traditional British pub feel, serve your sliders alongside:
Marinated olives, sun-dried tomatoes, and antipasti
This transforms your dish into a balanced sharing board perfect for game nights, gatherings, or casual celebrations.
Family-Friendly Add-Ons
For a full, comforting dinner, try adding:
Garlic roasted potatoes
Steamed seasonal vegetables
Corn on the cob with herb butter
These sides help round out the meal and make it suitable for all ages.
Premium Star Ingredients — Available at Nicol Retailer
What makes this recipe truly exceptional is the quality of the ingredients — both of which you can conveniently purchase from Nicol Retailer.
The foundation of the dish is the Birchstead British Top Rump Short Rib Cap 95% Beef Burger Pucks. These are made from premium British beef known for its tenderness, rich flavour and superb cooking consistency. These burger pucks offer professional-grade quality, ensuring every slider is juicy, satisfying and packed with natural beef richness.
To complement this, the recipe uses Schär Gluten-Free Mini Brioche Sliders — soft, golden, and buttery in texture. These buns elevate the dish, offering a light sweetness that pairs perfectly with the savoury beef. They also ensure the recipe remains suitable for gluten-free diners. Their bakery-style softness makes them ideal for gourmet sliders, giving you a restaurant-standard result at home.
Nicol Retailer proudly stocks both items, allowing you to source premium beef and high-quality gluten-free brioche buns from one trusted supplier. Whether you’re cooking for family, entertaining guests, or designing a menu for a business, Nicol Retailer ensures you have access to top-tier ingredients that deliver exceptional taste every time.
A Silky, No-Bake Dessert Made with Centaur Pistachio Paste
If you’re looking for a dessert that blends luxury, artistry and effortless elegance, this Pistachio & White Chocolate Mousse Cake deserves a place at the top of your baking list. Made with the incredibly smooth and intensely flavourful Centaur Pistachio Paste (1kg) from Nicol Retailer Limited, this no-bake masterpiece delivers a depth of nutty richness that transforms each bite into a decadent experience.
The velvety pistachio mousse melts on the palate, the buttery biscuit base adds a satisfying crunch, and the white chocolate topping brings a silky sweetness that completes the perfect harmony of flavours. Whether you’re hosting a celebration, preparing a gourmet after-dinner treat, or simply treating yourself to something extraordinary, this dessert promises show-stopping presentation, unforgettable flavour and pure pistachio indulgence.
Crafted to impress but remarkably simple to prepare, this mousse cake showcases the true beauty of premium ingredients — and when those ingredients come from Nicol Retailer Limited, you know you’re working with the best. This is the kind of dessert that turns a special occasion into a memory.
Brief History of Pistachio Paste
Pistachio paste has a long, rich history that stretches back thousands of years. Pistachios themselves are one of the world’s oldest cultivated nuts, enjoyed as early as 7000 BC in Persia (modern-day Iran). Known as “the green gold,” pistachios quickly became prized across the Middle East, Mediterranean and later Europe for their vibrant colour, natural sweetness and luxurious flavour.
Although pistachios were historically eaten whole, roasted or ground into sweets, pistachio paste as we know it today gained popularity in the 19th and early 20th centuries when European pastry chefs began incorporating finely milled pistachios into creams, custards, pralines and patisserie fillings. Italy — especially Sicily — is now renowned for its pistachio paste, using naturally green nuts from Bronte to create deeply flavoured spreads and dessert bases. France also embraced pistachio paste in classic pâtisserie such as Paris-Brest, macarons and ice cream.
Today, pistachio paste is a key ingredient in gourmet desserts worldwide, loved for its smooth texture, distinctive flavour and versatility. Whether used in cakes, mousses, gelato or buttercreams, high-quality paste like Centaur Pistachio Paste delivers a pure, authentic pistachio profile that elevates even the simplest recipes into patisserie-level creations.
How to Make This Delicious Pistachio & White Chocolate Mousse Cake
Creating this luxurious, no-bake dessert is far easier than it looks — and every step helps build the silky texture, rich pistachio flavour and beautiful presentation that make this mousse cake unforgettable. Follow the simple instructions below to prepare each layer to perfection and bring this elegant dessert to life in your own kitchen.
Indulge in this luxurious Pistachio & White Chocolate Mousse Cake, made with rich, nutty Centaur Pistachio Paste from Nicol Retailer Limited. This no-bake dessert combines a buttery biscuit base, creamy pistachio mousse, and a silky white chocolate topping for an irresistible gourmet treat. Perfect for celebrations, dinner parties, or anytime you want a show-stopping pistachio dessert with authentic flavour and a smooth, melt-in-the-mouth texture.
Press mixture firmly into the base of a 20 cm (8-inch) springform cake tin or tart ring.
Chill in fridge while you prepare the filling.
Make the Pistachio Mousse
In a mixing bowl, whisk together the mascarpone (or yogurt), powdered sugar, vanilla extract and Centaur Pistachio Paste until smooth.
In a separate bowl, whip the double cream to soft peaks.
Gently fold the whipped cream into the pistachio-paste mixture until fully combined and light.
Pour Mousse Over Base
Remove the biscuit base from fridge and pour the pistachio mousse over it.
Smooth the top with a spatula.
Chill in fridge for at least 2 hours (preferably overnight) so the mousse sets firmly.
Prepare the White Chocolate Glaze
Gently melt the white chocolate with 50 ml cream in a heatproof bowl over simmering water (double boiler). Stir until smooth and glossy.
Let cool slightly, then pour over the chilled pistachio mousse layer.
Return to fridge and chill for at least 30 minutes to set.
Decorate & Serve
Carefully remove the cake from the tin.
Sprinkle crushed pistachios over the top.
Add white chocolate shavings or curls.
Garnish with a few whole pistachios and fresh mint leaves for colour.
Slice and serve chilled — the contrast between cold creamy mousse and crunchy pistachios is irresistible.
Notes
For the richest flavour, use high-quality Centaur Pistachio Paste from Nicol Retailer Limited — it provides a deep, authentic pistachio taste that elevates the mousse beyond ordinary desserts.Chill the mousse cake for at least 2 hours (or overnight) for the smoothest texture and cleanest slices.Use full-fat mascarpone or Greek yogurt for the creamiest consistency; swapping to yogurt gives a lighter, tangier finish.If the mousse feels too thick, loosen it with a small splash of cream; if too thin, chill for 20 minutes before assembling.For a professional finish, top the cake with crushed pistachios, white chocolate curls, or a drizzle of melted chocolate.This recipe is naturally no-bake, making it perfect for warm weather or quick hosting without using the oven.For gluten-free diners, simply replace the base with gluten-free digestive biscuits.Keep refrigerated until ready to serve — this dessert tastes best chilled and firm.
Why You’ll Love This Pistachio & White Chocolate Mousse Cake
This stunning no-bake dessert stands out for so many irresistible reasons:
Rich, authentic pistachio flavour thanks to premium Centaur Pistachio Paste from Nicol Retailer Limited, giving every bite a deep, natural nuttiness that cheaper alternatives can’t match.
Perfectly balanced sweetness from silky white chocolate, which enhances rather than overwhelms the pistachio mousse.
No baking required, making this cake easy, reliable and ideal for beginners or quick preparation.
Luxurious, melt-in-the-mouth texture created by the smooth pistachio mousse, buttery biscuit base and glossy white chocolate layer.
Visually stunning presentation, with its elegant green hue and patisserie-style finish, guaranteed to impress guests.
Ideal for celebrations, including birthdays, festive gatherings, dinner parties or gifting — this is a dessert that always steals the spotlight.
Versatile and customisable, allowing you to adjust sweetness, decorate creatively and serve with berries, chocolate or fresh herbs.
Made with high-quality ingredients sourced from Nicol Retailer Limited, ensuring premium taste and dependable results every time.
Light yet indulgent, offering a luxurious dessert without feeling overly heavy or dense.
Serving Suggestions
his luxurious Pistachio & White Chocolate Mousse Cake deserves to be served in a way that enhances its elegant layers and rich, nutty flavour. For the best experience, slice the cake while fully chilled to preserve its smooth mousse texture and clean, defined lines. Serve each portion on a chilled dessert plate to maintain its light, creamy consistency.
To complement the deep, buttery flavour of the Centaur Pistachio Paste, pair each slice with fresh seasonal berries—such as raspberries, strawberries or blueberries—for a pop of natural acidity and colour contrast. A drizzle of warm white chocolate or a touch of honey also adds a luxurious finishing note.
For a restaurant-style touch, garnish plates with crushed pistachios, mint leaves, or delicate white chocolate curls. The fresh mint brings brightness, while the added pistachios enhance the cake’s natural nuttiness and provide a satisfying crunch.
Beverage pairings can elevate your dessert even further. This pistachio mousse cake pairs beautifully with espresso, matcha latte, sweet dessert wine, or a light herbal tea. If you prefer something indulgent, try serving with a scoop of vanilla bean ice cream or pistachio gelato for the ultimate pistachio lover’s plate.
Whether you’re entertaining guests, celebrating a special occasion, or enjoying a refined treat at home, these serving suggestions turn every slice into a gourmet dessert experience — making your Pistachio & White Chocolate Mousse Cake truly unforgettable.
Shop Premium Ingredients for This Recipe at Nicol Retailer Limited
Creating a dessert as luxurious as this Pistachio & White Chocolate Mousse Cake begins with using the right ingredients — and you can find everything you need in one place at Nicol Retailer Limited. Whether you’re a home baker, a chef, or simply someone who loves crafting high-quality desserts, Nicol Retailer offers a carefully curated selection of premium products that take your baking to the next level.
Centaur Pistachio Paste – The Star Ingredient
The secret behind this cake’s rich flavour and silky, nutty mousse is the Centaur Pistachio Paste (1kg). Unlike cheaper pastes or artificially flavoured spreads, this premium paste delivers:
Deep, authentic pistachio flavour
Smooth, velvety consistency
Natural colour without additives
Excellent blending for mousses, creams and toppings
This is the key ingredient that transforms a simple no-bake cake into a patisserie-style masterpiece — and it’s exclusively available at Nicol Retailer Limited.
Other High-Quality Essentials You Can Buy at Nicol Retailer
To help you create this stunning dessert effortlessly, Nicol Retailer provides top-quality versions of all the core ingredients you need, including:
Butter & dairy products for a rich mousse and smooth base
Digestive biscuits or alternatives for the perfect crumb base
Double cream, mascarpone, or Greek yogurt for creamy, stable mousse texture
Crushed pistachios for decorative finishing touches
Everything is chosen for its freshness, quality and reliability, giving you confidence that your dessert will turn out beautifully every time.
Why Buy from Nicol Retailer Limited?
Trusted supplier of premium baking ingredients
Excellent value for bulk and speciality items
Perfect for home bakers, cafés, patisseries and catering
Fast delivery and reliable customer service
Carefully selected quality products not always available in supermarkets
When you shop at Nicol Retailer Limited, you’re not just buying ingredients — you’re investing in exceptional flavour, professional results and unforgettable desserts.
Experience a bite-sized taste of elegance with our Quail Egg & Smoked Salmon Blinis with Lemon-Dill Crème Fraîche — by Nicol Retailer Limited.
There are appetisers — and then there are showstoppers.
These Quail Egg & Smoked Salmon Blinis with Lemon-Dill Crème Fraîche are the kind of canapés that make people pause mid-conversation. Elegant, bite-sized, and bursting with delicate flavour, they bring together three things that define luxury entertaining: simplicity, sophistication, and quality ingredients.
Each blini is a masterpiece of balance — soft, buttery pancake base; silky smoked salmon; zesty, herby crème fraîche; and the pièce de résistance — a perfectly cooked Caillor Quail Egg. It adds richness and visual appeal.
It’s the perfect recipe for special occasions, dinner parties, weddings, or festive spreads. In these events, presentation matters as much as taste. And thanks to Caillor Cooked & Peeled Quail Eggs (1×48) from Nicol Retailer Limited, these luxurious canapés are as effortless to prepare as they are beautiful to serve.
The Secret to Perfect Quail Egg Canapés
If you’ve ever tried working with quail eggs, you’ll know they can be tricky. Their delicate shells and petite size make them easy to overcook or difficult to peel. This is why professional chefs and caterers trust Caillor Cooked & Peeled Quail Eggs.
These eggs are precooked to perfection and carefully peeled, preserving their shape, texture, and soft, creamy yolk. They’re ready to use straight from the pack. This makes them perfect for restaurants, catering services, or home cooks who value efficiency without compromising quality. Pairing them with smoked salmon and a fresh lemon-dill dressing gives this dish a beautifully balanced profile:
The smoky, salty salmon enhances the quail egg’s richness.
The zesty lemon and fragrant dill cut through the creaminess for freshness.
And the soft blini base ties everything together into one harmonious bite.
Recipe
Elegant, delicious, and effortless — these Quail Egg & Smoked Salmon Blinis with Lemon-Dill Crème Fraîche are the perfect bite-sized appetisers for any occasion. Made using premium Caillor Cooked & Peeled Quail Eggs (1×48) from Nicol Retailer Limited, each blini combines silky smoked salmon, zesty crème fraîche, and the rich creaminess of quail eggs. This creates a luxurious, flavour-packed experience.
Serve them as canapés, brunch bites, or elegant party starters — they’re guaranteed to impress every guest. Her e is the recipe:
Quail Egg & Smoked Salmon Blinis with Lemon-Dill Crème Fraîche
Delight your guests with these elegant Quail Egg & Smoked Salmon Blinis, featuring perfectly sized Caillor Cooked & Peeled Quail Eggs from Nicol Retailer Limited. Each bite combines creamy lemon-dill crème fraîche, silky smoked salmon, and tender quail eggs for a luxurious appetiser that’s perfect for parties, brunches, or festive gatherings. Easy to assemble and full of gourmet flair, this canapé brings sophistication to any occasion
Course Appetizer, brunch, Canape, party food, Starter
In a small bowl, mix the crème fraîche, lemon juice, dill, lemon zest, and a pinch of black pepper. Chill until ready to serve.
Assemble the Blinis
Lay the blinis on a platter. Add a small dollop of the crème fraîche mixture to each one, followed by a delicate ribbon of smoked salmon.
Add the Quail Eggs
Top each blini with a Caillor Cooked & Peeled Quail Egg — each perfectly bite-sized at 3 cm long and 2.7 cm wide, ideal for elegant canapés. Slice a few in half for visual appeal.
Garnish and Serve
Sprinkle with chopped dill and a touch of lemon zest. Add horseradish cream or a tiny spoon of caviar for a gourmet finish. Serve immediately.
Notes
This Quail Egg & Smoked Salmon Blini recipe is a perfect balance of luxury and simplicity — elegant enough for a dinner party, yet quick and easy for casual gatherings. Each canapé showcases premium Caillor Cooked & Peeled Quail Eggs from Nicol Retailer Limited, paired with smooth lemon-dill crème fraîche and rich smoked salmon for a truly gourmet bite.For the best results, assemble just before serving to maintain the blinis’ light texture and prevent sogginess. If you’re hosting, you can prep the crème fraîche mixture and smoked salmon ribbons up to 6 hours ahead, then chill until needed. Chef’s Tip: For extra indulgence, top each canapé with a small spoonful of caviar, a touch of horseradish cream, or a few pearls of salmon roe. Add microgreens or edible flowers for a professional finish that photographs beautifully.This recipe is ideal for holiday entertaining, brunch buffets, wedding receptions, and corporate events, adding a refined touch to any occasion.
These Quail Egg & Smoked Salmon Blinis are a celebration of flavour, texture, and visual beauty — soft, buttery blinis topped with zesty lemon-dill crème fraîche, silky smoked salmon, and the rich creaminess of quail eggs. Their delicate balance makes them perfect for a wide range of occasions, from intimate brunches to lavish celebrations.
Here’s how to make the most of these bite-sized showstoppers:
Elegant Canapés for Entertaining
Perfect for dinner parties, cocktail evenings, or wedding receptions — these blinis bring a touch of fine dining to any gathering. Arrange them on a slate board or marble platter, and garnish with micro herbs, lemon zest, or edible flowers for a stunning presentation.
Luxurious Weekend Brunch
Elevate your brunch spread by serving these blinis alongside avocado toast, smoked trout pâté, and freshly squeezed orange juice. Their creamy, smoky richness complements lighter dishes perfectly. Add a pot of Earl Grey tea or a mimosa for the ultimate relaxed weekend indulgence.
Picnic Perfection or Garden Party Favourite
These canapés travel beautifully and can be served cold, making them ideal for picnics, outdoor events, or afternoon teas. Pack them in a chilled box, then garnish just before serving for that freshly prepared look.
Pair them with sparkling elderflower tonic or lemon-infused sparkling water for a refreshing outdoor treat.
Charcuterie & Grazing Board Delight
Add these blinis to your charcuterie or grazing board for an elevated twist. Surround them with cheeses, olives, roasted nuts, marinated artichokes, and cured meats for a vibrant mix of textures and flavours. They work particularly well with mild cheeses like Brie or creamy goat’s cheese.
Festive Feasts & Holiday Starters
Looking for a luxurious appetiser for Christmas, Easter, or New Year’s Eve? These blinis shine on any festive table. The quail eggs add elegance, while the smoked salmon brings indulgence — making them a natural pairing for celebratory meals. Serve as a starter before roast lamb, beef Wellington, or vegetarian tarts for a beautifully balanced menu.
Fine Dining & Formal Events
If you’re hosting a formal event or catering for clients, presentation is everything. Stack the blinis slightly overlapping on white porcelain platters or slate trays, garnish with dill fronds, caviar pearls, or edible gold leaf. For a creative twist, top each quail egg with a tiny spoon of trout roe or lemon caviar for extra texture.
Light Lunch or Afternoon Tea
For a lighter option, serve your blinis alongside seasonal salads, grilled asparagus, or cold seafood platters. Their delicate flavour pairs wonderfully with crisp greens, pickled vegetables, or creamy potato salads. They also make a sophisticated addition to afternoon tea platters — perfectly portioned and visually stunning.
Conclusion
Every bite of these Quail Egg & Smoked Salmon Blinis with Lemon-Dill Crème Fraîche captures the essence of elegant dining — delicate, luxurious, and unforgettable. The rich creaminess of the Caillor Quail Eggs, the silky texture of smoked salmon, and the bright freshness of lemon and dill come together in perfect harmony. They create a dish that feels indulgent yet effortless.
Whether served at a celebration, brunch, or intimate dinner, these blinis prove that beautiful food doesn’t have to be complicated — it just starts with the right ingredients.
Crafted using Caillor Cooked & Peeled Quail Eggs (1×48) from Nicol Retailer Limited, this recipe combines restaurant-quality flavour with the convenience modern cooks love. Because at Nicol Retailer Limited, we believe every meal — no matter how small — deserves premium ingredients, care, and a touch of artistry.
Serve. Savour. Celebrate. Bring gourmet simplicity to your table today — shop the full range of luxury ingredients at Nicol Retailer Limited .
A classic British favourite, the Smoked Gammon Hock & Parsley Terrine, reinvented by Nicol Retailer Limited
There’s something special about classic British dishes — those that carry both flavour and tradition in every bite. The Smoked Gammon Hock & Parsley Terrine is one such masterpiece. It’s rustic yet refined, simple yet show-stopping.
This terrine combines tender, slow-cooked smoked gammon with fresh parsley and aromatic herbs. It is set in a light, savoury jelly that perfectly balances richness and freshness. The result? A dish that feels indulgent but is surprisingly easy to make at home.
Made with premium smoked gammon hock from Nicol Retailer Limited, every slice tells a story of quality, craftsmanship, and flavour.
Traditionally served at family gatherings and festive tables, this recipe brings that same charm to modern dining. Whether you’re planning a picnic, a dinner party, or simply want to impress your guests, the terrine delivers elegance and comfort in one slice. When you use Smoked Gammon Hock (1 kg) from Nicol Retailer Limited, you’re starting with premium-quality meat. It is expertly smoked for depth of flavour and perfectly cured. It’s ideal for slow cooking or terrine preparation.
Why Smoked Gammon Hock Works Perfectly
The gammon hock, also known as the pork knuckle, is one of the most flavourful cuts of the pig. When smoked, it develops a rich, deep taste that gives this terrine its signature character. The slow simmering process breaks down connective tissue and infuses the meat with natural savouriness. It keeps it juicy and tender.
Using a smoked hock means you don’t need to add extra salt or heavy seasonings. The meat itself brings complexity, enhanced by fresh herbs like parsley and chives. Combined with a gentle jelly set using stock from the same hock, it creates a terrine that’s full-bodied, balanced, and authentic.
It’s economical, too — one hock goes a long way, yielding a terrine that can serve 6–8 people. This makes it a perfect make-ahead dish for entertaining.
Recipe
Get ready to impress your guests with this Smoked Gammon Hock & Parsley Terrine — a true British classic that’s rich in flavour and beautifully simple to prepare. Made with Smoked Gammon Hock (1 kg) from Nicol Retailer Limited, this elegant make-ahead dish combines tender, smoky gammon with fresh herbs and a light, savoury jelly. Perfect for entertaining, picnics, or festive gatherings, it delivers rustic charm and restaurant-quality flavour in every slice. Here is the recipe:
Indulge in this classic Smoked Gammon Hock & Parsley Terrine, a rustic British favourite bursting with flavour. Made using premium Smoked Gammon Hock (1 kg) from Nicol Retailer Limited, this dish combines tender, slow-cooked ham with fresh herbs, mustard, and a light, savoury jelly. Perfect for picnics, festive platters, or elegant starters, it’s rich, wholesome, and beautifully balanced. Serve with toasted sourdough, cornichons, and wholegrain mustard for a truly irresistible bite.Available from Nicol Retailer Limited — your trusted UK supplier for premium British meats and gourmet ingredients.
Course Appetizer, Cold Platter, lunch, Starter
Cuisine English, European, french
Diet Gluten Free
Keyword British starter, ham hock terrine,, Nicol Retailer Limited, parsley terrine, smoked gammon hock
Place the smoked gammon hock, carrot, onion, celery, bay leaves and peppercorns in a large pan. Cover with cold water and bring to a gentle boil. Simmer for 2–2½ hours until the meat is falling off the bone.
Shred the Meat
Remove the hock and allow it to cool slightly. Discard the skin and bones, then shred the meat into chunky pieces. Strain and reserve 100 ml of the cooking stock.
Prepare the Gelatine
Soak the gelatine in cold water for 5 minutes (or follow pack instructions). Warm the reserved stock, remove from the heat, and stir in the drained gelatine until dissolved. Add the mustard, lemon juice, parsley and chives.
Assemble the Terrine
Line a loaf tin with clingfilm, leaving enough overhang to cover the top. Layer the shredded gammon into the tin and pour over the herby gelatine mixture. Press down gently to remove air pockets, fold over the clingfilm and chill overnight until set.
Slice & Serve
Turn out the terrine and slice thickly. Serve cold with toasted sourdough, cornichons, and a spoonful of mustard or chutney.
Notes
This Smoked Gammon Hock & Parsley Terrine is a timeless British classic that brings rustic charm and gourmet flair to any table. Using Smoked Gammon Hock (1 kg) from Nicol Retailer Limited, you’ll achieve tender, smoky meat with a beautifully balanced herby flavour.For best results, cook the gammon slowly until it easily pulls from the bone — this ensures rich flavour and perfect texture. The overnight chill is essential for setting the terrine, allowing the flavours to deepen and the gelatine to firm up properly.You can prepare this dish up to three days in advance, making it perfect for entertaining, picnics, or festive buffets. Serve straight from the fridge with pickles, mustard, or crusty bread for a traditional presentation.Pro Tip: Use the leftover cooking stock as a flavour base for soups, sauces, or risotto — nothing goes to waste!
The beauty of this Smoked Gammon Hock & Parsley Terrine lies in its versatility. It’s rustic yet refined — equally at home on a picnic blanket, a festive buffet, or a fine dining starter menu. Every slice offers the perfect blend of smoky, herby, and savoury flavours — and when paired thoughtfully, it becomes truly unforgettable.
Here’s how to serve and elevate your terrine for any occasion :
As a Classic British Starter
Serve a generous slice of terrine on a chilled plate with toasted sourdough or crusty baguette, a spoonful of wholegrain mustard, and a few crisp cornichons on the side. The buttery bread contrasts perfectly with the smoky, savoury meat and sharp pickle. Ideal for dinner parties or festive gatherings where presentation matters.
Picnic Perfection
Pack this terrine for a countryside picnic or light alfresco lunch. Slice it thickly and pair with buttered new potatoes, pickled onions, and apple chutney for a flavour-packed cold platter. It travels beautifully and tastes even better the next day once the flavours have deepened — making it a must-have for summer outings.
Light Lunch or Brunch Idea
Turn your terrine into a light yet satisfying meal by serving it with a fresh green salad, hard-boiled eggs, and a lemon vinaigrette. Add a few slices of ripe pear or apple for sweetness — the perfect contrast to the salty, smoky meat. Balanced, refreshing, and ideal for a weekend brunch or lunch buffet.
Charcuterie-Style Sharing Board
Create an elegant charcuterie board featuring your Smoked Gammon Hock Terrine, slices of artisan cheese, crackers, and seasonal fruits like figs or grapes. Add bowls of mustard, pickled radishes, and caramelised onion chutney for that irresistible sweet-savoury contrast.
Warm & Hearty Meal Option
For a more substantial dish, serve your terrine slightly warmed alongside creamy mashed potatoes or roasted root vegetables. Drizzle lightly with warm mustard cream sauce for an indulgent twist on the traditional cold terrine. This version is perfect for winter dining — rich, comforting, and deeply satisfying.
Modern Gastro Pub Twist
Reimagine your terrine as part of a British-inspired tasting menu. Serve it on slate with pea shoots, a soft-boiled quail egg, and a drizzle of apple reduction for a restaurant-quality presentation that wows every time.
Shop the Star Ingredient
For the best flavour and texture, make this recipe using Smoked Gammon Hock (1 kg) from Nicol Retailer Limited — expertly smoked for depth of flavour and ideal for slow cooking, shredding, and terrines. Delivering quality and freshness across the UK, Nicol Retailer Limited is your trusted source for premium British meats and gourmet ingredients.
The Smoked Gammon Hock & Parsley Terrine is a true celebration of British culinary heritage. It is timeless, elegant, and full of honest flavour. Each slice tells a story of tradition and craft: tender smoked gammon, fresh herbs, and delicate jelly coming together in perfect harmony. It’s the kind of dish that feels special yet comforting. It’s ideal for family gatherings, dinner parties, or casual weekend lunches.
Made using premium Smoked Gammon Hock (1 kg) from Nicol Retailer Limited, this recipe delivers quality you can taste in every bite. Whether you’re a home cook or a professional chef, it’s proof that simple ingredients, when prepared with care, can create something truly extraordinary.
So why not bring a touch of British tradition to your table? Visit Nicol Retailer Limited to explore our full range of artisan meats, gourmet ingredients, and chef-approved produce — delivered fresh across the UK.
Because every great meal starts with quality. And at Nicol Retailer Limited, quality is our signature.
Prefer Not to Make It from Scratch?
If you love the idea of a rich, flavour-packed terrine but don’t have the time to make one from scratch, we’ve got you covered. Explore our delicious range of ready-made pâtés and terrines, all prepared with the same attention to quality and traditional craftsmanship that makes this recipe so special.
From smooth, savoury pâtés to beautifully seasoned rustic terrines, there’s something for every table and occasion. Simply serve with crusty bread, chutney, or a fresh salad for an effortless gourmet experience.
🛒 Shop our full selection here: 👉 https://nicolretailer.com/product-category/pates-terrines/
Brought to you by Nicol Retailer Limited — your trusted UK source for premium ingredients and artisanal ready-made delicacies.
Imagine a dish that transports you to the serene shores of the sea with every bite. The Sea Scallops with Fresh Herbs & Orange Sauce Recipe is precisely that culinary marvel. This dish marries the natural sweetness of sea scallops with the refreshing zest of orange, creating a flavour profile that dances on your palate.
Fresh herbs elevate the experience, adding aromatic depth and a burst of colour that makes the dish as visually appealing as it is delicious. Perfect for both special occasions and cosy dinners at home, this recipe is designed to impress and delight. Dive into the artistry of cooking sea scallops and discover how these ocean gems can transform your dining experience.
If you’re looking to impress with minimal effort, this Sea Scallops with Fresh Herbs & Orange Sauce recipe is a must-try. Bursting with flavour, naturally gluten-free, and surprisingly simple to prepare, it’s perfect for date nights, dinner parties, or just treating yourself to a restaurant-quality seafood dish at home. Beyond the elegant presentation, this dish offers a beautiful balance of textures and flavours:
Scallops, when seared properly, develop a gorgeous golden crust while staying buttery soft inside.
The orange sauce brings a subtle sweetness and tang, cutting through the richness of the seafood.
Fresh herbs like parsley, thyme and chives add fragrance and a pop of colour, making the dish feel fresh and seasonal.
Even better? This meal is naturally gluten-free, low in carbohydrates, and fits easily into a pescatarian diet—ideal for coeliac guests or those looking to enjoy healthy seafood recipes without sacrificing flavour.
Step-by-Step: How to Cook Sea Scallops with Fresh Herbs & Orange Sauce Recipe :
Sea Scallops with Fresh Herbs and Orange Sauce Recipe
Discover a vibrant and flavourful dish with this Sea Scallops with Fresh Herbs and Orange Sauce recipe. Perfect for seafood enthusiasts, this dish combines tender, perfectly seared sea scallops with a zesty orange sauce, creating a delightful balance of sweet and savoury. Fresh herbs like parsley, thyme, or dill enhance the natural flavours, adding a fragrant and refreshing touch. Quick to prepare yet incredibly impressive, this recipe is ideal for a weeknight dinner or a special occasion. With its elegant presentation and irresistible taste, this scallop dish will surely become a favourite in your repertoire.
Course Main Course, Starter
Cuisine french
Diet Gluten Free, Low Calorie
Keyword Fresh herb scallop dish, Gourmet scallop recipe, Orange sauce for scallops, Pan-seared scallops, Sea Scallops, Sea Scallops Recipe
Pat the scallops dry with kitchen paper to ensure they sear properly. Season both sides with salt and pepper.
Make the Orange Sauce
In a small saucepan, combine the orange juice, orange zest, honey, and white wine vinegar. Bring the mixture to a gentle simmer over medium heat, allowing it to reduce slightly, about 5 minutes. Remove from heat and stir in the butter until smooth and glossy. Set aside.
Cook the Scallops
Heat the olive oil and butter in a large frying pan over medium-high heat. Once the pan is hot and the butter has melted, carefully add the scallops in a single layer, making sure not to overcrowd the pan. Sear the scallops for about 2-3 minutes on each side, or until they are golden and slightly caramelised. Remove from the pan and set aside on a warm plate.
Garnish and Serve
Place the scallops on serving plates. Drizzle the warm orange sauce over the top and sprinkle with the fresh herbs. Serve immediately with a side of crusty bread, steamed vegetables, or a fresh green salad.
Bring your scallop experience to life with themed menus tailored for specific occasions. Whether you’re after a romantic setting or festive grandeur, these menu combinations ensure a well-balanced, flavourful, and visually stunning meal:
Date Night: Create an intimate and indulgent evening with pan-seared scallops served over saffron risotto, alongside tender asparagus drizzled with lemon butter. Finish with a silky vanilla panna cotta topped with citrus glaze. Pair with a glass of unoaked Chardonnay or sparkling elderflower.
Dinner Party: Impress your guests with wild rice pilaf flecked with herbs and toasted almonds, served with roasted baby carrots glazed in honey and thyme. Complement with a bottle of crisp Sauvignon Blanc and finish with a classic lemon tart for a sweet, zesty ending.
Festive Feast: For special celebrations, serve scallops atop creamy parmesan polenta with grilled seasonal vegetables. Add a side of warm sourdough with herbed butter, toast with chilled Champagne, and conclude with a decadent almond cake drizzled in orange blossom syrup.
Healthy Gourmet: Keep things light and fresh with a citrus-dressed rocket and spinach salad, scallops atop a velvety cauliflower purée, and a citrus and berry sorbet trio to finish. A sparkling cucumber mint water or elderflower presse rounds out the wellness vibe perfectly.
Each menu is designed to highlight the versatility of scallops while maintaining balance and sophistication. Mix and match based on seasonality, preferences, or the mood you want to set.
Serving Suggestions
Elevate your Sea Scallops with Fresh Herbs & Orange Sauce Recipe into a luxurious, restaurant-quality meal with carefully curated accompaniments. From grains and greens to wine pairings and indulgent desserts, here’s how to build a stunning menu around this elegant seafood dish.
Grain-Based Companions (to soak up the sauce and add texture)
Lemon and parsley couscous – quick and vibrant, it mirrors the orange and herb notes in the scallops.
Wild rice pilaf with toasted almonds – nutty, aromatic, and a great textural contrast.
Cauliflower purée – smooth and mild, creating a silky bed that lets the scallops shine.
Parmesan polenta – indulgent and creamy with a subtle saltiness that pairs beautifully with citrus.
Saffron risotto – golden and rich with floral notes that complement the fresh herbs.
Garlic and herb mashed potatoes – comforting and satisfying, for a heartier twist.
Vegetable Sides (for colour, crunch, and balance)
Steamed asparagus with lemon zest – light, crisp and just bitter enough to cut the richness.
Roasted baby carrots glazed in honey-thyme – earthy and sweet to echo the orange tones.
Grilled courgette ribbons with olive oil – Mediterranean and delicate.
Non-alcoholic citrus spritzers with herbs like mint or basil.
Sparkling elderflower cordial with cucumber slices – botanical and refreshing.
Final Thoughts
Sea Scallops with Fresh Herbs & Orange Sauce Recipe is more than just a recipe—it’s an experience. From the golden sear of the scallops to the brightness of the citrus and the aromatic lift of fresh herbs, every element comes together in harmony. It’s a dish that proves gourmet doesn’t have to be complicated, and elegance can come from simplicity.
Whether you’re planning a romantic dinner, entertaining friends, or just indulging in something a little special for yourself, this recipe offers a deliciously refined way to celebrate seasonal ingredients and fresh flavours. The versatility in presentation and pairing options also means it can be customised for any occasion—from light summer lunches to festive evening feasts.
If you’re new to scallops, this is a perfect place to start. If you’re already a seafood lover, consider this your new go-to classic. Whichever way you serve it, one thing’s certain: this dish is sure to leave a lasting impression.
Grilling seafood brings out an incredible depth of flavour, making it a favourite for many outdoor cooking enthusiasts. When you think of the perfect summer dish, juicy grilled shrimps and scallops often come to mind. For those searching for the ultimate shrimp and scallops recipe, these seafood delights are not only delicious but also quick and easy to prepare, making them perfect for any grilling occasion. The natural sweetness of shrimps and scallops is heightened when grilled, creating a mouth-watering experience that is hard to match.
Whether you’re hosting a garden barbecue or enjoying a quiet dinner, this recipe is sure to impress your guests and leave them wanting more. The secret to achieving those perfect flavours lies in the marinade and grilling techniques that enhance the seafood. A marinade made with olive oil, garlic, parsley and lemon juice, delightful mix of tangy, sweet, and spicy flavours to the shrimps and scallops, which will excite your palate.
Grilling shrimps and scallops not only enhances their flavour but also creates an appealing presentation. The slight char from the grill provides a lovely visual contrast to the tender seafood, ensuring your dish looks as good as it tastes. As you prepare to light the grill, remember that the simplicity of this recipe is what makes it truly special.
The Juicy Grilled Shrimp and Scallops Recipe is a simple and delicious seafood dish perfect for outdoor grilling. It features fresh shrimp and scallops marinated in a flavourful mixture of olive oil, garlic, lemon juice, and herbs. The seafood is then grilled to perfection, resulting in a tender, smoky, and citrusy dish that can be enjoyed on its own or paired with your favourite sides. Perfect for gatherings or a quick dinner, this recipe is both versatile and satisfying.
Course brunch, lunch, Main Course
Cuisine Mediterranean
Keyword Shrimp and Scallops, Shrimp and Scallops recipe, Shrimp and Scallops skewers
Rinse the shrimps and scallops under cold water, then pat them dry with kitchen paper.
In a medium-sized bowl, whisk together the olive oil, lemon juice, minced garlic, parsley, smoked paprika, salt, and pepper.
Marinate the Seafood
Add the shrimps and scallops to the bowl, ensuring they are evenly coated in the marinade. Cover and refrigerate for 15 minutes to allow the flavours to develop
Prepare the Skewers
If using wooden skewers, soak them in water for at least 10 minutes to prevent them from burning.
Once the seafood has marinated, thread the shrimps and scallops alternately onto the skewers.
Grill the Skewers
Preheat your grill or barbecue to medium-high heat.
Place the skewers on the grill and cook for about 2-3 minutes per side, or until the shrimps are pink and the scallops are opaque. Be careful not to overcook as they can become dry.
Serve
Transfer the skewers to a serving plate and garnish with additional chopped parsley if desired.
Serve immediately with lemon wedges on the side for an extra zing of flavour.
Notes
TipsCleaning and preparing the seafood is essential. Rinse the shrimps under cold water and remove the shell and vein for a tidy result. For scallops, ensure they’re free of any attached side muscles. Pat both dry with kitchen paper to remove excess moisture.Making the marinade is straightforward. Whisk until thoroughly combined. Place the prawns and scallops in a resealable plastic bag, pour the marinade over them, seal the bag, and gently shake to coat. Allow them to marinate in the fridge for at least 30 minutes, but no longer than an hour to prevent over-marinating.Keep a close watch on the seafood as it cooks quickly. Shrimps typically take 2-3 minutes per side until they turn pink and opaque. Scallops need about 3-4 minutes per side, forming a lovely golden crust. Avoid overcooking by taking them off the grill as soon as they are done.Once cooked, allow the seafood to rest for a minute or two before serving. This short resting time helps the juices settle, ensuring every bite is moist and full of flavour. Now you’re ready to enjoy your perfectly grilled prawns and scallops, ideal for any occasion.
Grilled shrimps and scallops go wonderfully with a variety of side dishes and drinks, allowing you to tailor your meal to suit any occasion. For a fresh and vibrant side, try serving a mixed leaf salad with cherry tomatoes, cucumber slices, and a light vinaigrette. The crisp texture of the vegetables pairs beautifully with the tender seafood.
Grilled vegetables such as asparagus, courgette, or peppers make excellent accompaniments, adding both colour and flavour to your plate. For a more filling option, consider a serving of quinoa or couscous mixed with herbs and a splash of lemon juice, which provides a pleasant contrast to the juicy shrimps and scallops.
The choice of drink can also enhance your meal. A chilled, crisp white wine like Sauvignon Blanc or Pinot Grigio works wonderfully, complementing the subtle flavours of the seafood without overwhelming them. If you prefer a non-alcoholic option, sparkling water with a hint of lime or a light iced tea can be excellent alternatives.
For an extra touch of indulgence, serve the shrimps and scallops with a creamy garlic aioli or a tangy mango salsa. These sauces add depth to the flavour and enhance the overall presentation of the dish.
To finish, garnish your plate with fresh herbs such as parsley or coriander and a few lemon wedges. The herbs bring a burst of freshness, while the lemon adds a bright, zesty note that works perfectly with the seafood.
By combining these serving ideas, your grilled shrimps and scallops will take centre stage in a truly memorable meal.
Frequently Asked Questions
Over-marinating can make shrimp and scallops mushy, so stick to the recommended 30 minutes to an hour for marinating. Overcooking is another common issue; keep an eye on the grill and use a meat thermometer to ensure precise cooking. Shrimp should reach 120°F, while scallops should hit 130°F.
If you’re unsure about the quality of your seafood, always check for firmness and a fresh, oceanic smell for shrimp, and creamy white, plump appearance for scallops. These indicators will help you choose the best ingredients for your dish. For those who don’t have a grill, an indoor grill pan or broiler can be a good alternative. Just make sure to adjust the cooking times as necessary and keep an eye on the seafood to avoid overcooking.
To store leftovers, place the grilled shrimp and scallops in an airtight container and refrigerate promptly. Consume them within two days for the best taste. They can be reheated gently on the stove or enjoyed cold in a salad for a quick meal.
These tips should help you navigate any potential pitfalls and ensure a delicious outcome every time you prepare this recipe.
Imagine a dish where tender duck meets a vibrant orange glaze, creating an explosion of flavors that dance on your taste buds. That’s the magic of Duck à l’Orange, a beloved classic in French culinary tradition. This delicious French Duck à l’Orange recipe showcases how simplicity can lead to extraordinary results, making it a must-try for anyone interested in gourmet cooking. Duck à l’Orange is renowned for its unique combination of savory and sweet elements, which create a harmonious and memorable dining experience. The star of the dish is, of course, the duck. Its rich, succulent meat is perfectly complemented by the tangy, citrus-infused sauce. This dish isn’t just a meal; it’s an experience that embodies the elegance and sophistication of French cuisine.
One of the remarkable aspects of this recipe is its adaptability. Whether you’re hosting a fancy dinner party or simply want to treat yourself to something special, Duck à l’Orange is versatile enough to fit any occasion. And the best part? You don’t have to be a professional chef to pull it off. With a bit of preparation and attention to detail, you can master this dish in your own kitchen.
Cooking Duck à l’Orange involves a few essential steps, each contributing to the dish’s final flavour profile. Selecting fresh, high-quality ingredients is crucial, as is understanding the balance of flavours that make this recipe so iconic. From the initial searing of the duck to the careful reduction of the orange sauce, each step is designed to maximize taste and texture.
So, whether you’re new to French cooking or looking to expand your culinary repertoire, Duck à l’Orange offers a delightful challenge with a delicious payoff. Dive into this recipe and discover why it has stood the test of time.
Duck à l’Orange is a timeless dish from French cuisine that combines the richness of duck with the sweet and tangy flavours of orange. Perfect for a special occasion or a sophisticated dinner at home, this recipe is sure to impress guests with its balance of taste and elegance. Let’s take a look at how to prepare this exquisite meal.
Course Main Course
Cuisine french
Keyword Classic French Duck à l’Orange Recipe, Duck à l’Orange
Preheat the oven to 200°C (fan 180°C) or Gas Mark 6. Pat the duck breasts dry with kitchen paper. Lightly score the skin of each duck breast in a criss-cross pattern, ensuring you don’t cut through to the meat. Season generously with salt and black pepper on both sides.
Cooking the Duck Breasts
Heat a large, oven-safe frying pan over medium heat. Place the duck breasts skin-side down in the pan (no oil is needed, as the fat will render out). Cook for about 6–8 minutes, allowing the skin to become golden and crispy. Turn the breasts over and sear the meat side for 2 minutes. Transfer the pan to the preheated oven and roast for an additional 8–10 minutes for medium-rare (or 12–15 minutes if you prefer well-done). Once cooked, remove from the oven and let the duck breasts rest on a warm plate, loosely covered with foil.
Making the Orange Glaze
While the duck rests, prepare the orange glaze. Pour off excess fat from the frying pan, leaving about 1 tablespoon. Return the pan to medium heat. Add the red wine vinegar and caster sugar, stirring until the sugar dissolves and forms a caramel-like consistency. Gradually add the orange juice (including the freshly squeezed 100ml) and chicken stock. Bring the mixture to a simmer and allow it to reduce
Thickening the Sauce
In a small bowl, mix the corn flour with a little water to form a smooth paste. Whisk this into the sauce and cook for another 3–4 minutes, allowing it to thicken. Stir in the orange zest and butter for a glossy finish. Taste and adjust the seasoning if necessary.
Serving
Place each whole duck breast on a serving plate. Drizzle the orange glaze generously over the top, ensuring the skin remains crispy. Garnish with fresh parsley if desired. Serve with your choice of accompaniments, such as roasted potatoes, steamed greens, or a light salad.
Notes
Cooking TipsAchieving culinary success with Duck à l’Orange hinges on mastering a few essential techniques. The star of the dish is undoubtedly the sauce, where balancing sweetness and acidity is key. The orange and sugar bring a natural sweetness, while the white wine vinegar provides the necessary tang. Fine-tuning these elements can make a world of difference, so don’t hesitate to adjust the quantities to suit your palate.Cooking the duck to perfection involves closely monitoring its internal temperature. Use a reliable meat thermometer to ensure the duck reaches an internal temperature of 165°F. This precision helps achieve crispy skin while keeping the meat juicy. An evenly browned exterior is just as crucial, so sear the duck on all sides before transferring it to the oven.The sauce preparation also deserves special attention. Once the orange juice, sugar, and vinegar mixture has reduced by half, the addition of chicken stock and orange liqueur enriches the flavours. To get the perfect consistency, gradually incorporate the corn starch mixture, stirring constantly until the sauce thickens just right.Timing is another critical factor. Allow the duck to rest after roasting; this step helps redistribute the juices, making each bite succulent. Meanwhile, ensure the sauce doesn’t over-reduce; aim for a consistency that lightly coats the back of a spoon without becoming overly thick or concentrated.By mastering these cooking techniques, you’ll not only create an exquisite Duck à l’Orange but also elevate your culinary skills to new heights.
When crafting the perfect meal with Duck à l’Orange, choosing complementary side dishes and beverages can enhance your dining experience. For a classic touch, buttery mashed potatoes are a fantastic choice, providing a creamy, smooth contrast to the crispy, flavourful duck. Alternatively, glazed rainbow carrots offer a sweet and savoury profile that pairs beautifully with the citrusy orange sauce. A fresh arugula salad with a light vinaigrette adds a refreshing, peppery bite that balances the richness of the main dish.
Wine selection is equally important in rounding out your meal. A medium-bodied red wine, such as Pinot Noir, pairs excellently with the duck’s robust flavors, offering subtle fruit notes and balanced acidity. For white wine enthusiasts, a dry Chardonnay is a superb option. Its crisp and clean profile highlights the citrus elements in the sauce while providing a refreshing counterpoint to the savory duck.
If you prefer something non-alcoholic, a sparkling water infused with a splash of orange or lemon can mimic the zesty flavours of the dish and keep your palate refreshed. Alternatively, an iced tea with a hint of citrus could be a delightful choice, offering a balance of sweetness and acidity that complements the meal.
Side dishes and beverages are not mere afterthoughts; they play a crucial role in the overall dining experience. By thoughtfully selecting your pairings, you elevate the classic French Duck à l’Orange recipe, making your meal not just satisfying, but truly memorable.
Common Mistakes to Avoid
Navigating the nuances of Duck à l’Orange can be challenging, but steering clear of a few common missteps can make all the difference. One frequent error is skipping the step of patting the duck dry before seasoning and searing. Excess moisture can prevent the skin from achieving that coveted crispiness, which is a hallmark of this dish.
Another pitfall is neglecting to balance the flavours in the orange sauce. While the sweet and tangy combination is key, an imbalance can overshadow the delicate flavour of the duck. Taste your sauce frequently and adjust the sweetness or acidity as needed.
Overcooking the duck is a mistake that can easily turn this elegant dish into a dry disappointment. Use a meat thermometer to ensure you remove the duck from the oven at the precise moment it reaches 165°F. This step is crucial for maintaining juicy, tender meat.
Failing to strain the sauce can also compromise the dish’s texture. Tiny bits of zest or other solids can create a gritty mouthfeel. For a smooth, velvety finish, take the time to strain the sauce before serving.
Lastly, overlooking the importance of a proper rest period for the duck can result in a less juicy final product. Allowing the meat to rest for about 10-15 minutes after roasting will help the juices redistribute evenly, ensuring each bite is succulent.
By being mindful of these common mistakes, you can master the art of Duck à l’Orange and deliver a dish that is both delicious and impressive. Remember, attention to detail and a willingness to adjust as you go are key components to achieving culinary success with this classic French recipe.
Conclusion
In crafting this Classic French Duck à l’Orange Recipe, you embark on a culinary journey that brings the essence of French cuisine right into your kitchen. The combination of succulent duck and a tangy orange glaze creates a dish that is both sophisticated and satisfying. This recipe isn’t just about following steps; it’s about immersing yourself in the rich traditions of French cooking and creating an experience that is memorable for both you and your guests.
Remember, the key to mastering this dish lies in your attention to detail. From selecting fresh, high-quality ingredients to meticulously balancing the flavours in your orange sauce, each step plays a crucial role in the final outcome. Don’t rush the process. Take your time to ensure that each element is prepared to perfection.
Experimentation is part of the fun. Adjust the sweetness of the sauce, tweak the seasoning, or try different pairings to discover what best suits your palate. The beauty of Duck à l’Orange lies in its versatility and the room it allows for personal touches.
Above all, enjoy the process. Cooking should be a pleasurable experience, and this recipe offers a wonderful opportunity to refine your culinary skills while preparing something truly special. So, gather your ingredients, take a deep breath, and dive into making this classic French dish. Your effort will be rewarded with a meal that dazzles the senses and leaves a lasting impression.
With practice and patience, you’ll soon be serving a Duck à l’Orange that’s sure to impress. Bon appétit!
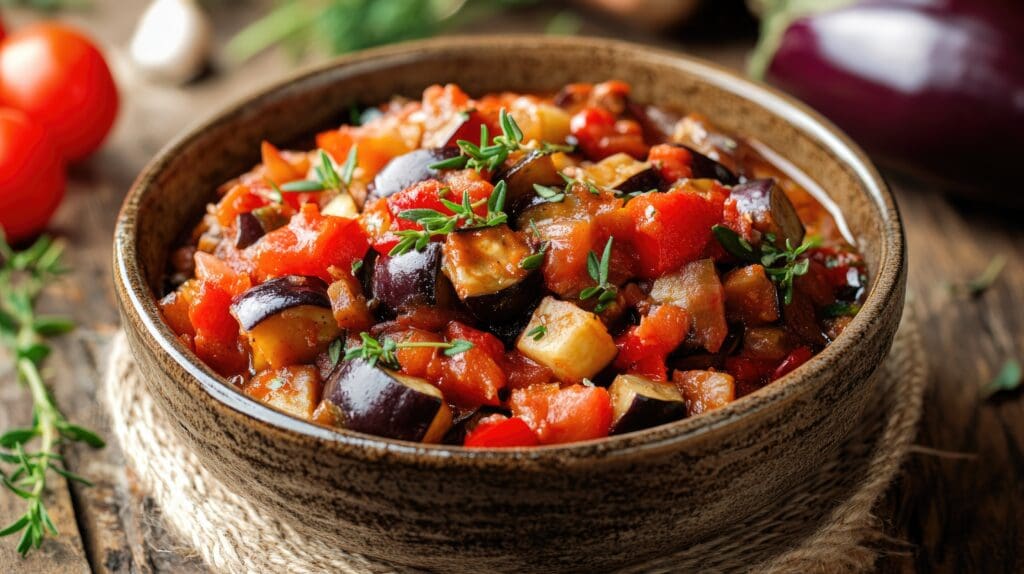
Ratatouille, originating from the sun-soaked region of Provence in France, is a cherished dish that embodies the essence of Mediterranean cooking. This Provençal Vegetable Stew not only delights the palate but also celebrates the abundance of summer vegetables. The perfect vegetable ratatouille is a vibrant and colourful dish that brings together a medley of aubergines, courgettes, tomatoes, and peppers, all cooked to perfection with aromatic herbs and a drizzle of olive oil
What makes ratatouille particularly appealing is its versatility. Whether served hot or at room temperature, it fits seamlessly into various meal settings. It can be the star of the show as a main course or serve as a delightful side dish complementing a range of proteins. For those seeking a vegetarian or vegan option, ratatouille stands out as a hearty and satisfying choice, rich in both flavour and nutrients.
The beauty of ratatouille lies in its simplicity and the quality of its ingredients. Provençal cuisine is known for its emphasis on fresh, local produce, and this dish is no exception. The selection of vegetables, bursting with natural flavours, forms the foundation of a successful ratatouille. When cooked with care, each vegetable retains its integrity, contributing to a harmonious blend of tastes and textures.
Cooking ratatouille is not just about following a recipe; it’s an experience that engages the senses. The process of chopping and preparing the vegetables, the aromatic scent of herbs like basil and thyme filling the kitchen, and the gentle simmering that melds the flavours together all add to the charm of this dish.
Ratatouille also holds a certain rustic charm, reminiscent of countryside cooking where meals are prepared with love and shared with family and friends. It’s a dish that encourages communal dining, inviting everyone to gather around the table and enjoy the simple pleasures of good food and company.
In many ways, ratatouille is a testament to the beauty of uncomplicated cooking. With just a few fresh ingredients and some basic techniques, you can create a dish that is both wholesome and indulgent. Whether you’re new to cooking or a seasoned chef, ratatouille offers a rewarding culinary adventure that highlights the best of what nature has to offer.
Enjoy your homemade vegetable ratatouille either as a main course or as a charming side dish. This classic French dish is a medley of fresh vegetables, typically including courgettes, aubergines, and tomatoes, cooked to perfection with fragrant herbs. Its rich flavours and vibrant colours make it a wonderful addition to any meal, offering both a healthy and delicious option for your dining experience. Whether you're serving it at a dinner party or enjoying it as a comforting meal at home, vegetable ratatouille is sure to impress.
Begin by preparing all the vegetables as described in the ingredients list. This will make the cooking process smoother.
In a large pan, heat the olive oil over medium heat. Add the finely chopped onion and cook until it becomes translucent, which should take about 5 minutes. Stir in the minced garlic and cook for an additional minute.
Add the chopped red and yellow peppers to the pan. Cook them for about 5 minutes until they start to soften.
Incorporate the diced aubergine and sliced courgettes into the pan. Stir well and continue to cook for another 5 minutes, allowing them to soften.
Add the chopped tomatoes, thyme, and oregano to the pan. Season with salt and pepper to taste. Stir everything together to combine well.
Reduce the heat to low and cover the pan with a lid. Let the mixture simmer gently for about 30 minutes, stirring occasionally. The vegetables should become tender and the flavours will blend together beautifully.
Once cooked, remove the pan from the heat. Garnish the ratatouille with fresh basil leaves before serving.
Cooking ratatouille to perfection requires a delicate balance of techniques to ensure each vegetable retains its shape while contributing to the overall harmony of flavours. Once the vegetables have been layered in your chosen dish, the next step is to cook them slowly to meld the flavours without turning the vegetables to mush.
Begin by covering your dish with a lid or aluminium foil. This helps to trap the steam and moisture, allowing the vegetables to cook evenly and retain their natural juices. Place the dish on the hob over low heat, allowing it to simmer gently. Patience is key here, as this slow cooking method can take up to an hour but results in a rich and flavourful stew.
Alternatively, you can opt for baking the ratatouille in the oven. Preheat your oven to a moderate temperature, around 180°C (350°F). Place the covered dish in the oven and let it bake for approximately 45 minutes to an hour. Baking offers a slightly different texture, giving the vegetables a tender yet firm bite. Halfway through, you may want to uncover the dish to allow some of the liquid to evaporate, concentrating the flavours further.
During cooking, it’s important to monitor the ratatouille occasionally. Check to ensure that the vegetables are cooking evenly and give the dish a gentle stir if necessary. This ensures that the flavours are well-distributed throughout the stew.
Another technique to enhance the flavour profile is to finish the dish with a brief rest period. After cooking, allow the ratatouille to sit, covered, for about 15 minutes before serving. This resting time lets the flavours continue to develop and meld together, offering a more cohesive taste experience.
While the traditional method involves slow cooking, you can also use a pressure cooker for a quicker version. However, be mindful that the rapid cooking might slightly alter the texture of the vegetables.
Regardless of the method chosen, the goal remains the same: to create a dish where each vegetable stands out yet harmonises beautifully with the others, offering a taste of Provençal cuisine at its finest.
Serving suggestions
Ratatouille can elevate any meal with its rich, layered flavours and vibrant presentation. For a casual yet satisfying option, serve it with a slice of crusty baguette or a side of fluffy couscous. These simple accompaniments help to soak up the delightful juices of the Provençal Vegetable Stew, making each bite truly delightful.
For those seeking a more elaborate dining experience, consider pairing ratatouille with grilled meats or fish. Its robust flavours complement a variety of proteins, enhancing the overall meal. A beautifully seared piece of chicken or a succulent fillet of fish can transform your ratatouille into a gourmet feast.
Ratatouille also works wonderfully as a topping for pasta or rice. The sauce-like consistency of the dish blends seamlessly with these bases, creating a comforting and wholesome meal. For a lighter option, consider serving it over a bed of quinoa or bulgur wheat, adding an extra layer of texture and nutrition.
Presentation plays a crucial role in making your ratatouille look as appetising as it tastes. Opt for a shallow serving bowl or a large platter to showcase the vibrant colours of the vegetables. Arrange the vegetables artfully, and finish with a drizzle of extra virgin olive oil and a scattering of fresh basil leaves to enhance the dish’s visual appeal.
For a unique twist, try serving ratatouille as a warm starter or appetiser. Spoon it into individual ramekins and top with a sprinkle of cheese before popping them under the grill for a few minutes. The result is a deliciously gooey and flavourful beginning to any meal.
Ratatouille can also be served cold or at room temperature, making it a versatile option for picnics or casual gatherings. Simply spoon it into a serving dish and let your guests enjoy its rich flavours at their leisure. With so many serving possibilities, ratatouille is sure to become a favourite in your culinary repertoire.
Storing Leftovers
Storing leftover ratatouille is straightforward and helps to prolong the enjoyment of this delightful Provençal Vegetable Stew. After cooking, let the ratatouille cool to room temperature before transferring it to an airtight container. This step is crucial for maintaining the freshness and preventing condensation, which can affect the texture of the dish.
When storing in the refrigerator, the ratatouille will remain good for up to five days. If you plan to keep it longer, consider freezing it. Divide the stew into individual portions and place them in freezer-safe containers. Label each container with the date to keep track of its freshness. Frozen ratatouille can be stored for up to three months, making it a convenient option for future meals.
Reheating ratatouille is best done gently to preserve its flavours and textures. If using the hob, place the stew in a saucepan over low to medium heat, stirring occasionally until it is warmed through. This method helps to maintain the integrity of the vegetables while ensuring even heating.
For a quicker option, the microwave can be used. Place the ratatouille in a microwave-safe dish, cover it with a microwave-safe lid or wrap, and heat on low power in short intervals. Stir between each interval to ensure even heating and to prevent any hot spots.
If reheating from frozen, it’s best to thaw the ratatouille in the refrigerator overnight. This gradual thawing process helps to retain the dish’s quality. Once thawed, reheat using your preferred method, either on the hob or in the microwave.
Ratatouille also makes a fantastic meal prep option, allowing you to enjoy a nutritious and flavourful dish throughout the week. With proper storage and gentle reheating, your ratatouille will remain as delightful as when it was freshly made.
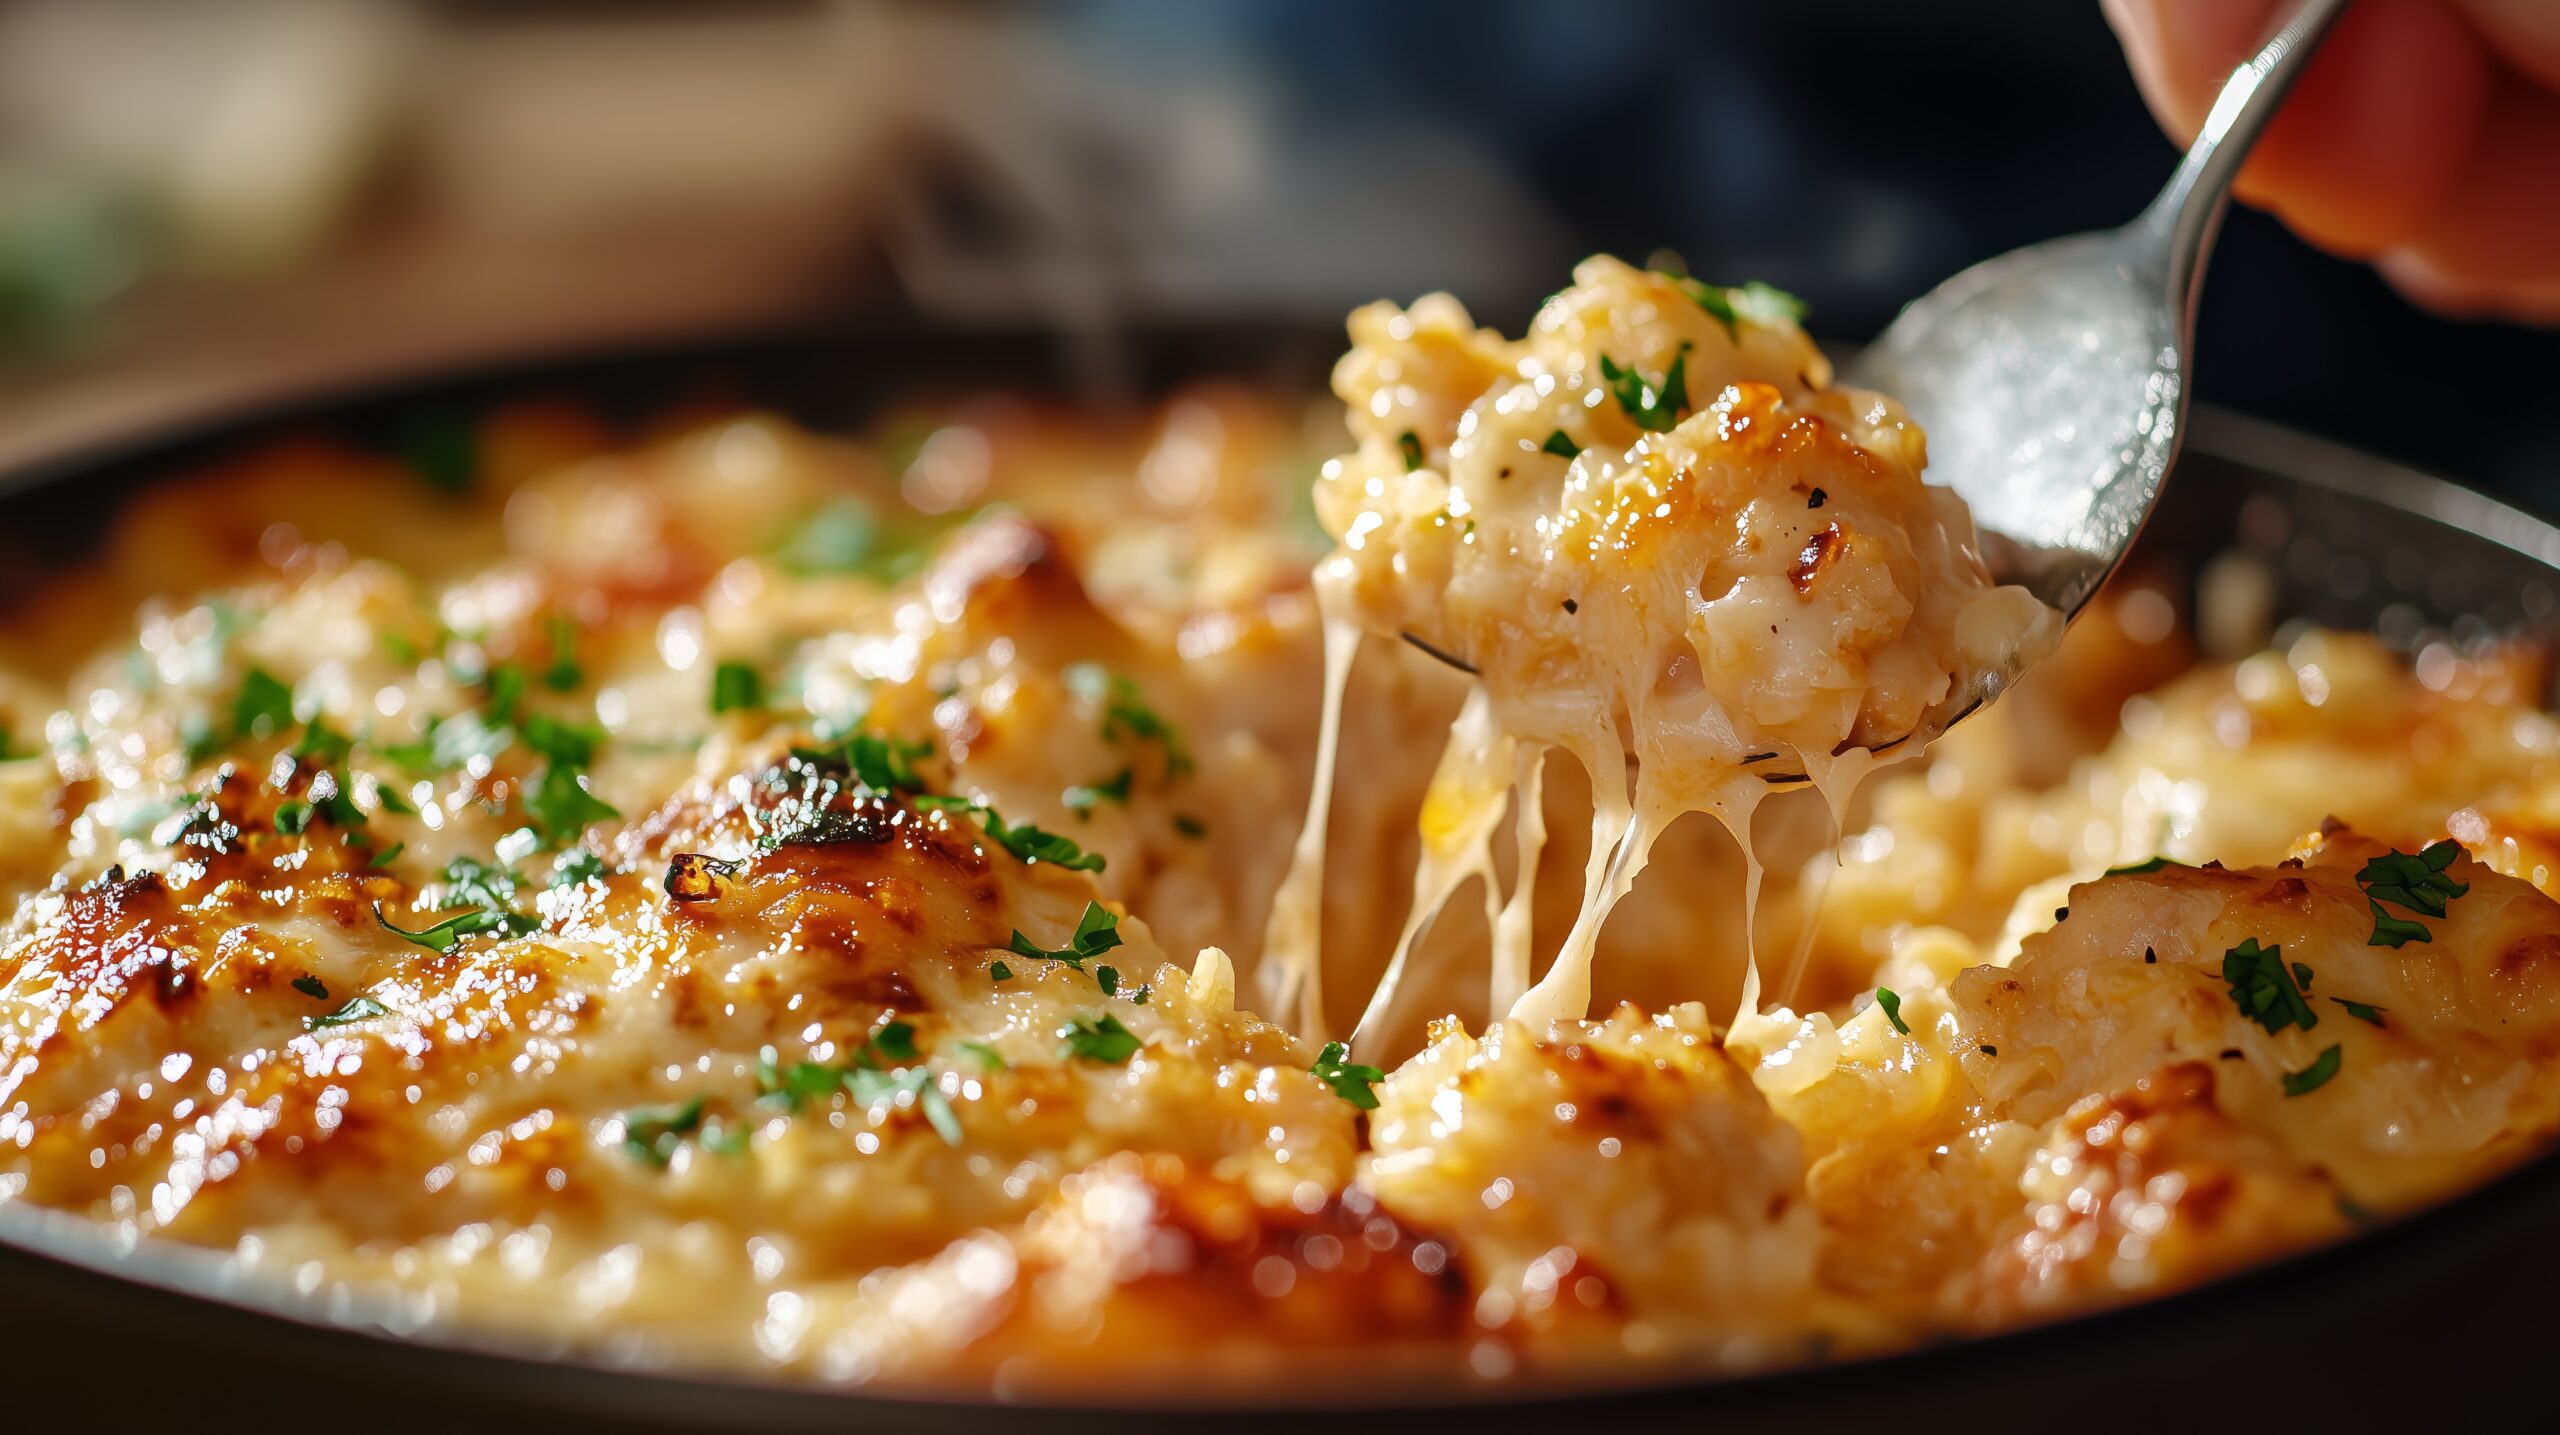
Get ready to enjoy a culinary masterpiece that marries the hearty essence of cauliflower with the luxurious charm of melted cheese. This Cauliflower Bake Recipe with a Cheesy Twist is the ultimate comfort food, delivering a warm and satisfying experience that could effortlessly become a regular favourite in your dining line-up. With its creamy texture and sumptuous taste, it’s perfect for both laid-back family meals and more sophisticated soirées with friends.
What makes this Cauliflower Bake Recipe with a Cheesy Twist truly special is the inclusion of fresh herbs, which infuse the dish with a lively and fragrant essence. A sprinkle of parsley, thyme, or chives can boost the flavour, turning each mouthful into a delightful journey. The vibrant taste of these herbs marries well with the rich cheese sauce, resulting in a delicious medley of tastes and aromas.
This recipe is also incredibly versatile, allowing for numerous variations to suit different dietary needs and preferences. Whether you’re catering to vegetarians or simply looking to incorporate more vegetables into your diet, this dish is a fantastic option. The cauliflower provides a substantial base, while the cheese and herbs elevate it to something truly special.
Preparing this Ultimate Cauliflower Bake Recipe with a Cheesy Twist, involving simple steps that even novice cooks can follow with ease. The result is a dish that looks as impressive as it tastes, making it a wonderful addition to any table. With its combination of wholesome ingredients and rich, comforting flavours.
Here’s how to make this delightful cauliflower bake, step by step:
There's something truly comforting about a cheesy cauliflower bake with fresh herbs, a dish that wraps you in warmth and delight with every bite. Imagine tender florets of cauliflower bathed in a rich, creamy cheese sauce, bubbling away in the oven until golden and irresistible.When the bake emerges, it's a sight to behold — golden and inviting. Each mouthful offers a wonderful contrast of creamy sauce, tender cauliflower, and the aromatic herbs weaving through. It’s a dish that invites you to savour each moment, bringing a sense of home and happiness to the table. Perfect for a cosy evening or as a delightful side
Preheat your oven to 200°C (180°C fan) or Gas Mark 6.
Prepare the Cauliflower
Bring a large pot of salted water to the boil. Add the cauliflower florets and cook for about 5 minutes until slightly tender. Drain well using a colander and set aside.
Make the Cheese Sauce
In a saucepan, melt the butter over medium heat. Stir in the flour and cook for about 2 minutes, stirring continuously, to form a paste. Gradually whisk in the milk, ensuring no lumps form. Continue to cook, stirring constantly, until the sauce thickens.
Add the Cheese
Remove the sauce pan from the heat and stir in most of the cheddar and parmesan cheese, leaving a bit for the topping. Mix until the cheese is fully melted and the sauce is smooth. Season with salt and black pepper to taste.
Combine and Bake
Place the cauliflower in a baking dish. Pour the cheese sauce over the cauliflower, ensuring it is evenly coated. Sprinkle the remaining cheese on top.
Bake
Place the dish in the preheated oven and bake for 25-30minutes, or until the top is golden and bubbling.
Once baked, remove from the oven and sprinkle with chopped parsley and chives.
Serve
Allow to cool slightly before serving warm.
Notes
When selecting your produce, look for a firm and white cauliflower with no dark spots or blemishes. The fresher the produce, the better the flavour and texture of your dish will be. For the herbs, choose vibrant, aromatic leaves to enhance the overall taste.After removing the dish from the oven, allow it to rest for a few minutes. This resting period helps the bake set and makes it easier to serve.
This cheesy cauliflower bake offers a wealth of serving options, making it a flexible choice for any meal. For a casual family lunch, consider pairing it with a vibrant green salad dressed in a light vinaigrette. The crispness of the salad will complement the rich and creamy texture of the bake, providing a balanced dining experience.
For more substantial fare, this bake works wonderfully as a side dish. Serve it alongside roasted meats like chicken, lamb, or beef. The robust flavours of the meat will be beautifully enhanced by the cheesy, herb-infused cauliflower. If you prefer seafood, grilled fish or prawns can also pair well, adding a lightness that balances the dish’s richness.
Vegetarians can enjoy this bake as a main course. To make it even more filling, consider adding some cooked quinoa or couscous on the side. These grains will absorb any extra cheese sauce and add a delightful texture contrast.
For special occasions or gatherings, present this dish in individual ramekins for a touch of elegance. Garnish each portion with a sprinkle of fresh herbs, such as chives or parsley, to add a burst of colour and flavour. A light dusting of paprika or a drizzle of truffle oil can further elevate the presentation, impressing your guests.
For a more rustic approach, serve the bake directly from the baking dish at the centre of the table, encouraging family-style sharing. This creates a warm and inviting atmosphere, perfect for holidays or casual get-togethers.
No matter how you choose to serve it, this cheesy cauliflower bake will bring comfort and satisfaction to your dining experience.
Popular Variations
To add a different twist to your cheesy cauliflower bake, consider incorporating some cooked bacon or diced chicken for extra protein. You can also boost the vegetable content by adding spinach, peas, or mushrooms, which will provide additional texture and nutrients. For those who enjoy a bit of heat, a pinch of chilli flakes or a dash of hot sauce can spice up the cheese sauce beautifully.
Experimenting with different cheeses can also yield delightful results. Try using a combination of cheeses like mozzarella for extra gooeyness or a bit of blue cheese for a stronger, more pungent flavour. For a Mediterranean touch, mix in some sun-dried tomatoes and olives.
If you’re looking to keep the dish lighter, consider using a reduced-fat cheese and swapping out the double cream for a lighter alternative like Greek yoghurt. These adjustments can help reduce the overall calorie content while still maintaining a rich and satisfying flavour.
By trying out these variations, you can keep this beloved dish exciting and cater to a wide range of tastes and dietary preferences.